Working with Details Spreadsheets
Important
Information and features vary according to the roles to which you belong and the permissions associated with those roles. For more information, contact your module manager or your campus support team.
The Details Spreadsheet is an Excel-like spreadsheet used to display and manage large amounts of data. While details spreadsheets are mostly used in the J1 Web Finance and Student products, they may be used in other products across J1 Web as needed.
Work with Details Spreadsheets Toolbar
The details spreadsheet toolbar is used to hold actions you may need to complete while managing the data. The toolbar will change depending on the type of data and your permissions. You'll find the toolbar just above the spreadsheet.

Toolbar functions may include a combination of the following options:
Save
Undo
Redo
Download (to Excel)
Column Selector
Delete
Cut
Copy
Search
Additional Toolbar Functions
Each details spreadsheet will have different options depending on the type of data and the function of the spreadsheet.
If the details spreadsheet has display or action options, you will see a checkbox or a button along the top of the spreadsheet rows next to the toolbar.


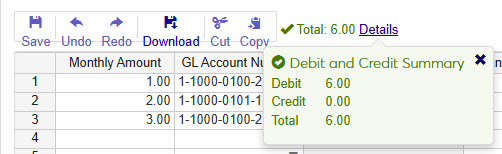
On a details spreadsheet that includes transactions, adjustments, batches, or other functions that deal with dollar amounts, you will see a total amount next to the toolbar along with a Details link. Clicking the Details link will open a popover with a Debit and Credit Summary.

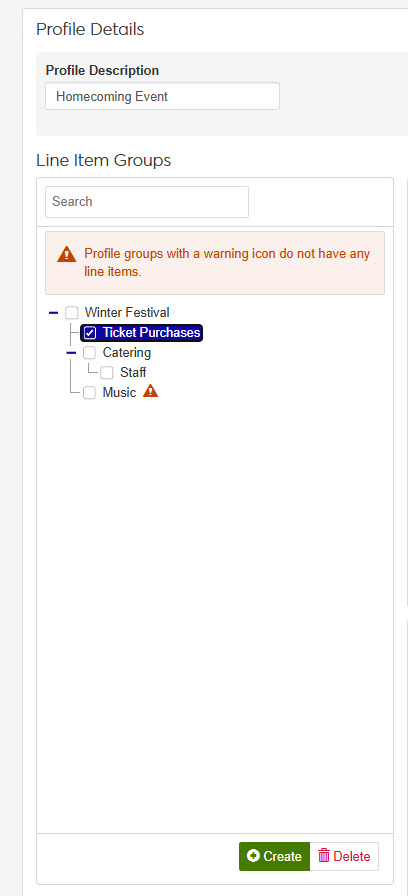
A tree allows you to view and manage a hierarchy of data in a spreadsheet. You can create groups and subgroups to help organize or categorize more complex data.
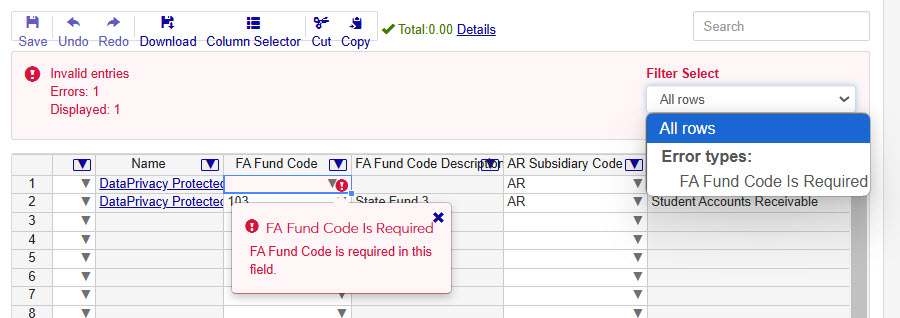
This feature is most often used to communicate any validation errors that appear in the details spreadsheet. When the system finds an error, a section above the spreadsheet will appear with in a red highlight with a count of errors. You can filter errors by type by selecting the Filter Select drop-down. Within the spreadsheet, errors will appear with a warning icon  that will provide more details when clicked.
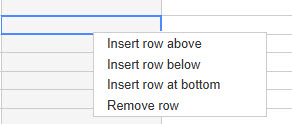
Some details spreadsheets will allow you to use the right-click option to insert or delete rows when managing the data.
For a user to be able to work with datasheets, they will need to have the Can edit worksheets permission on a role they're assigned to, for each module where they need to use a datasheeet.
Select the checkboxes next to the rows you want to export.
From the Options drop-down, select Download to Excel. The Download to Excel pop-up opens.
Select options for the Excel format and data columns.
Click Download. Your .xlsx or .zip file is saved in the file location that you have set in your browser settings.
While on a datasheet you can click and drag column headers to reorder the way the columns display in the datasheet view.
There are several columns displayed by default in the datasheet. You can use the Column Selector in the toolbar to display or hide columns.
Click the Column Selector icon above the datasheet.
Select the checkboxes of the columns to be added. The columns are automatically added window.
You can remove columns by deselecting the checkboxes next to the columns you wish to remove.
When you are finished, you can click the X button to close the Column Selector menu.