Microsoft Outlook Calendar Account Settings
Important
Information and features vary according to the roles to which you belong and the permissions associated with those roles. For more information, contact your module manager or your campus support team.
Calendar synchronization allows users to view their Outlook calendar meetings and events on their J1 Web Home page calendars. This is a one way synchronization process. Users can see their Outlook items in J1 Web, but must access Outlook to update, add, or remove events on their Outlook calendars. Outlook items shown in J1 Web have an “Edit in Microsoft Outlook” link that accesses the Outlook Web Application website where they can make changes.
Note
If your school does not have an Outlook Web Application (OWA) set up, users will still be able to see their Outlook calendar items, but they will not be able to access the OWA and make updates.
On-premises Exchange Server means your school purchased Exchange licenses and manages the installation and updates onsite, and users access Exchange through your local setup.
Setting up synchronization is a four step process:
Step 1: Enter Microsoft Exchange Information in J1 Web
Step 2: Grant the Exchange Account Access to the Calendars from the Exchange Server
Step 3: Update the Directory Service User Name in the Desktop
Step 4: Activate Calendar Syncing in J1 Web
Detailed information for each step is available in the How To section below.
For Step 1, enter your school’s Exchange web service and account information. The Exchange username and password you enter will be used to log in to Exchange and retrieve your users’ calendars. For more information about granting the Exchange account accessto your user’s Exchange calendars, see Step 2.
From the System Administration hub, select System Settings, Calendar.
From the Third-party Calendars section, click the Enter account settings link. The Microsoft Outlook Calendar Account Settings page
In the Exchange Web Service (EWS) URL field, select http:// or https:// and enter your school’s Exchange Web Service URL. For example, select https:// and enter webmail.jenzabar.local/EWS/Exchange.asmx.
In the Exchange Domain field, enter the Exchange user’s network domain.
In the Username field, enter the Exchange account username your school wants to use to log into Exchange to retrieve user’s emails.
In the next step, this user will be granted access to the user’s Exchange calendars. J1 Web will use these credentials to log into Exchange and access users’ calendars.
In the Password field, enter the password for the username entered above.
If the username and/password for the Exchange account expire, the sync will be disrupted. Your school may want to consider creating a special Exchange account that does not expire.
Click Update.
For Step 2, grant the Exchange user entered above access to your users’ calendars using the following steps. If the Exchange user entered above already has access to your user’s email accounts, proceed to Step 3.
Log in to your school’s Exchange server or a remote server with access to your school’s Exchange server as an administrative user.
Open the Exchange Management Shell utility. Utility initialization starts.
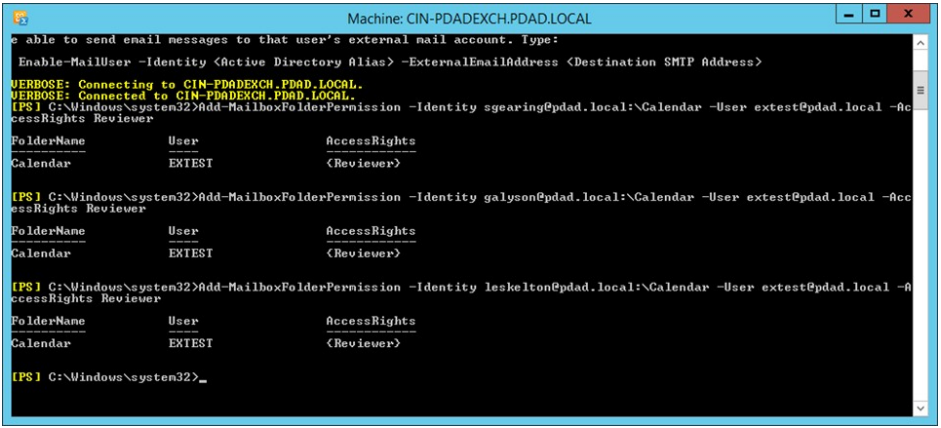
When utility initialization is completed, run the command line below. This command grants the Exchange user entered in J1 Web (Step 1) access to the end user’s calendar.
Replace the with the UPN of the end user that wants to see their calendar in J1 Web. Replace the with the UPN of the Exchange admin user entered in the J1 Web Microsoft Outlook Calendar Account Settings page.
Add-MailboxFolderPermission –Identity
:\Calendar –User  -
AccessRights Reviewer
Note
For IT administrators comfortable with PowerShell scripting, it is recommended a script be created (at least initially) to grant the Exchange admin user access to multiple end user calendars instead of one at a time.
For more information about the Add-MailboxFolderPermission command, please see the following Microsoft article: https://docs.microsoft.com/en-us/powershell/module/exchange/add-mailboxfolderpermission?redirectedfrom=MSDN&view=exchange-ps
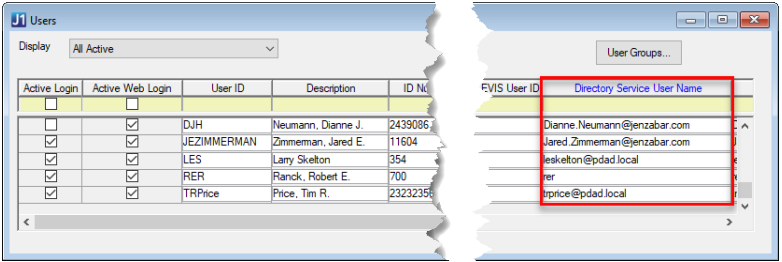
For Step 3, “link” your J1 Web users to their Outlook calendar. To create this link, you must update the APP_USER.DIRECTORY_SERVICE_USERNAME column to their User Principal Name (UPN). Generally the UPN is in this format: username@domain. For example, hsimpson@springfield.net. The UPN should be the same as their network domain account UPN.
There are two ways to update user’s directory service user name:
Using the J1 Desktop Users window, Directory Service User Name column:
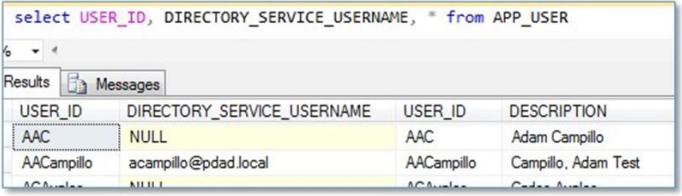
Using the following update statement (you can also create your own):
UPDATE APP_USER SET DIRECTORY_SERVICE_USERNAME = ‘’ WHERE USER_ID = ‘’
In Step 4, enable the Outlook sync in J1 Web System Administration. Once syncing is enabled, end users will have the option to sync their Outlook calendars with J1 Web from the Accounts and Preferences page, Calendar options.
From the System Administration hub, select System Settings, Calendar.
From the Microsoft Outlook Calendar settings options, click Enter account settings. The Microsoft Outlook Calendar Account Settings page appears.
Slide the Outlook Calendar Syncing option to ON.
Click Update. The Microsoft Outlook Calendar Account Settings window closes and Outlook calendar syncing will be available to users from the Account and Preferences page.
Run the Exchange Settings Test. Exchange Settings Testing errors come from Microsoft and typically provide enough information to troubleshoot the issue.
If the Exchange Settings Test succeeded, run the 'Verify a Mailbox or Calendar' test for a user with J1 Web and Exchange Online access.
To verify their account:
From the Microsoft Outlook Calendar Account Settings page, click the Save button. The Calendar Settings page appears.
From the Third-party Calendars, Microsoft Outlook Calendar, On-premises Exchange Server options, click the Verify a mailbox or calendar link.
Enter their username and calendar ID information.
Click Test settings.
Ensure your school uses on-premises Active Directory to perform the AD steps and not Azure Active Directory (cloud-based).
Ensure you entered the Exchange Web Service URL and Exchange credentials correctly in J1 Web.
J1 Web relies on these values to connect with Exchange and they must be entered correctly for the sync to work.