Advising Trees
Use this page to view and build advising trees. Advising trees (called institutional requirement trees in Desktop) help you set up curricula for your school's programs. Advising trees work with academic planning. Trees show what the requirements are, and academic plans show when the requirements need to be completed.
Advising trees are made up of two basic elements, which you can think of as roots and branches. Larger foundational elements such as majors, minors, and aims form the roots, while courses, groups of courses, GPAs, and other elements make up the branches.
Requirements can be single or grouped. Requirements can have "AND" or "OR" relationships with each other. For example, if ENGL111 and ENGL112 have an "AND" relationship, the student must successfully complete both. If they have an "OR" relationship, they need to complete only one of the courses.
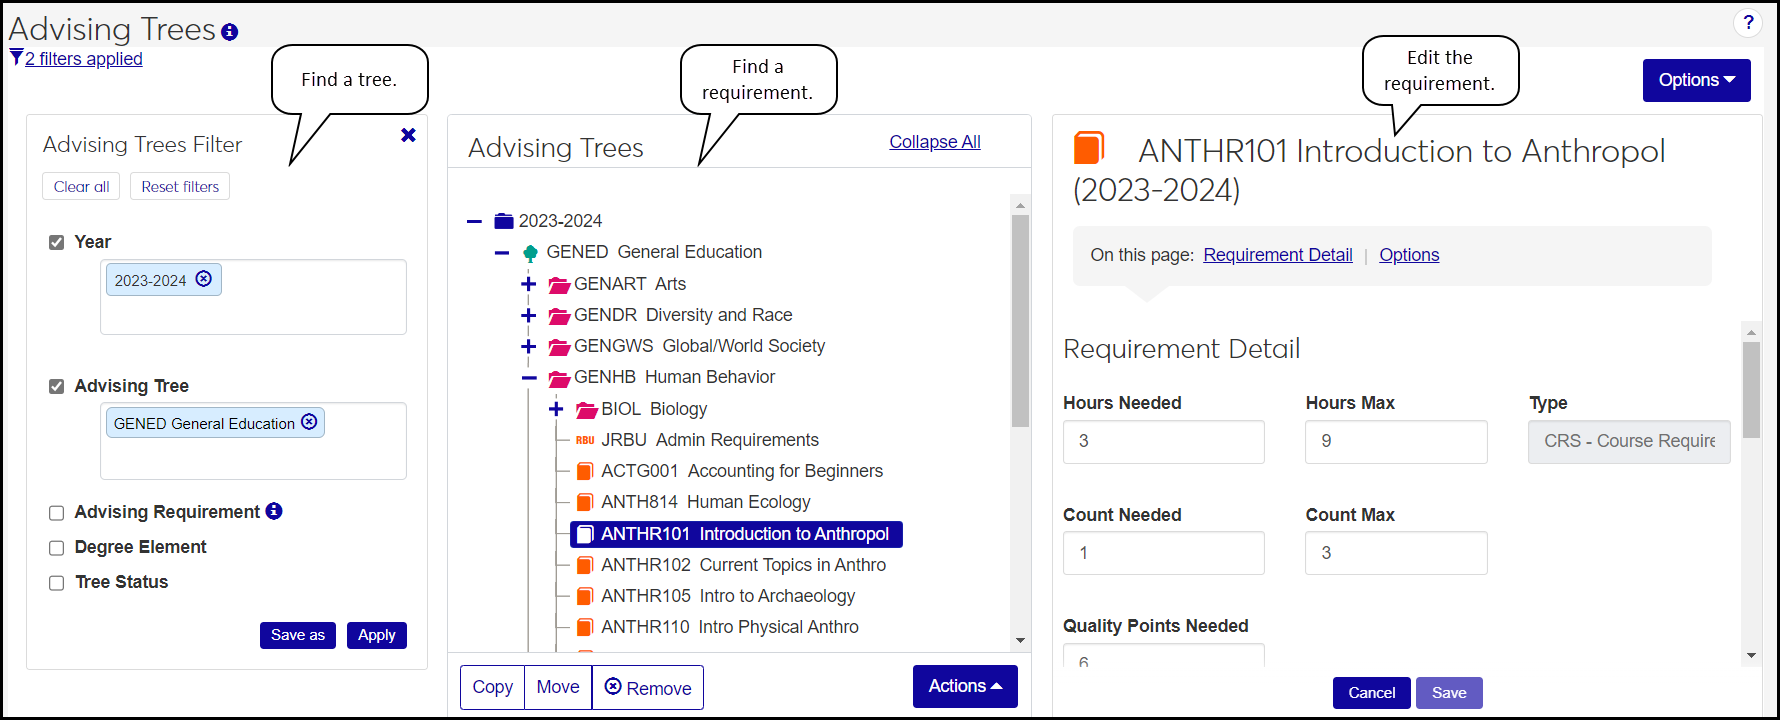
The page is laid out in panels.
Filter: In the first panel, use filters to find the tree or trees you want.
Trees and requirements: The second panel has the trees and their requirements.
Details: The third panel shows details of the trees and requirements. It's also where you add requirements in a batch.
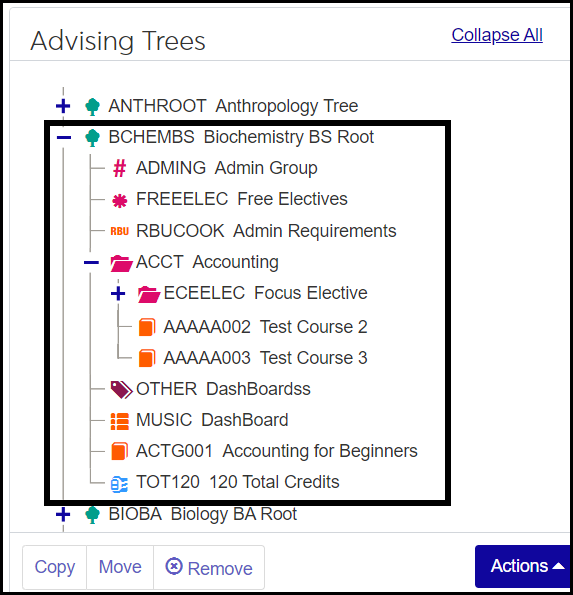
Use the Expand  and Collapse
  icons to navigate the tree. (You can also double-click to expand.) Trees expand, and so do groups within trees, to reveal requirements within.
Requirements are marked with icons. Each kind of requirement has a unique icon.
Tip
It's helpful to think of all nodes, including groups and even trees themselves, as requirements. So if instructions say you can select multiple items, that includes any nodes, even multiple groups and multiple trees.
| Tree |
| Group |
| Course |
| Cumulative Course (such as a music practice course that a student can take multiple times without counting as a repeat) |
| Admin |
| Free Elective |
| Other |
| Rules Based Update (RBU) |
 | Total |


You can use the buttons and links or you can drag and drop items around in the tree. Either way, pop-ups ask you to confirm your changes.
The permission needed is "Can manage advising trees". It's available in the Academic Advising Manage role and roles copied from it.
What if a requirement (a course or cumulative course) appears several times in a student's trees? For example, if Math 257 meets a requirement in the student's GENEDs, their major, and their minor. Is each of those instances met when the student completes the course satisfactorily?
The answer depends on the Reuse status and Priority of each of those instances. To learn more, visit the Reuse and Priority in Advising Trees topic.
From the Advising Administration hub, click Hub options.
Click Tree building, and select Advising trees. the Advising Trees page opens.
Use filters to view one or more trees. You might start by selecting Year and typing 202. Then select the academic year from the list, and click Apply. Or if you want to view GENED from all years, select Advising Tree, and enter GENED. Select GENED from the list, and click Apply. The Advising Trees panel populates.
Click the Expand
and Collapse icons to navigate the tree. (You can also double-click to expand.)When you click on a tree or requirement, its details appear in the right-hand panel.
Click on a tree or requirement. Its details appear in the right-hand panel.
Edit the details.
To abandon your changes, click the Cancel button at the bottom of the Details panel. Otherwise, your changes are saved when you click Save or when you click another node on tree.
Tip
To edit multiple requirements (even multiple trees) at the same time:
Use Ctrl-Click and/or Shift-Click to select multiple requirements.
Click Actions, and select Edit details. The Edit Requirements pop-up opens with the selected requirements listed.
Click an option in the Select a Detail to Update drop-down, and then enter or select a value for that field.
Click either Update or Update and edit another. The new value is saved in each of the selected requirements.
Click on a tree or a group.
Click the Add Single
 icon.
icon.Begin typing any part of the name of a requirement. A list of requirements matching your entry appears.
Tip
To narrow the list, you can enter the Cluster Code or Advising Requirement Type Code followed by a semicolon and then your search word.
Example 1: Cluster
Enter this: g;art
Result: ARCs whose cluster is Group and that have "art" in their Code or Description
Example 2: Advising Requirement Type
Enter this: crs;art
Result: ARCs whose type is Course and that have "art" in their Code or Description
Advising Requirement Types are defined by your school on the Advising Requirement Type Definitions page.
Cluster Codes are provided by Jenzabar. Some cluster code examples:
c = course
cc = cumulative course
g = group
r = root
rbu = rules based update
Select a requirement from the resulting list. The requirement is added to the tree.
Tip
If you add a requirement by mistake, select the requirement, and click the Remove button at the bottom of the panel.
Click on a tree or a group.
Click the Add Batch button
 . The Add Requirements panel opens.
Enter a search item in at least one of the fields in the Requirements Search section at the top: Requirement Keyword, Type, or Parent Root .
Click the Search button. The List of Requirements populates.
Click the checkbox on a row to select a requirement. You can use Ctrl-click and Shift-click to select multiple requirements.
Click Add requirements to tree. The selected requirements are added to your advising tree.
Click on a requirement.
At the bottom of the tree panel, click Copy.
Click the tree, group, or requirement you want the requirement to go in.
At the bottom of the tree panel, click Paste. A pop-up asks you to confirm your choice. Click Yes, copy.
Note
When you copy requirements, if they have child requirements, the children are copied, too.
Click on a requirement.
At the bottom of the tree panel, click Move.
Click on the tree or group you want the requirement to go in.
At the bottom of the tree panel, click Paste. A pop-up asks you to confirm your choice. Click Yes, move.
Tip
You can also drag and drop requirements.
Note
When you move requirements, if they have child requirements, the children are moved, too.
Click on the requirement (or tree or group).
At the bottom of the tree panel, click Remove.
A pop-up asks you to confirm your choice. Click Yes, remove.
Caution
If the element has child requirements, they'll be removed, too.
Select a tree (or any node in a tree).
At the bottom of the tree panel, click the Actions button, and select Print tree. The Institutional Requirements Report for that tree opens in a new tab. Use your browser's commands to print and to save the report as a PDF.
Click the Options button.
Select Copy trees. The Copy Program Requirements page opens in a new tab.
ARCs are usually managed on the Advising Requirement Code Definition page, but for your convenience, you can create them here on the Advising Trees page, too.
Click the Options button, and select Create advising requirement. The Create Advising Requirement Code Definition pop-up opens.
Enter information in the fields. See the Advising Requirement Code Definitions help topic for a discussion of each field.
Tip
For help with Grade Scale, Credit Type, and Grade, click Grade table lookup. The Grade Table Definitions pop-up opens. Click in the Grade Table Options field to see all the available combinations of Grade Scale, Credit Type, and Grade. Select an item. It fills in the Grade Scale, Credit Type, and Grade fields.
Click either Create and close or Save and create another.
You can exclude any node on a tree (whether a group or individual requirement) from being used in academic plans. This is can be useful, for example, when a course isn't offered in the selected year.
Select any node on an advising tree. (It can be a group, but it must be a single node.)
In the Detail panel, under Options, select the checkbox for Exclude from Planning. The requirement won't appear in the academic plans.
Tip
If the requirement isn't a plannable requirement anyway, then selecting this checkbox will also hide the requirement from these places:
Academic Plan page, Make Selection pop-up
Student Registration feature on the Campus Portal
In addition to the methods above, you can also select options from the Actions button to start the following procedures:
Create tree
Add single requirement
Add batch requirement
Edit details (of a requirement)
Print tree