My Advisee Rosterw
Important
Information and features vary according to the roles to which you belong and the permissions associated with those roles. For more information, contact your module manager or your campus support team.
Reach this page from the Academic Advising hub, in the hub options drop-down menu. Use this page to view a list of your current advisees and important advising information that varies according to your advisees’ classification. You can also register or drop courses for your advisees on this page.
There are a number of ways to view your roster:
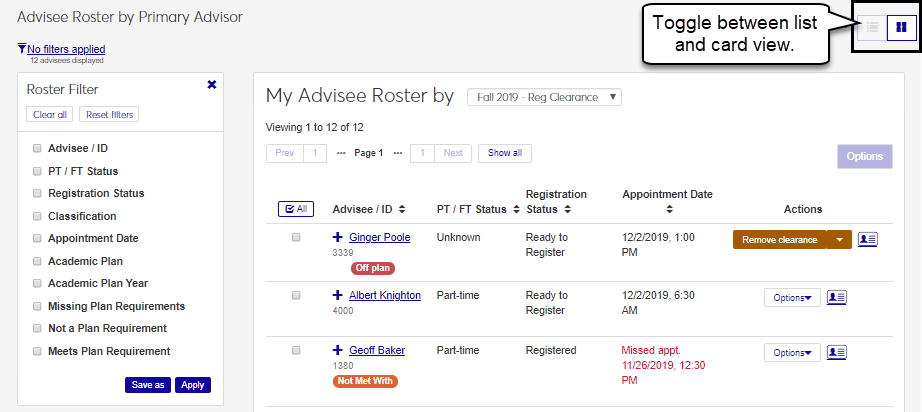
View your advisees as cards or in a list. List View shows a grid with advisees in rows, and several columns visible at a glance. Click the expand icon to view more information. Card View can include a photo of your advisee and information at a glance. Each card has a front and back side.
View your advisees based on your advisor role (primary advisor or secondary advisor).
View your advisees based on their classification or the advising cycle. The view you choose determines what details are shown in the list.
Tip
Your school may classify students depending upon your 2-year or 4-year school configuration (IPEDS Settings page) and your IPEDS classification definitions Classification Definitions page).
The following information can be available for your advisees according to their classification, information availability, where your school is within the advising cycle, and your role and related permissions.
Classification shows the student's status as a freshman or sophomore, for example.
Contact information. A phone number or email may be available from an advisee. This information is maintained on the Person Information Details page, Contact Info tab.
Personal Information Card. Click the personal information card icon to see a brief personal profile that may include a photo, the student’s classification, programs, and contact information.
PT / FT Status shows the student's full-time status with regard to tuition and financial aid.
Career GPA shows the career GPA as configured on the Repeat, Transcript, and GPA Settings page.
Academic Plan Status lets you know whether the student is on target to complete their academic plan on time. It is derived from the student’s J1 Web Academic Plan page.
Career Hours Earned comes from the Student Information Details page, Summaries tab.
Academic Standing shows particular achievements or disciplinary statuses such as Good Standing or Term Probation, for example. These appear on the Student Information Details page, Enrollment tab.
Financial Aid lets you know whether the advisee is receiving financial aid. This information is derived from your school's financial aid system (such as JFA) and identifies the student’s current satisfactory academic progress (SAP) standing, which impacts their eligibility for financial aid.
Note
For this information to appear accurately, several things must be in place:
Advisee must have grades entered
Advisee’s academic record must be calculated
Satisfactory progress must be calculated
Holds lists any holds on the advisee's account.
Graduation Stage shows where the advisee is within the graduation process. This information is on the Student Information Details page, Graduation tab. Information may not appear if:
The advisee isn’t close to graduating or hasn’t started the graduation process.
The graduation stage hasn’t been selected for the advisee’s active degree.
Graduation stages may not have been ordered using the Graduation Stage Definitions page.
The advisee is a freshmen or sophomore student who hasn’t had this information defined yet.
Program Information shows the advisee's intended Major, Minor, Concentrations, and Certifications. The information comes from the Student Information Details page.
Requires Advisor Clearance shows whether the advisor needs to clear the student to begin registering each term.
Requires Advisor Approval shows whether the advisor needs to approve the advisee's course selections before they can be registered
Advisor Number: If the number is 1, you are the advisee's primary advisor. If the number is anything else, you're not the primary advisor.
Plan Sensitivity shows how restricted the advisee is in course choices.
May register off plan but must stay on curriculum
May register without plan restrictions
Must register for planned courses
Requested Plan Edit Approvals shows whether the advisee has initiated changes to their academic plan and is awaiting the advisor's approval.
Currently Registered shows whether the advisee is registered for any courses—that is, if their student course history has any sections with a status of either Current or Reserved.
Tip
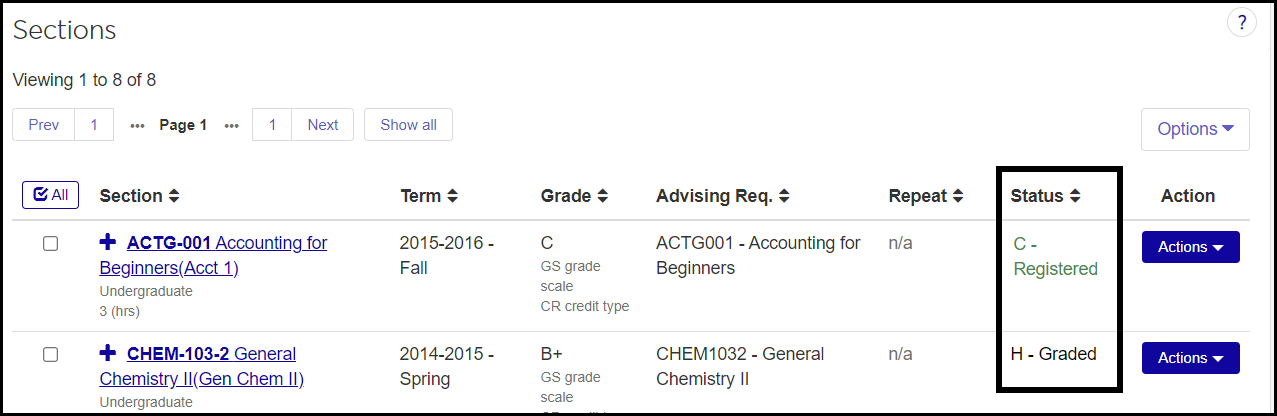
The database location it searches is the Student Course History table, Transaction status column (student_crs_hist.transaction_sts). If any of the advisee's sections in any year/term have a status of C (Current [also called Registered]) or R (Reserved), then the Currently Registered field's value is Yes. If no section in any year/term has a status of C or R, then the Currently Registered value is No.
In J1 Web, this student course history information is presented on the Student Section List. (From a student's summary page, click the Person options drop-down, and select Student, Student, Student section list. The information is in the Status column.)
In Desktop, this information is on the Student Registration window, Inquiry tab. Select a student. In the Student Registrations data window, the information is in the Status column. You can also see the status of sections in each term on the Register tab of the same window.
Advising team: From the Actions drop-down, a pop-up lists the advisee's primary and secondary advisors. You can remove primary advisors. You can also change the advisee's relationship with primary advisors to Active or Inactive.
Communication Feed: From the Actions drop-down, a pop-up lists communications. Click the Expand arrow beside a communication to see more details. The pop-up shows attached documents you can click to view. You can also read comments and add comments. (Available only if the school is licensed for Communications Plus and the user has permission to view the Communication Feed.)
Interaction Inventory: From the Actions drop-down, this opens the Interaction Inventory page in a new tab with the advisee already selected. (Available only if the school is not licensed for Communications Plus and the user has permission to view the Interaction Inventory.)
The Actions button lets you register or drop courses for advisees.
The student's planning calendar pop-up opens showing both registered sections unregistered sections. (Unregistered sections appear to help you and the student plan their schedule.) For more details on using the planning calendar to register or drop courses, see the Student Planning Calendar in J1 Web topic.
There are several layers of permission needed to register and drop advisees from their courses.
Can register advisees and Can drop courses for advisees
In these roles or copies of them:
Primary Advisor - Access to Assigned Students
Secondary Advisor - Access to Students by Academic Program
Secondary Advisor - Access to Students by Athletic Roster
Secondary Advisor - Access to Students by Campus Location
Can view courses
Course Information - Access to All Courses role (or a copy of it)
Only the "Can view courses" permission is needed in this role
In addition, there are override permissions available in each advisor role (primary and secondary):
Can grant course authorization overrides
Can grant course corequisite overrides
Can grant course full overrides
Can grant course prerequisite overrides
Can grant course prohibited overrides
Can grant course repeat overrides
Can grant schedule conflict overrides
There are settings on Year / Term / Subterm Definitions page and on the Manage Course Details page that affect when and whether advisors can register and drop students. The settings here that allow students to register and drop on the Campus Portal also allow their advisors to register and drop them in J1 Web.
Year / Term / Subterm page
Year / Term view (or Subterm view)
First Campus Portal Add / Drop Date
Last Campus Portal Add / Drop Date
Year / Term Control for Registration Control Groups (or Subterm Control for Registration Control Groups)
Note
Registration Control Groups are also called Tel/Web Groups, Web Registration Groups, and Registration Groups. Students are assigned to them to control their registration. If the settings for a group
First Campus Portal Add Date
Last Campus Portal Add Date
First Campus Portal Drop Date
Last Campus Portal Drop Date
Registration Clearance (required vs. not required)
Advisor Approval (required vs. not required)
Plan Sensitivity
May register without plan restrictions
May register OFF plan, but must stay ON curriculum (Courses must be part of the student's academic plan, but needn't be taken in the planned term.)
Must register for planned courses (Courses must be registered in the term designated in the academic plan.)
Advisor Add / Drop Date Overrides
First Add
Last Add
First Drop
Last Drop
Manage Section Details page
Restrict Registration by Section
Restrict Registration by Web Group
Add Begin Date
Add End Date
Drop Begin Date
Drop End Date
The system looks at add and drop dates in the following order. The first date it finds is the date it uses. If there's no date in the first priority, it moves to the second, and so on.
Advisor Add / Drop Date Overrides (Year / Term / Subterm Definitions page)
Course section (Manage Section Details page)
Registration Control Group (Year / Term / Subterm Definitions page)
Subterm (Year / Term / Subterm Definitions page)
Term (Year / Term / Subterm Definitions page)
In the Academic Advising hub, click the Hub options drop-down.
Select one of the options (such as Primary Advisor or By Academic Program), and select View my advisee roster. You advisee roster page (for the option you selected) opens.
Click the List View icon  or the Card View icon
  to switch views.
Important
Text messaging is available with a Communications Plus license.
Select the advisees to be emailed. Advisees can be selected individually or using the All option.
Note
The email option is unavailable for advising students who don’t have the Notification Enabled option set to Yes and a valid institutional email address defined on the Person Information Details Page, Contact Info tab.
Using the Options drop-down, select Send communication. The Create New Communication window appears.
Select a Communication Type: Email or Text.
Select an Interaction Code, Name / Description.
Select a From email address or phone number.
Listed under the To field are any selected recipients with invalid or missing email addresses or phone numbers. You can deselect them or fix their contact information before proceeding.
If this is an email, there are two extra fields:
Contact Type: "Institutional Priority" is selected and isn't editable.
Subject: Enter a subject line
You can include a link in the message by clicking the paper clip icon and adding the URL.
Enter your content in the Body field.
Click the Send button. The Create New Communication window closes, and the emails or texts are sent to your selected advisees.
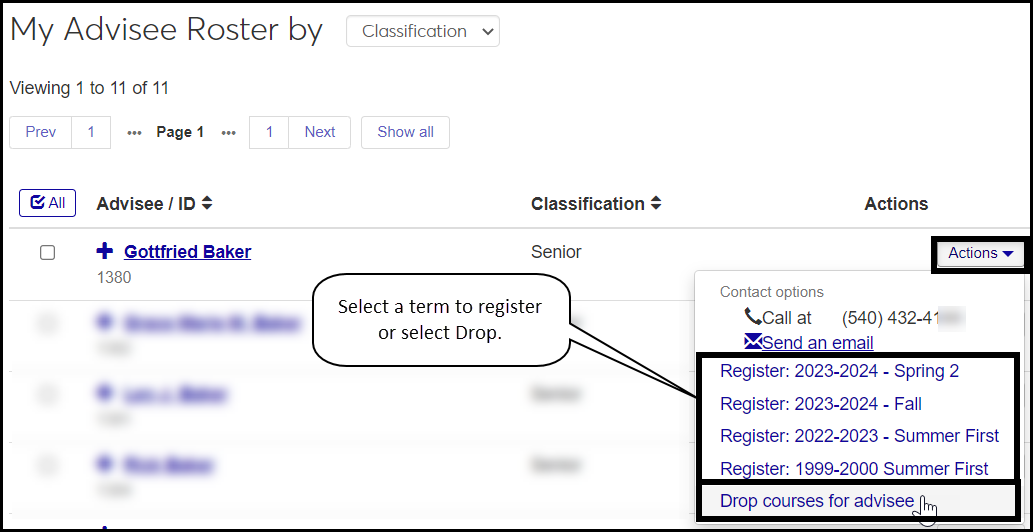
On an advisee's row, click the Actions button, and and select Register [year / term] from the drop-down. The Register Selected Students window pops up showing the student's planning calendar. (See the Student Planning Calendar in J1 Web topic for more information on using the calendar to plan, add, and drop courses.)
Scroll down below the calendar to select a section to work with.
If you know the course code, or at least the department code, begin typing it in the Section field. A list of results appears. Select a section. Enter and select additional sections as needed.
If you don't know the course code or you want more options, click Show course search. The section list for the selected year/term appears with information such as the course title, instructors, enrollment status, schedule, and location.
Use the Section Filter to find courses.
Click the Select button next to courses you want to register. Their code appears above in the Section field.
Optional: Select the Grant advisor approval checkbox to approve the sections selected for registration.
Click the Register button.
Note
Because you're the student's advisor, if the course required advisor approval, then approval is automatically granted and marked with today's date.
When someone else registers one of your advisees, and advisor approval is required, the course is set to Reserved status until you approve or until the registrar overrides the advisor approval requirement.
On an advisee's row, click the Actions button, and select Drop courses for advisee from the drop-down. The Drop Courses for Advisee window pops up.
The year/term with open registration is selected by default. If you need to change it, click the Remove icon, and select another year/term. The Drop Courses for Advisee pop-up opens.
Select the checkboxes for each of the courses you want to drop. If the drop deadline has passed,
Click Yes, drop selected courses.
Tip
You can also drop courses from the student's planning calendar. For details, see the Student Planning Calendar in J1 Web topic.
You may not have advisees assigned to you or your advisees might not be assigned to a student web group associated with the current advising cycle.
When you have more than 100 advisees, the advisee roster is only available in the list view.
If the add/drop deadline has passed for a year/term, you won't be able to register or drop students. Also, you must be assigned to roles that have these permissions:
Can register advisees
Can drop courses for advisees
Both permissions are available in these roles or roles copied from them:
Primary Advisor - Access to Assigned Students
Secondary Advisor - Access to Students by Academic Program
Secondary Advisor - Access to Students by Athletic Roster
Secondary Advisor - Access to Students by Campus Location
In addition, the settings on the Year / Term / Subterm Definitions page that control students registering and dropping themselves also control advisors registering and dropping their advisees. The restrictions can come from the term, the course section, or the student's Registration Control Group (also called Tel/Web Group and Web Registration Group).
Plan Sensitivity (no restriction, on curriculum, planned courses)
Add and Drop dates
The Advisor Add / Drop Date Overrides (also on the Year / Term / Subterm Definitions page) can allow advisors to register and drop beyond the Add and Drop dates for the term, course, and Registration Control Group.
The system looks at add and drop dates in the following order. The first date it finds is the date it uses. If there's no date in the first priority, it moves to the second, and so on.
Advisor Add / Drop Date Overrides
Course section
Registration Control Group
Subterm
Term
In addition to permission to register and drop advisees, you need permission to view courses. If you're in an instructor or a department head role, you have permission to the courses you teach or courses in your department, but not necessarily all your advisees' courses.
Ask your administrator for permission to view all courses. They can assign you to a copy of the Course Information - Access to All Courses role. (At a minimum, it should have the "Can view courses" permission selected.)
When the student's advisor registers a course requiring advisor approval, the approval is granted automatically and marked with that day's date.
When someone other than the advisor registers a course requiring advisor approval, the course is set to Reserved status. The course will move to Current status when either the advisor approves or a registrar overrides the advisor approval requirement. (The "Can override advisor approval required" permission is in the Registration Override and Access Control role and roles made from it.)