Student Academic Plan Page
Important
Information and features vary according to the roles to which you belong and the permissions associated with those roles. For more information, contact your module manager or your campus support team.
Reach this page by clicking on a student's name to go to their student summary page, then select Academic Plan in the Student drop-down menu. Use this page to determine when an advisee will take the courses needed to satisfy the requirements of their program, minor, certification, or concentration. Curriculum is based on the advising requirement trees and aims set up by your module manager on the Advising Trees page. You'll work with the student to assign their requirements to the appropriate time periods and get them ready to register for courses.
Tip
Did you know that you can configure select groups of students to have permissions to edit their academic plan in Campus Portal? This can save a lot of time meeting with students. If desired, it can be set up to require the advisor to approve the changes, or not. A System Administrator will need to do the setup. For more information see My Academic Plan Setup and Student Plan Approvals.
Assign unassigned requirements. If a student is a transfer student or picks a double-major, you may need to assign requirements that aren't a part of the default plan to the academic plan.
Select courses to meet elective requirements. If a student has a foreign language or free elective requirement, you can select a specific course to meet the requirement.
Monitor a student's progress in meeting their requirements. The progress bar at the top of the page shows you how many requirements the student has successfully met.
Add and remove time periods. If a student adds a double-major, they may need to add a year/term to their plan in order to meet the requirements without exceeding workload limits.
Export the academic plan to PDF, which can be saved and emailed to the student.
View copies of the student's unofficial transcript and advising worksheet.
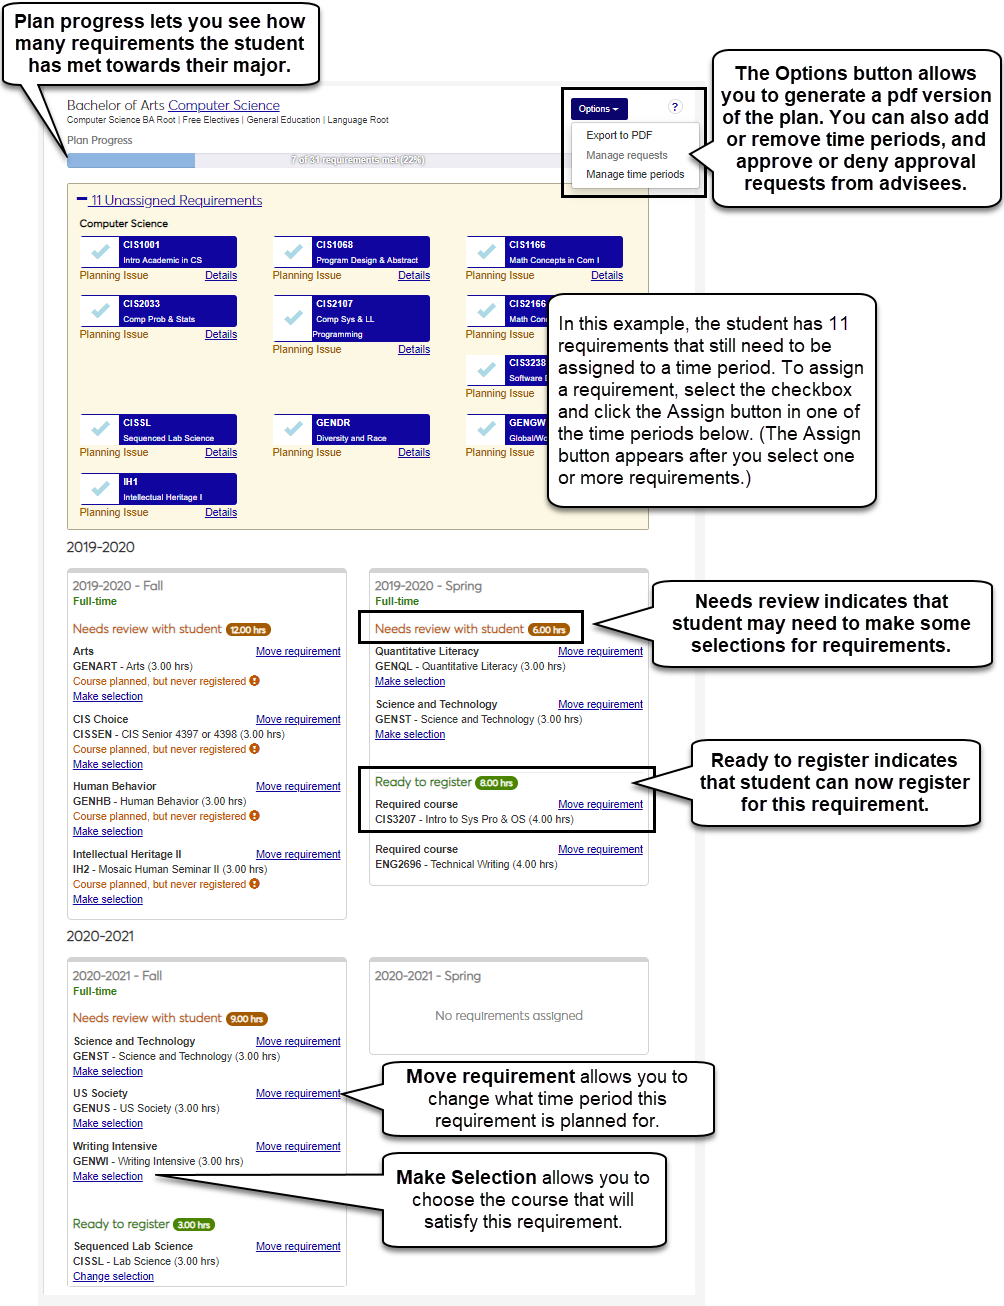
Icons show important enrollment information for an advisee's current year/term and any year/terms available for enrollment. You can see if an advisee is enrolled in courses that meet their academic plan requirements and within the planned timeframe.
 The green checkmark indicates the advisee is enrolled in a course that meets a planned requirement within the academic plan timeframe.
 The exclamation mark indicates the advisee is enrolled in a course that meets a planned requirement, but it's outside the academic plan time frame. A link to the advisee's email is available if you want to reach out and discuss the plan.
 The crossed-arrows indicate the advisee is enrolled in a course that meets a planned requirement, but they have not met the requirement. This could be due to a student making unsatisfactory grades, withdrawing from the course, or planning to take the course, but not actually enrolling in it. If the enrollment period for the next year/term/subterm has not yet started, an advisor can move this requirement to another timeframe. If the enrollment period for the next year/term/subterm has started, the unmet requirement becomes an unassigned requirement and appears at the top of the plan.
The unmet requirement icon lets you know when a student withdraws from a course or fails to satisfy a requirement within the current year/term. A Move Requirement link in the pop-up lets you move the requirement to another time period before the student enrollment period ends for the current year/term. This helps keep student on track with their plan.
Notice
During the first fall subterm Harry had to withdraw from Accounting 301, a requirement of his Math major. His advisor saw the requirement hadn't been met and moved it to the second fall subterm before the registration period opened.
If the year/term ends and the requirement hasn't been moved, it becomes an unassigned requirement.
The student terms shown and the ones available to add, if needed are determined by the following:
Your school's IPEDS configuration, which determines if your school is a 4-year or 2-year degree granting school (IPEDS Settings page)
Your school's classification definitions, which represent students' status in their movement toward completing a program or link your organization's classification codes to pre-defined IPEDS classification codes (Classification Definitions page)
The year/terms set up on the Year / Term / Subterm page
As you are setting up the student's plan, you will need to keep in mind there may be prerequisites for a course. The system ensures courses with prerequisites aren't planned in a time period before the prerequisite. Course descriptions show the prerequisites.
The system ensures courses with corequisites are planned for the same time period. Course descriptions show the corequisites.
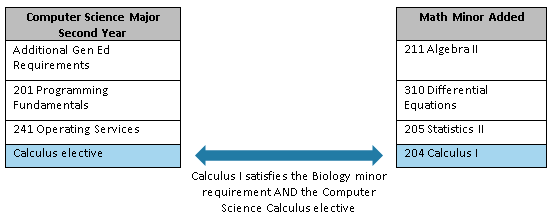
When a student adds a new minor, certification, or additional program, the requirements associated with it may satisfy the electives of their selected major. For example, if a Computer Science major adds a Math minor that requires Calculus I, Calculus I may also satisfy the student’s Computer Science calculus elective. While Calculus I meets both requirements in the student’s aims, the course only needs to be planned and taken once.
Notice
The “swap” feature lets you connect the major’s elective with the new minor’s requirement, even if a course has already been selected for the requirement. In the example above, you can “swap” the Calculus elective with the 204 Calculus I course ensuring the course is only planned once, but still meets both requirements in the student’s aims.
The “Needs Review” status indicates changes have been made to the curriculum associated with a plan one of your advisees is following to complete their major, minor, concentration, or program. You will receive a “Review your advisee’s academic plan” task letting you know you need to review the student's plan to see if updates need to be made to keep your impacted advisees on plan.
Notice
If a required course related to the Biology major is no longer being offered by your school, you'll need to review the plan and find another course to take its place.
What can cause a student to be off plan?
Work with the student to update the plan and ensure they are ready for registration.
While working with your advisees, you can select specific courses when planning free electives. It can be helpful to add free electives when a student still needs hours to complete a requirement, but have no more course 'slots' available to choose for electives.
Open the advisee's Summary page:
Click the Search icon
 on the universal toolbar. The Search panel opens with Person selected.
Enter part of the advisee's name or ID, and select them from the list. The advisee's Summary page opens.
Click the Person options drop-down, and select Student, Student, Academic plan. The advisee's Academic Plan page opens showing the advisee's Current Enrollment Summary panel, the plan name, the Plan Progress bar, and the Unassigned Requirements.
On a student's Student Summary page, click the Person options drop-down.
Select Student, Student, and Academic plan. The student's Academic Plan page opens with the student's plan name as a link.
View the student's Current Enrollment Summary panel, the plan name, the Plan Progress bar, and the Unassigned Requirements.
On a student's Academic Plan page, click the plan's name. The student's Plan Layout Details page opens.
If the student has more than one plan, click the Plan options drop-down and select All plans to see the list of their plans.
On the student's Academic Plan page, click the blue Options button and select Add elective.
In the Add Elective popup, click the drop-down menu for the Elective field, and select FREEELEC.
Enter the number of hours, and choose a year/term.
Click Save, or if you want to add another elective, click Save and another.
When you return to the Academic Plan page, you will be able to select a course to meet this elective.
For an unspecified elective, select the Make Selection link below the course details.
A pop-up window appears with possible selections. Choose one and click Select Requirement.
Students may or may not be able to find an elective they want to take.
Tip
If you and the student cannot find a course the student wants to take, click the Just plan [subject] button. The window closes, a generic subject elective will be planned, and the student will be able to pick the course at another time or during registration.
Note
If a student requires registration approval, then they must register for what the advisor and advising student select during this planning process. If the student only requires registration clearance or does not require registration clearance or approval at all, they are not required to register for what is selected during the planning process.
Click the Unassigned Requirements link. A list of the unassigned requirements appears.
Click the blue checkmarks next to the requirements you want to assign to a particular year/term. The blue checkmarks turn green.
Tip
You can plan more than one requirement at a time for a specific year/term.
Locate the year/term you want to assign the requirements to and click Assign. The requirements are assigned to the appropriate year/term and the plan progress bar is updated.
From time period, select the Make selection link. Make selection links appear beneath the requirements you can plan a course for. The Course Options pop-up appears.
Note
Some courses are mandatory and automatically planned for you. Those courses cannot be changed without approval of the Registrar and your module manager.
Select the course the student wants to take in order to satisfy the requirement. Some electives may have a Just plan "Make final selection at registration" option that lets the student pick the course when they register.
Click the Select Requirement button. The Course Options pop-up closes and the requirement has a course planned.
If more electives are needed to meet required hours, you can add them using the Add elective option in the Options drop-down menu.
From time period, select the Change selection link. Change Selection links appear beneath the requirements you can plan a course for. The Course Options pop-up appears.
Note
Some courses are mandatory and automatically planned for you. Those courses cannot be changed without approval of the Registrar and your module manager.
Select the course the student wants to take in order to satisfy the requirement. Some electives may have a Just plan "Make final selection at registration" option that lets the student pick the course when they register.
Click the Select Requirement button. The Course Options pop-up closes and the requirement has a course planned.
Note
In certain circumstances, a student may add a new minor, certification, or additional program, and the requirements associated with it may satisfy the electives of their selected major. For example, if a Computer Science major adds a Math minor that requires Calculus I, Calculus I may also satisfy the student’s Computer Science calculus elective.
When the student adds a new minor, certification, or additional program, the new requirements appear at the top of the page in the Unplanned Requirements section.
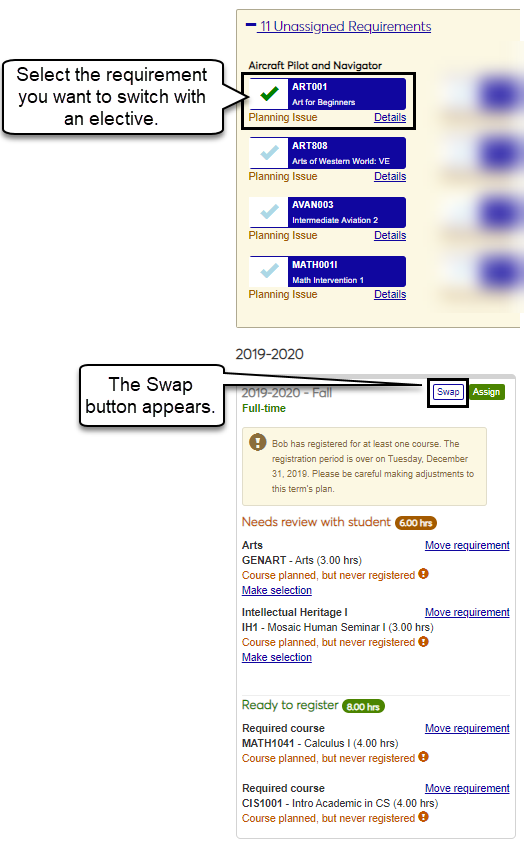
Click the Unassigned Requirements link. A list of the newly added unassigned requirements appears.
Click the blue checkmark next to the requirement you want to switch with an elective. The blue checkmark turns green and terms with an elective that can be satisfied by the requirement show a Swap button.
Once you find the term with an elective you want to replace with the requirement, click the Swap button
 . A blue swap button appears next to any electives that qualify to satisfy the requirement and elective.
Click the blue swap button. The selected elective is switched with the requirement. This one course will now meet the elective and the requirement for the student's aims.
Note
 indicates a planned requirement. Planned requirements cannot be swapped for a new requirement.
Click the Done button. The confirm swap pop-up window appears verifying the change.
Click the Yes, swap button. The confirm swap pop-up window closes and the newly planned course meets both requirements.
Click on the Unmet Requirement icon
. The Unmet Requirement pop-up appears.Click the Move Requirement link.
From the To column, use the Select a time period to determine which time period the requirement will be assigned to.
Click the Update button. The Move Requirements window closes and the requirement is moved to the selected time period.
From the page Options, select Export to PDF. A new web browser tab opens showing the student's plan in PDF format.
Use the web browser's print and save options to provide a copy to your advisee.
There are three main steps to associating academic plans with advising students:
The Advising Administrator publishes the academic plans and they are associated with the appropriate programs.
The student selects their program (as seen on the Student Information Details page, Program tab), and the plan associated with the program is associated with the student. This may be done manually using the Synchronize Advisee Information page or an automated AD to RE Transfer process. This is similar to the way advising trees are associated with them.
The year/term the student's academic plan will begin being used is selected on the Student Information Details page, Program tab.
If any of these steps are not completed, the academic plan will not be associated with the advising student.
If you are working with a group requirement, the system uses the “parent” requirement hours from the Advising Trees page or the credit hours entered on the Manage Course Details page, Hours tab.
There are several reasons an advisee might not have a plan:
The advisee may not have selected a major, minor, certification, or concentration, and therefore there is no associated academic plan (Student Information Details page, Program tab).
The Academic Advising Module Manager may not have published the academic plan for the student’s selected aim (major, minor, certification, etc.).
The Registrar or Advising Module Manager may not have associated an academic planning starting year/term (Student Information Details page, Program tab).
Contact your module manager for more information.
It can mean several things:
You can easily add a *FREE elective to the student's academic plan if they need more course 'slots' to meet requirements for their program.
Your school sets up a workload limit that determines how many hours a student can take in a term. This helps keep students within a reasonable number of hours. As you are working with the student's academic plans, you may not be able to assign a requirement to a year/term if they have already met the workload limit. To workaround this issue, assign one of the other requirements for that year/term to another year/term and then assign the requirement.
You may also be able to work with your Registrar for overload waivers.
The plan progress bar shows how many hours the advisee has completed out of the total required hours for their aims.
This is likely a transfer student who has transferred in as a sophomore or junior who hasn't taken a course at your school yet. The plan will show their starting point at your school and not their very first year of school.
There are many reasons unplanned requirements might be showing:
There may have been requirements that were never assigned to a year/term.
Not all of a transfer student's courses meet your school's requirements.
There may have been a change in the curriculum.
Work with your student to get the requirements planned so they can be ready to register.
Some courses are required to satisfy the requirements of the program, minor, certification, or concentration. These requirements are planned for you and cannot be updated. Contact your module manager for more information.