Manage Workflows
Important
Information and features vary according to the roles to which you belong and the permissions associated with those roles. For more information, contact your module manager or your campus support team.
The Manage Workflows page lets you create, manage, and delete workflow definitions - templates that define the stages, requirements, and sequence for workflows. These definitions can be associated repeatedly with individuals and objects in the system.
As shown in the image above, there are three main steps to creating a workflow: define the details, create stages, and add work items/ requirements to them. Once these steps are complete, you can publish the workflow to make it available for associating with individuals/objects in the system.
Note
Workflows associated with individuals and objects in the system cannot be deleted.
From this page you can:
Create new workflow definitions.
Associate workflows individuals and objects.
Copy existing workflows to create new ones.
Update workflow stages and items.
View all workflow instances.
Change workflow definition statuses.
Workflow processes are broken down into sequential stages that are comprised of workflow items/requirements.
Stages:
Group items/requirements that need to be completed to move forward through the process.
Can be concurrent or sequential. Concurrent means participants can complete the requirements in any order. Sequential means a stage cannot be completed until the stage before it has been completed.
Can copy and tailor stages from other workflows.
Items:
Can be referred to as requirements. They are the steps workflow stakeholders must complete to finish the process.
Can trigger predefined actions based on rules and conditions.
Can assign To Dos to J1 Web users.
Item requirement types:
Data type leverages information about individuals and organizations in the system to meet a requirement. Data requirements use data dictionary data sets uploaded to the system to determine if a requirement has or has not been met.
For example, if a student must be a junior to proceed with the next step in the workflow, a data set that includes classification data can be uploaded into the system and then selected when the user creates the workflow requirements.
For multiple criteria, the system uses an OR comparison, meaning if the value matches any one criteria rule, the requirement is satisfied. If none of the criteria are met, the item is marked with a warning status and the workflow remains incomplete even if all other requirements are met.
Document requires a completed document to be uploaded to fulfill the requirement.
Uploaded documents are stored in J1 Document Storage and categorized appropriately. Allowed file types vary according to the Document Storage allowed file configurations in the Desktop.
Form requires that a Campus Portal FormFlow - Form be completed.
Forms that will be completed as a part of a workflow must have the J1 Mapping Tool > Record in ERP setting must be configured to Yes. If a PDF copy of the form will be stored in J1 Document Storage, the form must also be associated with a document storage category and type in the J1 Mapping Tool.
Other captures requirements completed outside J1 Web and the Campus Portal. Participants select a checkbox to indicate the task was completed. Options let participants mark the task (for example, meeting with the advisor) complete in J1 Web, the Campus Portal, or Both.
Signature* collects digital signatures on forms submitted through the Campus Portal. Jenzabar integrates with DocuSign to collect digital signatures.
Forms requiring signatures are stored in J1 Document Storage. They must have the J1 Mapping Tool, Record in ERP setting configured to Yes and they must be associated with a document storage category and type in the J1 Mapping Tool.
Test needs specific test scores to be completed and meet a minimum threshold to fulfill the requirement. Test Score requirements use the test score definitions in J1 Web and Desktop.
*Workflow Plus only.
Item To Dos
Can be assigned to any active J1 Web user individually or using affiliation data sets.
These users do not need to be in a Workflow role. To Dos show up in their To Do List, a feature available to everyone in the J1 Web User role.
Provide Approve/Deny type for approving/denying other items in the workflow.
Can be assigned immediately when concurrent workflows are associated with individuals and objects or when a previous stage is completed for sequential workflows.
Workflow includes rule options for stages and items. Rules can update stage and item statuses based on the status on other stages and items, associate new workflows with individuals or objects, and kick off workflow-initiated automation plans. For example, when the student submits the Course Withdrawal form, a workflow automation plan can kick off a series of notifications and communications to those impacted.
Multiple rules can be associated with a stage or item, and "else" statements can be used to differentiate what happens when a condition is met versus when it is not met.
Draft is the initial workflow status. Draft workflows can be edited and deleted, but they cannot be associated with individuals or objects. Keep workflows in a draft status until they are complete and ready for use.
Published workflows are ready and available to be associated with individuals and objects by users with association permissions and that belong to a role with the appropriate access code. Published workflows cannot be edited, and once associated with an individual or object, they cannot be deleted or reverted to draft status.
Retired workflows are no longer needed for associating with new individuals or objects in the system. If a workflow is retired while still associated with individuals or objects, it remains visible, and those already assigned to it continue completing its requirements. However, it cannot be associated with new individuals or objects.
To view this page and access the various features, you must belong to a Workflow Base role with the "Can manage workflows" permission enabled.
If filter options aren’t appearing, click the No filters applied link. You can find workflows in several ways:
Searching by specific word using the Keyword filter.
Using a filter or combination of filters (e.g., keyword, additional information, status, workflow, etc.).
Using the column headings to sort by ascending or descending order.
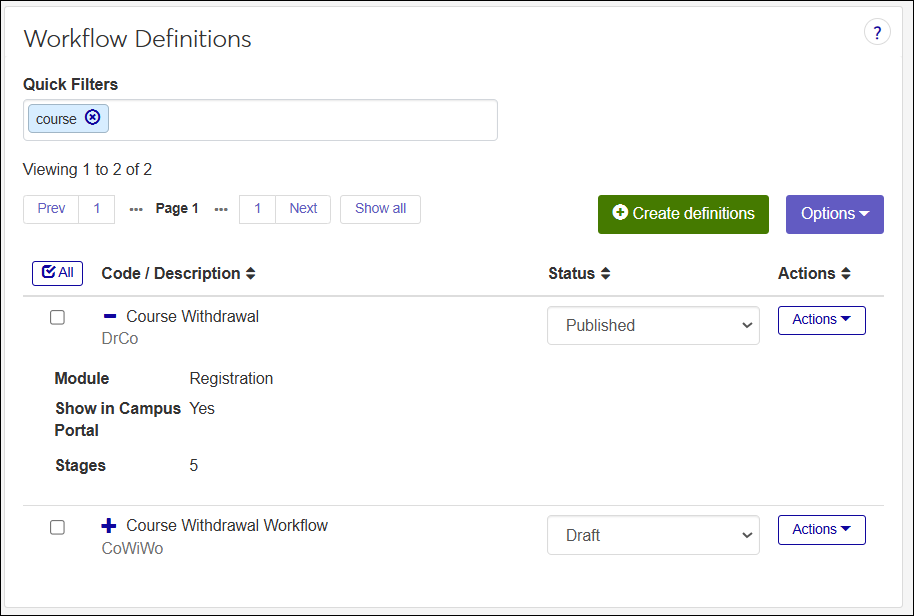
There are two ways to create a workflow: Click Create definitions and step through the following process or copy an existing workflow and update details, stages, and items as needed.
Access the Workflow Definitions page.
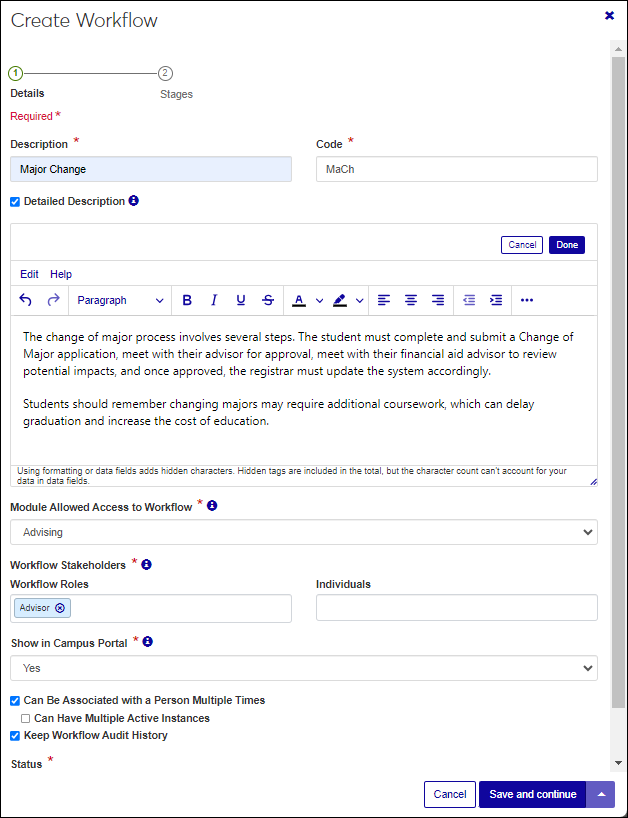
Click the Create definitions button. The Create Workflow window appears.
In the Description field, enter information that helps identify the workflow to other users. This is shown to users with permission to associate workflows as well as users with permission to view workflows associated with individuals and objects.
The Code field uniquely identifies the workflow in the system and can be used for reporting. This is automatically generated but can be updated to meet specific data standards. This is the only time a code can be updated.
Use the Detailed Description options to enter general, overall information about the workflow (e.g., overview of steps on how to complete it, why it is required, who to contact if they have questions, etc.). This information is shown in J1 Web as well as the Campus Portal, Workflow Status feature (if the workflow is configured to be visible/available to Campus Portal users).
Note
Detailed information about individual stages and items (e.g., how to complete a specific stage/item) can also be added at the stage and item levels later in the process.
Click Edit to enter your content and access text editing features. Click the ellipsis to include links, images, and code, and access the accessibility checker feature which ensures content meets accessibility guidelines.
Note
Detailed Descriptions are shown in plain text in J1 Web and design format in the Campus Portal.
Once your content is added, click the Done button.
From the Module Allowed Access to Workflow drop-down, select the module you want to be able to access the workflow. Users in roles with permission to this module code will be able to view, track, and, depending on their permissions, associate this workflow.
Use the Workflow Roles and Individuals fields to select workflow stakeholders individually and using Workflow Roles.
Stakeholders in the Workflow Base role with "Can view workflows" permissions can monitor the workflow progress for each association on the Workflow Instances page (My Workflows).
Consider which roles and individuals on campus need to look up information as well as those responsible for assisting others through the workflow process—for example, advisors, coaches, and student success and financial aid officers. Every time this workflow is associated with a student, they must be able to follow the process of anyone receiving this workflow.
Note
Roles dynamically associate the individuals assigned to them with the workflow. This is helpful when you don't know who the advisor for a student might be or if their advisor changes. The system makes the association for you, and they'll be able to access the appropriate workflows.
From the Show in Campus Portal drop-down, select Yes to make the workflow available in the Campus Portal, Workflow Status feature. Campus Portal users associated with the workflow can view, track, and complete certain requirements.
If you don't want the workflow to be available on the Campus Portal, select No.
Use the Can Be Associated with a Person Multiple Times and Can Have Multiple Active Instances options to determine how repeated workflows are handled.
If an individual or object can be associated with the same workflow multiple times, select the Can Be Associated with a Person Multiple Times checkbox. For example, a student may drop courses more than once over their enrollment period.
If an individual or object can be associated with multiple instances of the workflow simultaneously, select the Can Have Multiple Active Instances checkbox. For example, a student applying for two majors may have two instances of the Undergraduate Application workflow if they're applying to two programs.
Select the Keep Workflow Audit History checkbox to track workflow updates in an audit trail that can be viewed by workflow users.
Click the Save and continue button. The Stages options appear.
Select the workflow's stage progression:
Concurrent means any stage can be completed at any time without restrictions on one being completed before another.
Sequential means a stage cannot be completed until the stage before it has been completed.
Click the Save button.
There are two ways to add a workflow stage:
Create a brand new stage.
Copy an existing stage from another workflow. When an existing stage is copied, the items associated with it are also copied into the new workflow. Use Edit options to tailor the stage and related items.
These procedures outline creating an entirely new stage.
Access the Workflow Definitions page.
Find the workflow you want to add a stage to.
From the Actions menu, select Edit Stages. The Edit Stage window appears.
Click the Create stage button. The Create Stage window appears.
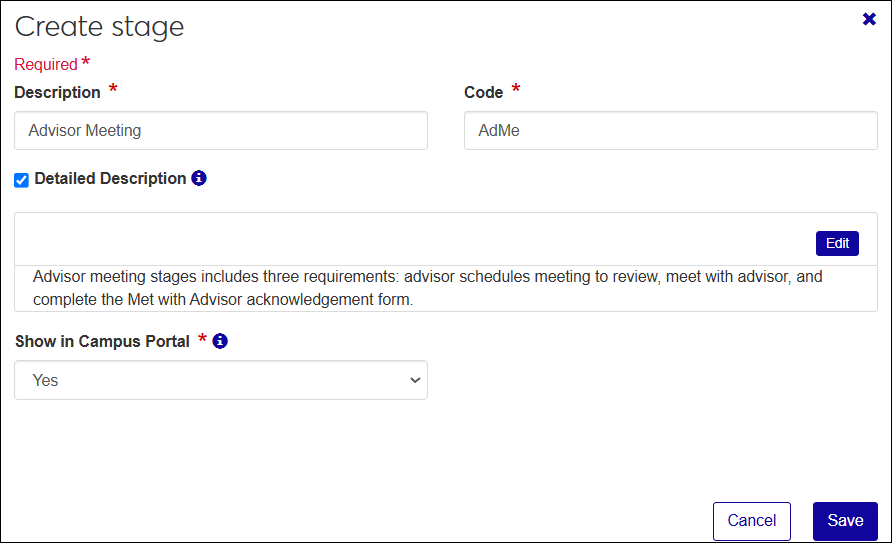
In the Description field, enter a title to identify the stage. This is visible to participants and stakeholders.
The Code field uniquely identifies the stage and can be used for reporting. It is automatically generated, but can be updated to meet specific data standards. This is the only time a code can be updated.
Select the Detailed Description checkbox and click the Edit button to enter information about the stage (e.g., information on how to complete the stage, etc.). This information is shown in J1 Web as well as the Campus Portal, Workflow Status feature (if the workflow is configured to be visible/available to Campus Portal users).
Click the ellipsis to include links, images, and code, and access the accessibility checker feature which ensures content meets accessibility guidelines.
Note
Detailed Descriptions are shown in plain text in J1 Web and design format in the Campus Portal.
Once your content is added, click the Done button.
From the Show in Campus Portal drop-down, select Yes to make the stage available in the Campus Portal, Workflow Status feature. Campus Portal users associated with the workflow can view, track, and complete certain requirements in the stage.
If you don't want the stage to be available on the Campus Portal, select No.
Click the Save button.
Repeat Steps 1 – 6 for every stage needed for the workflow.
To reorder when stages occur:
Click the Edit stage order button. The Edit stage order window opens.
Hover over the arrow icon on the left side of the row until your cursor changes to a hand icon.
Click and hold while you drag the stage to the new location.
Release the mouse button.
Repeat these steps as needed.
Click the Save button.
Add items/requirements to the workflow stages.
Access the Workflow Definitions page.
Find the workflow you want to add items to.
From the Actions menu, select Edit Stages. The Edit Stage window appears.
Access the stage you want to add an item to.
Click the Create item button. The Create Item window opens.
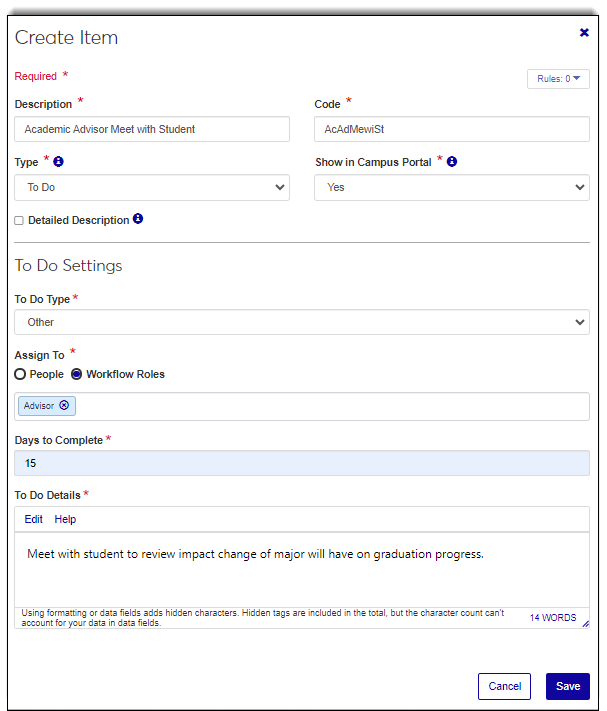
In the Description field, enter a title to identify the item. This is visible to participants and stakeholders.
The Code field uniquely identifies the item and can be used for reporting. It is automatically generated but can be updated to meet specific data standards. This is the only time a code can be updated.
From the Type drop-down, select Requirement or To Do.
To Dos:
To Dos are assigned to J1 Web users and appear in the assignee's To Do List.
Select the To Do Type: Other, Email, Phone Call, or Approve/Deny.
When Approve/Deny is selected, choose the item in the workflow that needs to be approved or denied by the assignee.
Determine who the To Do will be assigned to.
To choose a recipient by name, select People, type their names and then select them. To select recipients associated through affiliations, select Workflow Roles and choose an affiliation data set. For example, a Workflow Roles affiliation data set could capture advisors and coaches who would receive a approve/deny To Do for a course withdrawal workflow.
Enter how long the recipient has to complete the To Do upon assignment in the Days to Complete field.
Add descriptive notes in the To Do Details section.
Note
Use the Edit and Help links for formatting shortcuts for your content.
Requirement Types:
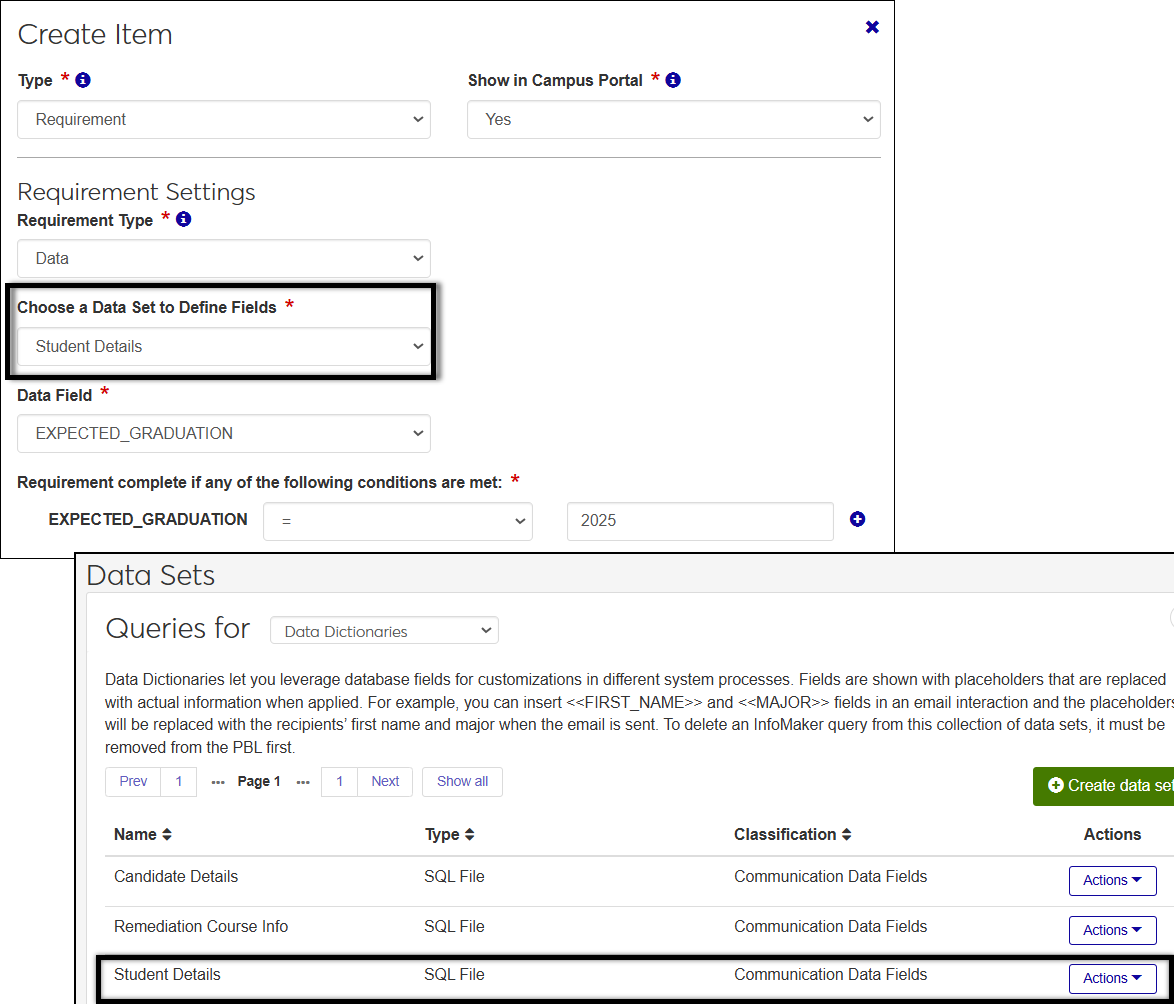
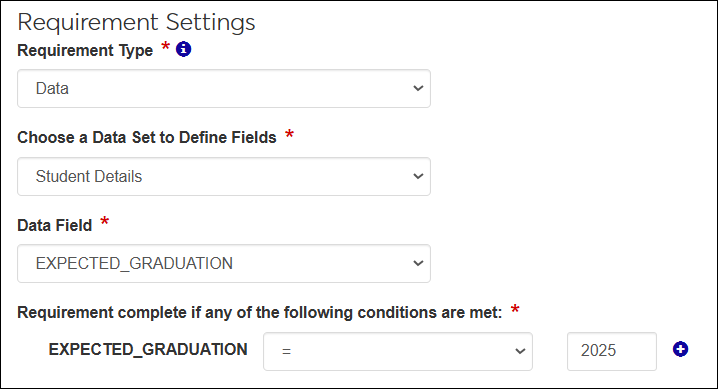
Data requires a certain piece of information about an individual or organization in the system meets a certain condition. Information is collected through a data set (SQL queries uploaded to the system) and once selected, the data fields in that data set are available for defining the condition that must be met to mark the requirement complete.
For example, a workflow might only proceed for students that are seniors. The condition would be the student's classification and classification would need to be a field in the selected data set.
To add multiple conditions, click the Plus icon.
Note
For multiple criteria, the system uses an OR comparison. If a value matches any one criteria rule, the requirement is satisfied. If none of the criteria are met, the item is marked with a warning status and the workflow remains incomplete even if all other requirements are met.
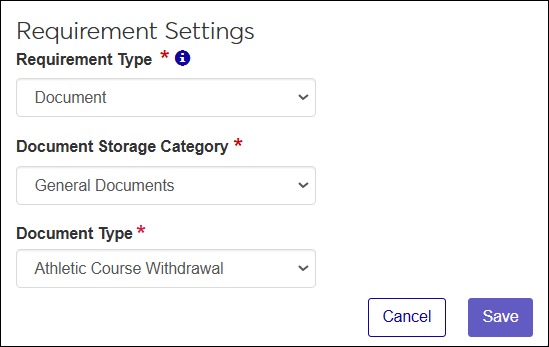
Document requires a completed document to be uploaded to fulfill the requirement. Uploaded documents are stored in J1 Document Storage and categorized appropriately. Once the Document requirement type is selected, select the appropriate Document Storage Category and Document Type from the drop-down options.
Allowed file types vary according to the Document Storage configurations in the Desktop.
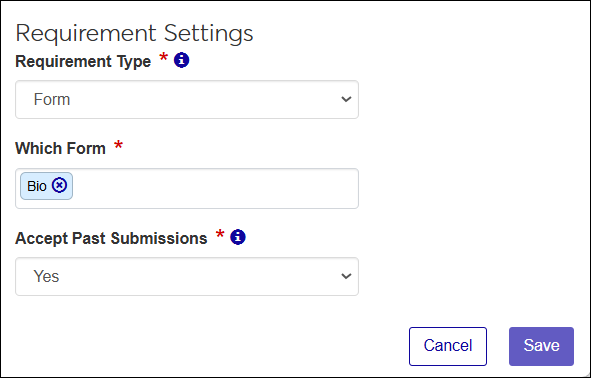
Form requires a Campus Portal FormFlow - Form be completed. Use the Which Form field to start typing and select the form the workflow participant must complete. The selected form will be shown to the participants in the Campus Portal, Workflow Status feature.
To allow past form submissions to satisfy the requirement, select Yes from the Accept Past Submissions drop-down. This means any new form submissions satisfy the requirement, but an older submission can satisfy the requirement as well. For example, once a health release form is completed, it does not have to be submitted every time they complete the workflow. They can submit it once and never have to submit it again.
If past submissions of the form cannot satisfy the requirement, select No from the Accept Past Submissions drop-down.
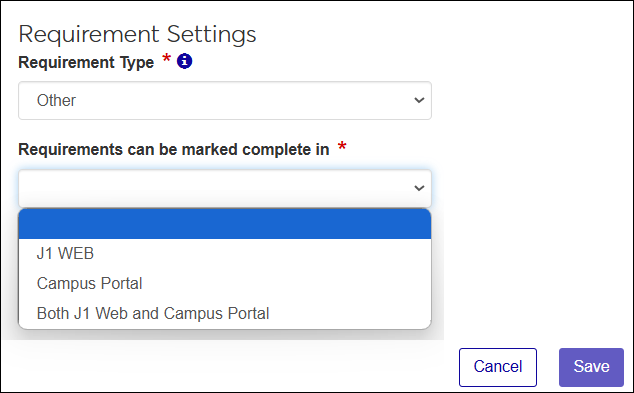
Other captures requirements completed outside J1 Web and the Campus Portal. They are not automated, and participants select a checkbox to indicate the task was completed.
Other tasks can be marked complete in J1 Web, the Campus Portal, or Both. Other participants can see if the task has been marked complete, but only the participant in the selected environment can select the checkbox.
Signature* collects digital signatures on forms submitted through the Campus Portal. Jenzabar integrates with DocuSign to collect digital signatures.
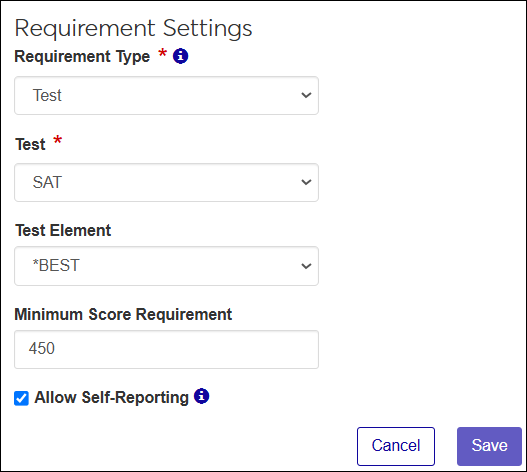
Test requires a specific test be completed. Test Element and Minimum Score Requirement further request a participant include the total composite score for the test type against the lowest value that will meet the requirement; however, these are not required. For example, a student may be required to submit an SAT score of at least 450. Test requirements use the test score definitions in J1 Web and Desktop.
To meet the requirement, an official test score meeting the required minimum must be entered by a J1 user in J1 Web or Desktop.
If the minimum score is not met, the item has a Failed status, and the workflow is incomplete even if all the other requirements are met.
To allow self-reported scores to satisfy the requirement, select the Allow Self-Reporting checkbox.
*Available with Workflow Plus. Requires DocuSign integration.
From the Show in Campus Portal drop-down, select Yes to make the item available in the Campus Portal, Workflow Status feature. Campus Portal users associated with the workflow can view, track, and complete the item.
If you don't want the item to be available on the Campus Portal, select No.
Select the Detailed Description checkbox and click the Edit button to enter information about the item (e.g., requirements for completing the item, etc.). This information is shown in J1 Web as well as the Campus Portal, Workflow Status feature (if the workflow is configured to be visible/available to Campus Portal users).
You can include images, links, and code. An accessibility checker is available to ensure content meets accessibility guidelines.
Note
Detailed Descriptions are shown in plain text in J1 Web and design format in the Campus Portal.
Once your content is added, click the Done button.
To reorder when items occur:
From the Stage options drop-down, select Edit item order. The Edit Item Order window appears.
Hover over the arrow icon on the left side of the row until your cursor changes to a hand icon.
Click and hold while you drag the item to the new location.
Release the mouse button.
Repeat these steps as needed.
Click the Save button.
Access the Workflow Definitions page.
Find the workflow you want to add rules to.
From the Actions menu, select Edit Stages. The Edit Stage window appears.
Find the stage or item where you want to add a rule.
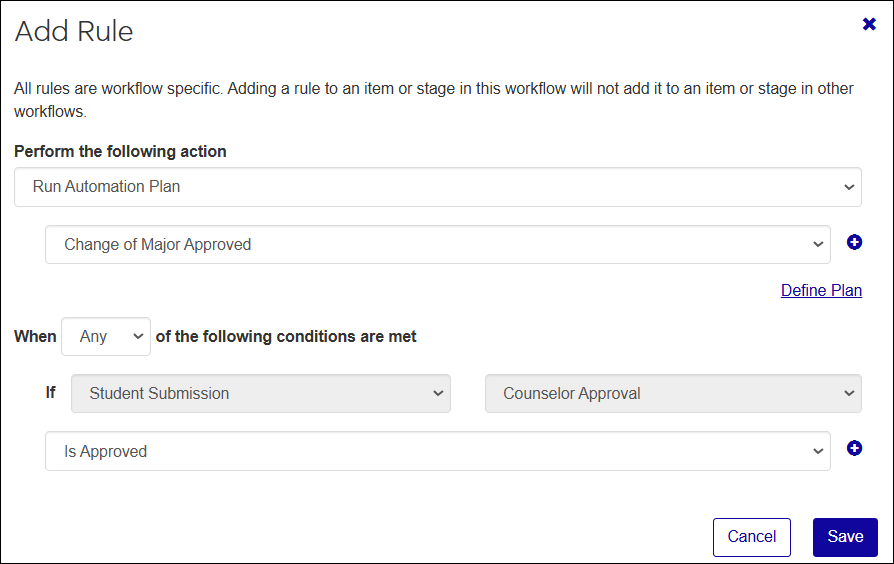
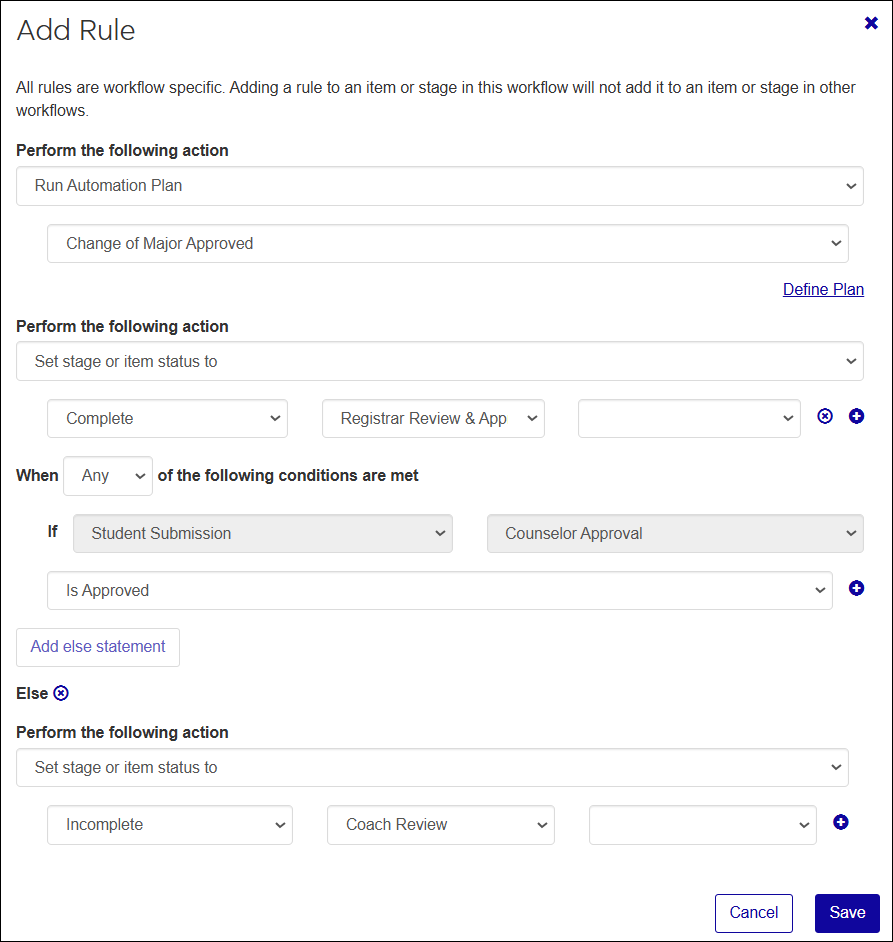
From the Stage or Item options drop-down, select Add rule. The Add Rule window appears.
From the Perform the following action drop-down, select from the following options:
Set stage or item status to option lets you update stage and item statuses based on the status of other stages and items in the workflow.
Associate additional workflow initiates new workflows to individuals or objects
Run Automation Plan kicks off workflow-initiated automation plans
Multiple actions can be associated with a stage or item.
Use the When the following conditions are met options to determine when the action is performed. For example, if an item is approved, then an automation plan might be initiated.
"Else" statements let you differentiate what happens when a condition is met versus when it is not met.
To add another action or condition, click the Plus icons.
Click the Save button.
There are multiple ways to associate a workflow with an individual/object in the system. These procedures step through associating one from the Workflow Definitions page.
Access the Workflow Definitions page.
Find the workflow you want to associate with individuals/objects in the system.
From the Actions menu, select Associate workflow. The Associate Workflow window appears.
Note
Only published workflows can be associated with individuals/objects.
Use the When options to determine when to associate the workflow:
Now associates the workflow with the recipients immediately.
Schedule lets you pick a specific day and time when the workflow should be associated with the recipients.
Use the Recipients options to determine who the workflow will be associated with
People/Organizations lets you choose workflow recipients in the system by name.
Data Set selects workflow recipients through people/organization list data sets.
Click the View recipients button. Recipients are shown.
Note
To see the detailed information about the workflow stages and items that will be applied to the recipient, click the Preview button.
Click the Save button.
Access the Workflow Definitions page.
Find the workflow you want to view.
From the workflow Actions menu, select View instances. The Workflow Instances page appears.
Access the Workflow Definitions page.
Find the workflow you want to update.
From the Status drop-down, select:
Draft is the initial workflow status. Draft workflows can be edited and deleted, but they cannot be associated with individuals or objects. Keep workflows in a draft status until they are complete and ready for use.
Published workflows are ready and available to be associated with individuals and objects by users with association permissions and that belong to a role with the appropriate access code. Published workflows cannot be edited, and once associated with an individual or object, they cannot be deleted or reverted to draft status.
Retired workflows are no longer needed for associating with new individuals or objects in the system. If a workflow is retired while still associated with individuals or objects, it remains visible, and those already assigned to it continue completing its requirements. However, it cannot be associated with new individuals or objects.