Create Incident Reports
Important
Information and features vary according to the roles to which you belong and the permissions associated with those roles. For more information, contact your module manager or your campus support team.
Users with the necessary permissions can create incident reports from the Student Conduct Hub page.
To create and submit incident reports, users must be in one of the following roles with the "Can submit incident reports" permission enabled.
Residence Life Administrator
Student Life Module Manager
Student Conduct - Assistant Director Access by Department
Student Conduct - Director Access by Department
Student Conduct - Incident Reports
On the the Incident Reports page, select the +Create incident report button, or select Create incident report from the Hub options drop-down. The Create Incident Report window opens.
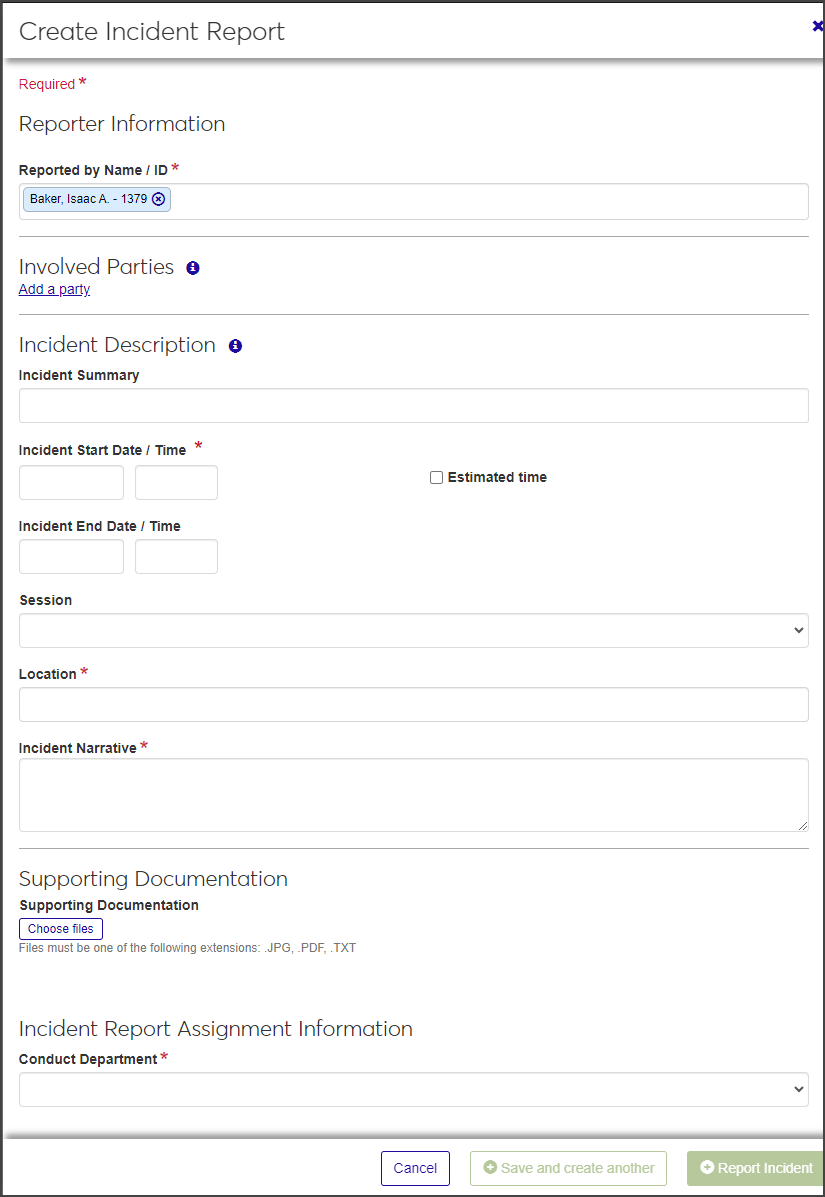
The window is divided into sections: Reporter Information, Involved Parties, Incident Description, Supporting Documentation, and Incident Report Assignment Information.
Required fields are indicated by a red asterisk.
Note
If an incident involved fire, users with edit permissions will add that information after the report is created and saved.
Even if you don't have all the information about the incident, complete the sections to the best of your knowledge. The incident report can be edited at a later date.
In the Reporter Information section, the Reported by Name/ID field autofills with the name and ID of the logged-in user. To change it:
Click the Remove icon to delete the autofilled name.
Begin typing the name or ID number of the reporter in the field and select the correct name when it appears. You can select only one reporter.
In the Involved Parties section, click Add a party. The section expands to show a series of fields:
If the involved party is in your system's database (e.g., a faculty member or student), begin typing the name or ID number of the party in the Involved Party Name / ID field and select the correct name when it appears in the list. Since the person's information is already in the system, the other fields are removed when you select the name.
If the involved party is not in the database (e.g., an external party), complete the name, phone number, email address, and address fields to the best of your knowledge. Only the first and last name are required, but the more information you can include, the better.
To upload a photo of the involved party's ID card, click Choose file under Identification Card Photo, locate the file, and select it. The user configures the file types that are allowed. You can only upload one file.
Repeat steps 2 and 3 for each additional involved party.
In the Incident Description section, enter a brief summary of the incident in the Incident Summary field. The summary should be easily identifiable and searchable.
Click in the Incident Start Date/Time fields and select the start date and time of the incident.
Click in the Incident End Date/Time fields and select the end date and time of the incident.
Select the Session from the drop-down. All currently active sessions are listed as options.
In the Location field, begin typing the name of the location, place, or space (e.g., a residence hall or outdoor area) and select the correct location when it appears in the list.
Enter a detailed description of the incident in the Incident Narrative text field. This field has no character limit.
To add supporting photos or documentation, click the Choose files button in the Supporting Documentation section.
Navigate to the file you want to upload and select it.
In the Incident Report Assignment Information section, select the Conduct Department you are assigning the incident report to.
When you have completed all the required fields, click Save and create another to save the report and clear the fields so you can enter another one. Click Report incident to save the report and close the window.