Recalculate Financial Balances
Important
Information and features vary according to the roles to which you belong and the permissions associated with those roles. For more information, contact your module manager or your campus support team.
The purpose of the recalculation is to locate all transactions in the General Ledger with a U (unposted), C (current), or Y (year) status and bring them back into sync with one of their balances.
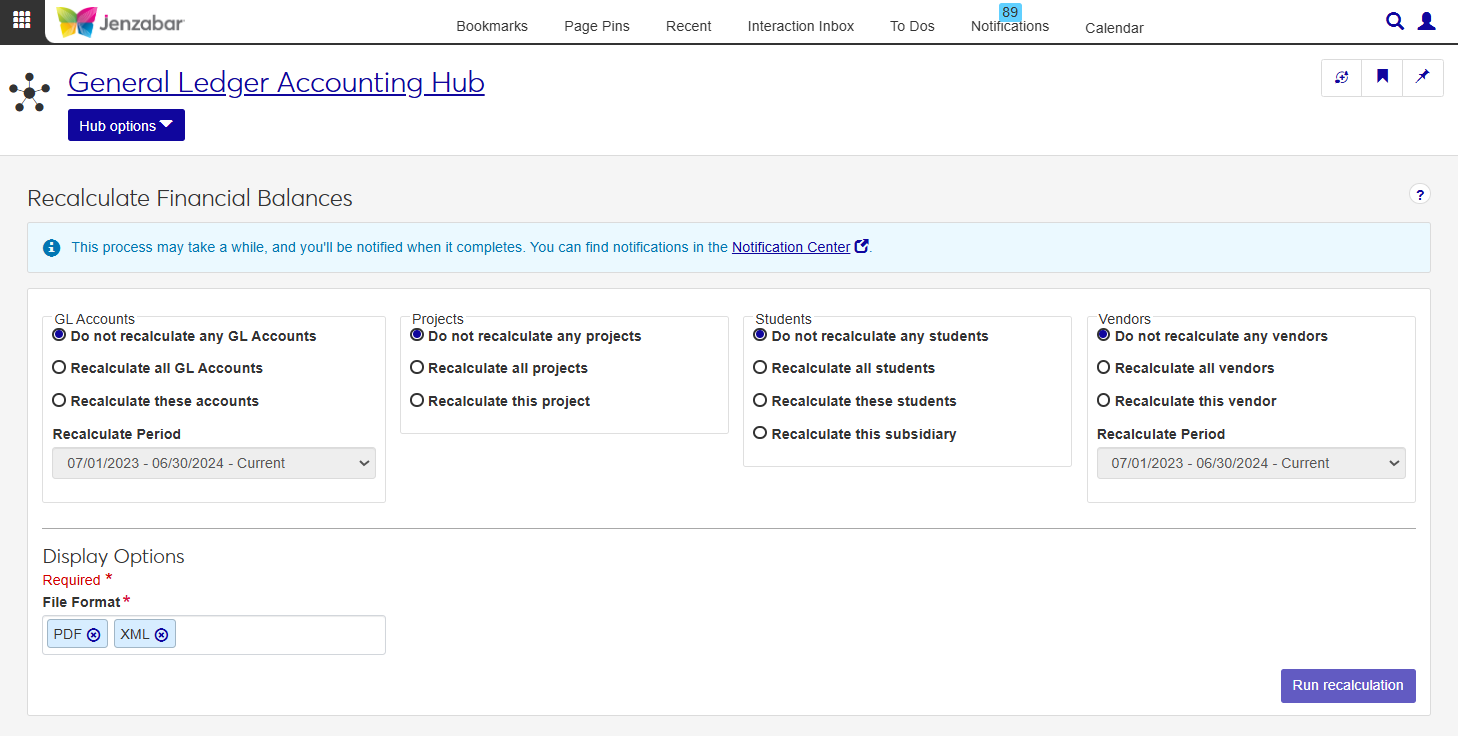
Use this window to run the Recalc process for GL Accounts, Projects, Students and Vendors. Select an option from each section, choose how you would like to receive a report, and start the recalculation.
Users that need to complete the recalculation process need to have the Can recalculate financial balances in the General Ledger Accounting Processing role (or copy).
Recalculation Options
When running a recalc, there are several options to choose the financial information that will be included.
GL Accounts
If GL Accounts are selected for recalculation, pressing the Run Recalculation button will update the GL Master table, Transaction History Table and the Fund Balance Current/Future Table.
Do not recalculate any GL Accounts: No GL Accounts will be included in the recalculation process.
Recalculate all GL Accounts: All GL Accounts will be included in the recalculation process.
Recalculate these accounts: Enables the Select GL Accounts for Recalculation pop-up there you can add specific GL accounts from the Available Accounts datasheet. The number of selected accounts will appear in the Accounts Selected: # button when the pop-up is closed.
Recalculate Period: Use this drop-down to select Current, Future, or Both to determine which GL Accounts to include in the recalculation process.
What happens in the J1 system when GL Accounts are included in the recalc?
Acknowledges a recalc is being run and prevents users from accessing related functions.
Determines the accounts that need to be recalculated, based on the information provided by the user (either recalculate all GL accounts, selected full or partial accounts and/or for a specific recalculation period).
Resets the current year balances (if current year is included in the recalculate period) and future year balances (if a future year is included in the recalculate period). These balances include the encumbered, unposted and posted balances.
This process may take a while, and you'll be notified when it completes. You can find notifications in the Notification Center.
Projects
If Projects are selected for recalculation, pressing the Run Recalculation button will update the Project Definition table and the Project Master table.
Do not recalculate any projects: No Projects will be included in the recalculation process.
Recalculate all projects: All Projects will be included in the recalculation process.
Recalculate this project: Enables the Select Projects for Recalculation drop-down where you can add one specific project from the projects listed.
What happens in the J1 system when Projects are included in the recalc?
Acknowledges a recalc is being run and prevents users from accessing related functions.
Determines the projects that need to be recalculated (either all projects or a specific project that has been selected).
Retrieves the sum and updates Project Balances for the Project Definition and Project Master tables.
This process may take a while, and you'll be notified when it completes. You can find notifications in the Notification Center.
Students
If one of the Recalculate Students options is selected, pressing the Run Recalculation button will update the Subsidiary Master table and the Subsidiary Definition table.
Do not recalculate any students: No students will be included in the recalculation.
Recalculate all students: All students will be included in the recalculation.
Recalculate these students: Enables the Select Students for Recalculation pop-up there you can select students from the Available Students datasheet. The number of selected students will appear in the Students Selected: # button when the pop-up is closed.
Recalculate this subsidiary: Enables the Select Subsidiary for Recalculation drop-down where you can add one specific subsidiary from the available list.
What happens in the J1 system when Students are included in the recalc?
Acknowledges a recalc is being run and prevents users from accessing related functions.
Determines the Students and Subsidiaries that need to be recalculated, based on the selected options.
Retrieves the sum of appropriate transactions and update balances for the Subsidiary Master table.
If any payment plan criteria is set up, a recalculation of the payment plan balances will take place.
Retrieves the sum and updates the cumulative balances for the Subsidiary Definition table.
This process may take a while, and you'll be notified when it completes. You can find notifications in the Notification Center.
Vendors
If one of the Recalculate Vendors options is selected, pressing the Run Recalculation button will update the vendors on the AP Master table and Transaction History table.
Do not recalculate any vendors: No vendors will be included in the recalculation.
Recalculate all vendors: All vendors will be included in the recalculation.
Recalculate this vendor: Enables the Select Vendor type-ahead where you can add one specific vendor. Start typing the name of the vendor you want included in the recalculation. You may only pick one.
Recalculate Period: Use this drop-down to select Current, Future, or Both to determine which Vendors to include in the recalculation process.
What happens in the J1 system when Vendors are included in the recalc?
Acknowledges a recalc is being run and prevents users from accessing related functions.
Determines the vendors that need to be recalculated based on the selected options.
Retrieves and updates the sum balances for the AP Master table, specifically focusing on the Amount Invoiced YTD, Amount Paid YTD and Lifetime to Date columns.
Updates the date of the last invoice for each vendor subsidiary on the Transaction History table.
This process may take a while, and you'll be notified when it completes. You can find notifications in the Notification Center.
This section allows you to choose the format(s) you want for the Recalculation Confirmation Report. Your options include:
CSV
DIF
HTML
PDF
PSR
SQL
TXT
XLSX
XML
Access the Recalculate Financial Balances page.
Use the options to choose the financial information that will be included in the recalculation:
GL Accounts
Projects
Students
Vendors
Select one or more File Format options. You can select from:
PDF
CSV
DIF
HTML
PSR
SQL
TXT
XLSX
XML
Click Run recalculation. This process may take a while, and you'll be notified when it completes. You can find notifications in the Notification Center.