Degree Definitions
Important
Information and features vary according to the roles to which you belong and the permissions associated with those roles. For more information, contact your module manager or your campus support team.
Overview
Every degree offered by your institution will need to be defined on the Degree Definitions page with a degree code. You may also need to define degrees that are not offered at your school for degrees earned by students at other institutions. Each degree requires a code and a description. Additionally, there are several optional fields for indicating institutional reporting values that may be required for your school. These fields include IPEDS Award Level, NSC Enrollment Credential Level, and others. These fields are optional and will depend on your school's reporting requirements.
Degree definitions are stored in the degree_definition table.
Degree definitions can also be managed in Desktop, on the Degree Definition window.
Degree definitions are used widely throughout the Jenzabar One system, including faculty degree history, institutional reporting, and student information.
Field | Note |
|---|---|
Code | Up to 5 characters. Required. Not editable once created. Must be unique. |
Description | Up to 100 characters. Required. |
IPEDS Award Level | Select the equivalent IPEDS Award Level from the drop-down menu. IPEDS Award Levels are maintained on the IPEDS Award Level Definitions page. These levels are assigned to CIP codes on the CIP Definitions page and assigned to degrees on the Degree Definitions page. IPEDS Award Levels appear in the IPEDS Completion report. |
PESC Award Level | Select the equivalent PESC (Postsecondary Electronic Standards Council) Award Level from the drop-down menu. The default values are provided by Jenzabar. For more information, see the J1 Desktop help topic for PESC Award Levels or visit pesc.org. |
NSC Enrollment Credential Level | Select the equivalent NSC Enrollment Credential Level from the drop-down menu. This drop-down contains degree codes recognized by the National Student Clearinghouse (NSC) for Enrollment reporting. The codes are maintained on the NSC Program Credential Level Definitions page. |
NSC Degree Verify Level | Select the equivalent degree code recognized by the NSC Degree Verification Service. These codes/descriptions are provided by default and cannot be modified or deleted, and new codes/descriptions cannot be added. |
Enrollment Level | Select the equivalent Enrollment Level from the drop-down menu. Oklahoma schools must assign enrollment levels to each degree code to meet state reporting requirements. Use of enrollment levels is optional for other schools. Enrollment levels are defined on the Enrollment Level Definition page. |
To manage Degree definitions, you must belong to a role with "Can manage degree definitions" enabled. Jenzabar provides this permission with the Registration Module Manager and Registrar default roles, but your school may have created a customized version of this role.
From the Registration Administration hub, under Hub options, click Manage Definitions, and select Degree definitions. You can also use the global search in the top right-hand corner of the system. The Degree Definition page appears.
Enter characters, words, or phrases in the Quick Filters to limit the list of definitions.
Click a heading to sort the list by that column.
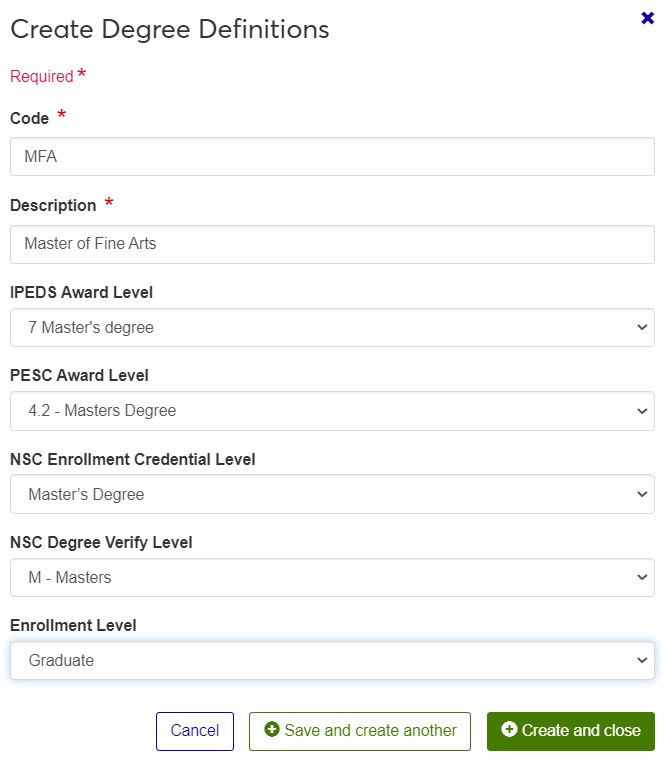
Click the Create definitions button.
Enter a unique Code (required), up to 5 characters.
Enter a Description (required), of up to 100 characters.
Choose an IPEDS Award Level from the drop-down (optional, but needed for IPEDS and NSC reporting).
Choose a PESC Award Level from the drop-down (optional, but needed for electronic transcripts).
Choose an NSC Enrollment Credential Level from the drop-down (optional, but needed for NSC reporting).
Choose an NSC Degree Verify Level from the drop-down (optional, but needed for NSC reporting).
Choose an Enrollment Level from the drop-down (optional, but needed for Oklahoma state reporting).
Click either Save and create another or Create and close.
Click the Edit icon
 on the row of a definition. The edit pop-up opens.
The Code is not editable, but all other fields are. Edit the available fields as needed.
Click Update.
Select the checkboxes next to the rows you want to export.
From the Options drop-down, select Download to Excel. The Download to Excel pop-up opens.
Select options for the Excel format and data columns.
Click Download. Your .xlsx or .zip file is saved in the file location that you have set in your browser settings.