Automated Advisor Assignments
Important
Information and features vary according to the roles to which you belong and the permissions associated with those roles. For more information, contact your module manager or your campus support team.
Use the Automated Advisor Assignments page to maintain advisor sets and set up automatic assignment of advisees to them. The process runs each day for all advisor sets, but you can run it on-demand for selected sets when you need an immediate update.
Tip
 You can watch the Automated Advisor Assignments overview video and then return to this help topic for details and instructions.

An advisor set is a grouping of primary advisors with a common purpose.
Notice
You might have sets like these:
Freshmen
At-Risk
Nursing
Paralegal
Each set can contain multiple primary advisors, and you configure how advisees are assigned to each of the advisors.
The Advising Groups window in Desktop is a similar concept, but J1 Web Advising Sets are not exactly the same. Desktop advising groups are not ported to J1 Web, so you'll create new advising sets in J1 Web.
Advisor Set information (such as set name, advisors assigned, and rules) is stored on the AssignmentSetXXX tables. The automated assignment process updates the Advisor Student table (advisor_stud_table). The AssignmentSetAppID column indicates which advisor set created the assignment.
Advisor sets are used here and on the Manage Advisors page.
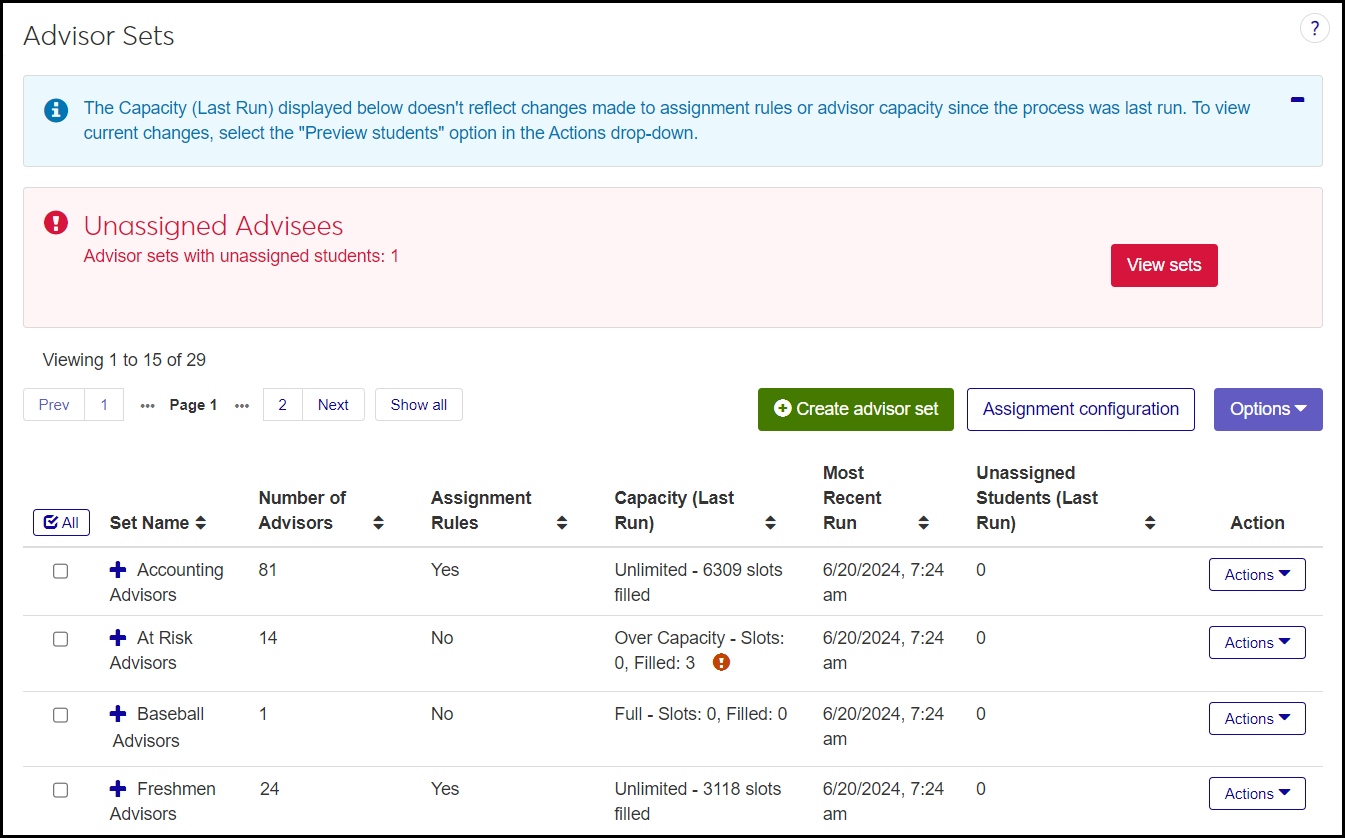
Use the Advisor Sets Filter to narrow the list. For example, you can restrict the list to sets containing particular advisors, sets that don't yet have assignment rules, or sets that aren't full.
If there are sets with unassigned advisees, an alert appears near the top of the page. In the alert, click View sets to restrict the list to sets with unassigned advisees. For such sets, click the number of unassigned students to see details, including why the students haven't been assigned.
Set Name: Up to 50 characters. Required. Must be unique.
Number of Advisors: Read only. A count of the advisors assigned to the set.
Assignment Rules: Read only. Yes or No. If the set doesn't have assignment rules, the automated process won't add advisees to it. Use the Actions menu to add or edit assignment rules. You can either use existing data sets (Freshmen, for example), or create custom rules. See "Rules for Advisor Sets" below.
Capacity (Last Run): Status, slots allotted, and slots filled as of the last time the process ran.
Status: Full, Over Capacity, Open, or Unlimited
Full: All advisors in the set have reached capacity.
Over Capacity: At least one advisor is over capacity. (This can happen only if Allow Capacity Overload is set to Yes on the Assignment Configuration pop-up.)
Open: At least one advisor hasn't reached capacity.
Unlimited: At least one advisor has no limit, so the set has no capacity limit.
Warning
If a set has an advisor with unlimited capacity, and if the Assignment Configuration is for filling each advisor alphabetically to capacity, then the process will stay on the unlimited advisor once it reaches them.
Tip
If you select the "Fill advisor capacity in alphabetical order" configuration, make sure you don't have advisors with unlimited capacity.
Slots: The sum of the capacity of all the advisors in the set
Filled: The total of advisees assigned in the set as of the last time the process ran
Note
If the process has never yet been run on the set, then a note says "Not Run".
Most Recent Run: The date and time the process last ran. A warning message notifies you if changes have been made to either the advisors in the set or the assignment rules since the last run. Click it to see the changes.
Unassigned Students (Last Run): The number of students who meet the rules for the advisor set but haven't been assigned because the set is full. The number is a link that opens the Unassigned Students (Last Run) pop-up. There, you can manually assign the students to an advisor by selecting the students, and clicking Options > Assign to Advisor.
Note
This column appears only if Allow Capacity Overload is set to No in the Assignment Configuration pop-up.
Advisors in Set: Names and IDs of all the advisors in the set
Last Edited: Date and time that either the list of advisors in the set or the assignment rules were changed
Set Locked: Yes or No as selected on the Edit Advisor Set pop-up with the Lock assignments checkbox. When a set is locked, students assigned to the set can't be removed. Even if the students no longer match the set's rules, they won't be removed by the daily runs or when you run the process on demand.
Status: Whether the set is Active or Inactive.
Warning
Inactive sets aren't included in the automated daily process. However, you can include inactive sets when you run the process on demand.
Tip
Why make a set inactive? Suppose there's a set you don't want updated daily, but only at the beginning of a term or just after the census date, for example. You can make it inactive and select it when you run the process on demand.
Set Rules: The rules for assigning students to the set, as configured in the Assignment Rules pop-up. Example: Athletics is Baseball and Classification is Freshmen.
On the Automated Advisor Assignments page, you can add or edit rules for assigning students to a particular advisor set. You can either use existing data sets (such as Freshmen or Accounting Majors) if you have them, or you can create custom rules to find and assign students.
The custom rules consist of one or more conditions that either are or are not met. The rules have a subject, the verb "is" or "is not", and an object. The subject is a field in the app, and the object is its value. For example, a rule could be "Classification is Sophomore". Another rule could be "Major is Accounting, and Academic Standing is not Probation".
These are the condition subject fields available:
Fields | J1 Web Location | Database Location |
|---|---|---|
Academic Standing | Student Information Details page > Enrollment tab | student_master.cur_acad_probation |
Athletics | Desktop: Sports Tracking | sports_tracking.id_num |
Attribute | Student Information Details page > General Information tab | attribute_trans.attrib_cde |
Certification | Student Information Details page > Program tab | degree_history.certification_1 |
Class | Student Information Details page > General Information tab | student_master.current_class_cde |
Concentration | Student Information Details page > Program tab | degree_history.concentration_1 |
Course Location | Manage Section Details page > Schedule tab: Campus, Place, Space fields | section_master.loc_cde |
Division | Student Information Details page > General Information tab | student_master.cur_stud_div |
International Student | A student's Person Information Details page > Biograph tab: Citizenship Status If the status is neither C - Citizen of US nor U - Unknown, then the student is marked as an International Student. | biograph_master.citizenship_sts |
Major | Student Information Details page > Program tab | degree_history.major_1 |
Main Location | Student Information Details page > General Information tab: Campus | student_master.loc_cde |
Minor | Student Information Details page > Program tab | degree_history.minor_1 |
Registration Control Group (also called Tel/Web Group, Web Group, and Registration Group) | Student Information Details page > Enrollment tab | student_master.tel_web_grp_cde |
The operators are always "Is" or "Is not".
The condition objects are the values defined for the condition subjects. (For example, the values for Classification are the definitions maintained on the Classification Definitions page.)
The permission needed is "Can manage advisor sets" in the Academic Advising Module Manager role or roles copied from it.
In the Advising Administration hub, click Hub options, and select Advisors and Advising Setup > Automated Advisor Assignments. The Automated Advisor Assignments page opens showing the Advisor Sets list.
To filter the list, use the Advisor Sets filter.
If there are unassigned advisees in any set (because the students met the rules of the set, but the set was full), an Unassigned Advisees alert appears. To view only those sets with unassigned advisees, click View sets in the alert. To return to the complete list, use the Advisor SetsFilter.
To view additional fields for a row, click the Expand icon
 .
.To work with a particular set, use the Actions drop-down.
To work a group of sets, select the checkboxes on their rows, and use the Options drop-down.
Click the Assignment configuration button. The Assignment Configuration window pops up.
Under each heading, select a radio button.
Method
Fill advisor capacity equally: The process assigns one student to each advisor in the set, and then another student to each, and then another, and so on.
Fill advisor capacity in alphabetical order: The process fills the capacity of the first advisor, then fills the capacity of the second advisor, and so on.
Warning
Don't select this option if you have sets containing an advisor with unlimited capacity. With this option, if the process reaches an advisor who has unlimited capacity, it will assign all the rest of the advisees for the set to that advisor. It will never move on to another advisor.
Update Sets Automatically
Yes: The assignment process runs automatically each night. You can also run it on demand as needed.
No: The process never runs automatically. Instead, you run it on demand as needed.
Allow Capacity Overload
Yes: The process can overload advisors beyond their capacity. After all the advisors in the set have reached capacity, the process begins overloading advisors.
No: The process won't overload advisors. Students beyond the set's capacity remain unassigned.
Click Save.
Click the Create advisor set button. The Create Advisor Set pop-up opens.
Enter an Advisor Set Name. Up to 50 characters. Required. Must be unique.
Under Select Advisors for Set, select a radio button.
Advisor / ID: Begin entering a name or ID, and select it from the list. You can add multiple advisors.
Data Set: Click the drop-down, and select a data set.
Click Add advisors. The advisors appear on the list below, but the set is not yet saved. Their advising role and their capacity appears, too.
If necessary, click the Remove icon
 to remove an advisor from the set.
Click Create the set. The advisor set is saved. See instructions to "Add Assignment Rules to a Set or Edit a Set's Rules".
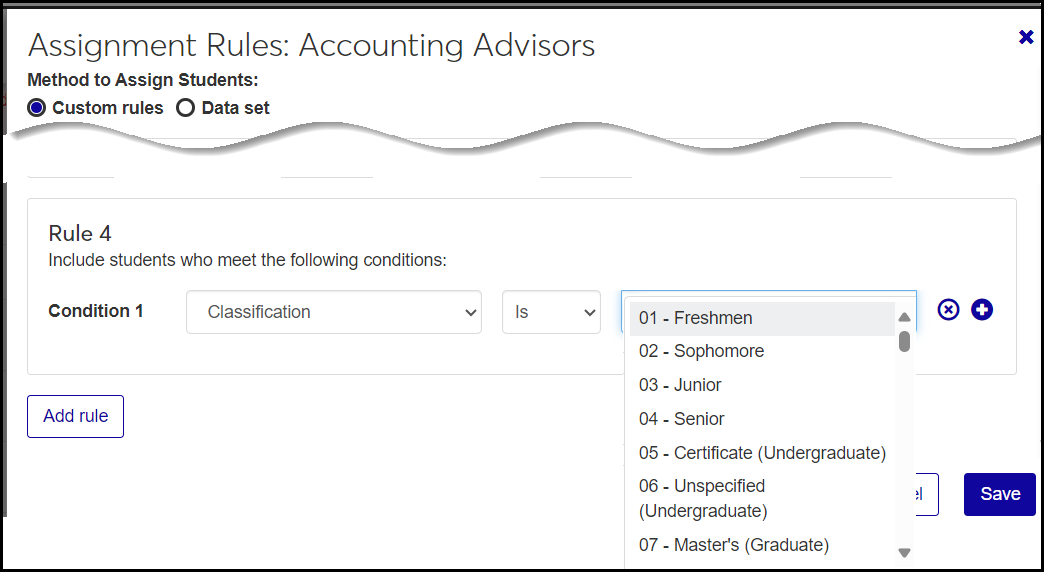
On the row for a set, click the Actions drop-down, and select Add assignment rules. (If the set already has rules, select Edit assignment rules.) The Assignment Rules pop-up opens.
Under Method to Assign Students, select a radio button.
Custom rules
Click Add rule. The Rule 1 row appears.
Select a condition subject in the drop-down. (This is a field for the process to search, such as Academic Standing or Major.)
Select an operator in the drop-down: Is or Is Not.
Select a condition object in the drop-down. (This is a value in the selected condition subject, such as English for Major.)
To add another condition to the rule, click the Add icon
 .
.To remove a condition from the rule, click the Remove icon
.To add a another rule, click Add rule.
Data set
In the Data Set drop-down, select a value.
Tip
For information on creating data sets for assigning students, see "Create a Data Set for Assignment Rules" below.
Click Save. The data set or rules are now assigned to the advisor set. The Assignment Rules pop-up closes. The next time the process runs on demand or in its daily run, the students will be assigned.
To preview the students who will be assigned in the next run (and those who are already assigned), click Actions, and select Preview students.
Create a data set file using a third-party application (Bold Reports, InfoMaker, Rest API, Source, or SQL for example).
Note
Data sets are created by your school's IT team on the Data Sets page in the Campus-Wide Definitions hub. Ask them to create the data sets you need.
Note
The first column must be the ID Number, and it must have the alias "[IdNumber]". This is the only required column.
From the Campus-wide Definitions hub, click the Hub options drop-down, and select Data Sets. The Data Sets page opens with the People/Organization Lists view selected.
Click the Create data set button.
In Name of Data Set, enter a name.
In Classification, select Advisor Set Advisees.
In Select Modules Allowed to Access the Data Set, select Advising and Advising Meeting.
In Type, select the type of file you've made for your data set (Bold Reports, InfoMaker, Rest API, Source, or SQL).
Click the Choose file button. The file navigation opens.
Navigate to the file. Select it, and click the Open button. The file is selected.
Click the Create data set button. Your data set is now available in the Assignment Rules pop-up on the Automated Advisor Assignments page.
To view the details of your data set (still on the Data Sets page in the Campus-wide Definitions hub), click the Actions drop-down on the row of your data set, and select View Details. The View Details pop-up opens. To download the details, click the Download button.
Note
View Details and Download may not be available for every Type. They are available for InfoMaker and SQL.
The preview shows the students already assigned to the set and those who will be assigned at the next run of the process.
On a set's row, click Actions, and select Preview students. The Preview Students pop-up opens. The list of students appears showing their major and classification.
To filter the list, type a search term in the Quick Filters field. You can search any or all of the columns (Student / ID, Major, Classification, Assigned.) You can enter more than one search term.
Note
The filter finds students that meet any (not necessarily all) of your search terms. For example, if you enter "Junior", it restricts the list to Juniors only. However, if you enter "Junior" and "Computer Science", the list shows all Juniors and all Computer Science majors.
The Assigned column shows these values:
Yes if the student is already assigned to an advisor.
Pending Add if the student will be assigned on the next run of the process.
Pending Drop if the student's assignment will be removed on the next run of the process.
To download all or part of the list to a spreadsheet, select checkboxes, click Options, and select Download to Excel.
Editing an advisor set means changing the list of advisors in the set.
On a set's row, click the Actions drop-down, and select Edit Advisor Set. The Edit Advisor Set pop-up opens. The current list of advisors in the set appears.
To remove an advisor, click the Remove icon
on their row.To remove all the advisors, click the Remove all button.
To add advisors:
Under Select Advisors for Set, click a radio button.
Advisor / ID: Begin entering a name or ID, and select it from the list. You can add multiple advisors.
Data Set: Click the drop-down, and select a data set.
Click Add advisors. The advisors are added to the list but not yet saved.
Click Save.
If the advisor set itself isn't locked (in the Edit Advisor Set pop-up), then you can lock or unlock individual assignments within the set.
Tip
If a set is locked, the process (daily or on-demand) doesn't remove students who no longer match the set's rules.
On a set's row, click the Actions drop-down, and select Manage set assignments. The Manage Set Assignments pop-up opens. The current list of advisors in the set appears, with a row for each of their advisees. (So if a particular advisor has 12 advisees in the set, that advisor is listed 12 times.)
Note
If the advisor set itself is locked, an alert informs you that you can't lock and unlock individual assignments. You can unlock the set on the Edit Advisor Set pop-up.
To change one assignment from Locked to Unlocked or vice-versa, click the Locked (or Unlocked) button. Your change is saved automatically.
To change multiple assignments from Locked to Unlocked or vice-versa, select the checkboxes for assignments. In the Options drop-down, select Unlock Assignments (or Lock Assignments). Your changes are saved automatically.
To add advisors:
Under Select Advisors for Set, click a radio button.
Advisor / ID: Begin entering a name or ID, and select it from the list. You can add multiple advisors.
Data Set: Click the drop-down, and select a data set.
Click Add advisors. The advisors are added to the list but not yet saved.
Click Save.
Email is available for all J1 Web users. Text communications are available for schools with the Communications Plus license.
On a set's row, click Actions, and select Send communication. The Create New Communication pop-up opens with the advisors in the set listed as recipients.
Follow the prompts to complete your communication. For more information, see the Communication Management help topic.
Click Send.
On a set's row, click Actions, and select View advisor details. The Advisor Details pop-up opens. Each advisor in the set is shown in a card with this information:
Advisor Capacity Status: Shows the percentage of their capacity that's filled in a horizontal bar chart.
Percentage of Capacity Filled: A horizontal status bar with the percentage printed in it
Status: Full, Over Capacity, Open, or Unlimited
Slots: The total number of students the advisor can advise
Filled: The number of advisees assigned to the advisor
Available slots: The number of students that can still be assigned to the advisor before they reach capacity
Advisees from set: The number of advisees that were assigned through the advisor set rather than manually assigned individually
Manual assignments: The number of advisees that were assigned manually rather than through the advisor set
Advisor sets: The list of advising sets that assigned advisees to this advisor (and the count of advisees assigned by each of the sets)
To open an advisor's Summary page in a new tab, click their name or ID.
To edit an advisor's settings:
Click the Ellipsis icon (. . .) on the advisor's card.
Select Edit advisor settings. The Advisor Settings pop-up opens.
You can edit the Advising Capacity by changing the number or switching to or from the Unlimited radio button.
You can switch the Advisor Status to Active or Inactive.
Click Update. Your changes are saved.
To send a communication to one advisor:
Click the Ellipsis icon (. . .) on the advisor's card.
Select Send communication. The Create New Communication pop-up opens with the advisor as recipient. Follow the prompts to fill in the communication.
Click Send.
To view and edit an advisor's advisees:
Click the Ellipsis icon (. . .) on the advisor's card.
Select View and edit advisees. The advisor's Advisee List opens.
Use the filter to narrow down the list as needed.
To add advisee assignments to the advisor:
Click the Add advisee button. The Assign Advisees to Advisor pop-up opens.
In the field, begin typing a student name or ID, and select from the list. You can add multiple students.
Click Add advisees. The students are assigned to the advisor, and the pop-up closes.
To assign advisees to multiple advisors, click the link to open the Manage Advisees page.
To remove advisee assignments from the advisor, do either of these:
Click the Remove icon
on an advisee's row.Or select the checkboxes for one or more advisees, and click Options > Remove advisees.
To change the Advising Relationship between the advisor and an advisee, do either of these:
In the Advising Relationship column on an advisee's row, click the button to change the relationship to Active or Inactive.
Or select the checkboxes for one or more advisees, click Options, and select either Set Relationship to Active or Set Relationship to Inactive.
To send a communication to selected advisees:
Select the checkboxes for one or more advisees, click Options, and select Send communication. The Create New Communication pop-up opens with the selected advisees as recipients.
Follow the prompts to fill in the communication.
Click Send.
Select the checkbox for one or more advisor sets.
Click Options, and select Edit selected status. The Edit Status for Selected Advisor Sets pop-up opens. It lists the Set Name, Capacity, and Status.
Under Select a Detail to Update, use the drop-down to select either Active or Inactive.
Click Update.
Select the checkbox for one or more advisor sets.
Click Options, and select Run Automated Advisors Process. A pop-up lists the included sets and also the sets that can't be processed (if they have no advisor, for example).
Click Yes, run. The process runs in the background, and you can continue working in J1 Web. You'll be notified when the process is complete.
Ask your school's IT team to create a data set in the Advisees Classification of students who don't have a primary advisor. They should make the data set available to the Advising module.
On the Manage Advisees page, click the View Advisees by Data Set drop-down.
In the Data Set field, begin typing the name of the data set, and select it from the list.
Click the Select button. The students who need a primary advisor appear.
To assign these students to an advisor manually:
Select the checkboxes for some students.
Click the Options drop-down, and select Assign to advisor. The Assign to Advisor pop-up opens.
In the Advisor / ID field, begin typing a primary advisor's name or ID, and select it from the list.
Click the Yes, assign button. The students are assigned to the advisor, and the pop-up closes.
To use automated advisor assignments for these students:
Note
The steps below represent a simplified scenario where you want to assign all unassigned students to a single advisor set. Your real-life scenarios will be more nuanced, but this gives you an idea of the steps.
On the Automated Advisor Assignments page, create an advisor set for assigning these students (or edit the rules for an existing set).
On the row of the advisor set, click the Actions button, and select Add assignment rules. The Assignment Rules pop-up opens.
Select the Data set radio button.
In the Data Set field, select the data set that's for students without a primary advisor.
Click Save. The pop-up closes. The students will be assigned to this set according to your Assignment Configuration settings. See the Automated Advisor Assignment topic for details.
Select the checkboxes next to the rows you want to export.
From the Options drop-down, select Download to Excel. The Download to Excel pop-up opens.
Select options for the Excel format and data columns.
Click Download. Your .xlsx or .zip file is saved in the file location that you have set in your browser settings.
No. To have advisees assigned, the advisors must be in the Primary Advisor role or a role copied from it. People who have only have other advising roles (Secondary Advisor, Advising Module Manager, and Advising - Access to All Students) are not assigned advisees in this process.
Secondary advisors are assigned in a different automatic process. On the Edit Role page for the secondary advisor role they're in, use the Associations tab to assign them as secondary advisors to students in the academic programs, athletic teams, or campus locations that you select.
Daily runs: On the Assignment Configuration window, if Yes is selected for Update Sets Automatically, then the process runs once a day on all active advisor sets. There isn't currently a scheduler.
On-command runs: You can select any or all sets in the list, click Options, and select Run Automated Advisors Process. A pop-up window lists the included sets and also the sets that can't be processed (if they have no advisor, for example). The process runs in the background, and you can continue working in J1 Web.
Short answer: No, the automated process assigns only active advisees to advisor sets—unless you set up an advisor set to be populated by a data set that includes inactive advisees.
Long answer: You usually want to exclude inactive advisees from the automatic process. (They might be students who already graduated or who are on a leave of absence, for example.)
To exclude inactive advisees, you can use either the "Custom rules" method or the "Data set" method of assigning students to advisor sets.
If you use "Custom rules", inactive advisees are always excluded.
If you use the "Data set" method, make sure the data set you select doesn't include inactive advisees.
Tip
If you have a special case where you need to include inactive advisees in the process, use the "Data set" method of assigning students, and select a data set that does include inactive advisees.
Use the Advisor Sets Filter. Deselect the checkbox for Has Unassigned Students, and click Apply. The other sets return to the list.
No. You can assign advisors to students individually on the Manage Advisors and the Manage Advisees pages. However, this is the place to set up and maintain a system for automatically assigning primary advisors.
On the set's row, click the number of unassigned students. The Unassigned Students window pops-up. At the top, it explains why the students weren't assigned on the most recent run of the process. For example, the advisors might have reached capacity. To resolve the issue, you could do any of the following:
Add an advisor to the set.
Add capacity to one or more advisors.
Create a new set.
Manually assign the student to an advisor who has capacity.
The list of advisees might be too long. To see a set's list of students, click Actions, and select Preview students.
If the advisor has been assigned the role in Desktop but not in J1 Web, this field says "Desktop Only". For J1 Web Advising to work properly, you must assign the advisor to the role in J1 Web.
No. If a set is locked, then all the assignments in it are locked, and you can't change them. If you unlock the set, then you can lock and unlock individual assignments.
In the Actions drop-down, select Edit advisor set. In the pop-up, select or deselect the Lock assignments checkbox. Click the Save button.
In the Actions drop-down, select Manage set assignments. In the pop-up you can lock and unlock individual assignments or use the Options drop-down to change selected assignments.
Make the set inactive:
In the Actions drop-down, select Edit advisor set. The Edit Advisor Set pop-up opens.
Select the checkbox for Lock assignments.
Click the Save button. The Edit Advisor Set pop-up closes. The set is excluded from daily runs, but you can include the set when you run the process on demand.
Perhaps that advisor has unlimited capacity, and the configuration is set to "Fill advisor capacity in alphabetical order". That means that once the system starts assigning to that advisor, it will never move on to the next advisor.
Notice
The configuration is set to find advisors alphabetically and fill them to capacity before moving to the next. A set has 3 advisors with the following capacities: Abdul 5, Bao unlimited, and Cara 10. The system finds 25 students that match the set's rules. It gives the first 5 to Abdul. It then gives 15 to Bao. Cara gets 0. And in every run from now on, if any more students match the rules, they'll go to Bao. Cara will never get any because Bao never reaches capacity.
Tip
If you select the "Fill advisor capacity in alphabetical order" configuration, make sure you don't have advisors with unlimited capacity.
The Manage Advisors page shows a list of all users who are in at least one advisor role. From each advisor's row, you can view their advisee list.
The Manage Advisees page shows a list of all students who have at least one advisor assigned. From each advisee's row, you can view their advising team.