Define a Document Interaction

Note
To generate document interactions, the appropriate document storage permissions must be in place. See the Set Up Document Storage section for more information.
Document interactions let you generate personalized Word documents such as letters that can be printed and mailed to constituents or generated as a PDF that can be used as an email attachment. Similar to MS Word’s mail merge features, documents can be set up to include data merge fields so they are tailored to each recipient.
Tip
Communication Management uses a third-party tool to generate the Word files, which means your school doesn't need to install Microsoft Office on your J1 Web server.
When a document interaction is generated, it’s stored in the Desktop Document Storage feature and associated with student and organization records so it can be downloaded and viewed. From J1 Web, users with the appropriate permissions can see who it was generated for in detail. For more information, see the Using Document Storage with Communication Management topic.
Tip
Document Settings determine how many pages will be included in a document interaction when it’s saved in Document Storage. If the document’s total page count exceeds the number configured, then more than one document will be stored.
Remember that the number of pages in a document may be impacted by the number of characters in merged data fields used in the document.
As a part of the define document interaction process, you'll upload a MS .dotx file.
Templated interactions are reusable communications your school sends out repeatedly. They can be sent individually or grouped in an automation plan and sent according to a schedule. For example, your school might send waitlist, acceptance, and student housing letters every spring. You can use these interactions as templates and reuse them every year.
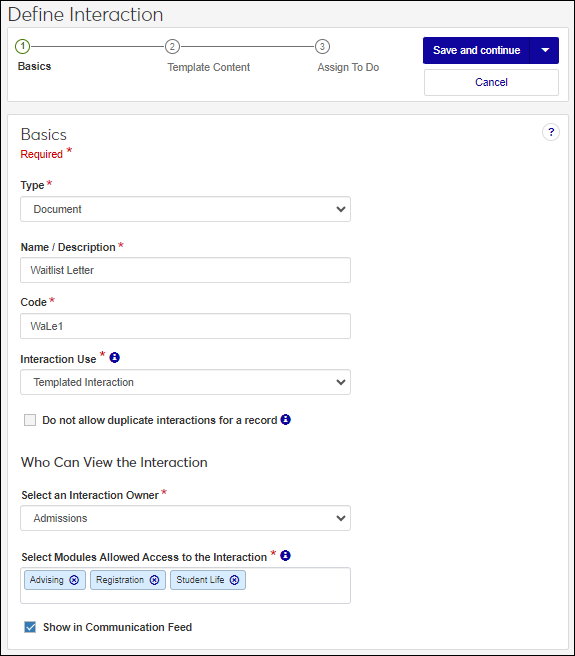
Access the Communication Management, Define Interaction page.
From the Type drop-down, select Document.
In the Name/Description field, enter a recognizable name or description for the interaction.
In the Code field, a unique code is generated for you or you can choose to enter your own unique identifier. Codes cannot be more than 15 characters.
From the Interaction Use drop-down, select, Templated Interaction.
If you want to keep the same interaction from being sent to an individual or organization more than once, select the Do not allow duplicate interactions for a record checkbox.
From the Select an Interaction Owner drop-down, select the module/department that is primarily responsible for this interaction type.
Note
If you select a default interaction access code from Communication Preferences (My General Settings), it will be shown here; however, you can change it as needed.
In the Select Modules Allowed Access to the Interaction, start typing and select the modules you want to be able to access the interaction.
Tip
Users in roles with permission to this module code will be able to view and depending on their permissions, work with this interaction. Consider who on campus would benefit from being able to view and potentially comment on this interaction. For example, registrars and advisors may benefit from similar information about a student.
If you want the interaction to be available in an individual’s or organization’s feed, select the Show in Communication Feed checkbox.*
* Available with Communications Plus.
Tip
If sensitive FERPA or HIPPA information might be included in the interaction, it might be better to not include it in the communication feed.
Click Save and continue. The Template Content page appears.
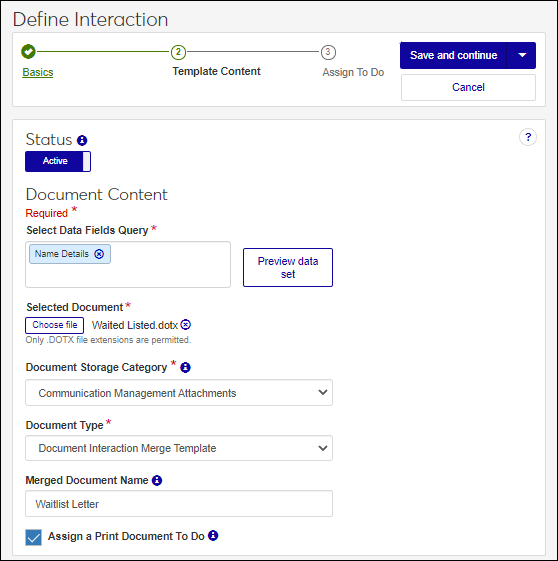
To make the interaction available for use, click the Status option to make it active.
To use data fields in the document, select a Data Fields Query. Fields are shown as placeholders that are replaced with content when the document is generated. For example, PREFERRED_NAME is replaced with the recipient’s preferred name.
Tip
Take a screenshot of the data set preview for the next step.
Once you determine the data set you plan to use to personalize the document, create your MS Word .DOTX file (if you haven't already).
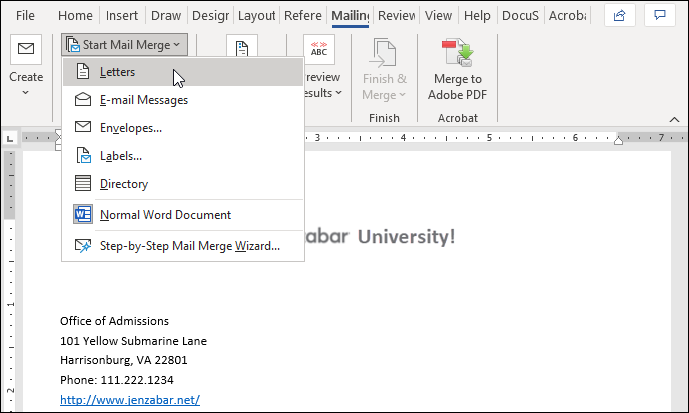
Create a new Microsoft Word document.
On the Mailings tab, click Start Mail Merge and select Letters.
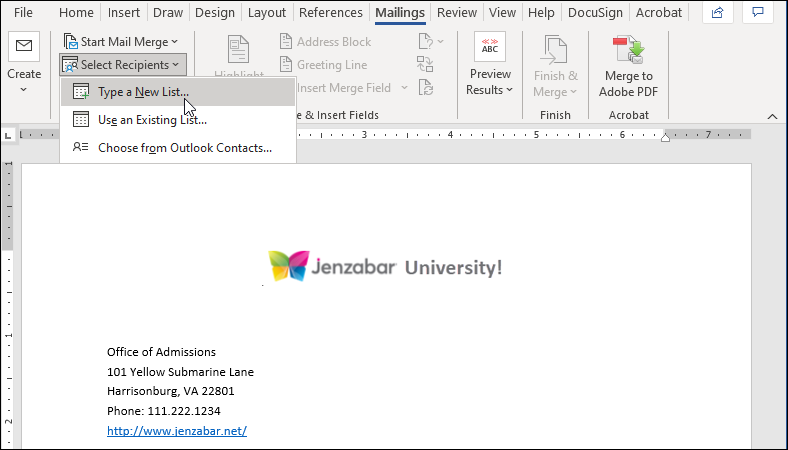
Click Select Recipients and select Type a new list.
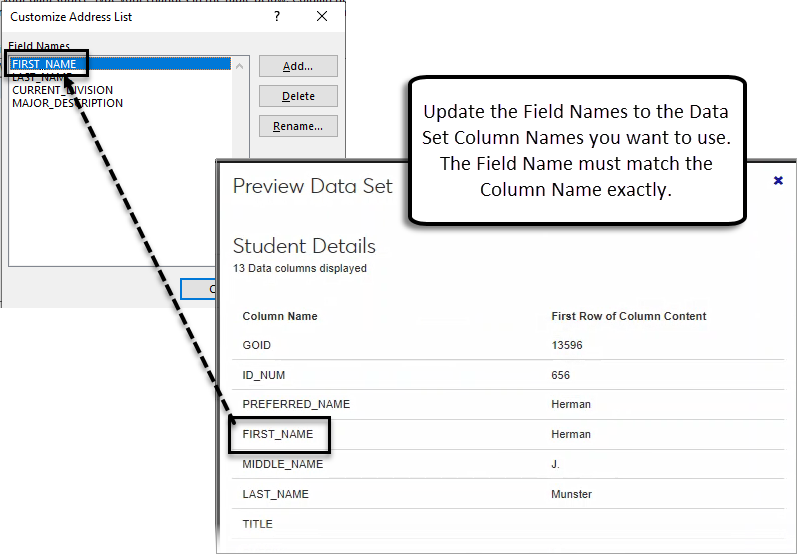
From the New Address List, click Customize Columns. The Customize Address List window appears.
Add Field Names for each data set Column Name you want to use.
Once you've added all the fields you want, close the Customize Address List window. The New Address List window reappears.
Click OK and save the file as an mdb. It will not be used in the processing and can eventually be discarded. The document reappears.
Enter your content and Insert Merge Fields where desired.
Save the Word document as a .dotx file to a location you will be able access and upload it from J1 Web.
Click Choose file to upload the document you created in Step 13.
Tip
File size limits are defined in the Desktop, Document Storage Setup, Make File Extensions Available window.
Note
Only .dotx files are allowed at this time.
From the Document Storage Category and Document Type drop-downs, select how the document will be categorized in Document Storage. How the document is categorized determines where it will be stored in Document Storage and who can access it.
Note
Document storage category and type options are determined by Document Storage settings managed in the Desktop.
Only users with permission to a selected category will be to view the document that gets generated.
In the Merged Document Name field, enter a recognizable name for the document.
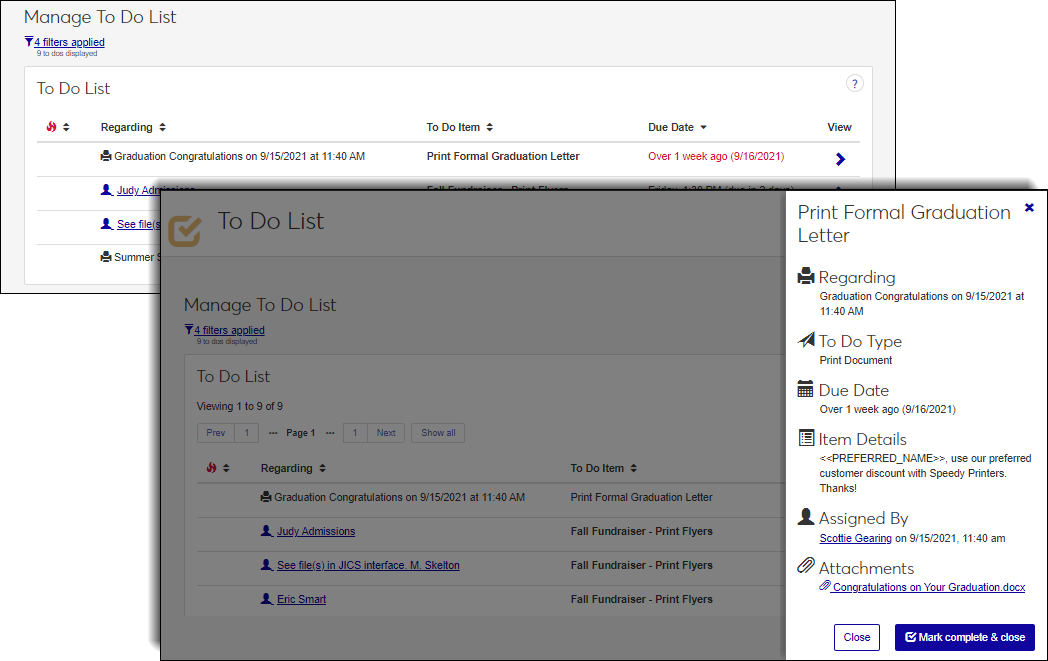
Select Assign a Print Document To Do to create and assign a print document task. Assigned individuals will receive a To Do with the generated document attached.
Click Save and continue.
If you did not select the Assign a Print Document To Do checkbox, proceed to the next step.
If you selected the Assign a Print Document To Do checkbox:
The Assign To Do page appears.
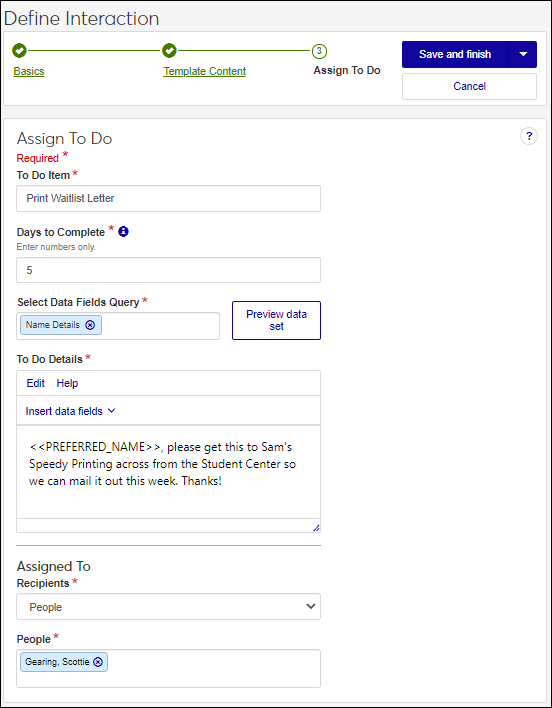
The To Do Item field shows the name of the document interaction. Update this title as needed.
Enter the Days to Complete the assigned To Do.
To personalize the To Do using data fields, select a Data Fields Query. Data fields can be added using the Insert data fields option where you enter To Do Details. Fields are shown as placeholders that are replaced with content when the To Do is sent. For example, PREFERRED_NAME is replaced with the recipient’s preferred name.
Add descriptive notes in the To Do Details section.
Note
Use the Edit and Help links for formatting shortcuts for your content.
Assign the To Do using the Recipients options.
To assign the To Do to specific individuals, select People from the Recipients drop-down and enter a name in the People field. You can assign the To Do to multiple people but be sure there isn't a duplication of efforts.
To use a query to select who will be assigned the To Do, select Data Sets from the Recipients drop-down and select a data set.
Select one of the save options.
To save and generate the interaction at another time or as part of a set, click Save and finish. The interaction will be available from the Interactions page.
To save and generate the document immediately, click Save and apply now. For more details, see Save and Apply Interaction Immediately.
System event interactions get sent/applied when a selected process occurs in J1 Web as opposed to being sent on a schedule. For example, you can send a letter to a donor about an upcoming fundraising benefit when they send an email to a philanthropic alumni group.
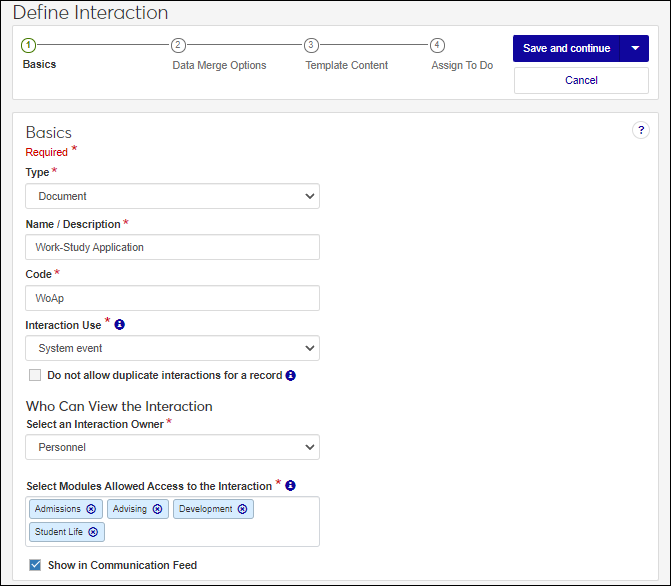
Access the Communication Management, Define Interaction page.
From the Type drop-down, select Document.
In the Name/Description field, enter a recognizable name or description for the interaction.
In the Code field, a unique code is generated for you or you can choose to enter your own unique identifier. Codes cannot be more than 15 characters.
From the Interaction Use drop-down, select, System event.
If you want to keep the same interaction from being sent to an individual or organization more than once, select the Do not allow duplicate interactions for a record checkbox.
From the Select an Interaction Owner drop-down, select the module/department that is primarily responsible for this interaction type.
Note
If you select a default interaction access code from Communication Preferences (My General Settings), it will be shown here; however, you can change it as needed.
In the Select Modules Allowed Access to the Interaction, start typing and select the modules you want to be able to access the interaction.
Tip
Users in roles with permission to this module code will be able to view and depending on their permissions, work with this interaction. Consider who on campus would benefit from being able to view and potentially comment on this interaction. For example, registrars and advisors may benefit from similar information about a student.
If you want the interaction to be available in an individual’s or organization’s feed, select the Show in Communication Feed checkbox.*
* Available with Communications Plus.
Tip
If sensitive FERPA or HIPPA information might be included in the interaction, it might be better to not include it in the communication feed.
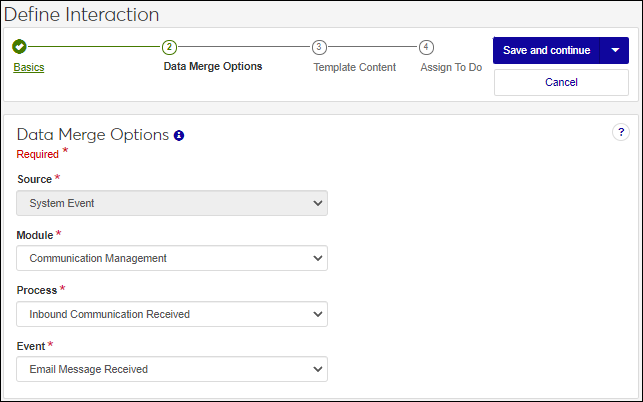
Click Save and continue. The Data Merge Options appear.
From the Module, Process, and Event drop-downs, select the module/ department, process, and event you want to trigger generating the document.
Note
Additional module, process, and event options will be available in future releases.
Click Save and continue. The Template Content page appears.
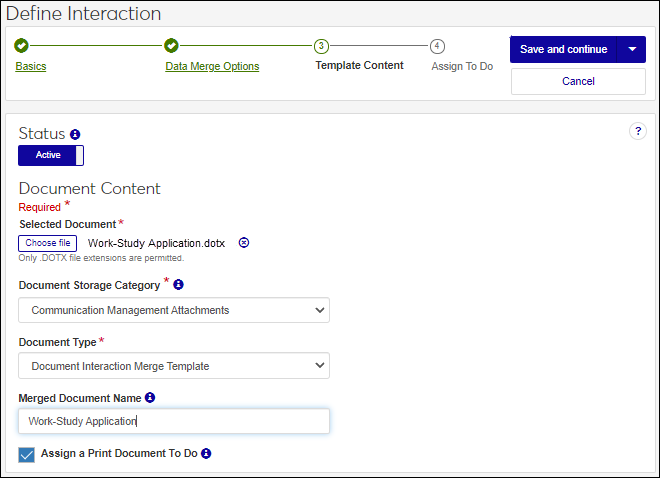
To make the interaction available for use, click the Status option to make it active.
If you haven’t already, create your MS Word .DOTX file.
Create a new Microsoft Word document.
On the Mailings tab, click Start Mail Merge and select Letters.
Click Select Recipients and select Type a new list.
From the New Address List, click Customize Columns. The Customize Address List window appears.
Add Field Names for each data set Column Name you want to use.
Once you've added all the fields you want, close the Customize Address List window. The New Address List window reappears.
Click OK and save the file as an mdb. It will not be used in the processing and can eventually be discarded. The document reappears.
Enter your content and Insert Merge Fields where desired.
Save the Word document as a .dotx file to a location you will be able access and upload it from J1 Web.
Click Choose file to upload the document you want to send.
Tip
File size limits are defined in the Desktop, Document Storage Setup, Make File Extensions Available window.
Note
Only .dotx files are allowed at this time.
From the Document Storage Category and Document Type drop-downs, select how the document will be categorized in Document Storage. How the document is categorized determines where it will be stored in Document Storage and who can access it.
Note
Document storage category and type options are determined by Document Storage settings managed in the Desktop.
Only users with permission to a selected category will be to view the document.
In the Merged Document Name field, enter a recognizable name for the document.
Select Assign a Print Document To Do to create and assign a print document task. Assigned individuals will receive a To Do with the generated document attached.
Click Save and continue.
If you did not select the Assign a Print Document To Do checkbox, proceed to the next step.
If you selected the Assign a Print Document To Do checkbox:
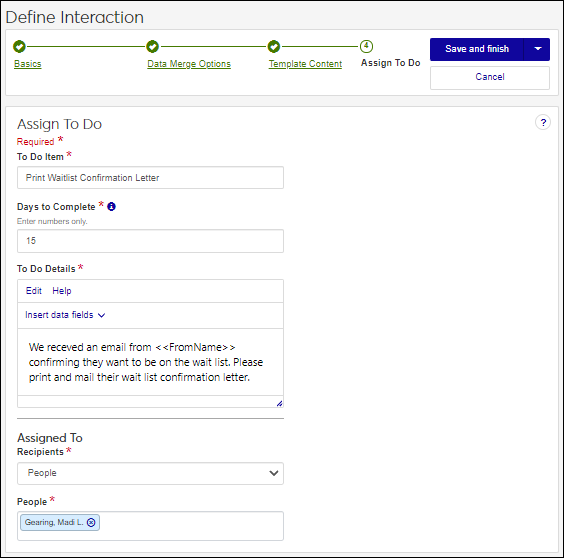
The Assign To Do page appears.
The To Do Item field shows the name of the document interaction. Update this title as needed.
Enter the Days to Complete the assigned To Do.
To personalize the To Do using data fields, select a Data Fields Query. Data fields can be added using the Insert data fields option where you enter To Do Details. Fields are shown as placeholders that are replaced with content when the To Do is sent. For example, PREFERRED_NAME is replaced with the recipient’s preferred name.
Add descriptive notes in the To Do Details section.
Note
Use the Edit and Help links for formatting shortcuts for your content.
Assign the To Do using the Recipients options.
To assign the To Do to specific individuals, select People from the Recipients drop-down and enter a name in the People field. You can assign the To Do to multiple people but be sure there isn't a duplication of efforts.
To use a query to select who will be assigned the To Do, select Data Sets from the Recipients drop-down and select a data set.
Click Save and finish. The interaction is available from the Interactions page. If the interaction is active, the document will be generated when the system event occurs.