Event Page Calendar Block
Use this block to see event information on the calendar.
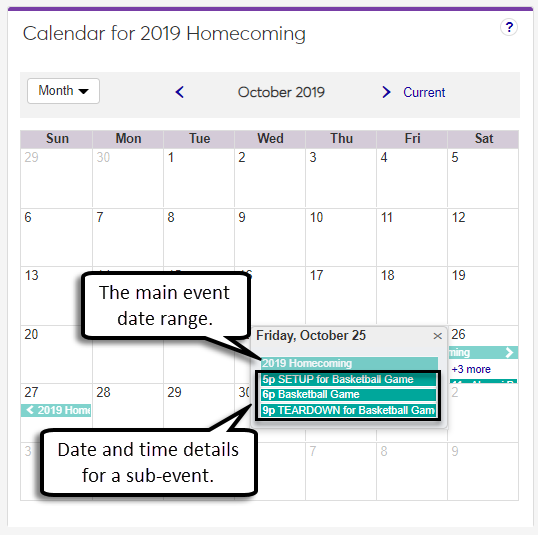
Note
For multi-part events, you can see the date range for the main event and the individual time slots for each sub-event. When you click on scheduled calendar times, additional information about the event or sub-event appears including location and time.
After a recurring event is submitted for approval, each occurrence is visible on the event coordinator’s calendar. Occurrences are also visible on the event and location calendars after they are scheduled.
Click on the calendar event to open the event general information pop-up.
Click the View event button or the event name link to access more information.
Tip
If the event has a scheduling conflict with a course, you have two options to resolve this within J1 Web. You can either cancel the event, or you can select a new location, date, or time to hold the event. To select a new location, date, or time, follow the steps below for a scheduled event.
Click the Scheduling options drop-down on the event page and select Postpone event.
Select Postpone this event to change the event status from Scheduled to Postponed.
From the Event options drop-down, select Review event details.
In the Location / Date / Time section, click the Edit location, date or time link.
If you know the location, date, and time you would like:
Remove the current location by clicking the x next to the location name.
Begin typing the new location name into the field and select the location from the drop-down.
Tip
You can also use the Locations filter to find locations based on specific criteria.
Click the Date / Time Edit icon or click a time slot in the calendar to open the Date and Time pop-up.
Enter the event Start and End times, or select the All Day checkbox.
Add optional setup or teardown times by selecting either the Setup or Teardown checkbox and adding the start and end times.
Click Select to save changes and close the pop-up.
Click Save to return to the Review Event Details page.
If you do not know the location, date or time you would like:
Search for locations using the Locations filter and selecting the checkbox for the search criteria you want to filter by.
Click the field below the checkbox and enter or select your search criteria.
Click Apply to apply the filter to the page.
Use the location scheduler's navigation buttons to view the locations' scheduling availability.
Tip
You can jump to the date range you are looking to schedule the event in by entering in filter criteria for Availability and clicking Apply.
Available timeslots are white. Unavailable timeslots are indicated by grey hatching.
Hover your cursor over the timeslot and click the green plus sign.
Enter the event Start and End times, or select the All Day checkbox.
Add optional setup or teardown times by selecting either the Setup or Teardown checkbox and adding the start and end times.
Click the Select button to add the information to the Selected Location / Date & Time section.
Click Save & continue to return to the Review Event Details page.
Return to the event page by clicking on the event icon.
When the proposed event is approved, click the Scheduling options drop-down and select Schedule this event.
Typically, events cannot be scheduled in timeslots where another meeting or event is already scheduled. However, if a course was created in J1 Desktop after your event was scheduled, a scheduling conflict alert will appear in J1 Web.