Advising Requirement Code Definitions
Use this page to view, edit, create, delete, and download advising requirement code definitions. Advising requirements codes (ARCs) are essential for building advising trees, and, therefore, curricula and student academic plans.
Desktop Location
You can work with ARCs in Desktop on the Maintain Advising Requirement window.
Database Location
ARCs are stored on the Advising Requirement Codes table (advising_req_codes.adv_req_code).
ARCs are used to build advising trees on the Advising Trees page and to build academic plans.
Code: Up to 8 characters. Required. Code and Description usually appear together, but Code can appear alone, so make it recognizable.
Description: Up to 25 characters. Required.
Type: The category of requirement, such as courses, electives, admins, and groups. Defined on the Advising Requirement Type Definitions page. Required.
Relation: This defines how the system uses relations of "AND" and "OR" to evaluate how a parent requirement is met when a child requirement is met.
Min/Max Hrs: Minimum hours needed to meet the requirement and maximum hours allowed.
Min/Max Count: The minimum number of instances (usually courses) needed to meet the requirement and the maximum number allowed.
Parent Root: You can select another ARC as a parent root to this ARC. This is stored in the Advising Requirement Codes table (advising_req_codes.parent_advising_req_codes_AppId).
Note
The Parent Root field is not in Desktop.
Cluster: Cluster codes appear here according to their associated advising requirement types. Clusters (Course, Cumulative Course, Course Total, Group, Root, RBU, and Other) specify how requirements are evaluated.
Comment: Up to 30 characters.
Priority: The priority for calculations and processing. Enter or select numbers 0 to 9. 1 is the highest priority. 9 is the lowest. 0 means that priority isn't at play. The Priority is defaulted in from the priority of the ARCs Advising Requirement Type definition, but you can edit it here for the particular ARC. Then, in advising trees, you can edit the priority of each instance of the ARC.
Tip
Priority matters only for courses and cumulative courses, not for any other requirement type. Therefore, we recommend setting the Priority of the others to 0. This reminds users that priority isn't at play for those other requirement types.
Tip
For more information and example scenarios, see the Reuse and Priority in Advising Trees topic.
Print Order: The priority for displaying and printing the requirement. Enter numbers 0 to 999. The lower the number, the higher the priority.
Allow Reuse: This sets the default for instances of this course ARC in advising trees. Options are Yes and No. You can edit Reuse in each instance of the ARC in advising trees. Briefly, Yes means that if this ARC appears several times in a student's trees (such as in their major and in GENEDs), it satisfies each of the requirements.
Warning
Reuse is for courses (Course and Cumulative Course ARC types) only. It is not meaningful for other ARC types such as Group.
Tip
For more information and example scenarios, see the Reuse and Priority in Advising Trees topic.
Print: Select the checkbox if you want the requirement's information available for printing.
Display: Select the checkbox if you want the requirement's information available for display.
Begin Date/End Date: Dates when the requirement is in effect.
Note
The dates don't affect the ARC's usability in the system. They're merely reminders.
Quality Points: The minimum number of of quality points needed to meet the requirement.
GPA: The minimum GPA needed to meet the requirement.
Grade Scale: The grade scale that must be used to meet the requirement.
Credit Type: The credit type that must be used to meet the requirement.
Grade: The minimum grade needed to meet the requirement.
The following permissions are needed. They're available on the Academic Advising Module Manager role and roles copied from it.
Can manage advising requirement definitions
Can view catalog courses
The Actions button affects an individual ARC. You can run a Curriculum Impact Analysis report, rename the ARC, or edit the ARC.
Tip
A Curriculum Impact Analysis report shows required and optional requirements for the selected requirement.
If the ARC is a course or cumulative course, you can also view the course catalog. It opens in a separate tab, and it's filtered to show the courses assigned to that requirement.
Tip
This is useful especially to see any other courses assigned to this ARC, such as transfer courses, courses with obsolete course codes (for example, if BIOL 101 was recreated as BIOL 1001), and individual instances of cumulative courses.
The Options button affects all the selected ARCs. You can edit them, delete them, or download them to a Microsoft Excel spreadsheet.
From the Advising Administration hub, click the Hub options drop-down.
Select Tree building and then Advising requirement codes. The Advising Requirement Code (ARC) Definitions page opens.
On the Advising Requirement Code (ARC) Definitions page, click the Create definitions button. The Create Advising Requirement Code Definition pop-up opens.
Enter information in the fields. Use the information in the Fields section above as a guide. Code, Description, and Type are required.
Tip
For help with Grade Scale, Credit Type, and Grade, click Grade table lookup. The Grade Table Definitions pop-up opens. Click in the Grade Table Options field to see all the available combinations of Grade Scale, Credit Type, and Grade. Select an item. It fills in the Grade Scale, Credit Type, and Grade fields.
Click either Create and close or Save and create another.
To rename an ARC, click the Actions button on its row, and select Rename. The Rename Advising Requirement Code pop-up opens. Follow the prompts.
To edit the other fields of an ARC, click the Actions button on its row, and select Edit. The Edit Advising Requirement Code Definition window opens. You can edit all the fields except Code. (Use the Rename feature to edit that field.)
If you want your edits to affect ARCs already in advising trees, select the checkbox labeled Apply these changes to Trees?.
Click the Update button.
Select the ARCs you want to edit.
Click the Options button, and click Edit selected.
Select a field from the Select a Detail to Update drop-down.
Enter or select a value for the field.
If you want your edits to affect ARCs already in advising trees, select the checkbox labeled Apply these changes to Trees?.
Click either Update or Update and edit another.
On the row for an ARC, click the Actions button.
Select Curriculum Impact Analysis. The report opens in a new tab.
If your school hasn't customized the report, the report opens in a new tab.
If your school has customized the report, the Curriculum Impact Analysis pop-up opens.
In the Report field, select the version of the report you want.
Click Genereate PDF. The pop-up closes, and the report opens in a new tab.
Use your browser's toolbar to print or save as a PDF. The Edit Advising Requirement Definitions pop-up opens.
Important
Access to the folders where Jenzabar-provided original reports are stored is controlled by your institution. For more information, contact your campus support team or see Working with Reports in J1 Web.
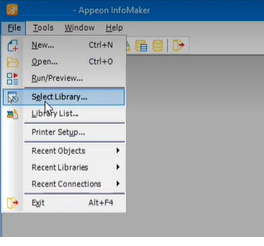
Open InfoMaker.
Click File > Select Library.
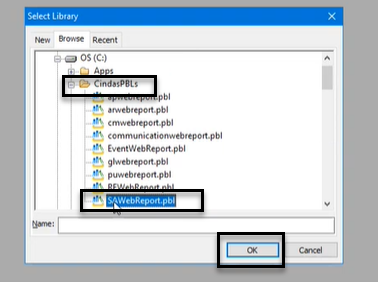
On the Select Library pop-up, navigate to the shared folder where Jenzabar-provided original reports and queries are stored.
Select the PBL (PowerBuilder Library) file that contains the report or query you want to customize.
Click OK.
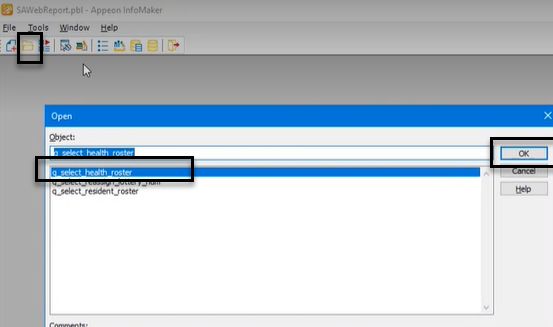
Click the Open icon.
On the Open pop-up, in the Object section, select the report or query you want to customize.
Click OK.
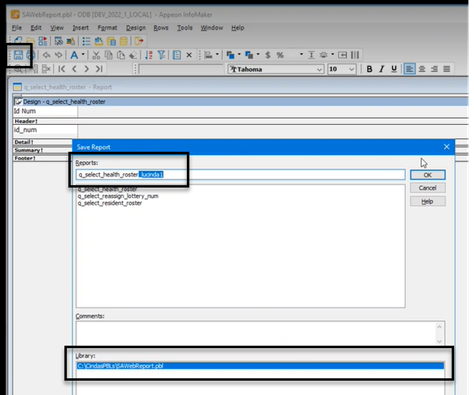
Customize the report or query as needed.
Save the customized version in the shared folder by adding a unique, easily identifiable extension to the file name.
Tip
By default, InfoMaker saves the customized version in the same folder that you opened the original version from. Confirm the file path is correct in the Library section.
On the corresponding report page in J1 Web:
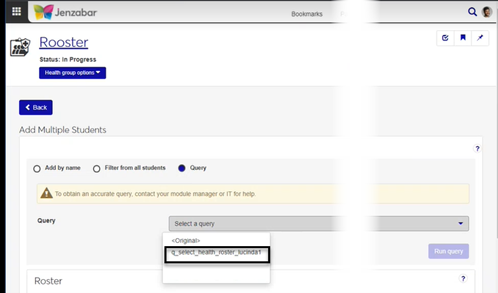
Customized versions of queries will display in the Query or Data Set drop-down.
Customized versions of reports will display in the Report Layout drop-down.
On the row for a course or cumulative course, click the Actions button.
Select View catalog. The Manage Catalog Courses page opens. The filter is preset to show only courses that have that ARC assigned.
Tip
If the View catalog option isn't available, it's because you need the "Can view catalog courses" permission available on the Academic Advising Module Manager role and roles copied from it.
You can use the views to see the course details. in a separate tab.
Select the checkboxes next to the rows you want to export.
From the Options drop-down, select Download to Excel. The Download to Excel pop-up opens.
Select options for the Excel format and data columns.
Click Download. Your .xlsx or .zip file is saved in the file location that you have set in your browser settings.
In most cases, yes. Customized versions of the report created in Desktop before your school started using J1 Web should be available as options in the Report Layout drop-down. If your school created new customized layouts in Desktop and copied them to the appropriate location on the J1 Web server, those reports are also available in the drop-down.
However, certain reports were modified to be used in J1 Web (i.e., the base report for J1 Web is different from the base report in Desktop). In those cases, the customized versions from Desktop will not work even when they are moved to the correct location on the J1 Web server. You'll need to re-customize those reports from the original version of the J1 Web report by following the instructions to Customize Reports for J1 Web.
See the help for each report page for guidance about customizing a specific report.
For the customized versions of the report created in Desktop to appear as choices in the Report Layout field drop-down, your campus support team needed to complete certain steps as part of the installation process. For more information, contact your campus support team or see Working with Reports in J1 Web.
Tip
Only custom versions of the report created in Desktop before J1 Web installation will appear as choices in the Report Layout field drop-down. Reports customized in Desktop after you've installed J1 Web are not available in the drop-down unless they have been copied over to the appropriate location on the J1 Web server.
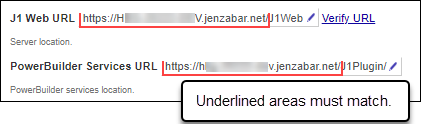
Verify the PowerBuilder Services URL is entered correctly in System Administration, System Settings, Product Installs and Sign page.
The URL must use HTTPS and not HTTP
The URL subdomain and domain must match the J1 Web URL
If the location where you store J1 Web reports is not the default installation location (C: > Jenzabar > Reports), verify the J1 Web server has permission to access the location. Detailed steps are available in the help topic Working with Reports in J1 Web.