Student General Information
Important
Information and features vary according to the roles to which you belong and the permissions associated with those roles. For more information, contact your module manager or your campus support team.
Use this page to view and edit general student information.
Information includes entrance year and term, holds, student cluster, previous college, eligibility, and whether the student requires Special GPA calculation.
If the person isn't already in your system as student, you can use the Quickly create a student button to open the Create Student page. There you can start the student's records.
The Options drop-down applies to all selected students.
Each Action drop-down is for an individual student.
Tip
In the J1 Desktop application, this information is on the J1 Desktop Student Information window | Student tab | Student Master subtab and the Attribute tab.
Filter the List
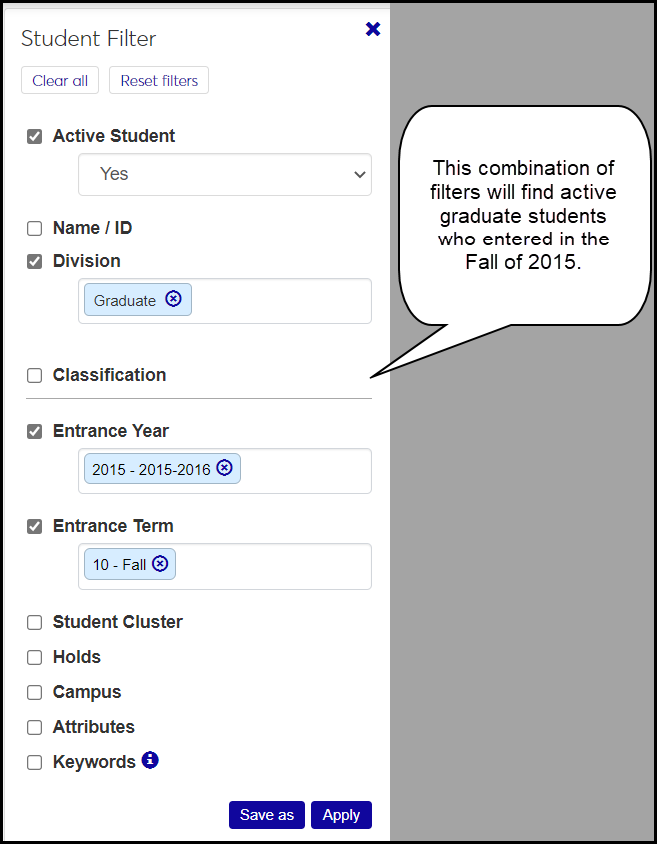
Use the Student Filter to limit the list to students you need to see. If you select more than one checkbox, only results that match all the checkboxes will show.
Some fields allow multiple selections. If you make multiple selections within a field, the results will match any (but not necessarily all) of the selections within the field.
So if you select the Division filter and the Entrance Year / Term filter, the list will show students who match both the Division criteria and the Entrance Year / Term criteria you selected. Within Entrance Year / Term, if you select both Fall 2008 and Spring 2009, you'll see students who entered either of those terms.
The Keywords field filters on all of the fields except the Active and Holds fields.
Tip
The Active Student filter can be very helpful. You probably want only active students for many of your searches, but at times you may want to see only inactives, and at other times both actives and inactives together. By default, the Active Student filter is selected with a value of Yes.
The Active Student field is on both of these pages:
Student General Information (with Active Student filter)
Student Information Details, General Information tab, Demographics heading (without a filter)
Options
Select one or more students, and use the Options drop-down to work with them.
Download to Excel
Download the information for the selected students.
Edit Selected Students
You can edit details for multiple students at a time by selecting students and clicking 'Edit selected' in the Options drop-down. Select as many details and their values as you wish.
Generate an Official Transcript
Generate an official transcript for the selected students.
Action
Use the Action drop-down to operate on an individual student.
FERPA Permissions
Select this link to open the student's FERPA Permissions page where you can view, edit, create, download, and delete FERPA permission contacts.
Manage Attributes
Select this option to open a pop-up where you can add or remove attributes. Today's date defaults as the Begin Date, but you can change it, and you can enter an End Date. Set the Show in Campus Portal switch to 'Yes' to show these attributes with other student details on the Campus Portal.
The available attributes are defined in J1 Desktop, in the Attribute Definition window.
Important
Attributes are available to schools licensed for Non-Traditional Registration.
Tip
To find students with particular attributes, you can filter the Student General Information list by attributes.
View Student Details
Select View student details in a student's Action drop-down to go to the General Information tab of the Student Information Details page. From there you can edit details including attributes.
The tab has the same information as here in the Registration Operations hub, but it's organized in a different way. It's focused on the individual student, and all the student information is grouped into tabs on a single page. You can edit a whole tab in one view. From the Student Information Details page, you have quick access to the student's summary page and related information such as their academic plan, advising worksheet, holds, test scores, unofficial transcript, and Notepad notes. You can also jump to their personal summary page and events timeline. If the student is also an employee, you can go to their employee summary page.
Generate an Official Transcript for One or More Students
This feature is a quick way to generate an official transcript. For more options, use the Transcript Requests page.
Select the checkboxes for one or more students.
Click the Options drop-down, and select Generate official transcript. The Generate Official Transcript pop-up opens with the selected students listed.
If you want to copy the transcript to Document Storage, select the checkbox for Save a copy to Document Master.
If you're saving a copy to Document Master, and you want to include a note, click the Edit icon
 under Doc Storage Note. The icon is disabled if the checkbox for Save a copy to Document Master is unselected.
Under Transcript PDF, select checkboxes if you wish.
Include Destination Address on Transcript: This uses the destination address listed above in the Destination column, if there is one. For more options, use the Transcript Requests page instead of this page.
Save copy of PDF to network location: The location is selected on the Repeat, Transcript, and GPA Settings page in the Transcript category. When this checkbox is selected, the file location appears.
In Address Priority List, select an option from the drop-down, or leave it as DEFAULT. The values are managed on the Maintain Address Priority window in Desktop.
If you're licensed for electronic transcripts (Etrans), the Etrans file save location from settings field displays the location set on the Repeat, Transcript, and GPA Settings page in the Transcript category.
Under Divisions and Additional Criteria, in Divisions to Include: Leave blank to include courses from all divisions. Otherwise, select one or more divisions.
Display Options, Layout: The Original layout is provided. If your school has created more, you can select one from the drop-down.
If you're generating electronic transcripts, click the Generate Etrans file button.
If you're generating PDFs, click either Preview PDF transcript or Generate PDF transcript. The preview shows the transcript for only the first student in the list. Generating transcripts takes time. You'll be notified when the process finishes, and you can check the results in the Notification Center.
On a student's row, click the Action drop-down, and select Manage attributes. The Manage Student Attributes pop-up opens.
To add an attribute, select one to add. If there's already an attribute, click Add another attribute, and select an attribute.
Today's date defaults as the Begin Date. If you wish, you can change the Begin Date and enter an End Date.
Set the Show in Campus Portal switch to 'Yes' if you want the attributes listed with the other student information on the Campus Portal.
To remove an attribute, click the Remove icon.
Click the Update button. A message tells you whether the update was successful.
If a student doesn't already exist in your system as a student, you can create them here.
Important
You need the "Can create students" permission available in the Registrars role and roles copied from it.
Click the Quickly create a student button. The Create Student wizard page opens. (It's the Create Person page but already set to designate the person as a student.)
Select a radio button under How do you want to create the person?
If the person exists in the system but isn't designated a student, select Use Existing Name / ID. The Name / ID field appears.
In the Name / ID field, start typing a name or ID, and select the person from the list.
If the person isn't in your system yet, select Create New Name / ID. The Basic Information fields appear. Fill them in as needed. First Name and Last Name are required.
Click the Continue button. The wizard advances to the Contact Information page.
Add information as needed. Either a phone number or alternate contact record is required.
Click the Continue button. The wizard advances to the Duplicate Checking page.
If no duplicate persons are found, click the Create new name / ID & continue button. A pop-up asks you to confirm that you want to create the student.
Click Yes, continue. The wizard advances to the Person Details, Individual page. On this and subsequent pages, fill in information as needed, and click the Save & continue button. After all the Person Details, the wizard advances to the Designate Person as Student page.
Click in the Division field, and select a division for the student.
Click in the Web Registration Group field, and select an option. (Web Registration Groups are also called Tel/Web Groups, Registration Control Groups, or just Registration Groups. They're categories to help you control which students can register for what, in which ways, and when.)
Under Create Student User, click the button to select Yes or No.
Click the Designate as student button. The student is created, and their Summary page opens.
Select the checkboxes next to the rows you want to export.
From the Options drop-down, select Download to Excel. The Download to Excel pop-up opens.
Select options for the Excel format and data columns.
Click Download. Your .xlsx or .zip file is saved in the file location that you have set in your browser settings.