Procurement
Tip
Only releases with enhancements or resolved issues for this module have content below.
2024.3
Delete Cancelled Payments in J1 Web
The new Delete Cancelled Payments page in J1 Web provides the same functionality as Desktop's Delete Cancelled Payments window. For more information, see Delete Cancelled Payments.
Additional Enhancements
There are performance improvements to access another vendor's details from the Vendor Information Details page.
Inventory Options Available for Orders and Requests
Requisitions created or accessed from the Orders and Requests page now display inventory options for systems configured for inventory management.
Split Line Item Feature Available for Requisitions and Purchase Orders
Schools that use GL allocation codes defined in the Desktop can use the new Split Line Item pop-up in J1 Web to allocate percentages of line items across multiple GL accounts. For more information, see the following topics:
New Import Invoices Feature
Use the new Import Invoices page to create invoices from an external file. This 3-step wizard guides you through each part of the process and uses mapping templates to ensure the imported data is accurately added to the system.
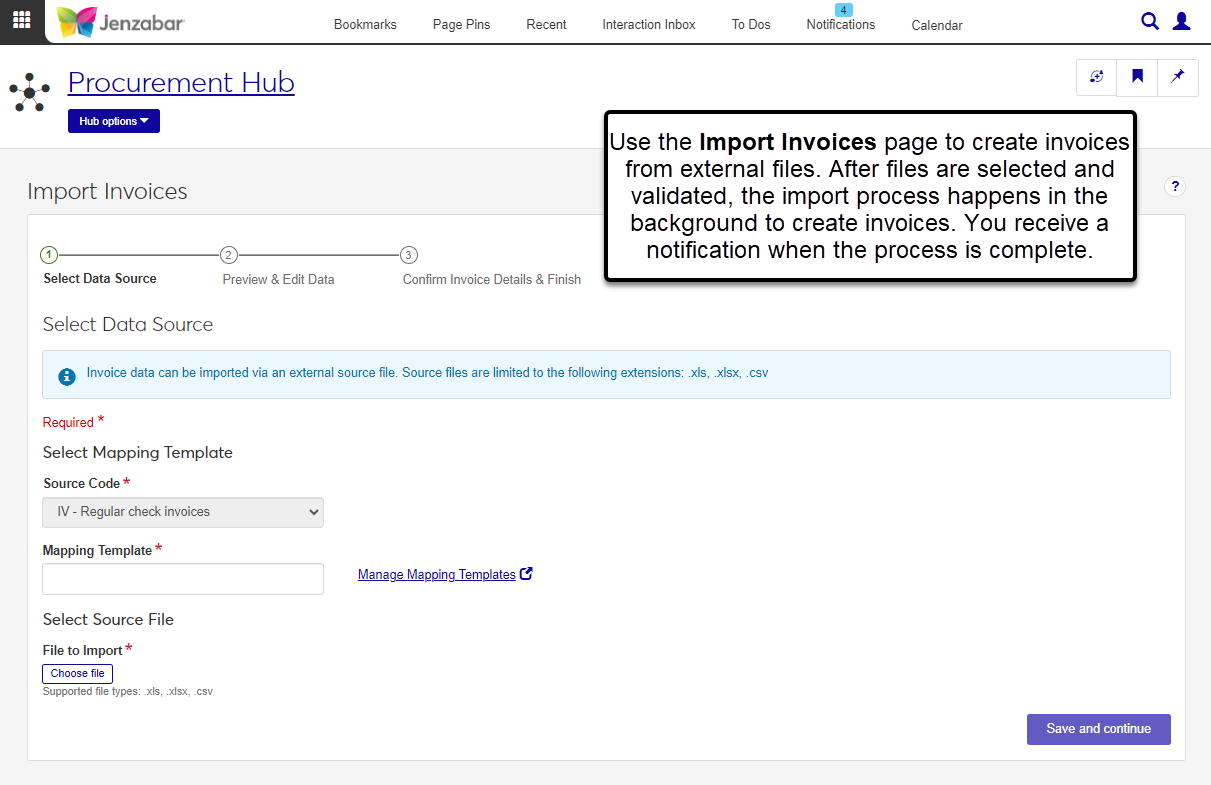
Select Data Source. Select the file and mapping template, then preview the data to be imported. (Mapping templates are managed in the new Data Management Hub. For more information, see Data Mapping Templates.)
Preview & Edit Data. Review the imported data, enter the batch description and date, and make updates to any rows with errors.
Confirm Invoice Details & Finish. Review a summary of the invoices to be created and start the import process. The process runs in the background, so you can continue working in J1 Web. You'll receive a notification when the process is complete and invoices are created.
Permission to import invoices is in the Invoices section of the Procurement - Accounts Payable role.
For more information about the process, see Import Invoices.
Recurring Payment Invoices Available in J1 Web
You can now create recurring payment invoices in J1 Web. (This is the same as the Regular Payment Invoices process in Desktop.)
The Procurement - Accounts Payable role has new permissions to view, create, edit, delete, and process recurring payment invoices.
A new Create Recurring Payment page defines the vendor, payment amount, months to process, and GL account information.
The Recurring Payment Details page displays information for review and updates.
The Recurring Payments page has two tabs. The Recurring Payments tab lists existing recurring payments and lets you add or view details. Use the Run Recurring Payments Process tab to create invoices for payment.
Note
The Create Recurring Payment Invoices process only adds invoices to the system. You'll still need to complete the Create Payment process to issue checks and e-payments.
For more information, see the online help for Recurring Payments.
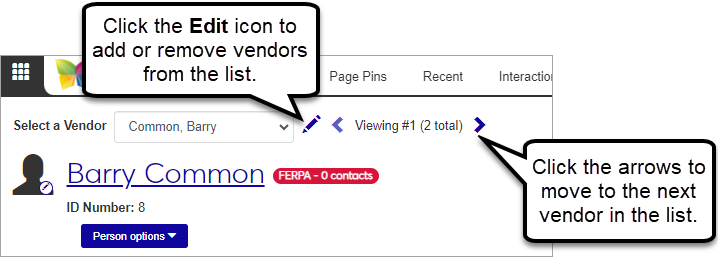
Enhanced Options to View Details for Multiple Vendors
The Vendor Information Details page now includes options to quickly switch to another vendor's details and select a list of vendors to view. A new Select a Vendor drop-down field at the top of the page above the vendor name lets you select another vendor and view their details. You can click the Edit icon  to add or remove vendors from the list. You can also use the left and right arrows next to the vendor's name to quickly switch to another vendor's account details.
Warning
At this time, this functionality is available only for person vendors and cannot be used for a combination of person and organization vendors. Functionality for organization vendors is coming in a future release.
Submit Fixed Assets from Invoices
The Create Invoice and Invoice Details pages now include a Submit New Fixed Asset button above the detail spreadsheet. Click the button to associate a fixed asset with an invoice line item.
Permission to submit fixed assets from invoice pages is managed in the default Asset Management Fixed Asset Access role.
For more information about the process, see Create Invoices.
Additional Enhancements
On the Invoice List page, the Comments icon now displays the total number of comments for the invoice header and line items. (It previously displayed only the number of comments for the invoice header.)
The ID Number / Name field now fills in the person or vendor's name when you enter an exact ID Number and tab to the next field. This update is available on accounts payable pages throughout the Procurement hub.
Inventory Options Available in J1 Web
J1 Web now supports the inventory process. The detail spreadsheets on PO and Requisition pages now include an Inventory column that provides options to autofill fields for inventory items and create new inventory codes. When inventory items are added to a PO or requisition, you can check for lower cost vendors and switch vendors if needed. For more details about the new functionality, see Create Requisition and Create Purchase Order.
Note
The inventory features are available only when your system is configured to manage inventory. Available functionality depends on your configuration selections on the Desktop Purchasing Module Setup window. See the following Desktop topics for more details about the inventory configuration options.
More Features for Users Transitioning from the Campus Portal to J1 Web
Additional functionality is available for campus users working on the Orders and Requests page.
On the Orders and Requests page, the Pending Approval tab now includes options to approve, deny, and return requests in the list.
On the Create Requisition page, a new Create & submit button lets users submit requests for a single line item immediately.
On the Requisition details page, the View details pop-up for the approval track now includes an "Approves If Over" column.
On the Review Requisitions page, four search filters were added: Requisition Name Includes, Requested Item Text Includes, Budget Account, and Project Code. Additionally, the Under Review By column now links to the person summary page.
Additional Enhancements
POs and requisitions now allow negative amounts in the Quantity and Cost Per Unit columns.
On the Purchase Order List page, the Comments icon now displays the total number of comments for the PO header and line items. (It previously displayed only the number of comments for the PO header.)
2023.3
Warning
J1 Web does not currently support the Open Items configuration. If your school is configured for Open Items in the Desktop A/R Configuration window, continue working in J1 Desktop as you will not be able to use J1 Web Finance at this time.
The Procurement hub includes functionality for accounts payable (AP) and purchasing (PO). Access to this hub is granted via the Procurement - Accounts Payable and Procurement - Purchasing roles.
The accounts payable features let you work with and manage vendors, invoices and payments.
Note
Most of the administrative and configuration windows in Desktop are planned to move to J1 Web in a future release. The following windows are still managed in Desktop and don't have an accompanying page in J1 Web yet.
Setup A/P & A/R Subsidiary Definitions
Subsidiary Group Control
A/P Configuration
Aging Report Configuration
Payment Prefix - Setup Bank Accounts
Select/Create Regular Payments
Tax Refund
Electronic Payment Configuration
Government Forms Filing Wizard
The Vendor List page lets you search for vendors based on various criteria. From here, you can also create new vendors, navigate to vendor detail pages, manage subsidiaries associated with vendors, and update 1099 form defaults.

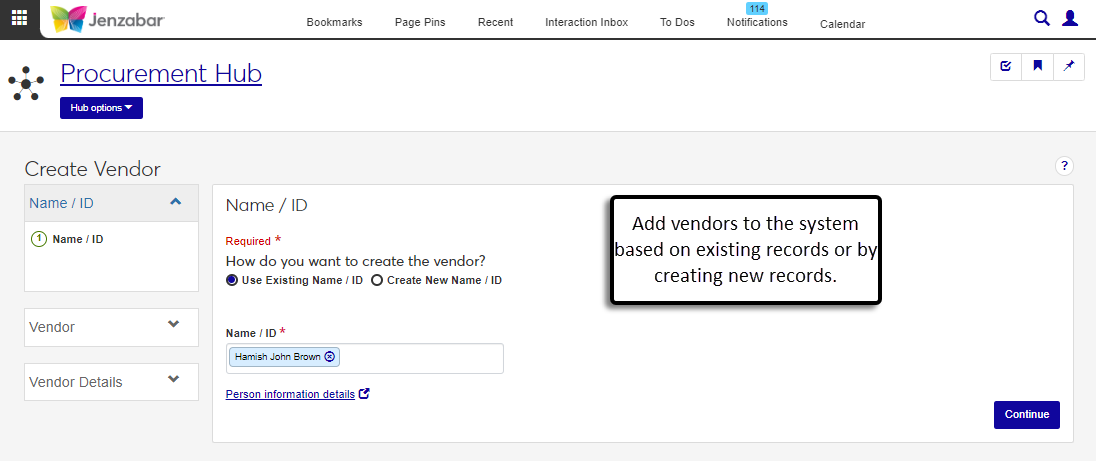
You can create new vendors with the Create Vendor page, which can be accessed from the Vendor List or via the Procurement hub navigation. New vendors can be based on existing ID numbers in the system, or ID numbers can be assigned when the vendor is created.
After vendors are created, you can view vendor information in varying levels of detail from the following pages.
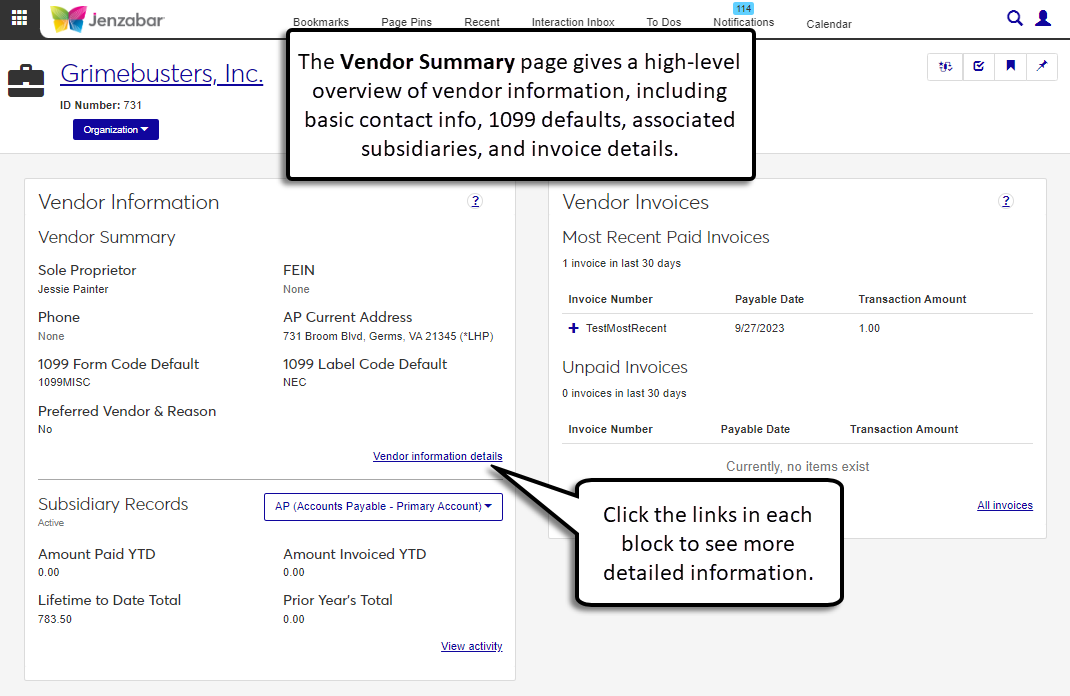
The Vendor Summary page provides a high-level overview of vendor information. From here, you can click the links to access the Vendor Information Details page and see vendor invoices.
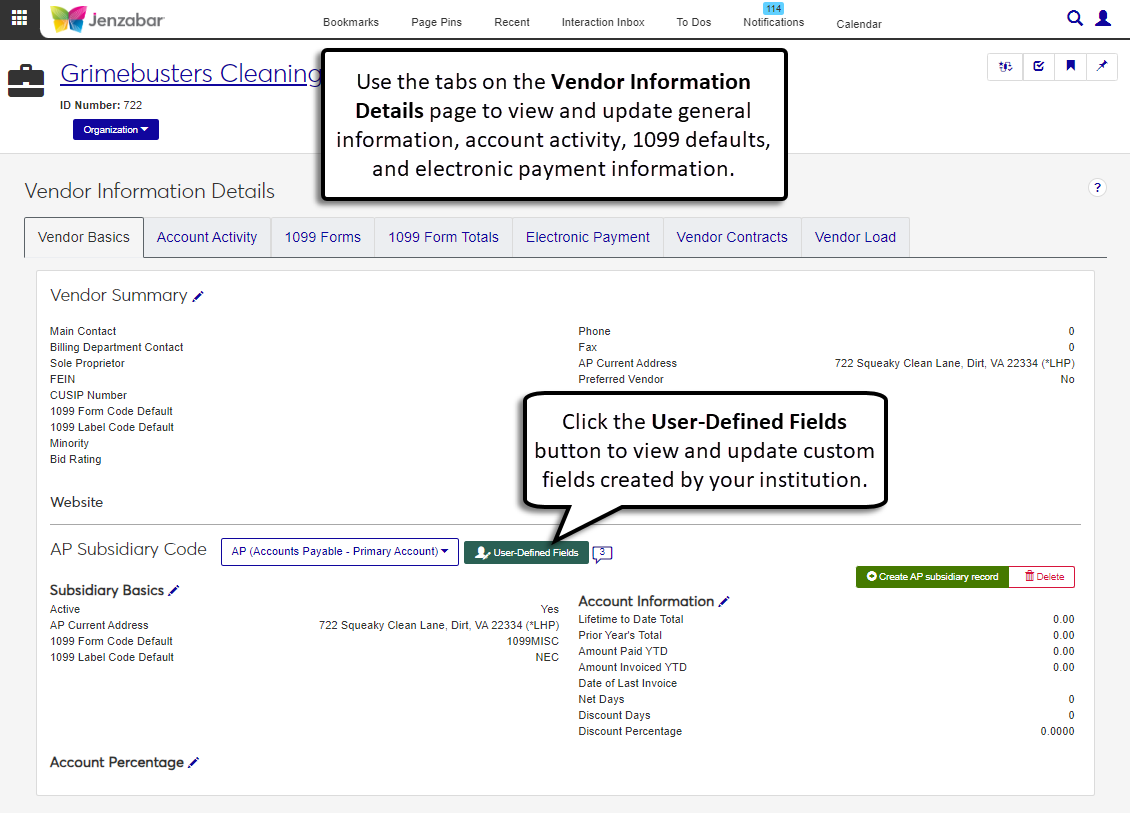
The Vendor Information Details page lets you update general information, account activity, 1099 defaults, and electronic payment information. You can also make view and make updates to vendor user-defined fields (UDEFs).
The Organization Information Details page mirrors Desktop's Name Entity window and lets you view a vendor's organization and contact information.

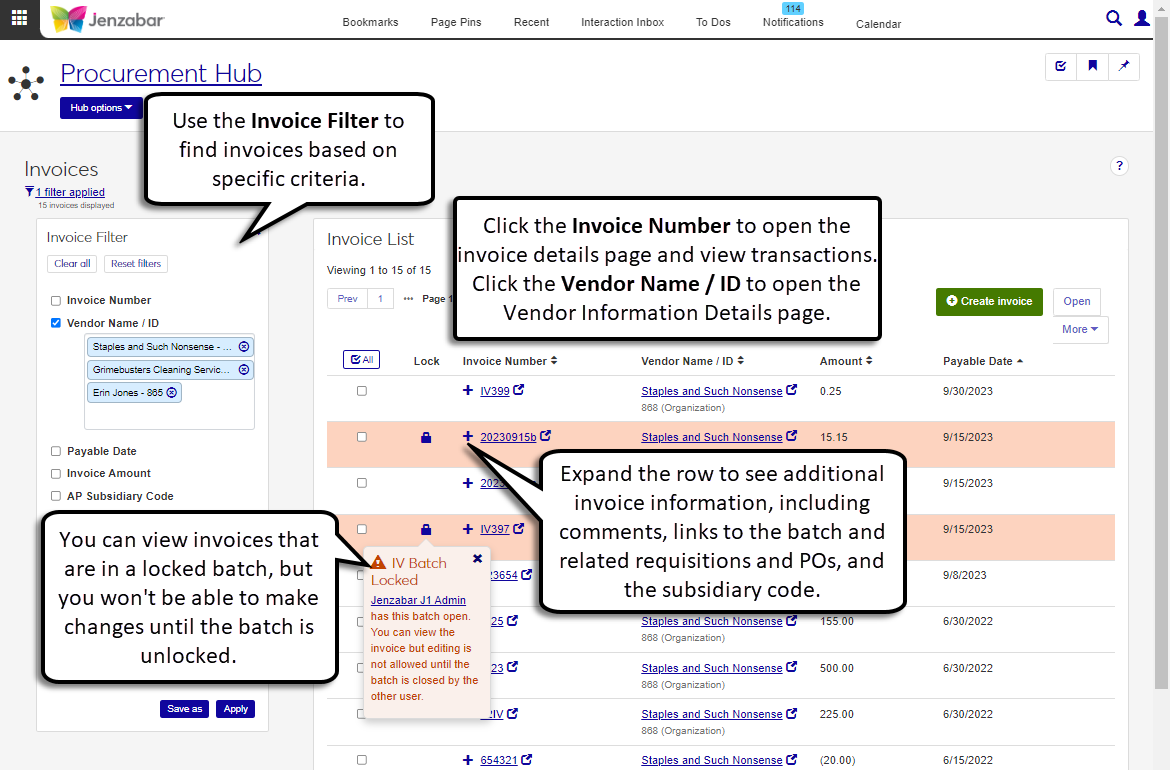
You can search for invoices based on specified criteria on the Invoices page. Use the links to open invoice details or view vendor details, and click the Expand icon to view additional details, like comments, links to invoice batch details, and related POs and requisitions. You can view locked invoices, but you cannot make changes to locked invoices.
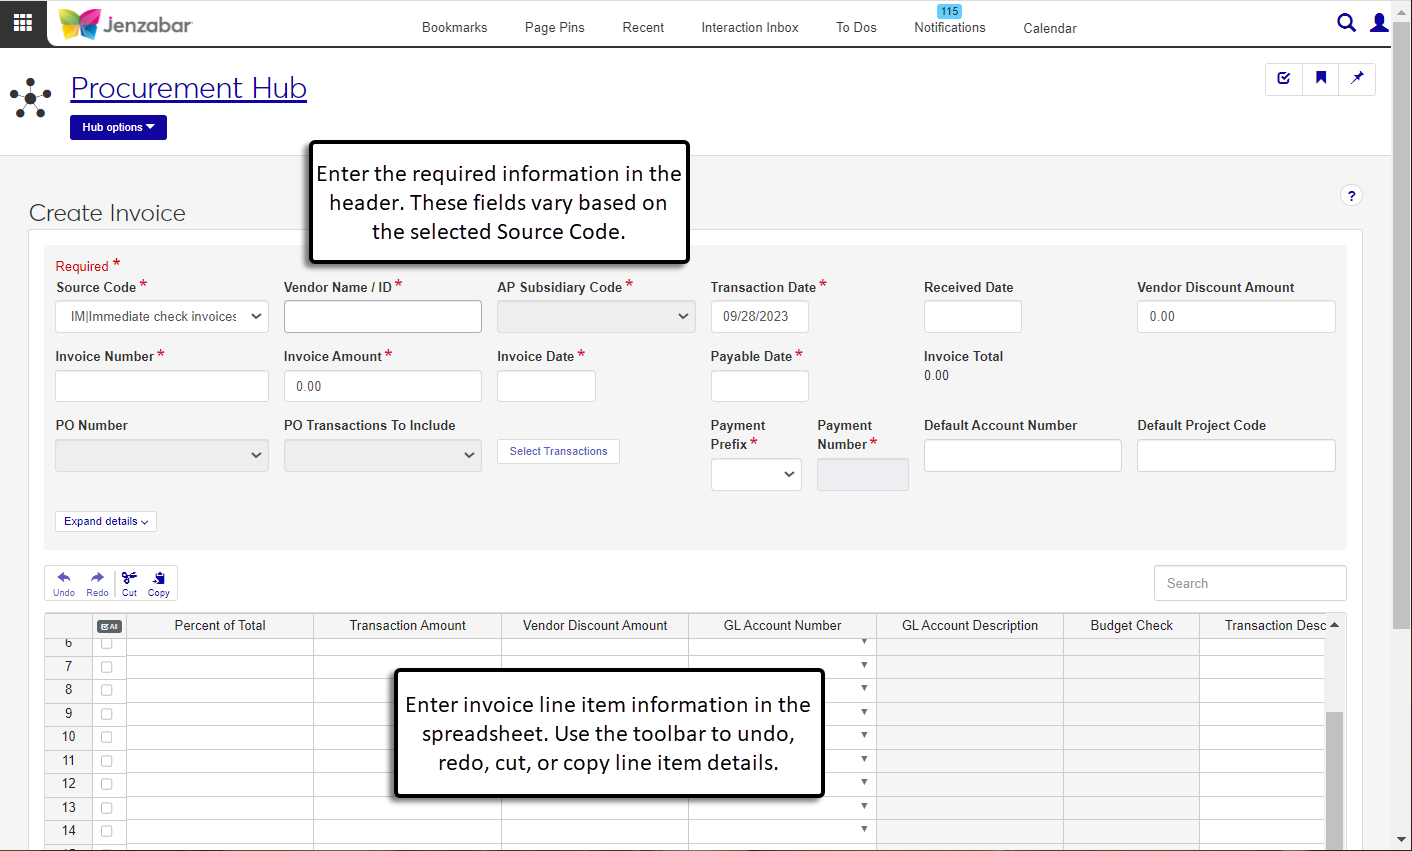
The Create Invoice page lets you select the appropriate Source Code, and then the available fields are updated to reflect the requirements for the selected source code.
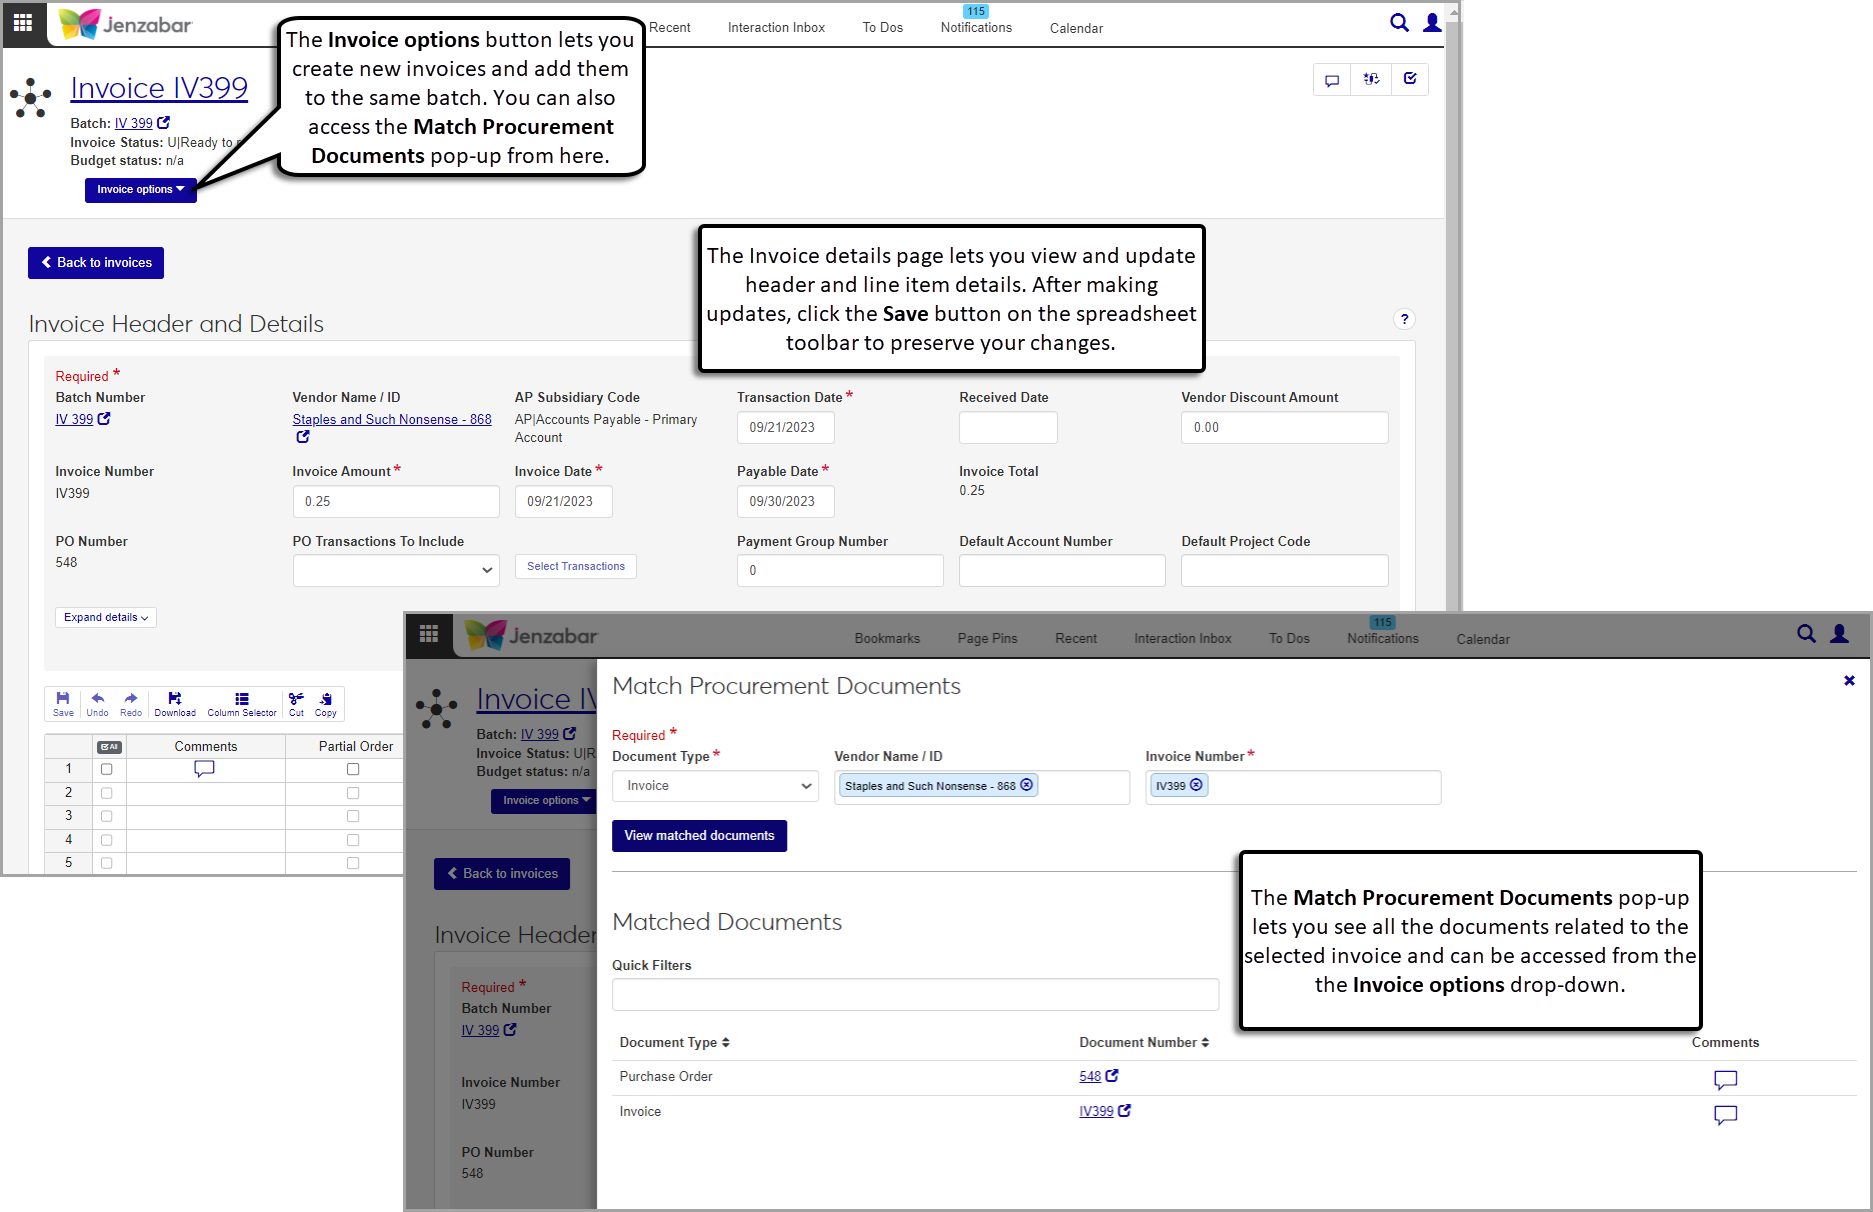
After the invoice is created, you can view and update the details from the invoice details page. Use the Match procurement documents option to find all the documents related to the invoice, such as requisitions, POs, and payments.
The Payments list page lets you view the list of system payments. From this page, you can access payment details, create new payments, make adjustments to existing payments, and void payments.

Click the Payment Number links to open the payment detail pages, where you can see the invoices paid, view related procurement documents, or void the payment.
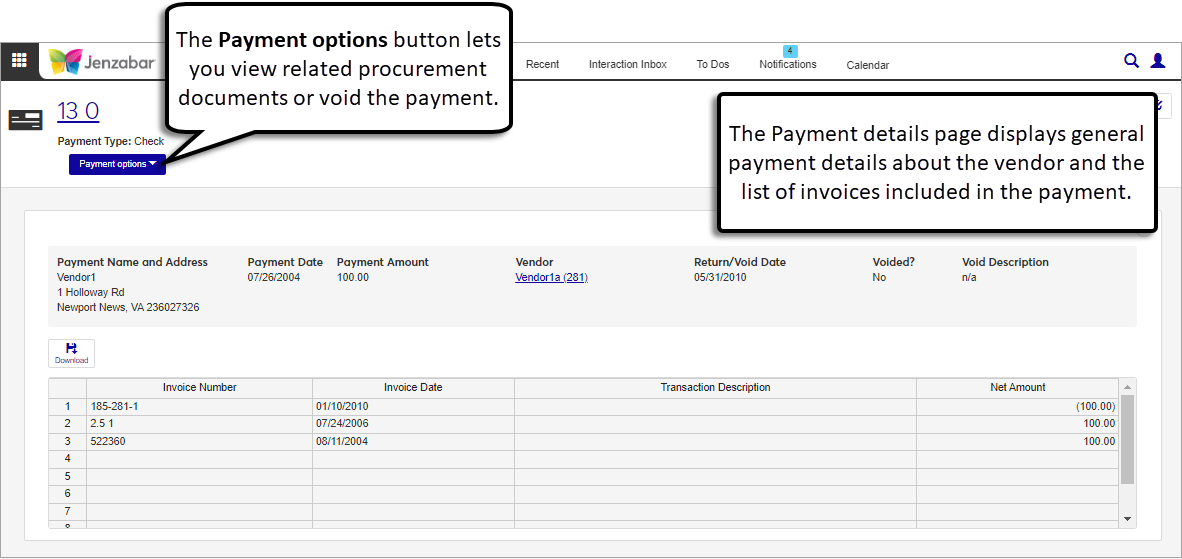
When the Void option is selected on the list page, a pop-up appears and lets you review the selected payments, add details, and void the payment.

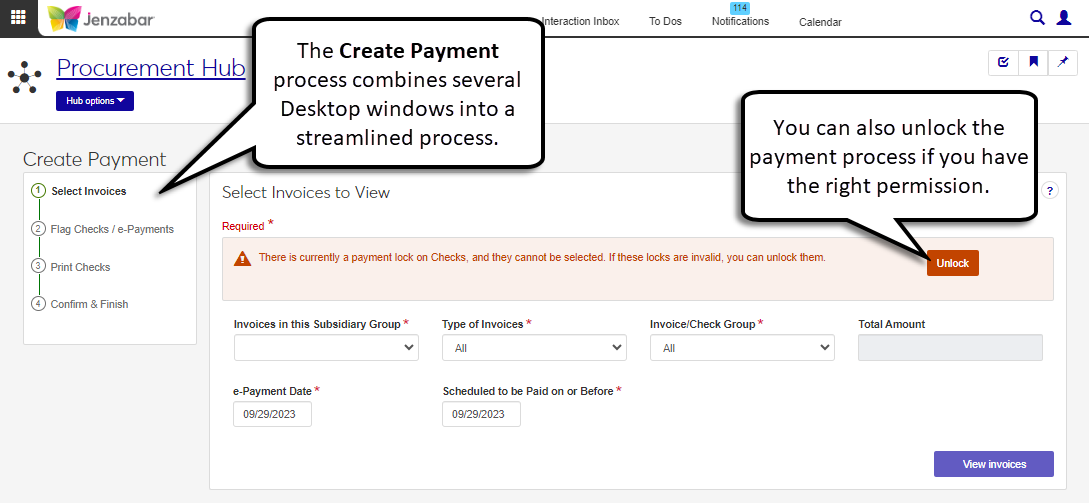
Creating payments in J1 Web is a streamlined process that combines several Desktop windows into a series of sequential pages.
Warning
Although the information is saved in both Desktop and J1 Web, the payment process must be run to completion in either J1 Web or in Desktop. In other words, once you start the process in J1 Web, you cannot continue the process in Desktop (and vice versa).
The following reports and files are generated during the Create Payment process.
Checks to be Issued*
Electronic Payments to be Issued*
Check*/Electronic Payment Register
Check/Electronic Payment reports
Electronic Payment transfer file
Note
Reports marked with an asterisk (*) need to be customized for J1 Web (i.e., reports that were customized in Desktop are not available in J1 Web). For additional information about customizing reports in J1 Web, see Working with Reports in J1 Web.
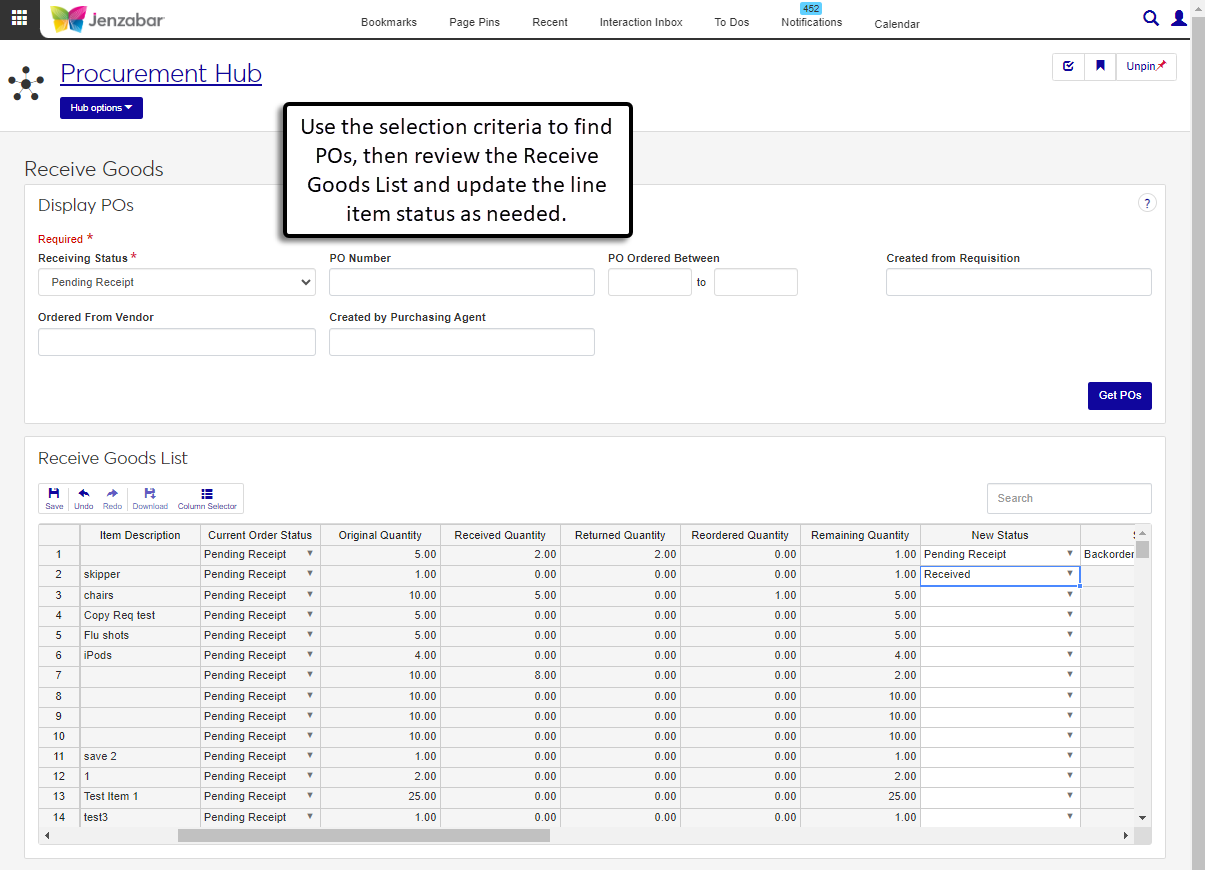
The Purchasing features in the Procurement hub let you work with requisitions, purchase orders, and received goods.
Note
The Purchasing Module Setup window is still managed in Desktop and doesn't have an accompanying page in J1 Web.
The notification settings defined in the Purchasing Module Setup window are not honored in J1 Web. Notifications in J1 Web are managed via the Communications module, and will be available in a future release coming soon. In the 2023.2 release, users won't receive notifications for events related to requisitions and purchase orders (e.g., when a requisition is approved or returned).
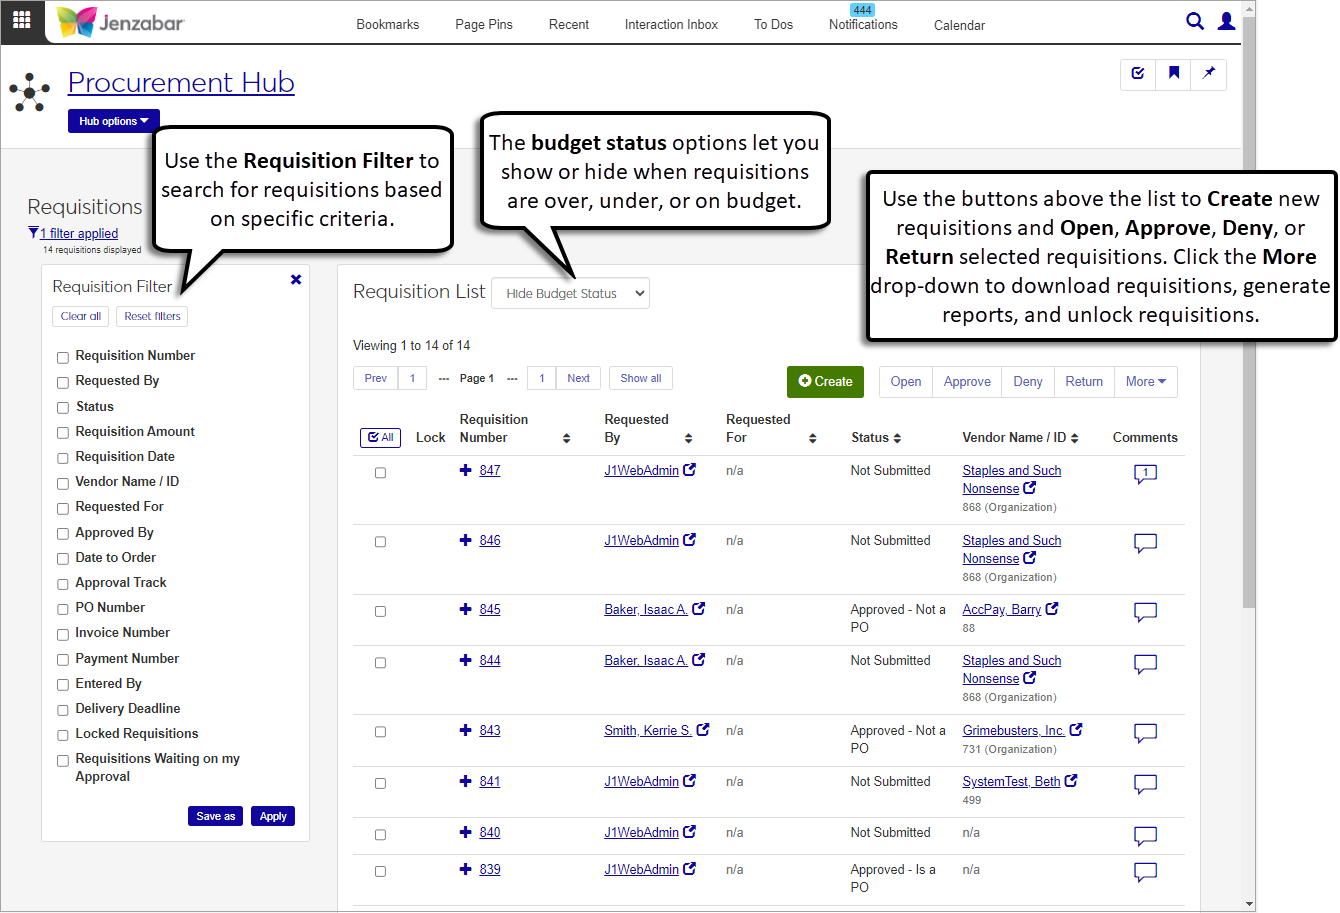
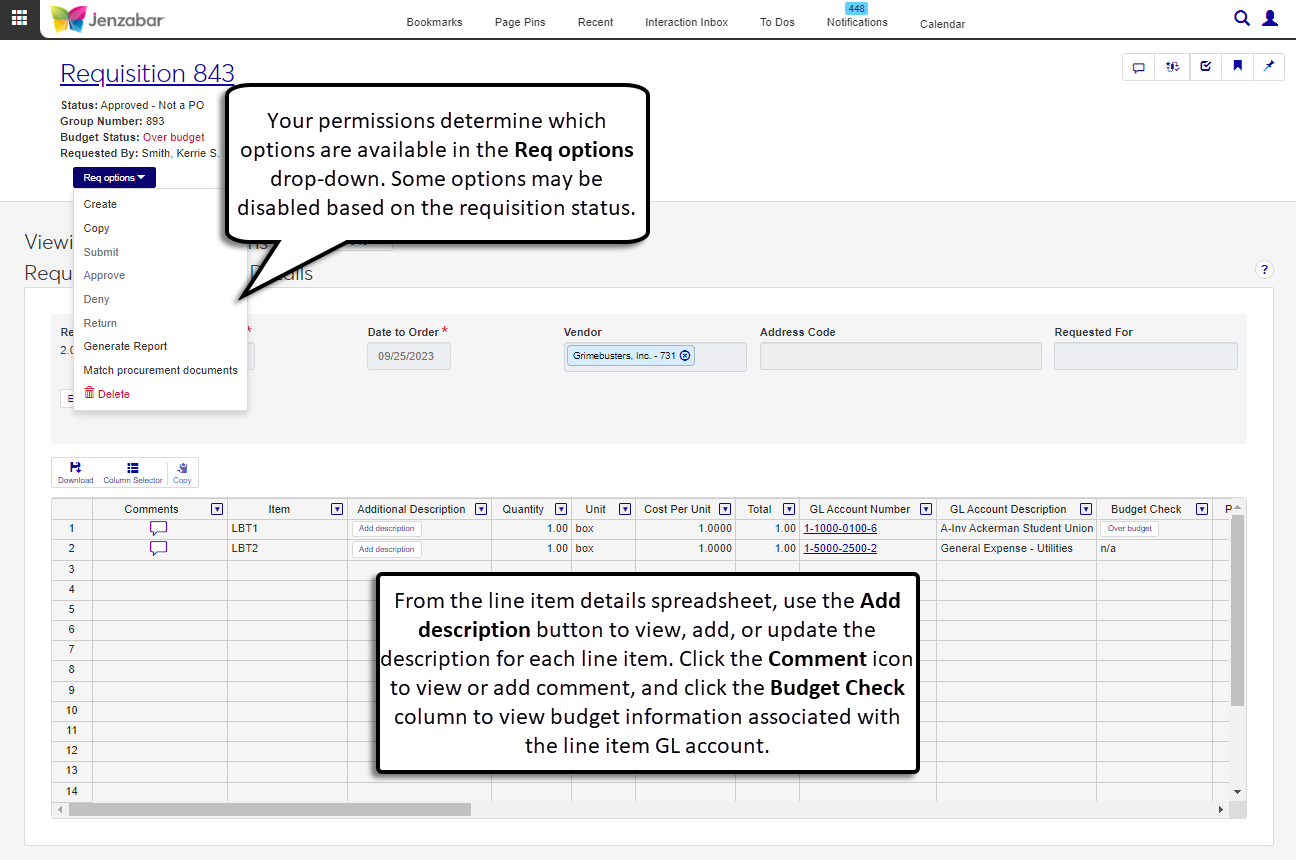
The Requisitions List page lets you search for, create, approve or deny, and generate requisition reports. From this page, you can access the requisition details page to view or update the requisition header and line item details. The Budget Status drop-down lets you display or hide budget status information for the requisition list.
The Create Requisition page can be accessed from the Requisition List page or from the Procurement hub navigation.
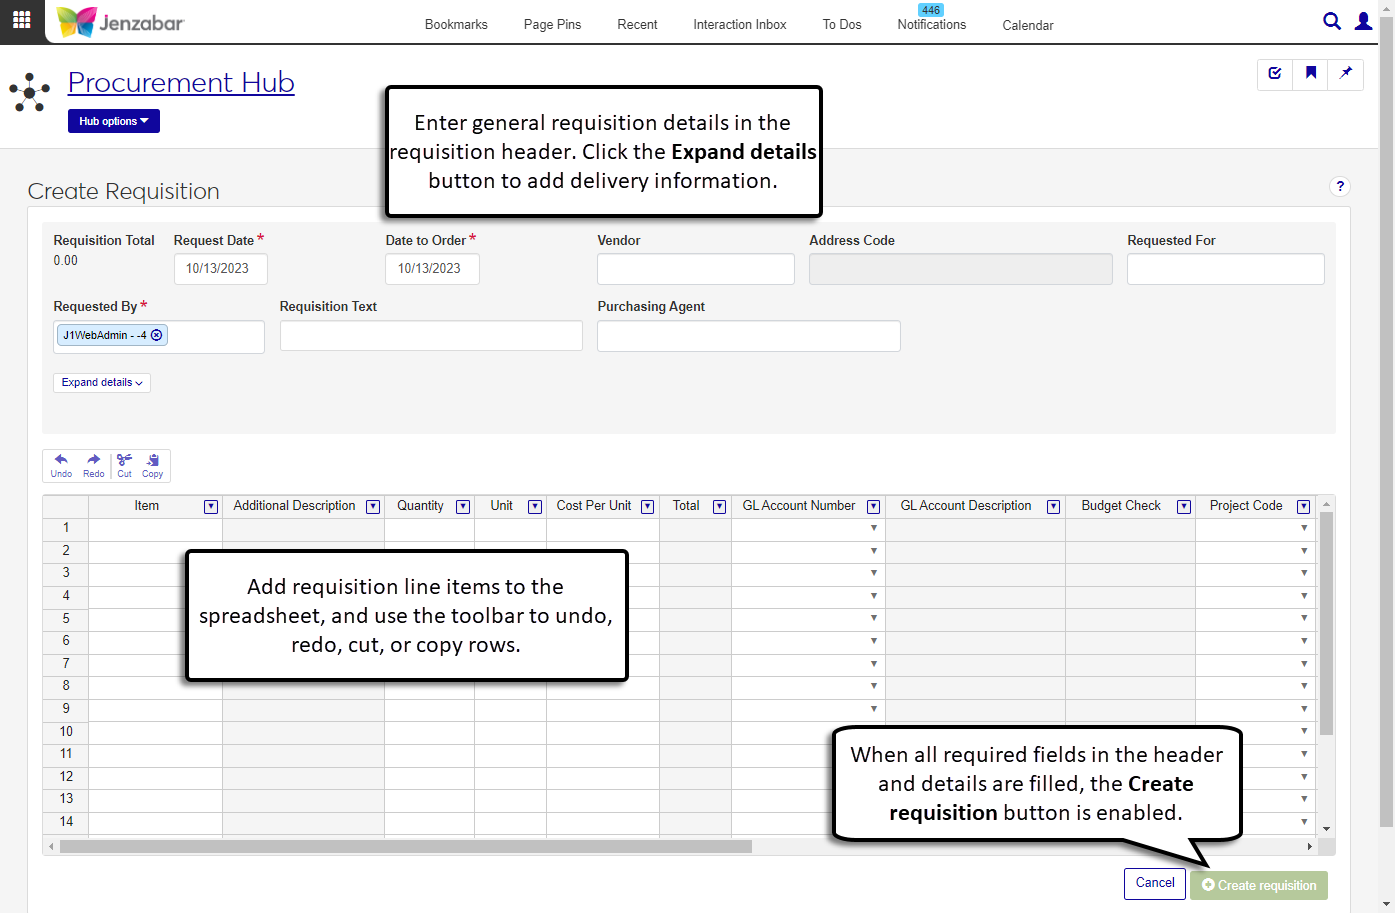
After the requisition is created, you can view or update details on the Requisition Header and Details page. Depending on your permissions and the requisition status, you also have options to submit, copy, approve, deny, return, or match procurement documents from this page.
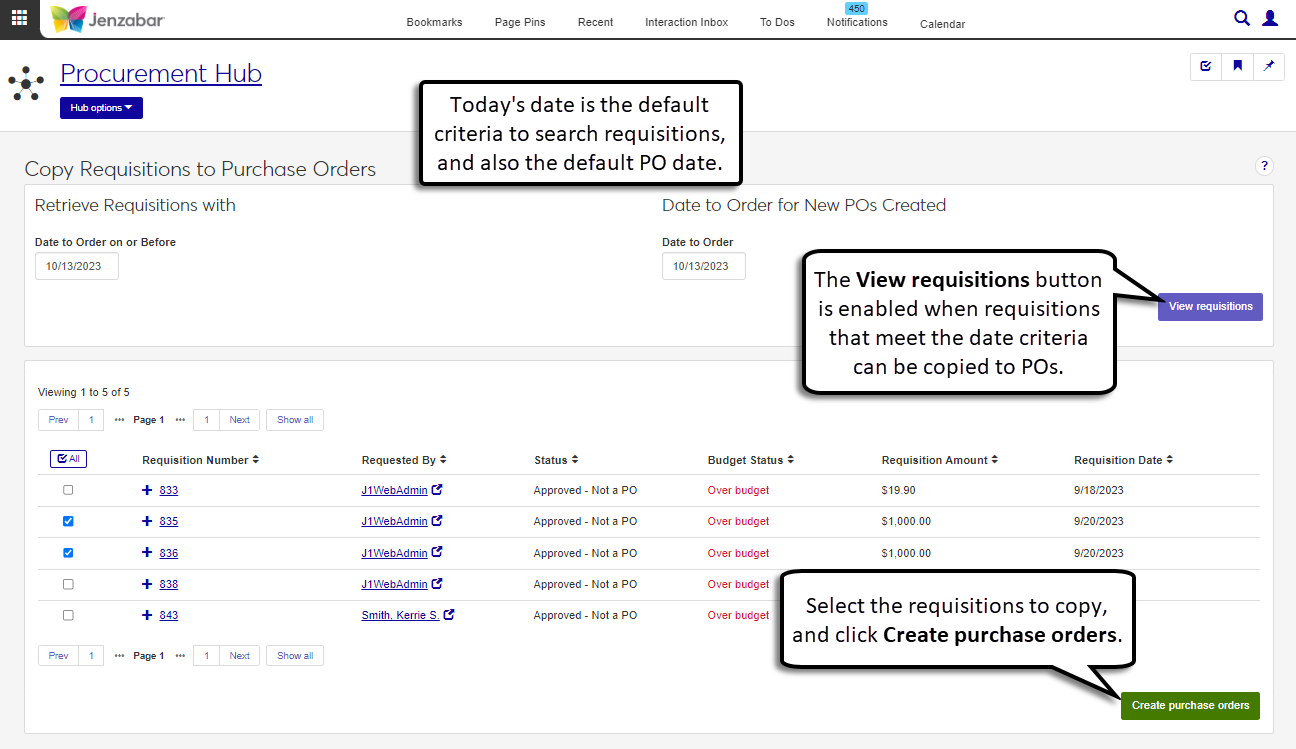
The Copy Requisitions to Purchase Orders page, accessed from the Procurement hub navigation, lets you select requisitions within a date range to create purchase orders.
Note
This page is only available if your institution is not configured to automatically create a purchase order upon final approval.
The Purchase Order List lets you view and access details for POs in your system. From this page, you can create, copy, and download POs. Additionally, you can unencumber POs and update supporting documentation. Use the Create communication button to send messages to vendors.
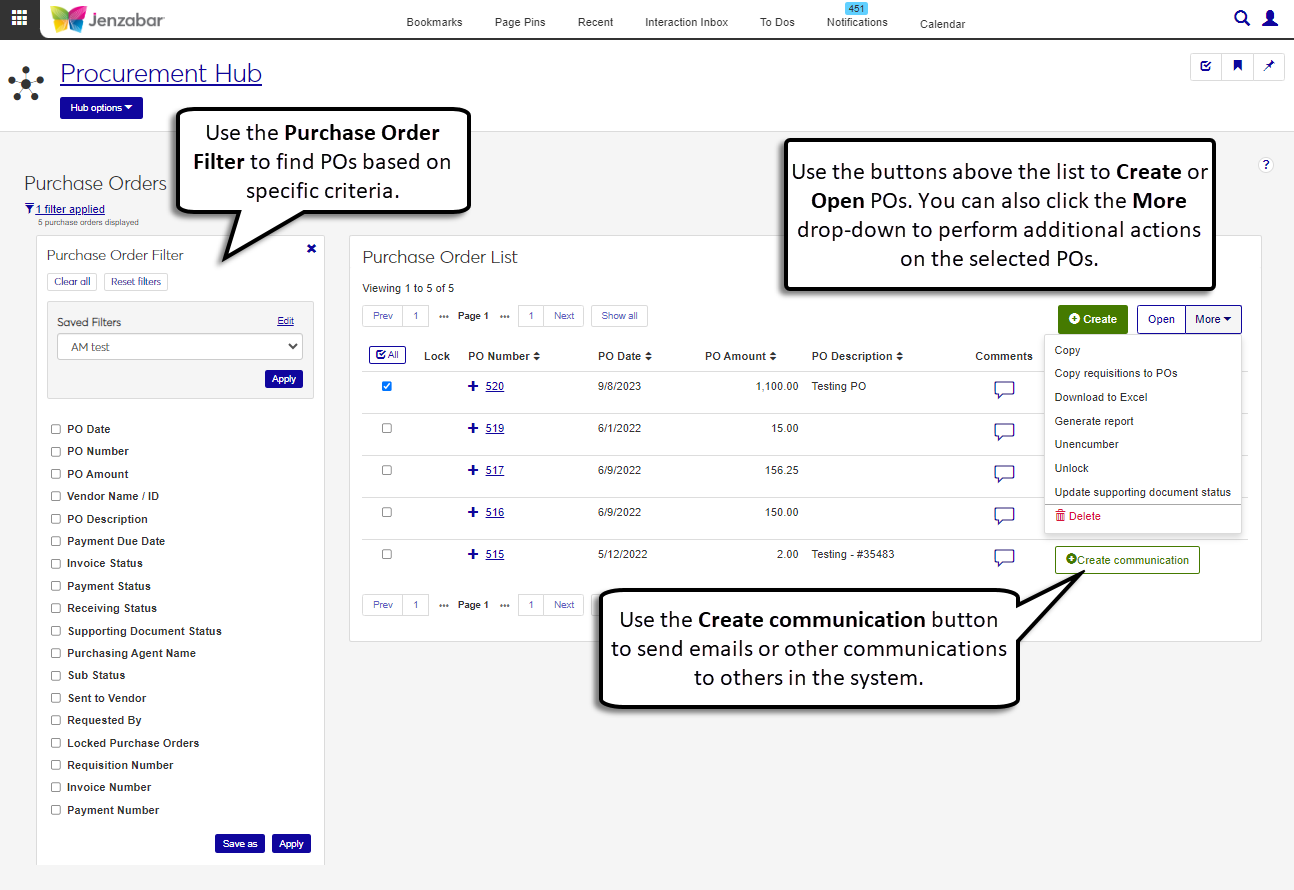
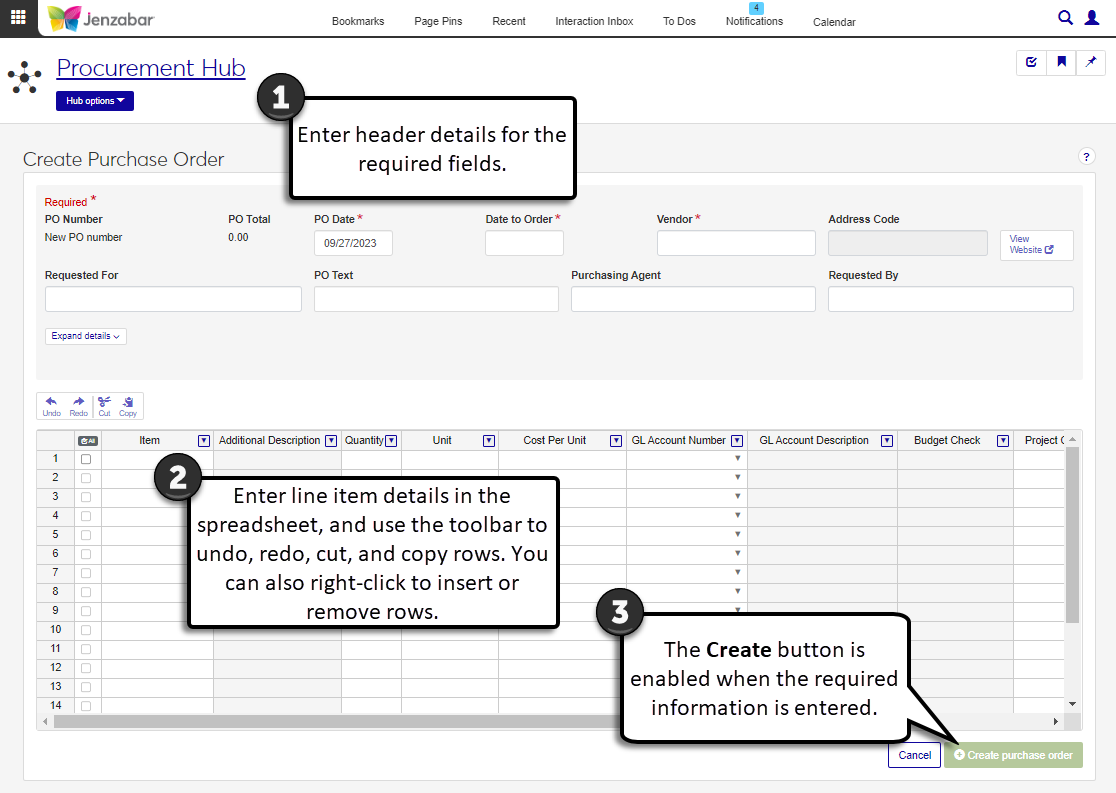
You can create POs in several ways: from the Create Purchase Order page, by copying a requisition to a PO, or by copying an existing PO.
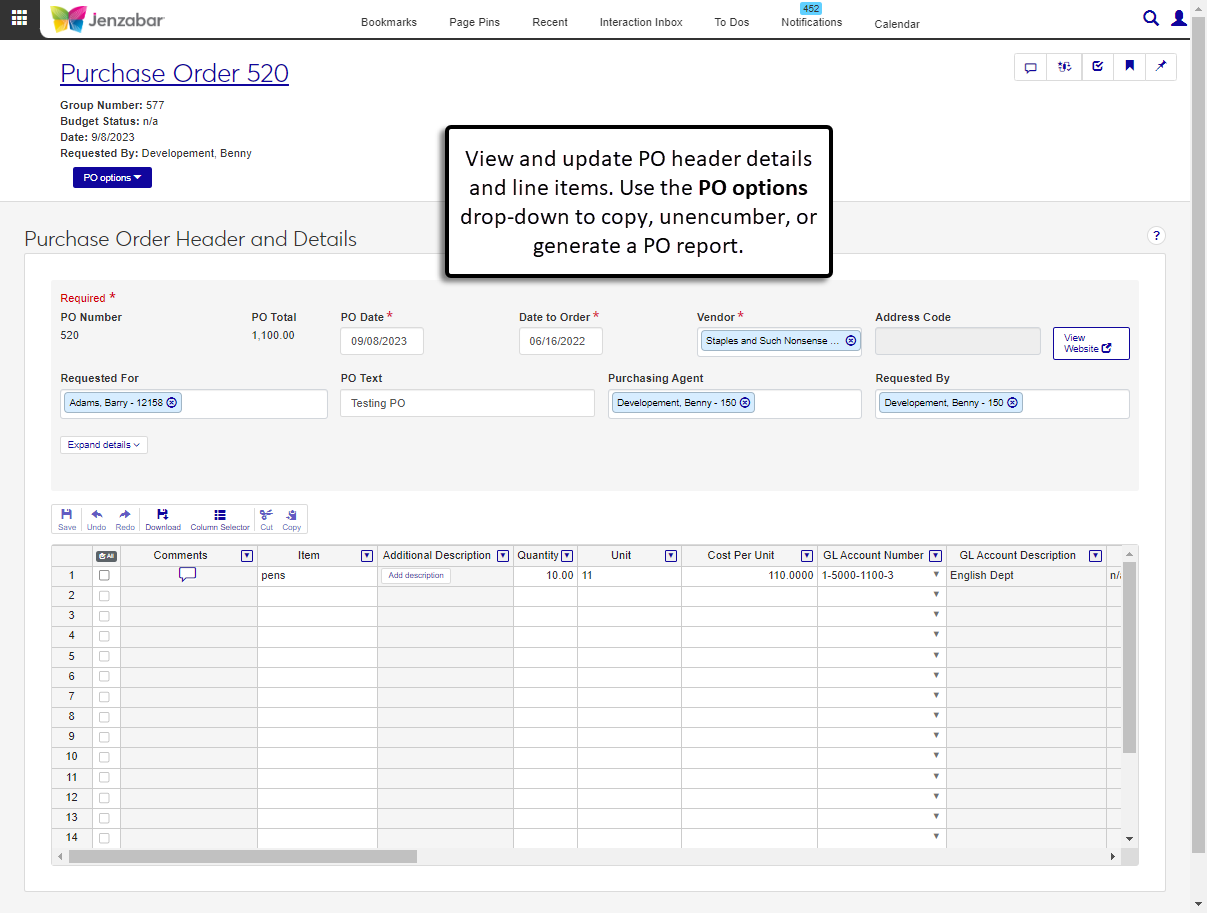
The Purchase Order Details page lets you view and update PO information. Additionally, you can copy the PO, unencumber the PO, generate the PO report, and view related procurement documents.
Generate various reports for procurement processes and documents from the Reports section of the Procurement hub navigation. The following reports can be generated from the Reports section.
AP Aging*
AP Register*
Credit Memo
MSDS
Open Purchase Orders Not Invoiced*
Open Purchase Orders Not Received
Purchase Orders by Date Printed
Purchase Orders by Vendor
Unpaid Invoices by Bank Account
Unpaid Invoices by Vendor
Vendor Payment History
* These reports must be recustomized and saved to the J1 Web PBL; customizations made in Desktop will not work for these reports. For more information about customizing reports for J1 Web, see Working with Reports in J1 Web.