Advising Student Holds Block
Important
Information and features vary according to the roles to which you belong and the permissions associated with those roles. For more information, contact your module manager or your campus support team.
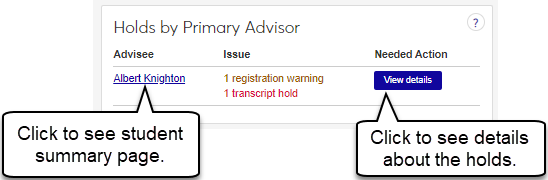
Use this block to identify advisees who have a registration or transcript problem with their student record. Depending upon your school‘s holds setup, holds can be placed on students for academic performance, fines, unpaid tuition, etc. Holds can impact a student’s ability to register for classes, retrieve transcripts, or receive their grades.
Permission to View and Manage Holds
Viewing and managing holds requires the "Can view holds" permission available in the Person Management role and roles copied from it. That role is on the User Management hub.
You assign None, View, Add, Add and Remove, or Admin permission for various hold types in the Associations tab of the role. See instructions below.
Note
Prior to J1 2024.1, permissions for holds were in Registration and Advising roles. (In fact, Advising roles still have the "Can view holds" permission in 2024.1, but it's restricted to view only.)
Permission to Override Holds
Overriding holds (to generate an official transcript of a student who has holds, for example) requires the "Can override student holds" permission available in the Registration Override and Access Control role and roles copied from it. The role is on the Registration Administration hub.
On the Navigation panel, click the Academic Advising hub. The page options appear.
Select one of the options: Primary, Academic Program, Athletic Roster, Campus Location, or All Students. The Summary page for that option opens, and the Advising Student Holds block appears. (The other options appear as tabs if you have those roles. Those tabs also have the Advising Student Holds block.)
Click the View details button. A Holds Information pop-up appears.
On the Holds block, the To Resolve column gives brief instructions for resolving the hold.
Note
Resolution options are set up on the Holds Definitions page.
Contact the appropriate office, department, or library to resolve the hold.
Then, when the issue is settled, click the Person options drop-down, and select Student, Student, Manage student holds. The Manage Student Holds page for that student opens.
Click the Actions drop-down, and select Edit hold. The Edit Student Hold pop-up opens.
Enter an End Date / Time and other information as needed.
Tip
As an alternative, you could enter a Removal Date / Time. However, if the hold wasn't a mistake, it's usually better to end the hold rather than remove it. That way the record of the hold is preserved.
Click the Update button.
Find a student's Summary page by using the universal search:
Click the Universal Search icon
 . The Search panel opens with the Person parameter selected.
Enter some of the student's name or ID, and select it from the list. The student's Summary page opens.
Click the Person options drop-down, and select Person, Manage holds. The student's Manage Holds page opens. Depending on permissions, you can view, add, edit, remove, and delete holds.
On the User Management hub, click the Hub options drop-down, and select Manage System Roles.
Scroll or use the System Roles Filter to find the role to set permissions on.
Tip
To find the Person Management role (or a copy with "Person" in the role name), click the Keyword checkbox. Enter "person" and click the Apply button.
Recommended: If a copy of the Person Management role doesn't already exist, make one to customize for your purposes. You could make one for Advising and one for Registrars, for example.
On the row for the Person Management role, click the Options drop-down, and select Copy. The Copy Role page opens.
Enter a New Role Name (such as Person Management - Advising) and New Role Description.
Click Save and continue. The role's permissions appear. Select and deselect permissions as needed.
Click the Copy role button. You're returned to the System Roles page. You can use the filters to find your new role.
Edit the role's permissions.:
On your role's row, click the Options drop-down, and select Edit. The Edit Role pop-up opens to the Permissions tab.
Click the Edit button.
Select and deselect permissions as needed, and click the Save button.
Add users to the role:
Click the Users tab.
Click the Add to Role button. The Add to Role pop-up opens.
Begin entering a user's name or ID, and select them from the list. Repeat for as many users as you need to add.
Click Add to Role. The users are added, and the pop-up closes.
Add modules to the role to enable interactions (communications) associated with those modules:
Click the Module Access tab.
Select the checkboxes for the modules you want.
Click the Options drop-down, and select Turn access on. Your changes are saved automatically.
Add specific permission types to specific hold types:
Click the Associations tab.
Click the Related Information group drop-down, and select Hold Type. The hold types appear below.
Select the checkbox for one or more hold types.
Click the Options drop-down, and select an access level:
None
View
Add
Add and Remove
Admin
Your changes are saved automatically.
Click on the advising student's name. The Student page appears with information about the student, including any available contact information.