Create a Receipt
Important
Information and features vary according to the roles to which you belong and the permissions associated with those roles. For more information, contact your module manager or your campus support team.
Warning
J1 Web does not currently support the Open Items configuration. If your school is configured for Open Items in the Desktop A/R Configuration window, continue working in J1 Desktop as you will not be able to use J1 Web Finance at this time.
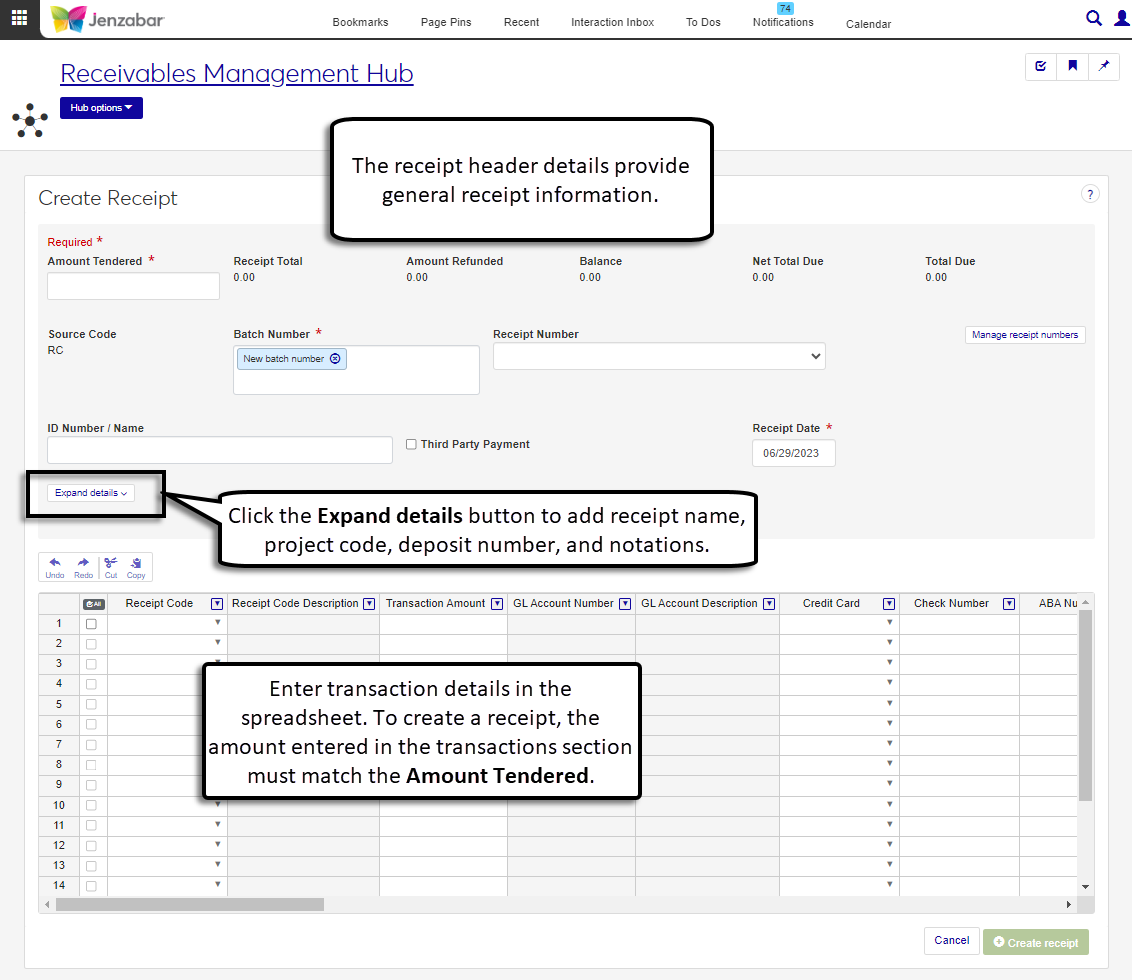
Use the Create Receipt page to enter and record transactions for payment receipts. The header section lets you add general receipt details, such as amount tendered, ID number associated with the payment, and receipt date. The spreadsheet details let you add transaction information for manual payments.
The steps to enter a receipt may vary, and schools typically enter receipts for one or all the following scenarios.
Regular student payments - receipts for individual students (e.g., tuition payment). One receipt may have multiple transactions if the student uses different methods of payment, like check and cash.
Payments for students on a payment plan - receipts for students that make payments against a payment plan. You can automatically distribute the amount over the student's payments or manually enter the amount for specific payments.
Payments for multiple students - receipts for payments that are applied to multiple students' balances (e.g., when an organization sends a single scholarship check to be applied to 4 students). When a single payment is applied to multiple students, each receipt transaction row is associated with a different student ID number.
Miscellaneous payments - receipts that are not associated with student subsidiaries (e.g., receipts for ticket sales to a Music department concert). Schools typically create a miscellaneous receipt code with a placeholder target account to handle this scenario.
Payments made by a third party - receipts for payments made by a third party person or organization and applied to a student account. The receipt may be entered differently depending on the method of third-party processing your institution uses.
To access this page, you must be in a Receivables Management role with "Can create receipts" permission. For additional details about permissions to work with receipts, see Roles and Permissions to Work with Receipts.
Receipts can also be added from the Desktop Receipt Entry Detail window (accessed from the Receipt Entry window > New Detail button).
Information entered in the header is saved to the RECEIPT_HEADER table. Transaction details are saved to the TRANS_HIST table.
The system automatically generates a receipt number based on receipt groups you define. Schools typically create a receipt group for each cashier (e.g., Amanda enters receipts that start at 10000 and Jerry enters receipts that start at 30000), as well as a receipt group for online payments. The group created for online payments is identified on the Desktop A/R Configuration window as the "Online Payment Receipt Group", and this is the default receipt number when the Receipt Number field is left blank.
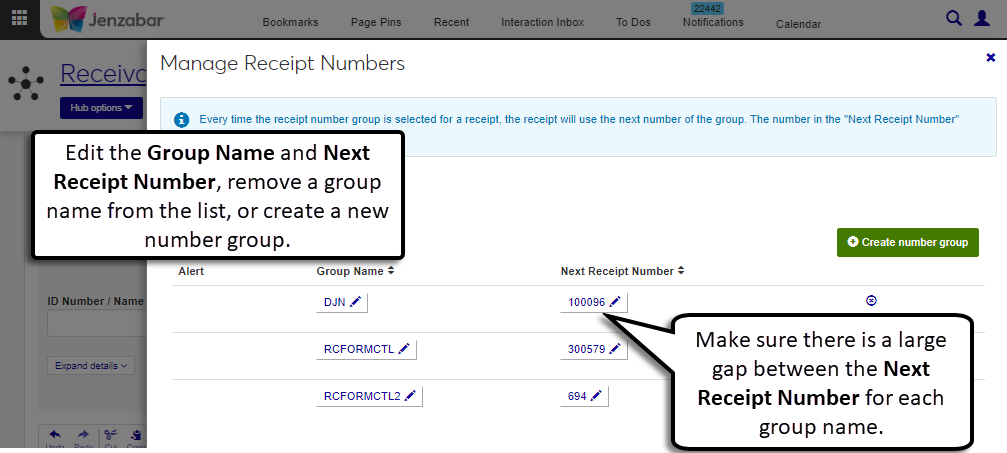
From the Create Receipt page, you can open the Manage Receipt Numbers pop-up to view and edit existing receipt groups, or add new groups.
Note
In Desktop, this functionality was managed in the Forms Control window. The Printer ID is equivalent to the J1 Web Group Name field, and the Forms Number is equivalent to the J1 Web Next Receipt Number field.
Warning
When adding or updating the Next Receipt Number, make sure there is a large numeric gap between each group (e.g., Group 1 starts with 10000 and Group 2 starts with 30000). Overlapping receipt numbers causes system errors.
The system allows you to generate receipt detail rows when receipts are entered for students associated with payment plans, must-pay course sections, and/or student life charges. After the ID Number / Name is entered, an informational alert displays with a Generate rows button. When clicked, the button opens a Generate Receipt Detail Rows pop-up and you can select the type of payment to generate receipt transaction rows. After selecting the appropriate receipt code for each detail row in the pop-up and entering required information, the transaction rows are added to the spreadsheet.
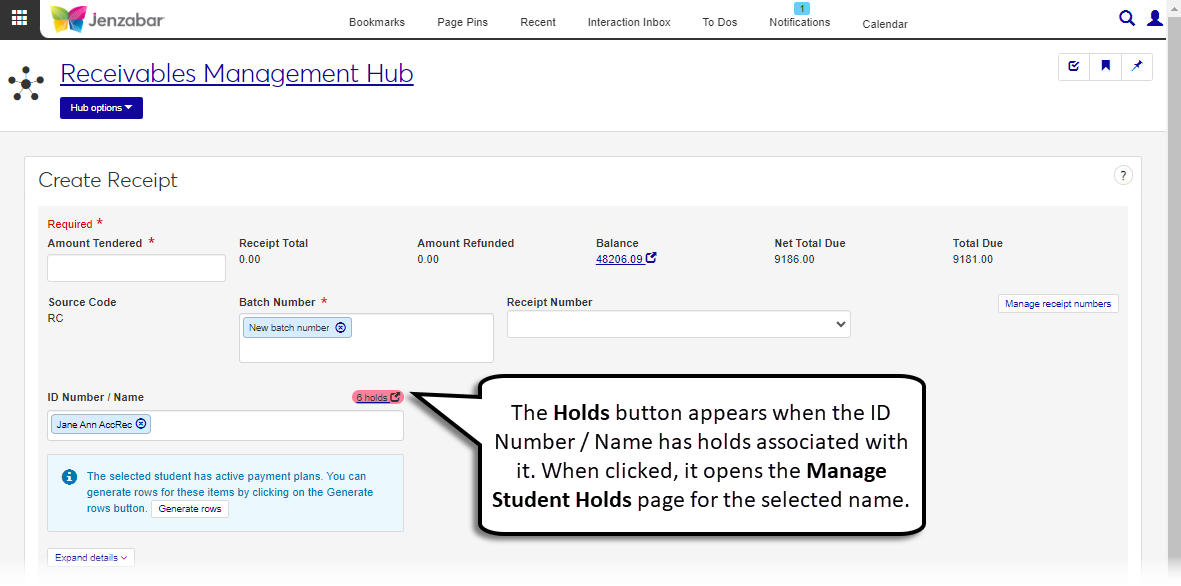
If there are holds associated with the ID Number / Name entered and you have permission to view holds, a link to the Manage Student Holds page appears. From that page, you can view, add, or edit holds if you have the appropriate permissions. For more information about managing holds, see Manage Student Holds in Student Information.
Note
You'll only see the holds that you have permission to view for a student. In other words, if a student has 5 holds and you have permission to view 3 of them, you'll only see 3 holds for that student.
There are several fields available for the receipt header, as well as additional columns for transaction details.
Note
The following fields are available in Desktop and either have a different look in J1 Web or are not available yet.
Autogenerate Rows from Subsidiary Master? Equivalent functionality for this checkbox can be accessed from the "Generate rows" button when an ID number is entered. In the Generate Receipt Detail Rows pop-up, select the From account balance option as the Type of Payment. This option is available for schools configured for the Balance Forward accounting method.
Autogenerate Rows from Open Items? J1 Web does not currently support the Open Items configuration. This functionality is planned for a future release.
A/R Hold. If the ID Number / Name has holds associated with it, a red Holds button
 is visible. This button links to the Manage Student Holds page for users with permission to view holds.
Print Receipt. J1 Web lets you generate and save the receipt file in a variety of formats and doesn't require you to set up a printer. When the file is generated as a PDF, you can print from the browser.
Currency. J1 Web doesn't currently support foreign currency configuration. This functionality is planned for a future release.
Exchange Rate. J1 Web doesn't currently support foreign currency configuration. This functionality is planned for a future release.
Field | Description |
|---|---|
Amount Tendered | Required. The amount received from the payer (in most cases, this is the payment amount). |
Receipt Total | A system-calculated amount that updates as transactions are added to the spreadsheet. |
Amount Refunded | The amount due back to the student/payer. It's calculated by subtracting the Receipt Total from the Amount Tendered. A value is only displayed when the Amount Tendered is greater than the Receipt Total. |
Balance | Auto-filled when the ID Number / Name field is entered. This is a calculated amount based on the total of all of the student’s transactions where the subsidiary code is set to be included in the receipt balance. If an ID Number/Name isn't entered, the Balance is 0.00. |
Net Total Due | This amount is calculated by the system for the entered ID Number, and the computation varies based on certain conditions. You can automatically generate receipt transaction rows based on the account balance, which updates the Net Total Due value. Options are available from the Generate Receipt Detail Rows pop-up.
NoteYou can manually update the transaction amount for the generated rows in the spreadsheet, and the column automatically updates. However, the Amount Tendered must equal the total Transaction Amount to save the receipt. |
Total Due | This amount is calculated by the system for the entered ID Number, and the computation varies based on certain conditions. You can automatically generate receipt transaction rows based on the account balance, which updates the Total Due value. Options are available from the Generate Receipt Detail Rows pop-up.
NoteYou can manually update the transaction amount for the generated rows in the spreadsheet, and the column automatically updates. However, the Amount Tendered must equal the total Transaction Amount to save the receipt. |
Source Code | Set to RC and cannot be edited. |
Batch Number | Required. Receipt transaction details are added to the next available RC batch number by default. Alternatively, you can add the receipt to an existing unposted RC batch by selecting an option from the drop-down. |
Receipt Number | Determines the number for the created receipt based on the selected receipt number group. Receipt number groups are managed in the Manage Receipt Numbers pop-up. The default receipt number if a receipt number group isn't selected is the next number for the receipt group identified as the "Online Payment Receipt Group" in the Desktop A/R Configuration window. |
Manage receipt numbers | Opens a pop-up with the list of receipt groups and the next receipt number for each group. The receipt number group is typically used to identify the cashier who entered the receipt. Schools usually create a separate receipt group for online payments, and this receipt group is identified as the "Online Payment Receipt Group" in the Desktop A/R Configuration window. WarningWhen adding or updating the Next Receipt Number, make sure there is a large numeric gap between each group (e.g., Group 1 starts with 10000 and Group 2 starts with 30000). Overlapping receipt numbers causes system errors. |
ID Number / Name | This is the student or person making the payment. If your school is not set up for enhanced billing and the Third Party Payment checkbox is selected, this is the ID number of the third party making the payment. You'll enter the ID for the student in the receipt detail spreadsheet. |
Third Party Payment | Select the checkbox if the payment is being made by a third party. When this checkbox is selected, enter the third party's ID number in the ID Number / Name field; the student's ID number will be entered in the receipt detail spreadsheet. NoteThis option isn't visible if your school is set up for enhanced third-party billing and the Process Third Party as Subsidiary checkbox is selected on the Desktop A/R Configuration window. |
Receipt Date | The date the payment is being made. Default is today's date. Required. Date should be within the current fiscal year. |
Name on Receipt | The person making the payment. Typically the name associated with the ID Number, but can be updated manually. This name appears on the printed receipt. |
Project Code | Indicates the payment is associated with a specific project. Available options are determined by your Project Access role and permissions. |
Deposit Number | Indicates the number on the deposit ticket this receipt will be included on. This can be helpful for tracking receipts associated with certain deposit tickets, but this number is not used by the system and doesn't appear on the default receipt layout. |
Notation 1 and 2 | Additional text used to describe the payment (up to 30 characters). This text does not appear on the default receipt layout. |
Tip
The system updates the ID Number / Name field when you enter a full ID number and press Tab to move to the next field.
Access the Create Receipt page from the Receivables Management Hub options or by clicking the Create receipt button on the Receipt List page.
Enter the Amount Tendered. Required.
In the ID Number / Name, enter an ID Number, name, SSN, or birthdate and select from the drop-down options. This is typically the name of the student, but for schools set up for third-party payments, this can be the ID number of the third party making the payment.
The following fields are read-only and are updated as transaction details are added to the spreadsheet and/or when an ID Number / Name is entered.
Receipt Total
Amount Refunded
Balance
Net Total Due
Total Due
The Source Code is set to RC and cannot be edited.
The Batch Number defaults to the next available RC batch number, or you can select an unposted RC batch from the drop-down to add the receipt to an existing batch.
Select a receipt group number from the Receipt Number drop-down. The next receipt number for the selected group will be assigned to the new receipt. If the field is left blank, the default is the next receipt number for the receipt group identified as the Online Payment Receipt Group in the Desktop A/R Configuration window.
To view, update, or create new receipt groups, click the Manage receipt numbers button. The Manage Receipt Numbers pop-up opens.
To edit an existing number group:
Warning
When adding or updating the Next Receipt Number, make sure there is a large numeric gap between each group (e.g., Group 1 starts with 10000 and Group 2 starts with 30000). Overlapping receipt numbers causes system errors.
Click the Edit icon next to the field you want to update.
Enter the updated value.
Click Save.
When edits are complete, click Close on the Manage Receipt Numbers pop-up.
To create a new number group:
Click the Create number group button. A new row is added to the grid.
Enter a unique Group Name (up to 10 characters).
Enter a positive number, up to 9 digits, as the Next Receipt Number.
Warning
Make sure there is a large numeric gap between the new group's next receipt number and existing next receipt numbers (e.g., Group 1 starts with 10000 and Group 2 starts with 30000). Overlapping receipt numbers causes system errors.
To remove an existing number group, click the Remove icon for that row.
Select the Third Party Payment checkbox if the payment is being made by a third party on the student's behalf. When this checkbox is selected, the third party's ID Number should be entered in the ID Number / Name field. The student's ID can be added to the receipt details.
Note
This option isn't visible if your school is set up for enhanced third-party billing and the Process Third Party as Subsidiary checkbox is selected on the Desktop A/R Configuration window.
The Receipt Date is defaulted to today's date, and you can update it to another date.
Click the Expand details button to enter information in the following fields:
Name on Receipt
Project Code
Deposit Number
Notation 1, 2
In the transaction details spreadsheet, select a Receipt Code and enter required and desired information for each transaction row. See the Fields section above for additional details about each column. Minimum required, editable columns are:
Receipt Code
Transaction Amount
Transaction Description
ID Number (required when an AR subsidiary is associated with the receipt code)
1098-T Academic Year / Term (required when an ID Number is entered)
Use the spreadsheet toolbar options to Undo, Redo, Cut, or Copy row information.
Click the Create receipt button. The receipt is saved and the Receipt Created. Generate PDF & Create Another? pop-up opens.
If any of the non-payment plan receipt detail rows are associated with a convenience fee, an "Apply General Convenience Fees?" pop-up displays when the receipt it saved. Click Yes, apply to update the transaction amounts to include the fees.
Keep the Generate receipt PDF checkbox selected to generate a printable receipt file in another tab. To create the receipt without generating the printable file, deselect the checkbox.
When the Generate receipt PDF checkbox is selected, the Receipt Layout is required. The default is <Original>, and any customizations of the J1 Web report are available for selection.
Note
Reports that were customized in Desktop are not available for selection. To create customized reports for J1 Web, see Working with Reports in J1 Web.
The File Format field automatically populates with the PDF file type, and you can select additional files types from the drop-down. When multiple file formats are selected, or when a single format that isn't PDF is selected, the files are downloaded as a zip folder.
Keep the Create another receipt under the same batch checkbox selected if desired. When this is selected, a blank Create Receipt page opens with the Batch Number filled in.
Click Yes, continue. The pop-up closes and one of the following pages displays.
The receipt PDF (when "Generate receipt PDF" is selected and PDF is the only selection in the File Format field)
The Create Receipt page (when "Create another receipt under the same batch" is selected)
The Receipt Details page (when neither checkbox is selected)
Note
The Payment plan option to generate receipt detail rows is available for students assigned to a payment plan with a remaining balance due. Only new self-service payment plans can be selected for payment.
Access the Create Receipt page from the Receivables Management Hub options or by clicking the Create receipt button on the Receipt List page.
Enter the Amount Tendered. Required.
The following fields are read-only and are updated as transaction details are added to the spreadsheet and/or when an ID Number / Name is entered.
Receipt Total
Amount Refunded
Balance
Net Total Due
Total Due
The Source Code is set to RC and cannot be edited.
The Batch Number defaults to the next available RC batch number, or you can select an unposted RC batch from the drop-down to add the receipt to an existing batch.
Select a receipt group number from the Receipt Number drop-down. The next receipt number for the selected group will be assigned to the new receipt. If the field is left blank, the default is the next receipt number for the receipt group identified as the Online Payment Receipt Group in the Desktop A/R Configuration window.
To edit an existing number group:
Click the Edit icon next to the field you want to update.
Enter the updated value.
Click Save.
When edits are complete, click Close on the Manage Receipt Numbers pop-up.
To remove an existing number group, click the Remove icon for that row.
To create a new number group:
Click the Create number group button. A new row is added to the grid.
Enter a unique Group Name (up to 10 characters).
Enter a positive number, up to 9 digits, as the Next Receipt Number.
Warning
Make sure there is a large numeric gap between the new group's next receipt number and existing next receipt numbers (e.g., Group 1 starts with 10000 and Group 2 starts with 30000). Overlapping receipt numbers causes system errors.
In the ID Number / Name, enter an ID Number, name, SSN, or birthdate and select from the drop-down options. This is typically the name of the student, but for schools set up for third-party payments, this can be the ID number of the third party making the payment.
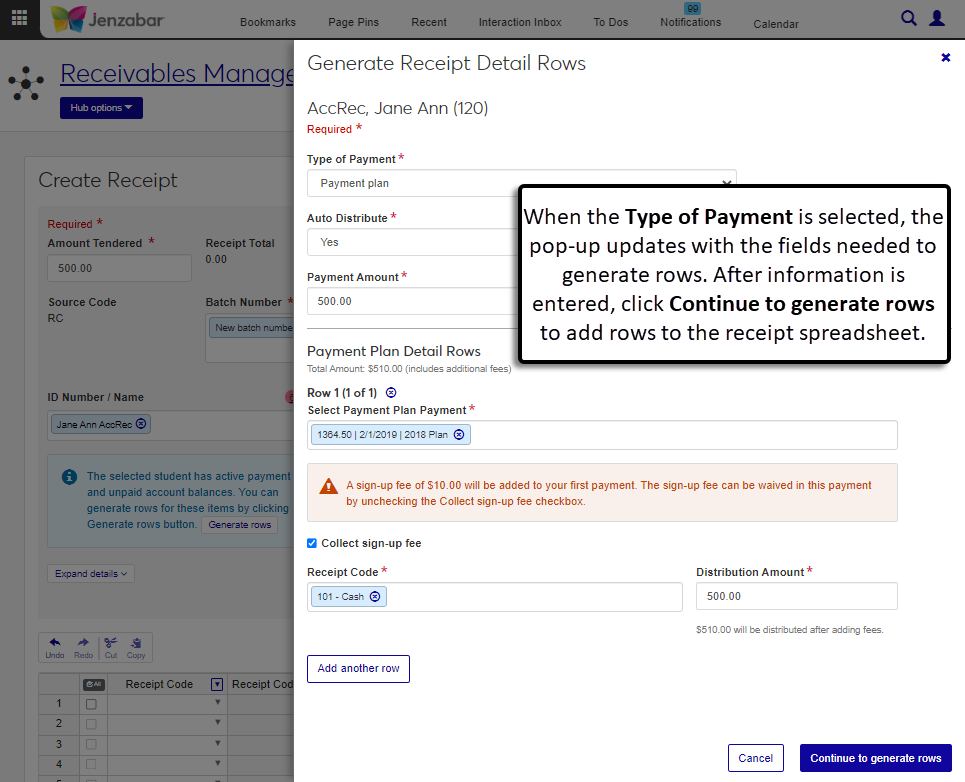
An informational alert lets you know receipt detail rows can be generated automatically. Click the Generate rows button.
In the Generate Receipt Detail Rows pop-up, select "Payment Plan" from the Type of Payment drop-down.
In the Auto Distribute field, select "Yes" or "No". The Payment Plan Detail Rows section appears.
If Yes is selected:
Note
The system automatically distributes the payment amount across unpaid payment detail rows until the payment amount is fully distributed. The payment is distributed to the oldest payment due date first, then up to most recent due date. You can manually adjust the Distribution Amount for each row if needed.
Enter the Payment Amount. The Payment Plan Detail Rows section appears.
In the Select Payment Plan Payment field, the self-service payment plan payment with the next or past due date is automatically selected. Required.
If the Payment Amount is less than the plan payment due, the Distribution Amount autofills with the payment amount. If the Payment Amount is more than the plan payment due, the Distribution Amount autofills with the plan payment amount and generates additional detail rows to distribute the remaining amount across the plan payments. Required.
Notice
Ann makes a $500 payment towards her Fall 2023 payment plan. Her plan has 4 payments of $300. When Yes, Auto Distribute is selected, the system automatically applies the first $300 to Payment 1 and the remaining $200 is applied to Payment 2.
If there are any fees associated with the plan, select or deselect the checkboxes to add the fee to the distribution amount. A note with the distribution amount, including fees, appears beneath the Distribution Amount field. Fee checkbox options can be one or more of the following:
Collect sign-up fee
Collect convenience fee
Enter the Receipt Code for each row. Required.
Click Add another row to distribute the payment amount to additional payments in the plan, and enter or select the required information.
Click the Remove icon to remove payment detail rows.
If No is selected:
The Payment Plan Detail Rows section appears.
In the Select Payment Plan Payment drop-down, select the appropriate plan payment. Required.
If there are any fees associated with the plan, select or deselect the checkboxes to add the fee to the distribution amount. A note with the distribution amount, including fees, appears beneath the Distribution Amount field. Fee checkbox options can be one or more of the following:
Collect sign-up fee
Collect convenience fee
Select a Receipt Code. Required.
Enter the Distribution Amount. Required.
Click Add another row to distribute the payment amount to additional payments.
Click the Remove icon to remove payment detail rows.
Review and update information as needed, then click Continue to generate rows. The pop-up closes and the receipt details spreadsheet is updated with transaction details for each payment row.
Select the Third Party Payment checkbox if the payment is being made by a third party on the student's behalf. When this checkbox is selected, the third party's ID Number should be entered in the ID Number / Name field. The student's ID can be added to the receipt details.
Note
This option isn't visible if your school is set up for enhanced third-party billing and the Process Third Party as Subsidiary checkbox is selected on the Desktop A/R Configuration window.
The Receipt Date is defaulted to today's date, and you can update it to another date.
Click the Expand details button to enter information in the following fields:
Name on Receipt
Project Code
Deposit Number
Notation 1, 2
In the transaction details spreadsheet, review the rows that were automatically generated for payment plan payments and make updates as needed.
Note
The Transaction Amount cannot be updated for rows generated via the Generate Rows process.
Use the spreadsheet toolbar options to Undo, Redo, Cut, or Copy row information.
Click the Create receipt button. The receipt is saved and the Receipt Created. Generate PDF & Create Another? pop-up opens.
Keep the Generate receipt PDF checkbox selected to generate a printable receipt file in another tab. To create the receipt without generating the printable file, deselect the checkbox.
When the Generate receipt PDF checkbox is selected, the Receipt Layout is required. The default is <Original>, and any customizations of the J1 Web report are available for selection.
Note
Reports that were customized in Desktop are not available for selection. To create customized reports for J1 Web, see Working with Reports in J1 Web.
The File Format field automatically populates with the PDF file type, and you can select additional files types from the drop-down. When multiple file formats are selected, or when a single format that isn't PDF is selected, the files are downloaded as a zip folder.
Keep the Create another receipt under the same batch checkbox selected if desired. When this is selected, a blank Create Receipt page opens with the Batch Number filled in.
Click Yes, continue. The pop-up closes and one of the following pages displays.
The receipt PDF (when "Generate receipt PDF" is selected and PDF is the only selection in the File Format field)
The Create Receipt page (when "Create another receipt under the same batch" is selected)
The Receipt Details page (when neither checkbox is selected)
Note
When a single receipt for multiple students, the student ID number is manually added to each transaction detail row instead of being added in the receipt header.
Access the Create Receipt page from the Receivables Management Hub options or by clicking the Create receipt button on the Receipt List page.
Enter the Amount Tendered. Required.
The following fields are read-only and are updated as transaction details are added to the spreadsheet and/or when an ID Number / Name is entered.
Receipt Total
Amount Refunded
Balance
Net Total Due
Total Due
The Source Code is set to RC and cannot be edited.
The Batch Number defaults to the next available RC batch number, or you can select an unposted RC batch from the drop-down to add the receipt to an existing batch.
Select a receipt group number from the Receipt Number drop-down. The next receipt number for the selected group will be assigned to the new receipt. If the field is left blank, the default is the next receipt number for the receipt group identified as the Online Payment Receipt Group in the Desktop A/R Configuration window.
To view, update, or create new receipt groups, click the Manage receipt numbers button. The Manage Receipt Numbers pop-up opens.
To edit an existing number group:
Warning
When adding or updating the Next Receipt Number, make sure there is a large numeric gap between each group (e.g., Group 1 starts with 10000 and Group 2 starts with 30000). Overlapping receipt numbers causes system errors.
Click the Edit icon next to the field you want to update.
Enter the updated value.
Click Save.
When edits are complete, click Close on the Manage Receipt Numbers pop-up.
To remove an existing number group, click the Remove icon for that row.
To create a new number group:
Click the Create number group button. A new row is added to the grid.
Enter a unique Group Name (up to 10 characters).
Enter a positive number, up to 9 digits, as the Next Receipt Number.
Warning
Make sure there is a large numeric gap between the new group's next receipt number and existing next receipt numbers (e.g., Group 1 starts with 10000 and Group 2 starts with 30000). Overlapping receipt numbers causes system errors.
Select the Third Party Payment checkbox if the payment is being made by a third party on the student's behalf. When this checkbox is selected, the third party's ID Number should be entered in the ID Number / Name field. The student's ID can be added to the receipt details.
Note
This option isn't visible if your school is set up for enhanced third-party billing and the Process Third Party as Subsidiary checkbox is selected on the Desktop A/R Configuration window.
The Receipt Date is defaulted to today's date, and you can update it to another date.
Click the Expand details button to enter information in the following fields:
Name on Receipt
Project Code
Deposit Number
Notation 1, 2
In the transaction details spreadsheet, select a Receipt Code and enter required and desired information for each transaction row, including the ID number for each student. See the Fields section above for additional details about each column.
Receipt Code
Transaction Amount
Transaction Description
ID Number (required when an AR subsidiary is associated with the receipt code)
1098-T Academic Year / Term (required when an ID Number is entered)
Use the spreadsheet toolbar options to Undo, Redo, Cut, or Copy row information.
Click the Create receipt button. The receipt is saved and the Receipt Created. Generate PDF & Create Another? pop-up opens.
If any of the non-payment plan receipt detail rows are associated with a convenience fee, an "Apply General Convenience Fees?" pop-up displays when the receipt it saved. Click Yes, apply to update the transaction amounts to include the fees.
Keep the Generate receipt PDF checkbox selected to generate a printable receipt file in another tab. To create the receipt without generating the printable file, deselect the checkbox.
When the Generate receipt PDF checkbox is selected, the Receipt Layout is required. The default is <Original>, and any customizations of the J1 Web report are available for selection.
Note
Reports that were customized in Desktop are not available for selection. To create customized reports for J1 Web, see Working with Reports in J1 Web.
The File Format field automatically populates with the PDF file type, and you can select additional files types from the drop-down. When multiple file formats are selected, or when a single format that isn't PDF is selected, the files are downloaded as a zip folder.
Keep the Create another receipt under the same batch checkbox selected if desired. When this is selected, a blank Create Receipt page opens with the Batch Number filled in.
Click Yes, continue. The pop-up closes and one of the following pages displays.
The receipt PDF (when "Generate receipt PDF" is selected and PDF is the only selection in the File Format field)
The Create Receipt page (when "Create another receipt under the same batch" is selected)
The Receipt Details page (when neither checkbox is selected)
Access the Create Receipt page from the Receivables Management Hub options or by clicking the Create receipt button on the Receipt List page.
Enter the Amount Tendered. Required.
The following fields are read-only and are updated as transaction details are added to the spreadsheet.
Receipt Total
Amount Refunded
Balance
Net Total Due
Total Due
The Source Code is set to RC and cannot be edited.
The Batch Number defaults to the next available RC batch number, or you can select an unposted RC batch from the drop-down to add the receipt to an existing batch.
Select a receipt group number from the Receipt Number drop-down. The next receipt number for the selected group will be assigned to the new receipt. If the field is left blank, the default is the next receipt number for the receipt group identified as the Online Payment Receipt Group in the Desktop A/R Configuration window.
To view, update, or create new receipt groups, click the Manage receipt numbers button. The Manage Receipt Numbers pop-up opens.
To edit an existing number group:
Warning
When adding or updating the Next Receipt Number, make sure there is a large numeric gap between each group (e.g., Group 1 starts with 10000 and Group 2 starts with 30000). Overlapping receipt numbers causes system errors.
Click the Edit icon next to the field you want to update.
Enter the updated value.
Click Save.
When edits are complete, click Close on the Manage Receipt Numbers pop-up.
To remove an existing number group, click the Remove icon for that row.
To create a new number group:
Click the Create number group button. A new row is added to the grid.
Enter a unique Group Name (up to 10 characters).
Enter a positive number, up to 9 digits, as the Next Receipt Number.
Warning
Make sure there is a large numeric gap between the new group's next receipt number and existing next receipt numbers (e.g., Group 1 starts with 10000 and Group 2 starts with 30000). Overlapping receipt numbers causes system errors.
Select the Third Party Payment checkbox if the payment is being made by a third party on the student's behalf. When this checkbox is selected, the third party's ID Number should be entered in the ID Number / Name field. The student's ID can be added to the receipt details.
Note
This option isn't visible if your school is set up for enhanced third-party billing and the Process Third Party as Subsidiary checkbox is selected on the Desktop A/R Configuration window.
The Receipt Date is defaulted to today's date, and you can update it to another date.
Click the Expand details button to enter information in the following fields:
Name on Receipt
Project Code
Deposit Number
Notation 1, 2
In the transaction details spreadsheet, select a Receipt Code and enter required and desired information for each transaction row. See the Fields section above for additional details about each column.
Receipt Code
Transaction Amount
Transaction Description
Use the spreadsheet toolbar options to Undo, Redo, Cut, or Copy row information.
Click the Create receipt button. The receipt is saved and the Receipt Created. Generate PDF & Create Another? pop-up opens.
Keep the Generate receipt PDF checkbox selected to generate a printable receipt file in another tab. To create the receipt without generating the printable file, deselect the checkbox.
If any of the receipt detail rows are associated with a convenience fee, an "Apply General Convenience Fees?" pop-up displays when the receipt it saved. Click Yes, apply to update the transaction amounts to include the fees.
When the Generate receipt PDF checkbox is selected, the Receipt Layout is required. The default is <Original>, and any customizations of the J1 Web report are available for selection.
Note
Reports that were customized in Desktop are not available for selection. To create customized reports for J1 Web, see Working with Reports in J1 Web.
The File Format field automatically populates with the PDF file type, and you can select additional files types from the drop-down. When multiple file formats are selected, or when a single format that isn't PDF is selected, the files are downloaded as a zip folder.
Keep the Create another receipt under the same batch checkbox selected if desired. When this is selected, a blank Create Receipt page opens with the Batch Number filled in.
Click Yes, continue. The pop-up closes and one of the following pages displays.
The receipt PDF (when "Generate receipt PDF" is selected and PDF is the only selection in the File Format field)
The Create Receipt page (when "Create another receipt under the same batch" is selected)
The Receipt Details page (when neither checkbox is selected)
Tip
Depending on the charges associated with the selected student, there may be several options available for generating receipt detail rows. If needed, you can click the Generate rows button multiple times to create rows for the receipt.
From the Create Receipt page, enter the Amount Tendered.
In the ID Number / Name, enter an ID Number, name, SSN, or birthdate and select from the drop-down options. This is typically the name of the student, but for schools set up for third-party payments, this can be the ID number of the third party making the payment.
An informational alert lets you know receipt detail rows can be generated automatically. Click the Generate rows button.
To generate rows for Payment Plans:
In the Generate Receipt Detail Rows pop-up, select "Payment Plan" from the Type of Payment drop-down.
In the Auto Distribute field, select "Yes" or "No". The Payment Plan Detail Rows section appears.
If Yes is selected:
Note
The system automatically distributes the payment amount across unpaid payment detail rows until the payment amount is fully distributed. The payment is distributed to the oldest payment due date first, then up to most recent due date. You can manually adjust the Distribution Amount for each row if needed.
Enter the Payment Amount. The Payment Plan Detail Rows section appears.
In the Select Payment Plan Payment field, the self-service payment plan payment with the next or past due date is automatically selected. Required.
If the Payment Amount is less than the plan payment due, the Distribution Amount autofills with the payment amount. If the Payment Amount is more than the plan payment due, the Distribution Amount autofills with the plan payment amount and generates additional detail rows to distribute the remaining amount across the plan payments. Required.
Notice
Ann makes a $500 payment towards her Fall 2023 payment plan. Her plan has 4 payments of $300. When Yes, Auto Distribute is selected, the system automatically applies the first $300 to Payment 1 and the remaining $200 is applied to Payment 2.
If there are any fees associated with the plan, select or deselect the checkboxes to add the fee to the distribution amount. A note with the distribution amount, including fees, appears beneath the Distribution Amount field. Fee checkbox options can be one or more of the following:
Collect sign-up fee
Collect convenience fee
Enter the Receipt Code for each row. Required.
Click Add another row to distribute the payment amount to additional payments in the plan, and enter or select the required information.
Click the Remove icon to remove payment detail rows.
If No is selected:
The Payment Plan Detail Rows section appears.
In the Select Payment Plan Payment drop-down, select the appropriate plan payment. Required.
If there are any fees associated with the plan, select or deselect the checkboxes to add the fee to the distribution amount. A note with the distribution amount, including fees, appears beneath the Distribution Amount field. Fee checkbox options can be one or more of the following:
Collect sign-up fee
Collect convenience fee
Select a Receipt Code. Required.
Enter the Distribution Amount. Required.
Click Add another row to distribute the payment amount to additional payments.
Click the Remove icon to remove payment detail rows.
Review and update information as needed, then click Continue to generate rows. The pop-up closes and the receipt details spreadsheet is updated with transaction details for each payment row.
To generate rows for Must Pay Sections:
In the Generate Receipt Detail Rows pop-up, select Must pay sections from the Type of Payment drop-down.
Select an option from the Select Must Pay Sections drop-down.
Select the Receipt Code.
Click Add another row to enter additional information, or click the Remove icon to remove a row.
Click Continue to generate rows. The transaction details spreadsheet updates based on the entered information.
To generate rows for Student Life Charges:
In the Generate Receipt Detail Rows pop-up, select Student life charges from the Type of Payment drop-down.
Select an option from the Select Student Life Charge drop-down.
Select the Receipt Code.
Click Add another row to enter additional information, or click the Remove icon to remove a row.
Click Continue to generate rows. The transaction details spreadsheet updates based on the entered information.
To auto-generate rows based on the student's total account balance:
Note
This option is available when your school is configured for the Balance Forward accounting method.
In the Generate Receipt Detail Rows pop-up, select From account balance from the Type of Payment drop-down.
Enter the Payment Amount.
Click Continue to generate rows. The transaction details spreadsheet updates based on the entered information.
The GL Account is populated based on the selected Receipt Code, so to update the GL Account number, you'll need to change the Receipt Code. In the Desktop application, the GL Account could be updated for receipt codes that weren't associated with a subsidiary code. In J1 Web, the GL Account is always read-only.