Miscellaneous Charges
Important
Information and features vary according to the roles to which you belong and the permissions associated with those roles. For more information, contact your module manager or your campus support team.
The Miscellaneous Charges page lists the miscellaneous (MS) charge batches in your system. MS charges are automatically generated when receipt transactions with convenience fees are entered in J1 Web or when online payments are made from the Campus Portal. From this page, you can add MS charges to students, access MS batch details, review and update existing MS charge details, and download MS batch information.
To access the Miscellaneous Charges page and create MS charges, you must be in a Receivables Management role with the following permissions:
Can view miscellaneous charges
Can create miscellaneous charges
Can edit miscellaneous charges
To view and update MS batches, you'll also need to be in the following General Ledger Accounting roles with the noted permissions:
General Ledger Accounting GL Account Component Access role or General Ledger Accounting GL Account Alternate Code Access role with the "Can view only GL accounts enabled by associations (restricted)"
General Ledger Accounting Miscellaneous role with the "Can view batches" permission
For more information about permissions to work with MS charges, see Roles and Permissions to Work with Student Charges.
You can also access the MS charges list from the Desktop Miscellaneous Charges window.
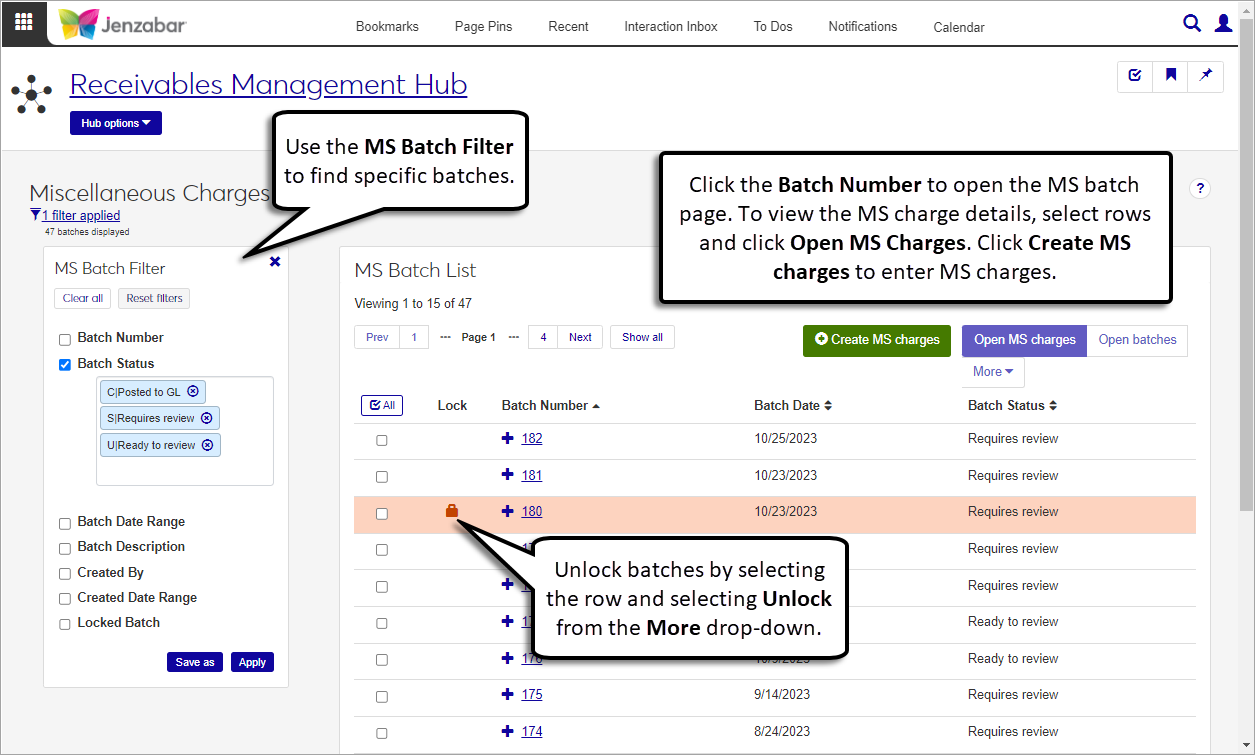
An MS batch is automatically created when new MS charges are created. When an MS batch is locked by another user, a Lock icon  is displayed next to the batch number on the MS Batch List. If you have permission to unlock MS batches, you can unlock the batch and make updates to the MS batch and MS charge details page as needed.
Warning
Unlocking an MS batch discards any unsaved changes and prevents other users from updating the MS charge details or MS batch details pages.
From the Finance Receivables Management Hub options, select Miscellaneous charges. The Miscellaneous Charges page opens.
Use the MS Batch Filter to refine the list based on selected criteria.
In the MS Batch List, click the Expand icon
 to view additional details about the batch.
To view MS batch details, click the Batch Number link or select one or more rows and click the Open batches button.
To view MS charge details, select one or more rows and click the Open MS charges button.
On the Miscellaneous Charges page, click the Create MS charges button. The Create Miscellaneous Charges page opens.
Click in the Billing Fee Code field and select an option from the drop-down. Required.
Enter a charge Description. Required.
The Date is set to today's date by default, and you can update it if needed.
In the transaction spreadsheet, enter or select information for the following required columns.
Billing Fee Code (prepopulated with the selection from the top of the page)
ID Number
Transaction Amount
Transaction Date (defaulted to today's date)
1098-T Academic Year / Term (required when the charge is 1098-T eligible)
Use the spreadsheet toolbar to undo or redo changes in the spreadsheet.
If needed, use the Column Selector to update which columns are displayed and hidden.
Click Create MS charges. The MS charges detail pages opens for review and updates.
On the Miscellaneous Charges page, select one or more rows to delete.
Click the More button and select Delete. The Delete MS Batches pop-up opens.
Review your selections and click Yes, delete. The batch and all its transactions, comments, and attachments are permanently removed from the system.
On the Miscellaneous Charges page, select one or more rows to download.
From the More drop-down menu, select Download to Excel. The Download to Excel pop-up opens.
Select options for the Excel format and data columns.
Click Download. Your .xlsx or .zip file is saved in the file location that you have set in your browser settings.
Warning
When a batch is unlocked, any unsaved changes are lost.
On the Miscellaneous Charges page, select one or more locked rows.
Click the More button and select Unlock. The Unlock Batches? pop-up opens.
Review the selected batches and click Yes, unlock.
Note
Comments added to the MS batch are also visible on the MS charges details and vice versa.
On the Miscellaneous Charges page, click the Comments icon
 for a row. (You may need to expand the row details to see the icon.) The Comments pop-up opens.
Click New comment.
Enter your comment text.
Click the Attach button if you want to add an attachment.
Click Add.
To open batch details, you must be in a General Ledger Account Miscellaneous Batches role with "Can view batches" permission. For additional information, contact your campus support team.
You can open and view details about locked batches, but you can't make updates until the batch is unlocked.