Student Division Information
Important
Information and features vary according to the roles to which you belong and the permissions associated with those roles. For more information, contact your module manager or your campus support team.
Use this page to view and edit information about a student's divisions.
Each row is a student-division combination, so a student will be listed more than once if they have more than one division.
Information includes entry date for the division, expected graduation term, cohort, entrance status, exit and reentry, leave of absence, certification, and advisors.
The Options drop-down applies to all selected students.
Each Action drop-down is for an individual student.
Tip
In the J1 Desktop application, this information is on the J1 Desktop Student Information window | Student Division tab.
The Advisee Group Code is on the J1 Desktop Maintain Advising Groups window.
Filter the List
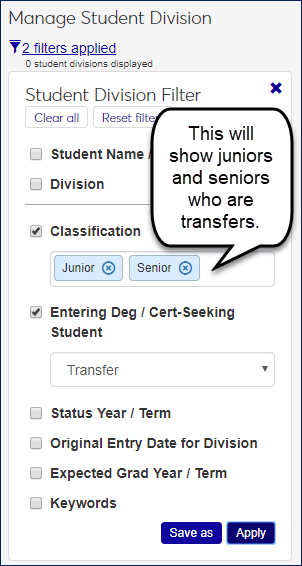
Use the Student Filter to limit the list to students you need to see. If you select more than one checkbox, only results that match all the checkboxes will show.
Some fields allow multiple selections. If you make multiple selections within a field, the results will match any (but not necessarily all) of the selections within the field.
So if you select Transfer in the Entering Deg / Cert-Seeking Student field, you'll see only transfer students. If you select Junior in the Classification field, you'll see only juniors who are transfers. If you select both Junior and Senior in the Classification field, you'll see juniors and seniors who are transfers.
Edit Selected Students
You can edit details for multiple students at a time by selecting students and clicking 'Edit selected' in the Options drop-down. Select as many details and their values as you wish.
View Student Details
Select View student details in a student's Action drop-down to go to the Student Division tab of the Student Information Details page.
The tab has the same information as here in the Registration Operations hub, but it's organized in a different way. It's focused on the individual student, and all the student information is grouped into tabs on a single page. You can edit a whole tab in one view. From the Student Information Details page, you have quick access to the student's summary page and related information such as their academic plan, advising worksheet, holds, test scores, unofficial transcript, and Notepad notes. You can also jump to their personal summary page and events timeline. If the student is also an employee, you can go to their employee summary page.
Add A Division to Students
You can add a division to one student using the Add student division button. This works even for students who don't have any division yet.
You can also add a division for multiple students at a time if they already have divisions. Use the Add student division to selected students option in the Options menu. It doesn't matter whether you select multiple rows for the same student. The division gets added only once for the student.
Remove A Division From a Student
Use the Action drop-down on a student-division row to remove the division. A message warns you if it's the student's current division or if the division has a degree.
Click the Add student division button.
In the Student field, enter a name or ID. (It's a type-ahead field, so you can enter a partial name or ID and then select from the results.)
Select a Division.
The other fields are not required, so enter the information as necessary.
Caution
The Current drop-down gives you the option of making the added division the current one for the student. The default is No. Use caution selecting Yes.
Click the Add button.
Use the filter to find the students you want.
Select students.
In the Options drop-down, select Add student division to selected students.
Select a Division.
The other fields are not required, so enter the information as necessary.
Caution
The Current drop-down gives you the option of making the added division the current one for the selected students. The default is No. Use caution selecting Yes.
Click the Add button.
On a student-division row, click the Action drop-down, and select Remove division.
Note
A pop-up asks you to confirm, and it warns you if the division is the student's current division or if it has a degree.
Click Remove.
Select the checkboxes next to the rows you want to export.
From the Options drop-down, select Download to Excel. The Download to Excel pop-up opens.
Select options for the Excel format and data columns.
Click Download. Your .xlsx or .zip file is saved in the file location that you have set in your browser settings.