Manage Student Accounts
Important
Information and features vary according to the roles to which you belong and the permissions associated with those roles. For more information, contact your module manager or your campus support team.
Warning
J1 Web does not currently support the Open Items configuration. If your school is configured for Open Items in the Desktop A/R Configuration window, continue working in J1 Desktop as you will not be able to use J1 Web Finance at this time.


The Student Accounts page lets you access and manage various details related to student account balances and transactions.
To access the Student Accounts page, you must be in the default Receivables Management role (or a copy of it) with "Can view student accounts" permission. Additional permissions are required to view and work with different information associated with student accounts, including payment plans, student subsidiaries, and deposits. For additional information about permissions for student accounts, see Receivables Management Permissions.
Important
Some student account information is managed on the student information details page. Access to student information details is granted in the Student module Registrars and Registration Module Manager roles. For additional information, see Roles and Permissions to Work with Student Accounts.
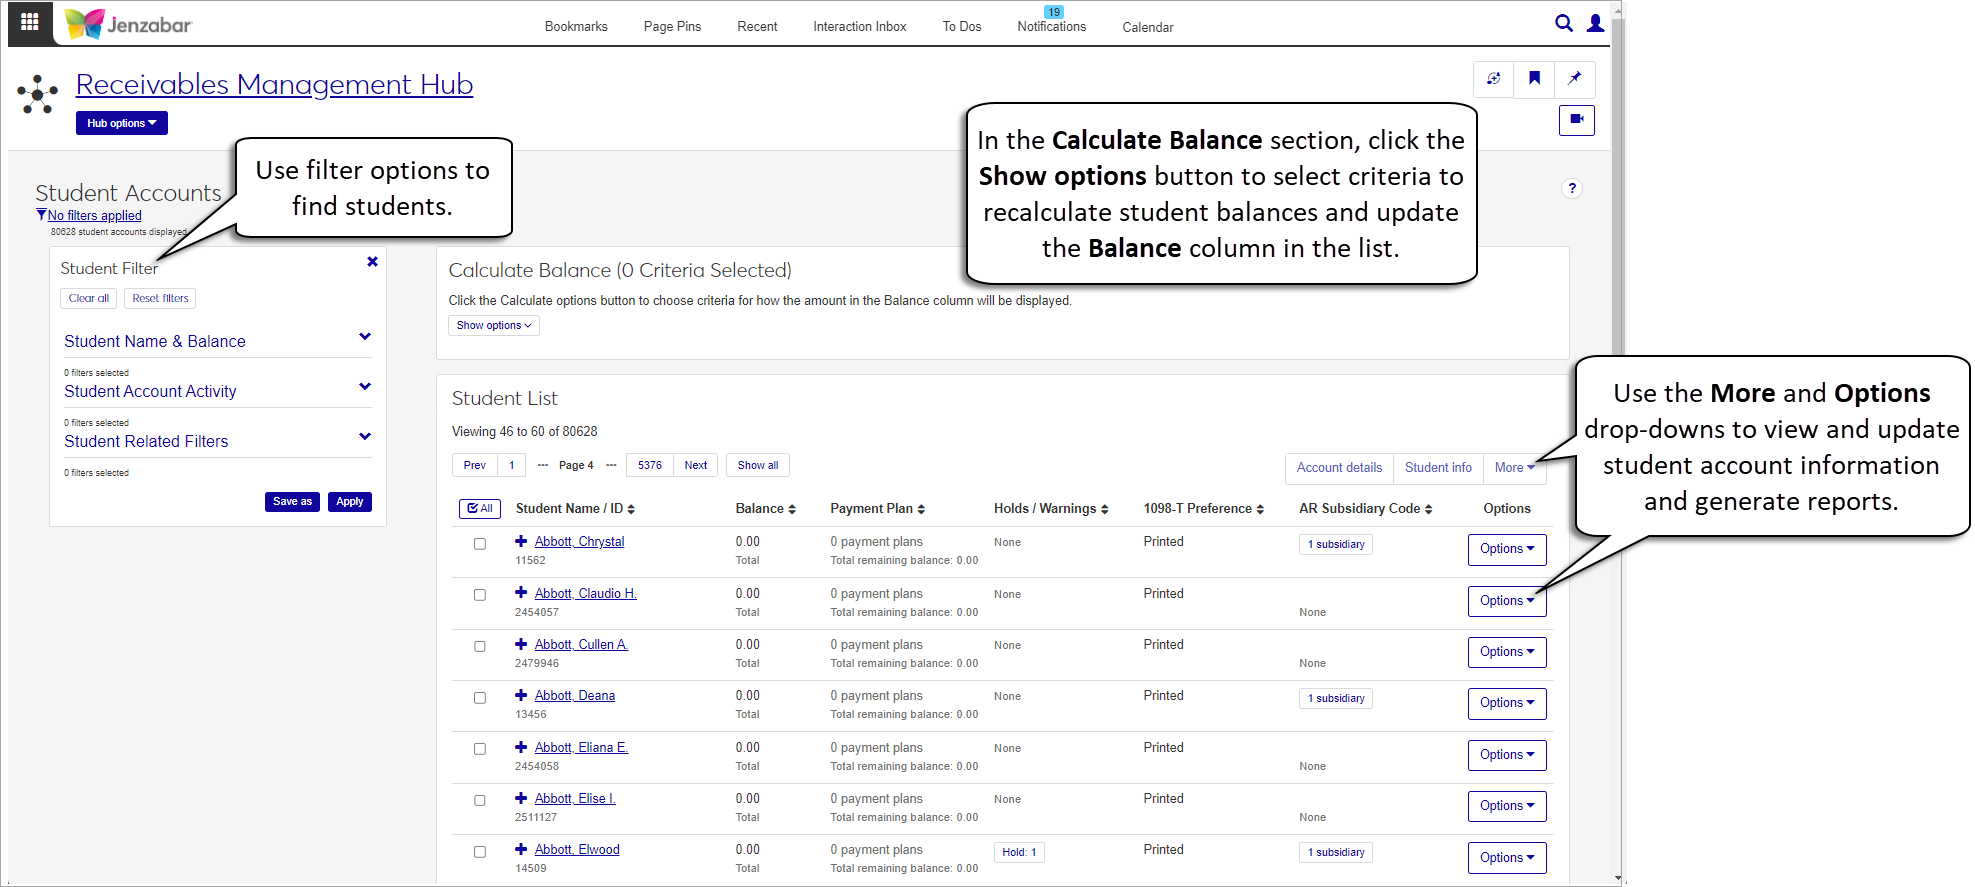
The Student Filter has three sections to group student information. Use the Expand icon  to view filter options in each section.
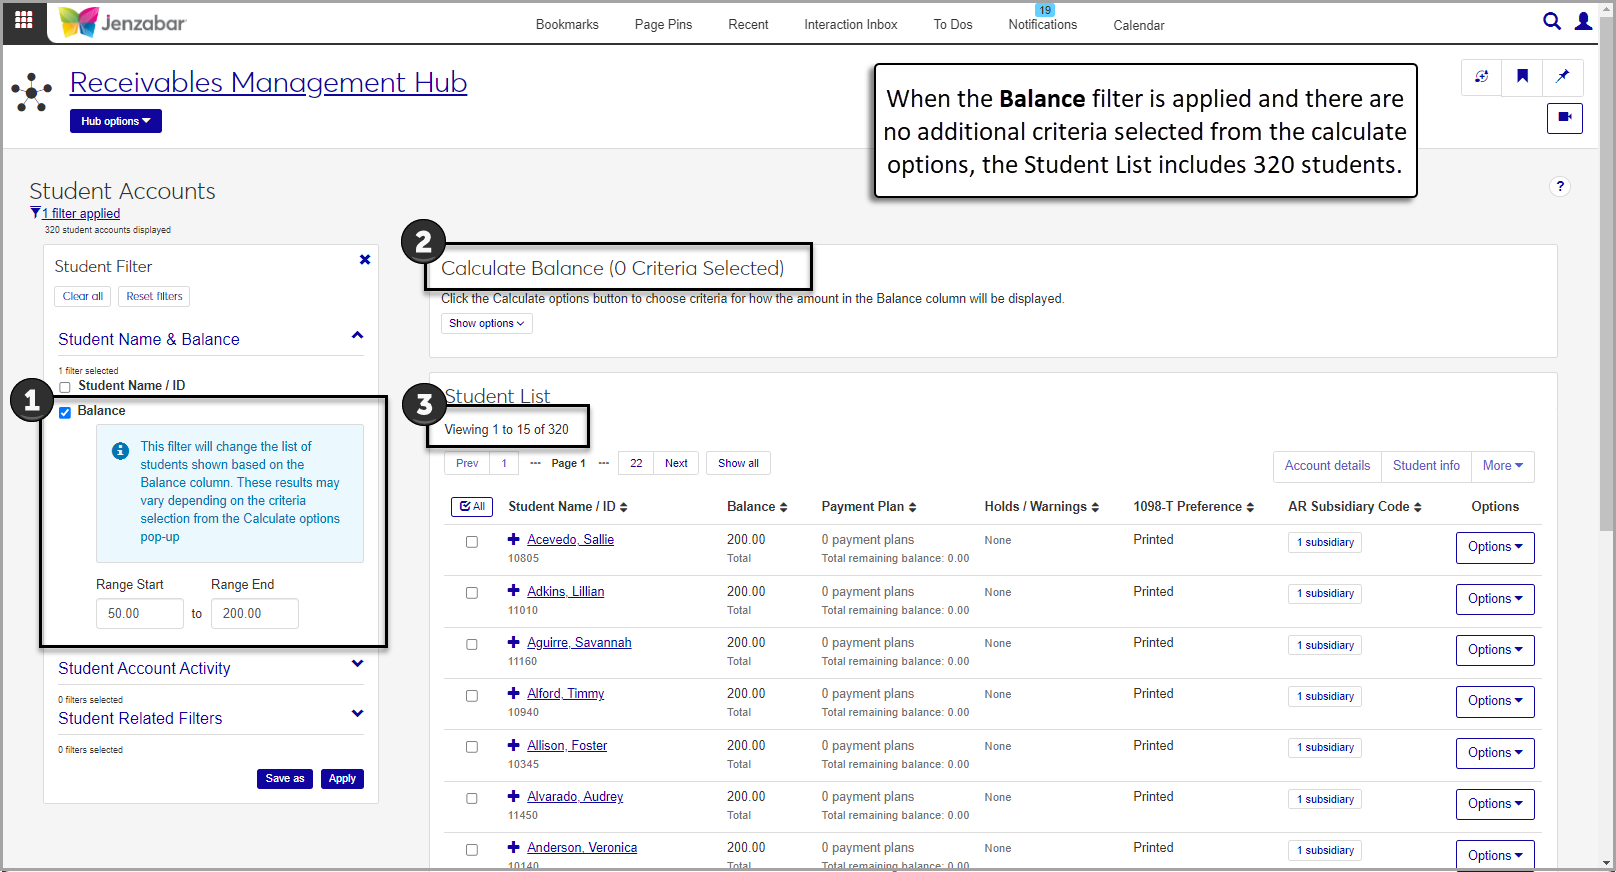
Student Name & Balance. Use these filter options to find students by name, ID number, or those with an account balance within a certain range.
Note
The Calculate options button lets you set criteria for how student balances are calculated and updates the Balance column accordingly. When new options are selected and applied, the list of students selected by the Balance filter may change based on the new calculations for the displayed balance.

Student Account Activity. Use these filter options to find students based on specific details about their account activity, like 1098-T details, billing period, and transactions.
Student Related Filters. Use these filter options to find students based on details like add/drop date, holds/warnings, and payment plans.
By default, the Balance column displays the total activity for each student regardless of transaction status. Use the Calculate options button to update the displayed balance based on selected criteria. You can reset the options to show the total balance at any time.
You can select one or more options for the fields below to calculate student balances and update the Balance column of the Student List.
1098-T Academic Year
1098-T Academic Term
Billing Period
Subsidiary Code
Subsidiary Group Code
Suspended Activity (include or exclude from the balance calculation)
Tip
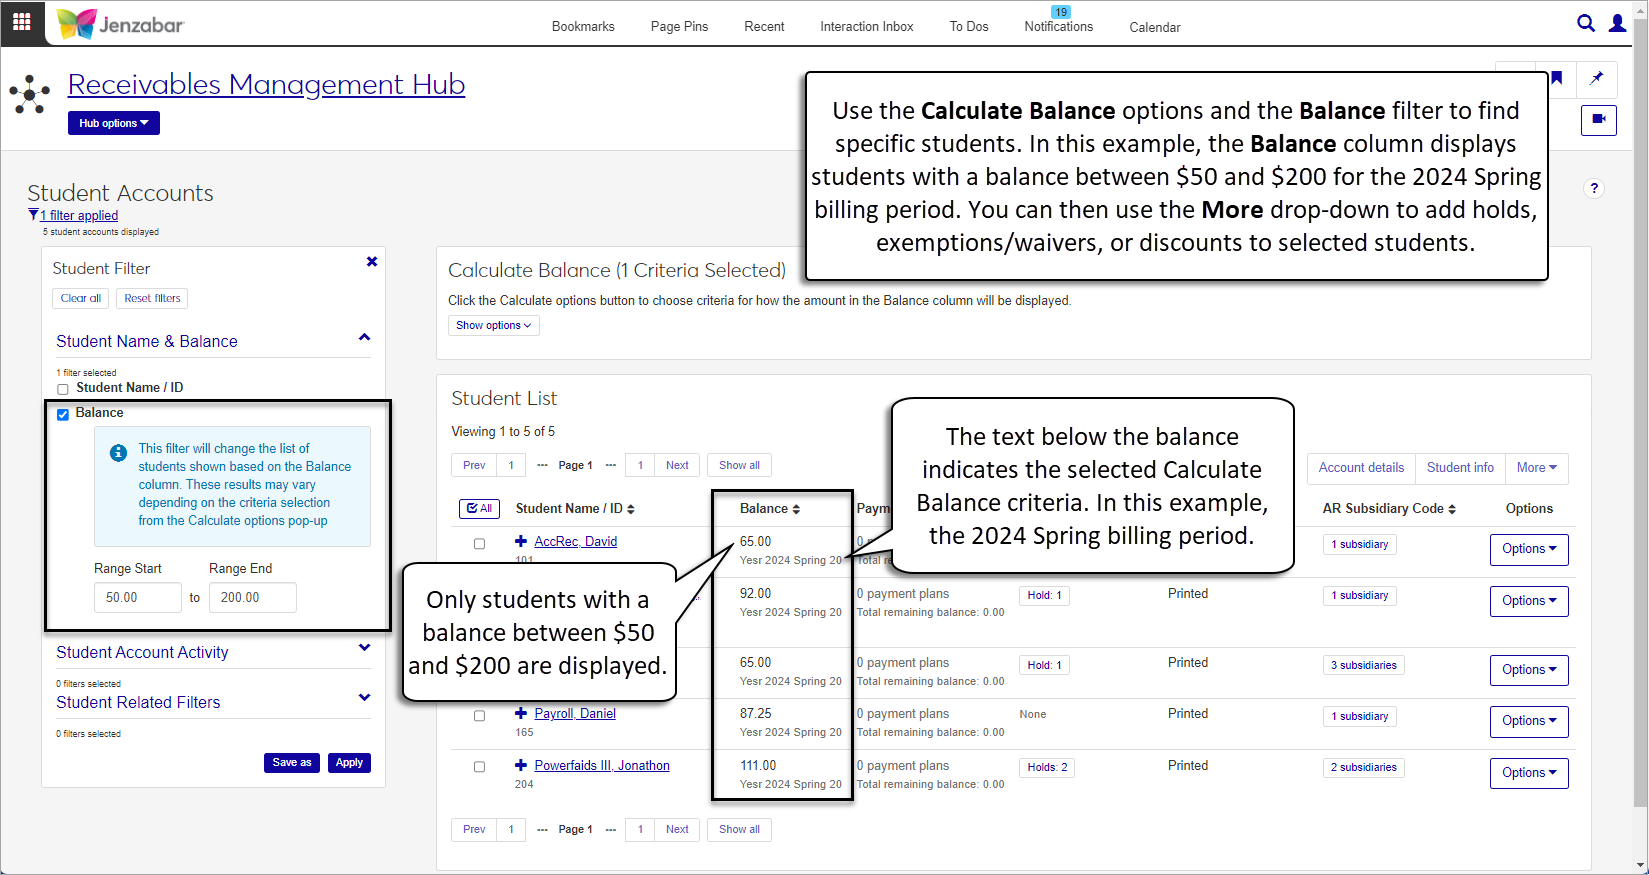
The Calculate Balances block only updates the "Balance" column on the Student Accounts page. When it's used with the Balance filter, you can select students that have a balance within a certain range and apply actions to just those students (e.g., add holds to students with an outstanding balance for the fall term).
You can view additional details about holds/warnings and subsidiary codes for students by clicking the button in the appropriate column. The pop-ups let you view and add comments about holds/warnings or subsidiaries. You can also open the student account details page from the AR subsidiary code pop-up.
Each student row has an Options button with different drop-down actions. Depending on your permissions, you may see some or all of these options.
Note
Permission to view certain options may be granted in other module hubs. For example, permission to view and work with the Student Information Details page is granted via the Registrars role (and copies of it), and access to the Person Information Details page is granted via the Person Management role (and copies of it).
You can select one or many students to activate the More drop-down. Depending on your permissions, you may see some or all of these options.
Note
Permission to view certain options may be granted in other module hubs. For example, permission to view and work with the Student Information Details page is granted via the Registrars role (and copies of it), and access to the Person Information Details page is granted via the Person Management role (and copies of it).
From the Finance Receivables Management Hub options, click Student accounts.
On the Student Accounts page, use the Student Filter to find students based on the criteria in the three sections.
Tip
The system updates the ID Number / Name field when you enter a full ID number and press Tab to move to the next field.
In the student list, use the Expand icon
 to see additional account-related information for each student.
From the Finance Receivables Management Hub options, click Student accounts. The Student Accounts page opens.
To view account details for a single student:
Click the Options button for a student and select Student account details.
The Student Account Details page opens. Use the page tabs to see more information about the selected subsidiary code.
To open the student account details page for multiple students:
Select two or more rows in the Student List.
Click the Account details button. The Student Account Details page opens for the first student in the list. To switch between multiple students on the page:
In the Select a Student section at the top of the page above the student name, click the left or right arrow to move to the next student record. You can switch between the students that were originally selected from the Student List.
Click the Edit icon
 to display the Edit Selections field.
You can click Clear all to remove existing selections.
To add student , enter their name or ID and select them from the drop-down list. Repeat as needed.
To remove students, click the Remove icon
 next to their name.
Click Done to return to the Select a Student view.

Important
Permissions to view student information are managed in the Student Registrars role (or copies of it).
From the Finance Receivables Management Hub options, click Student accounts. The Student Accounts page opens.
To view an individual student's information:
Click the Options button and select Student information details.
The Student Information Details page opens. Use the page tabs to view information about academics and financials.
To view information about one or more students:
Select one or more students from the list.
Click the Student info button at the top of the list.
The student information details page opens and the Viewing [X] of [Y] student information details drop-down lets you select which student's detail to view. Use the page tabs to see more information about the selected student's academics and financials.
From the Finance Receivables Management Hub options, click Student accounts. The Student Accounts page opens.
To view an individual student's information:
Click the Options button and select Person information details.
The person information details page opens. Use the page tabs to view information about the student.
To view information about one or more students:
Select one or more students from the list.
Click the More button and select Person information details.
The person information details page opens and the Viewing [X] of [Y] person information details drop-down lets you select which student's details to view. Use the page tabs to see more information about each student.
From the Finance Receivables Management Hub options, click Student accounts. The Student Accounts page opens.
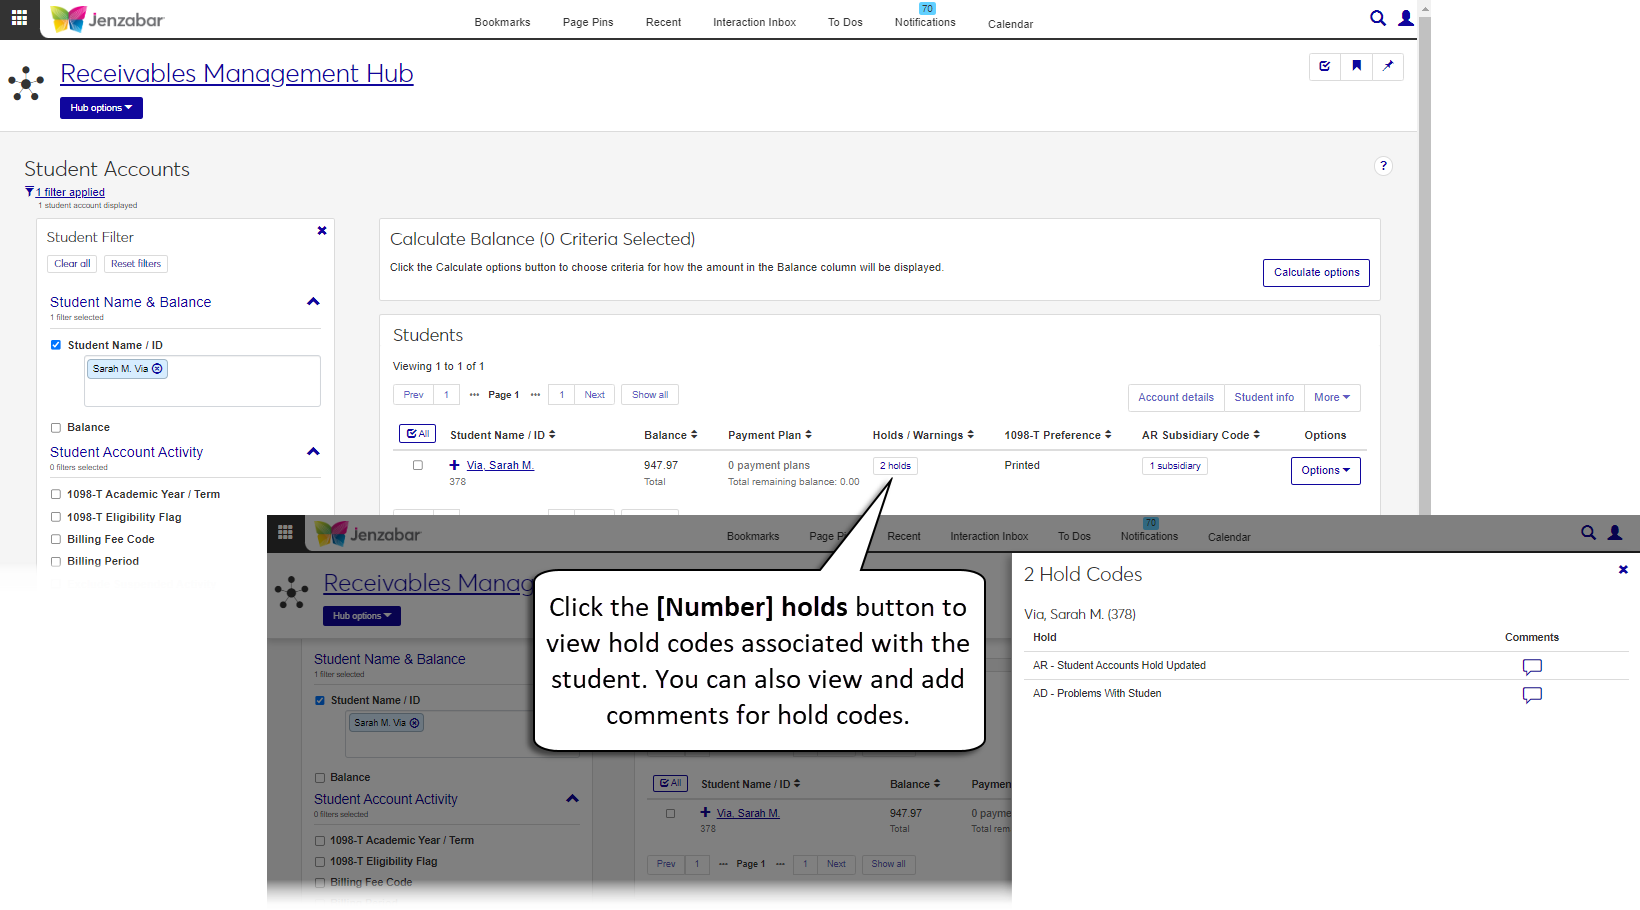
In the Holds / Warnings column, click the [Number] holds button. If the student doesn't have any holds, the column will show "None".
In the [Number] Hold Codes pop-up, you'll see a list of hold codes associated with that student.
Click the Comment icon to read and add comments for the selected hold code.
Click Close to return to the student list.
On the Student Accounts page, select the students you want to send the communication to.
Click the Options button and select Create communication. The Create New Communication pop-up opens.
The Communication Type is set to Email and cannot be updated.
The Interaction code, Name / Description defaults to Student Account Communication.
The From field is autofilled with the signed in user's email address.
The To field is autofilled with student's name.
The default Contact Type is Institutional Priority, which is the contact type your school has designated as the primary method of contact for all users in the system.
Enter a Subject. Each student receives a separate email with the same information, so a generic subject is recommended.
Add your message to the Body field. Apply formatting and add hyperlinks using the options available.
To add a hyperlink:
Click the link icon
 .
.Enter the URL.
Add an optional Text to display and Title.
From the Open link in... drop-down, select Current window or New window.
Click Save.
To add an attachment, click Attach file, navigate to and select a file.
Click Send.
From the Finance Receivables Management Hub options, click Student accounts.
On the Student Accounts page, click Calculate options in the Calculate Balance section.
In the Calculate Options pop-up, select from the following criteria to determine how account balances are calculated. You can select multiple options for each field.
1098-T Academic Year
1098-T Academic Term
Billing Period
Subsidiary Code
Subsidiary Group Code
Suspended Activity (select whether to include or exclude from calculations)
Click Calculate. Depending on the number of criteria selected, the balance recalculation may take a few minutes. The Balance column updates to the recalculated balance.
To reset the Balance column to the total balance:
Click Calculate options.
In the Calculate Options pop-up, click Reset to clear the previous selections.
Click Calculate. The pop-up closes and the Balance column updates to the total balance for each student.
From the Finance Receivables Management Hub options, click Student accounts. The Student Accounts page opens.
Click the Options button for a student, and select Generate AR inquiry report.
In the Generate AR Inquiry Report pop-up, review the AR Subsidiary Codes. To change the subsidiary code, click the Remove icon and select another option from the drop-down list.
Select one of the following options from the List Transactions Since drop-down.
None
Period Begin Date
Statement Date
Specific Date Range. When this option is selected, enter the required Start and End Date.
Select the Include Suspended Transactions checkbox to show suspended transactions on the report.
Select a Report Layout. The <Original> is the default, and if you've created customized versions of the report, those options are available for selection.
Select one or more options in the File Format. The default is PDF.
Click Generate. If PDF is the only file format selected, the report opens in a new browser tab. If any other file formats are selected, the files are downloaded as a zip file.
From the Finance Receivables Management Hub options, click Student accounts. The Student Accounts page opens.
To manage holds for a single student:
Click the Options button and select Manage student holds. The Manage Student Holds page opens.
Use the quick filter to find holds that are Active / Future or Inactive.
Use the Add hold button to add holds to the student record.
Enter a Hold Code. (You can enter a few characters and select the code from the matching values.)
Enter a Start Date / Time.
Only if you want the hold deactivated at a certain time, enter an End Date / Time.
If Actions or Action Lists are defined for the selected Hold Code, they are displayed for the Add Hold Action and Add Hold Action List. Select the checkbox to add the hold for the student in the J1 Desktop Communication Management feature.
Click the Add button, or click Save and add another.
Use the Actions drop-down to edit, remove, or delete a hold.
To add holds to one or more students:
Select one or more students from the list.
Click the More button and select Add student hold.
In the Add Student Hold pop-up, review the selected students. Click the Remove icon to remove any students that shouldn't have the hold added.
Select a Hold Code.
Enter a Start Date / Time for the hold to be applied.
Enter an optional End Date / Time for the hold.
Click Add. The pop-up closes, the Student Accounts page refreshes and holds are added to the students' records.
From the Finance Receivables Management Hub options, click Student accounts. The Student Accounts page opens.
Select one or more students from the list.
Click the More button and select Add discounts to students.
In the Add Discounts to Students pop-up, review the selected students. Click the Remove icon for students that shouldn't have a discount applied.
Select a Discount Type Code.
Select a Year and Term if the discount should only be applied for a specific year and term. If year and term aren't specified, the discount code is applied directly to the student.
Click Add. The pop-up closes, the Student Accounts page refreshes, and discounts are added to the students' records.
Important
Requires permission to edit student term academic and financial information, which is available in the Registrars and Registration Module Manager roles (or copies of them).
From the Finance Receivables Management Hub options, click Student accounts. The Student Accounts page opens.
Select one or more students from the list.
Click the More button and select Add exemptions / waivers to students.
In the Add Exemptions / Waivers to Students pop-up, review the selected students. Click the Remove icon for students that shouldn't have a discount applied.
Select a Year.
Select a Term.
Click the Add exemption button.
Select an optional Billing Period.
Select an Exemption Code.
The Active option is defaulted to Yes. Select No if you don't want the exemption to be included during the student billing process.
Enter a Priority Order. During the student billing process, exemptions with lower numbers (higher priority) are processed first.
Click Add another and repeat Steps 8 - 11 to add more exemptions as needed.
Click Add. The pop-up closes, the Student Accounts page refreshes, and exemptions are added to student records.
From the Finance Receivables Management Hub options, click Student accounts. The Student Accounts page opens.
Select one or more students from the list.
Click the More button and select Edit student information.
In the Edit Student Information pop-up, review the selected students. Click the Remove icon for students that you don't want to update.
In the Select a Detail to Update drop-down, select from the following details and update the options. Depending on your permissions, some or all of these details can be updated.
1098-T Preference - Electronic or Printed
Apply financial aid to miscellaneous charges - Yes or No
Billing override date - date selection
Discount type code - options are defined by your school
Entrance code - options are defined by your school
Lifetime billing period - options are defined by your school
Third party ID - the ID number of the third party responsible for billing
Tuition code - options are defined by your school
Click Add another detail to update additional details.
Click the Remove icon to remove details you don't want to update.
Click Update. The pop-up closes, the Student Accounts page refreshes, and the selected details are updated for students.
From the Finance Receivables Management Hub options, click Student accounts. The Student Accounts page opens.
Select one or more students from the list.
Click the More button and select Update student details.
In the Update Student Details pop-up, review the selected students. Click the Remove icon for students you don't want to update.
From the Select a Subsidiary Code to Update drop-down, select a subsidiary code. After selecting a subsidiary code, you can select one or both of the following actions.
In the Active / Deactivate Subsidiary drop-down, select the appropriate option to activate or deactivate the subsidiary code for the selected students.
Enter an optional Subsidiary History Begin Date. This date is used in the aging reports.
Click Update. The pop-up closes, the Student Accounts page refreshes, and the subsidiary information updates.
Select the rows you want to export to enable the More button.
From the More drop-down menu, select Download to Excel.
Select options for the Excel format and data columns.
Click Download. Your .xlsx or .zip file is saved in the file location that you have set in your browser settings.
You may not have permission to view or edit that information. There are several permissions that control access to student financial information. For more details about permissions associated with student accounts, see Roles and Permissions to Work with Student Accounts.
Contact your campus support team for more information about access.
Yes, multiple exemption/waiver codes can have the same priority order.
Payment plan details can be viewed on the Student Account Details page under the Payment Plan tab. For more information about payment plans, see Student Account Details.