Student Information Details Page
Important
Information and features vary according to the roles to which you belong and the permissions associated with those roles. For more information, contact your module manager or your campus support team.
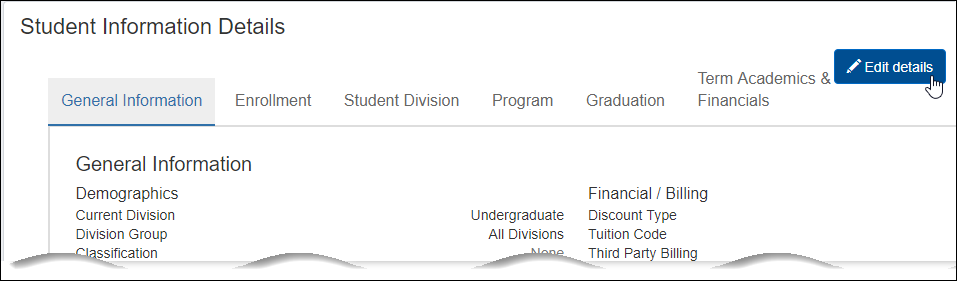
Use this page to view and edit a student's information. From each tab, you can click the Edit details button to make changes. Click in the fields to see the drop-down selections. In some fields, if no list appears, you can type a few characters to search. The Done editing button floats with you as you scroll down.
Tip
To find this page from a student's summary page, click the Student or Person drop-down. Under Student, click Manage student details.
The Student Information Details page mirrors information on the J1 Desktop Student Information window, except the Summaries tab mirrors information from the Desktop Student Inquiry window.
J1 Web Student Information Details Tab | J1 Desktop Student Information Window Tab |
|---|---|
General Information | Student tab > Student Master subtab; Attribute tab |
Enrollment | Student tab > Student Master subtab |
Student Division | Student Division tab (The Advisee Group Code comes from the J1 Desktop Maintain Advising Groups window.) |
Program | Degree tab |
Graduation | Degree tab > Degree Programs subtab, Graduation subtab and Graduation Stage subtab |
Summaries | Desktop Student Inquiry window > Summaries tab > Term, Division, and Subterm Division subtabs |
Term Academics | Student tab > Financial subtab and Student Term Table subtab |
Demographics, financials, matriculation, attributes, and previous institutions
Customized student information your school has added to the Student Master table
The Active Student field (Yes or No) in the Demographics section very important. Most registration work is with active students, so it's important to know which students are and aren't active.
The student's active status is stored on the Student Master table (student_master.is_student_active). The Active Student field appears on both of these pages:
Student General Information
Student Information Details, General Information tab, Demographics heading
Note
Exclude from Directory, a field under the Other Student Information heading, is for Texas state reporting. It's stored on the Student Master table: student_master.exclude_from_directory
In Desktop, the field appears on the Student Information window, Student tab, Student Master subtab. Its label is Student has notified the institution of his/her refusal to have "directory information" disclosed".
Any school can use this field and work it into internal reports or processes, but the system doesn't use it for any purpose other than Texas state reporting. It is not connected to FERPA functionality, for example. (The FERPA checkboxes are on the Name tab of the Student Information window.)
The User-Defined Fields button opens the User-Defined Fields pop-up. You can enter, edit, or remove values from the user-defined fields. These fields are managed by your System Administrator to let your school track unique information not captured in standard, Jenzabar-provided fields.
If the Display cross-table student information update pop-up window checkbox is selected on the Enrollment Settings page, then entering or editing information in certain fields makes the Cross-Table Student Information Update fields available. For details, see the Cross-Table Student Information Update topic.
Registration groups, academic standing, and full-time status
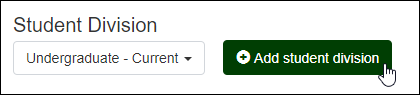
Select a division if the student has more than one.
Cohort information, first-time information, division dates, exit information, certifications, leave of absence
You can add a division. You have the option to make the new division the student's current division.
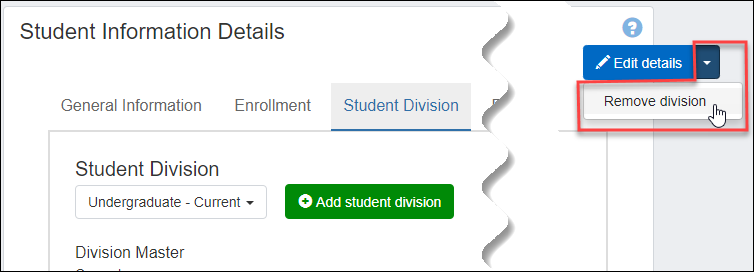
You can remove a division. The confirmation pop-up warns you if it's the student's current division.
The User-Defined Fields button opens the User-Defined Fields pop-up. You can enter, edit, or remove values from the user-defined fields. These fields are managed by your System Administrator to let your school track unique information not captured in standard, Jenzabar-provided fields.
If the Display cross-table student information update pop-up window checkbox is selected on the Enrollment Settings page, then entering or editing information in certain fields makes the Cross-Table Student Information Update fields available. For details, see the Cross-Table Student Information Update topic.
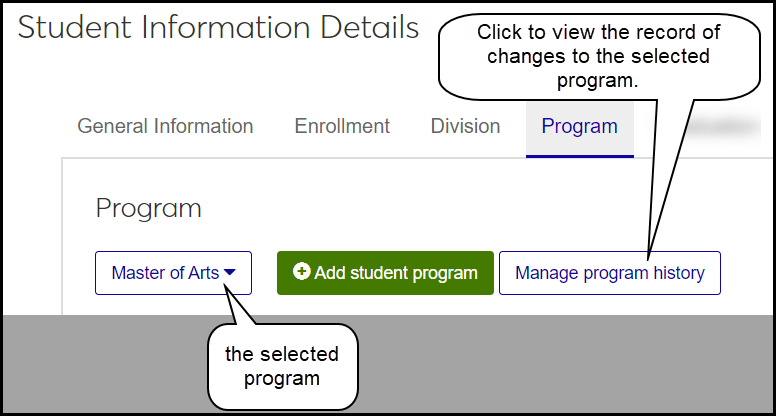
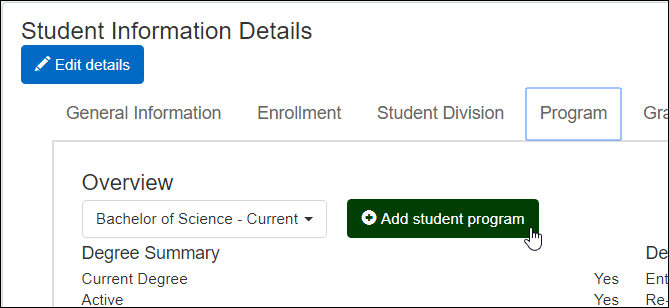
Select a program if the student has more than one.
Degrees, degree dates, honors, majors, minors, certificates, and concentrations
You can add a student program.
You can manage the student's program history. The Manage Program History pop-up shows the information as it was each time it was changed. It includes date and time of the change and who made the change.
Important
The Manage program history button is available only if you have the "Can edit student graduation info" permission.
Each change is labeled with date and time, so it's easy to track the progression of changes.
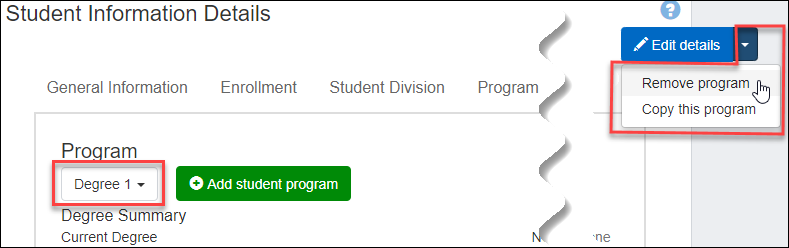
You can copy an existing program and edit it as a way of adding a student program.
You can remove a student program. The confirmation pop-up warns you if it's the student's current program.
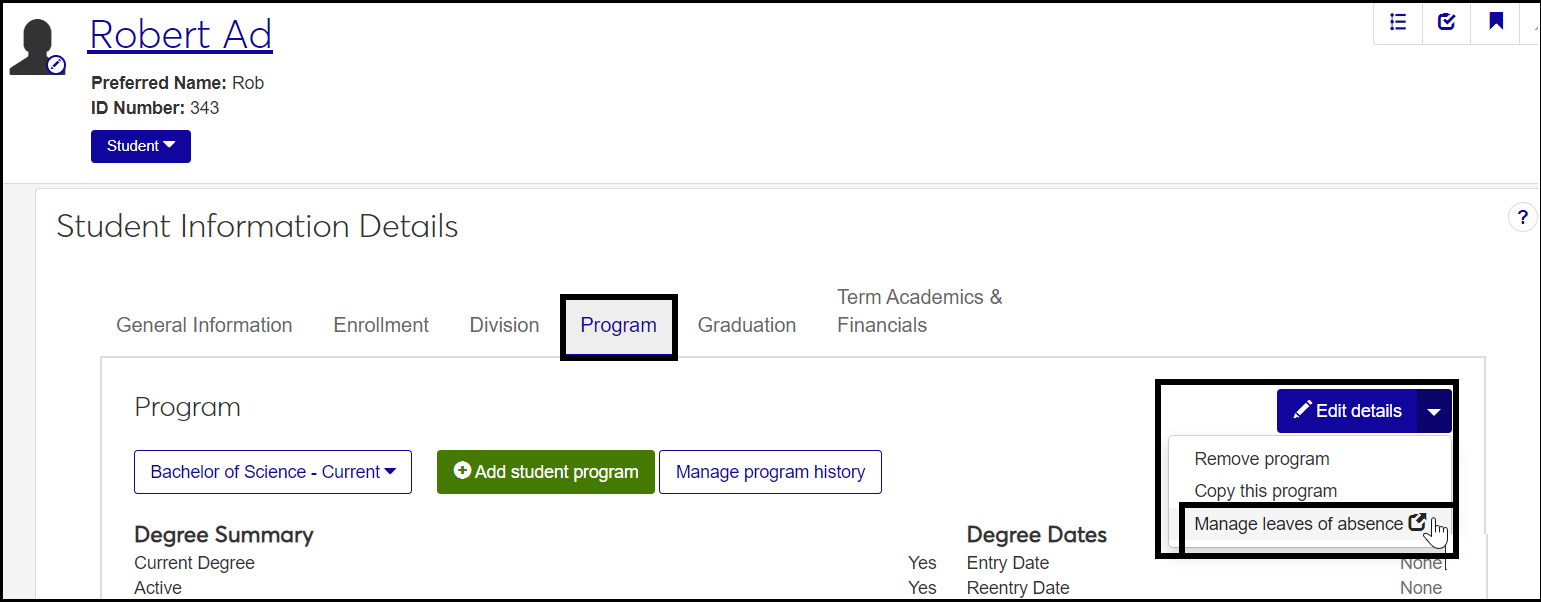
You can jump to the Manage Student Leaves of Absence page to view, edit, add, or delete a leave of absence for the student.

When you update a student's major or certification information, a pop-up opens requiring you to select the effective date of the change. The Effective Date and Time are stored on the Degree History table (degree_history.record_change_date).
Effective Date is also required when you add a program.
The User-Defined Fields button opens the User-Defined Fields pop-up. You can enter, edit, or remove values from the user-defined fields. These fields are managed by your System Administrator to let your school track unique information not captured in standard, Jenzabar-provided fields.
If the Display cross-table student information update pop-up window checkbox is selected on the Enrollment Settings page, then entering or editing information in certain fields makes the Cross-Table Student Information Update fields available. For details, see the Cross-Table Student Information Update topic.
The information in the Summaries tab is presented in a spreadsheet. It mirrors the Desktop Student Inquiries window, Summaries tab. Some of the information is updated by the Recalculate Academic Record process.
There several views available from the drop-down at the top of the page:
Term
Information included: Year/Term, Hours Enrolled, Number of Courses, PT/FT Hours, PT/FT Status, RBU Upper Limit, User-Defined Fields
Database table: Student Term Summary (student_term_sum)
Division
Information included: Year/Term, Hours Enrolled, Number of Courses, PT/FT Hours, PT/FT Status, RBU Upper Limit, User-Defined Fields
Database tables: Student Division Master (student_div_mast) and Student Term Summary by Division table (stud_term_sum_div)
Subterm Division:
Information included: Year/Term, Hours Enrolled, Number of Courses, PT/FT Hours, PT/FT Status, RBU Upper Limit, User-Defined Fields
Database table: Student Subterm Summary by Division table (stud_subterm_sub_div)
The User-Defined Fields button opens the User-Defined Fields pop-up. You can enter, edit, or remove values from the user-defined fields. These fields are managed by your System Administrator to let your school track unique information not captured in standard, Jenzabar-provided fields.
User-defined fields are available in each view of the Summaries tab.
The information on this tab is presented in a spreadsheet. Use the spreadsheet buttons to undo and redo changes, to download, and delete records, and to add a new row.
The information includes state classification and enrollment status, billing information including student billing exemptions, and the Include on Transcript option. You can edit most of the fields on existing rows. You can also add, remove, or edit billing exemptions.
You can add a student term table record either from scratch or by copying details from one of the student's previous terms.
The User-Defined Fields button opens the User-Defined Fields pop-up. You can enter, edit, or remove values from the user-defined fields. These fields are managed by your System Administrator to let your school track unique information not captured in standard, Jenzabar-provided fields.
From a student's summary page:
Click the Student or Person drop-down.
Under Student, select Manage student details. The Student Information Details page opens to the General Information tab.
From any of the Student Information pages in the Registration Operations hub:
In a student row, click the Action button.
Select View student details. The Student Information Details page opens to the tab equivalent to the page you were on.
For all tabs except Summaries and Term Academic and Financial Information:
On the Student Information Details page, select the tab you want to edit.
If you're on the Student Division, Program, Graduation, or Term Academics & Financials tabs, make a selection from the drop-down. That is, select a particular division, program, degree, or term to edit.
Click the Edit Details button.
Edit the fields.
Click in a field and select from the drop-down list.
If no choices appear, type a few characters of a value to search. Then select one of the values.
Click Done Editing.
Note
If you edit a student's major or certification information, then when you click Done Editing, a pop-up requires an Effective Date and Time. The current date and time are populated by default. Accept the defaults or enter a new date and time, and then click Update.
For the Summaries tab and Term Academic and Financial Information tab:
On the Student Information Details page, select the tab you want to edit. The information appears in a spreadsheet.
On the Summaries tab, select a Term.
Use the scrolls to view the whole spreadsheet.
Use the spreadsheet buttons to undo and redo changes, to download, and delete records, and to add a new row.
On the General, Division, or Program tab, or on any view of the Summaries tab, click the User-defined fields button. The User-defined fields window opens.
With proper permissions, you can edit any field.
Click Cancel or Save. The window closes.
Click the Student Division tab.
Click Add student division.
Select a Division. Required.
In the Current drop-down, No is selected by default. That is, the newly added division will not be the student's current division unless you select Yes.
Enter information in the optional fields as desired.
Tip
These fields are not required but may be important for state and federal reports.
Original Entry Date: Entry date for this new division
Entering Student Status: Select an option from the drop-down.
Notice
You're adding a graduate division for an undergraduate student whose undergraduate division's Entering Student Status is "First-time in postsecondary institution". For this new division, you select "Neither first-time in postsecondary nor transfer-in".
Entering First-time, Transfer-in Year / Term: If you selected First-time or Transfer-in for this division, select the Year / Term that applies.
Student Cohort: Select a cohort that applies to this division.
Expected Graduation Year / Term: Select the expected completion for this division.
Click Add.
Click the Student Division tab.
Select a division in the drop-down.
On the right side of the Edit details button, click the drop-down arrow, and select Remove division.
On the confirmation pop-up, click Remove.
Click the Program tab.
Click Add student program. The Add Program pop-up opens.
Select a Division.
Select a Degree.
Enter a Place Earned. For your school, type '*L', and select *LOCAL.
Make a selection for the Active field (required). These are the options:
Make this active and deactivate all others
Make this active and do not update others
Make this program inactive
Enter an Effective Date and Time (required).
Select the Current checkbox if you want to make this the current program. All other programs will be designated as not current.
Enter a Major, Minor, Certification, and/or Concentration. You can begin typing an element, and select it from the list.
In Advising Institutional Requirement Year, begin typing a year, and select from the list.
In Academic Plan Start Year / Term, begin typing a year, and select a year/term from the list.
Click Add.
Click the Program tab.
Select a program from the drop-down.
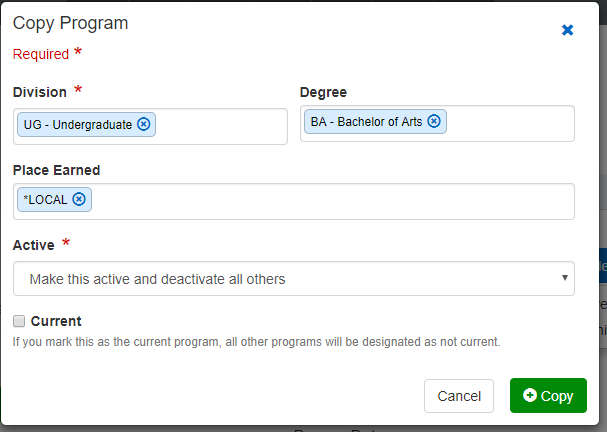
On the right side of the Edit details button, click the drop-down arrow, and select Copy this program. The Copy Program pop-up opens.
Edit the Division, Degree, and Place Earned as you wish.
Tip
To make your school the place the degree was earned, type '*L', and select *LOCAL.
Make a selection for the Active field.
Select the Current checkbox if you want to make this the current program. All other programs will be designated as not current.
Click Copy.
Click the Program tab.
Select a program from the drop-down.
Click the Manage program history button. The Manage Program History pop-up opens.
Important
The Manage program history button is available only if you have the "Can edit student graduation info" permission.
Select a record in the Program History drop-down.
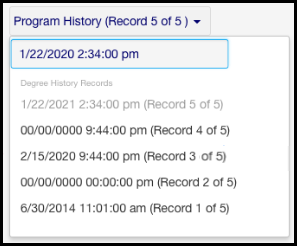
The program information appears as it was at that point in history, and these fields help you track the changes:
Effective Date and Time
Change Date and Time
Changed By
You can edit the Effective Date and click the Update button.
Important
If the program is locked, you need the "Can unlock / edit a locked program (degree)" permission.
Click the Program tab.
Select a program from the drop-down.
On the right side of the Edit details button, click the drop-down arrow, and select Remove division.
Note
The confirmation pop-up tells you what will be deleted, and it warns you if the program is the student's current program.
Click the Remove button.
Click the Graduation tab.
Select a degree in drop-down.
Click Edit details.
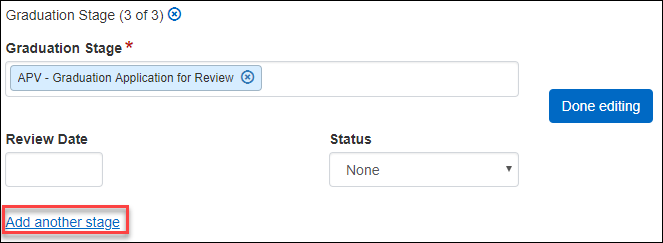
Scroll down to Graduation Stages.
Under the last Graduation Stage, click Add another stage.
Select a Graduation Stage.
If you wish, select a Review Date and Status.
Click Done editing.
Click the Summaries tab.
In the drop-down, select a view: Term, Division, or Subterm Division.
Some of the fields are editable. Make your edits.
Click Save on the toolbar.
To download information, click the Download icon on the toolbar.
To add, update, or remove user-defined fields click the User-defined fields button for a record. The User-Defined Fields pop-up opens. Make your changes, and click the Save button. The pop-up closes.
Click the Term Academic and Financial Information tab.
Some of the fields are editable. Make your edits.
Click Save on the toolbar.
To download information, select the checkbox for one or more rows, and click the Download icon on the toolbar.
To delete one or more rows, select the rows' checkboxes, and click the Delete icon on the toolbar.
To add, update, or remove user-defined fields click the User-defined fields button for a record. The User-Defined Fields pop-up opens. Make your changes, and click the Save button. The pop-up closes.
Click the Term Academics & Financials tab.
Click Add student term table record.
Select a Year / Term for the new record.
Tip
Type a year to bring up a list of year/terms.
If you wish, select the Copy details . . . checkbox, and then select an existing year/term to copy from.
Click the Term Academics & Financials tab.
Select a year/term from the drop-down.
On the right side of the Edit details button, click the drop-down arrow, and select Remove term table record.
On the confirmation pop-up, click Remove.
Click the Term Academics & Financials tab.
Click the Edit Details button.
Scroll down to Student Billing Exemptions, and click Add billing exemption.
Select an Exemption Code.
Select a Billing Period.
Enter a Priority Order.
Click Done editing.
Note
The Preliminary Amount and Actual Calculated Amount are not editable. They're calculated fields.
Note
Settings, permissions, and other factors affect your ability to withhold a term from a transcript. For a full description and instructions, see the Partial Transcripts help topic.
Click the Term Academic and Financial Information tab.
Select a Year / Term in which the student has a transcript hold.
Click the Edit Details button.
Scroll down to Student Term Table.
In the Include on Transcript drop-down, select No.
Note
The Include on Transcript field appears only if the Allow partial transcripts setting is selected on the Repeat, Transcript, and G{A Settings page.
Click Done editing. The term will not appear on the student's transcript. Instead, a note appears indicating that the term is withheld from the transcript.
It may not have been entered in J1 Desktop. General information is maintained J1 Web on the Person Information Details page, Contact Info tab or the Desktop on theName Entity window, Addresses tab. Check with your campus support team or module manager for more information.
Both areas contain the same information, but it's organized differently.
Student Information Details Page | Manage Student Information Pages |
|---|---|
One page divided into tabs | Individual pages |
Information on one student | Information on all students or those you search for |
Edits apply to one student | Can apply edits to one or multiple students |
Edit a whole tab in one view | Edit in various pop-ups |
Quick access to other student-related information | Quick access to other registration-related information |
Tip
To find the Manage Student Information pages, open the Registration Operations hub. From the Hub options drop-down, select one of the pages in the Student Information section.
Class Level on this page is the student's classification in the selected division. It's stored on the Student Division Master table (student_div_mast.class_cde). It's the same as the Division Class Level field on the Student Division Information page.
But there are other fields for classification, such as the student's current classification or a student's classification in a specific year/term. See the Classification Definitions topic for a complete list of classification fields (in Desktop and J1 Web), their database columns, and what they're used for.
No. There's no batch edit (Options, Edit selected) for the Include on Transcript field. Follow the instructions above to edit the field for an individual student.
Yes, you can place a student in a division group that includes more than one division.
Use Division Group to Control Which Divisions a Student Can Register In
Division Group (student_master.div_grp_cde) is a field on the Student Information Details page, General Information tab, under the Demographics heading. The options in the drop-down are defined on the Division Group Definitions page.
A division group is some combination of your existing divisions. You may have reasons to put Undergraduate and Graduate in a division group together, but Continuing Education and Parent Education in another division group. You may want to make an All Divisions group.
You can use division to allow a student to register for courses in more than one division. For example, if you want a student to be able to register for both undergraduate and graduate courses (but not Continuing Education), you create a division group with those parameters, and assign the student to it.
Tip
If you want to allow all students to register for courses in all divisions, use the "Allow alternate division" setting. See instructions below.
On the Division Group Definitions page, create the division groups you need. For example, if you need some students to be able to register for both undergraduate and graduate courses, create a division group associated with both those divisions.
On a student's Student Information Details page, General Information tab, click the Edit details button.
In the Division Group drop-down, select the group that has the divisions you want.
Click the Done Editing button. The student is now permitted to register in the divisions included in the group. This works for students registering themselves on the Campus Portal or staff registering students in J1 Web or J1 Desktop.
Access the the Campus Portal (JICS) Settings page.
In the Campus Portal Registration Configuration category, select the Allow alternate division checkbox. All students can now register in all divisions.