FERPA Permissions in J1 Web
Important
Information and features vary according to the roles to which you belong and the permissions associated with those roles. For more information, contact your module manager or your campus support team.
Use this page to view, edit, create, copy, download, and delete Federal Education Rights and Privacy Act (FERPA) permissions for students. FERPA permissions are permissions a student gives to parents or others to see their academic and/or financial information.
Desktop Location
You can manage FERPA permissions in Desktop on the FERPA Permissions window.
Database Location
FERPA permissions are stored on the FERPA Permission table (FERPApermission). This table is new with J1 Web 2024.1, replacing the ferpa_permission table, which has been renamed jexbkp_ferpa_permission.
The permissions granted here are honored in the Campus Portal in the Parent features.
You can also view who has FERPA permissions for a student on the FERPA Contacts block on the student's Student Summary page.
Settings for FERPA permissions are on the General Settings page in the Registration Administration hub.
There are also FERPA settings on the Advising Settings page to designate someone as a FERPA specialist and to upload a copy of the school's FERPA policy.
The types of permissions available (such as financial and academic information) are defined on the FERPA Category Definitions page.
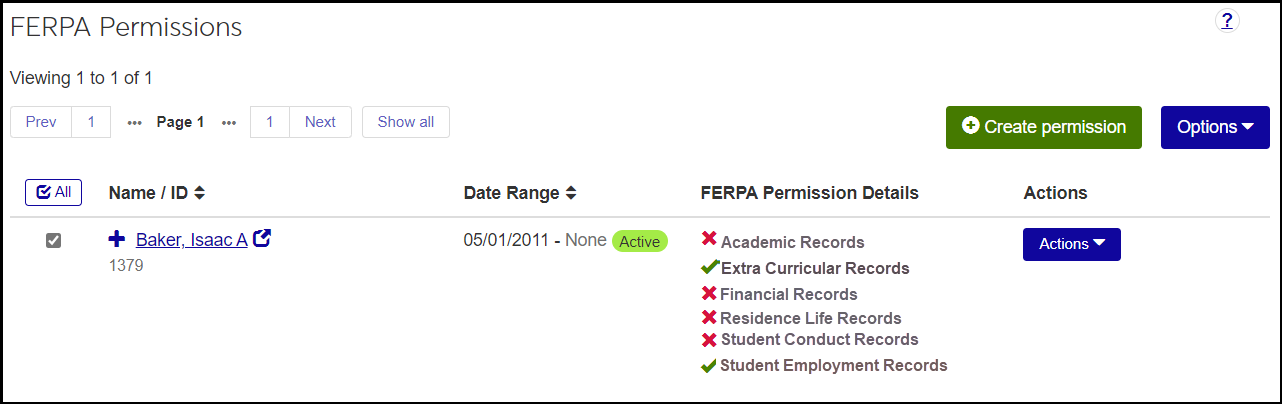
Name / ID: This is the parent (or other permittee). If the parent doesn't have an ID in the system, then ID isn't displayed. Required.
Date Range: The Start and End Date for the permission. If today's date is within the range, the Active badge is displayed. On the Create and Edit pop-ups, the Start Date is required, but the End Date isn't.
FERPA Permission Details: This lists all the FERPA categories defined on the FERPA Category Definition page that are designated there as Active and Show in Campus Portal. If the permission for this parent is active, a green checkmark
 appears. If not, a red X
  appears.
Note
On the Create and Edit pop-ups, this is a list of checkboxes available permissions. You can select the checkboxes for any and all permissions. If you don't select any checkboxes, no permissions are granted.
Relationship: Read only. Relationships are maintained on the Relationship Definitions page in the Campus-wide Definitions hub.
Passcode for Phone Inquiries: Up to 200 characters. A passcode the parent can use to identify themselves for phone inquiries.
Note: Up to 32,000 characters allowed.
The "Can view FERPA Permissions" permission is available in the following roles (and roles copied from them):
Faculty - Access to Courses and Students by Course
Department Head Course Access
Registrars
Registration - Access to All Students
Registration Module Manager
The "Can manage FERPA permissions" permission allows the user to view, edit, create, delete, and download permission assignments. It's available in the Registrars role and roles copied from it.
To create a contact (on the Create FERPA Permission pop-up), users need the "Can create contacts" permission, which is available in the Communication Management Base role and roles copied from it.
From a student's Summary page, click the Person options drop-down.
Select Student, Student, and FERPA Permissions. The student's FERPA Permissions page opens. Anyone who has been granted FERPA permissions for the student is listed.
Tip
You can also access a student's FERPA Permissions page from their FERPA Contacts block on their Student Summary page or from the Actions drop-down on the Student General Information page, which is in the Registration Operations hub.
To see all the fields for a person's permission, click the Expand icon
 .
.In the FERPA Permission Details column, if necessary to see the whole list of FERPA category definitions, click the More button.
Click the Create permission button. The Create FERPA Permission pop-up opens.
In Name / ID, begin typing a name or ID number.
If the name appears in the list, select it.
If the name isn't in the system, click the Create new contact button. The Create Contact wizard opens.
Enter the information. First Name, Last Name, and either Email or Phone are required.
Click Save & finish. The new contact is created as an external person. They are not saved to the Name Entity table. The Create Contact wizard closes.
In Name / ID, begin typing a name or ID number. Select the name from the list.
Enter a Start Date.
Enter an End Date (not required). If you don't enter one, the permission doesn't expire.
Under Create Parent User and J1 Campus Portal Login, select Yes or No. If you select Yes, an account is automatically created for the parent to use the Parent features in the Campus Portal.
Note
For parents to log in, your school must have the Parent features set up in the Campus Portal.
In addition, your school can configure the Account Notification feature in the Campus Portal to send an email to parents when this account is created. The email has instructions to set up their password and log in.
Under Granted FERPA Permissions, select checkboxes for all the permissions the student wants this contact to have. If you don't select any, this contact will have no permissions.
Enter a Passcode for Phone Inquiries. Up to 200 characters. Not required.
Enter a Note. Up to 32,000 characters. Not required.
Click either Create and close or Save and create another.
On a permission's row, click the Actions drop-down, and select Edit. The Edit FERPA Permission pop-up opens.
Make your edits. You can edit the dates, the permission checkboxes, the passcode, and the note. If the contact doesn't already have a Parent User and Campus Portal Login, you can select Yes.
Click the Update button. Your changes are saved, and the Edit pop-up closes.
On a permission's row, click the Actions drop-down, and select Copy. The Copy FERPA Permission pop-up opens. This creates another permission for the same contact, which you can edit to extend the End Date or add permissions.
Make your edits, and click the Copy button. The copy is saved, and the Copy pop-up closes.
Delete FERPA Permission Definitions
Select the checkboxes next to the rows you want to export.
From the Options drop-down, select Download to Excel. The Download to Excel pop-up opens.
Select options for the Excel format and data columns.
Click Download. Your .xlsx or .zip file is saved in the file location that you have set in your browser settings.
On the FERPA Category Definitions page, you define the types of FERPA permissions that can be assigned, such as Academic Records, Financial Records, and Residence Life Records.
On the FERPA Permissions page, you actually assign permission to specific information for a specific student. For example, you assign a parent permission to their child's Academic Records.