Transfer Status Definitions
Important
Information and features vary according to the roles to which you belong and the permissions associated with those roles. For more information, contact your module manager or your campus support team.
Use this page to manage transfer status definitions. These definitions are used on the Transfer Entry page. When a prospective transfer course is assigned a status of Approved for Transfer, it can be transferred to the student's course history.
Jenzabar provides some statuses, and you can create others.
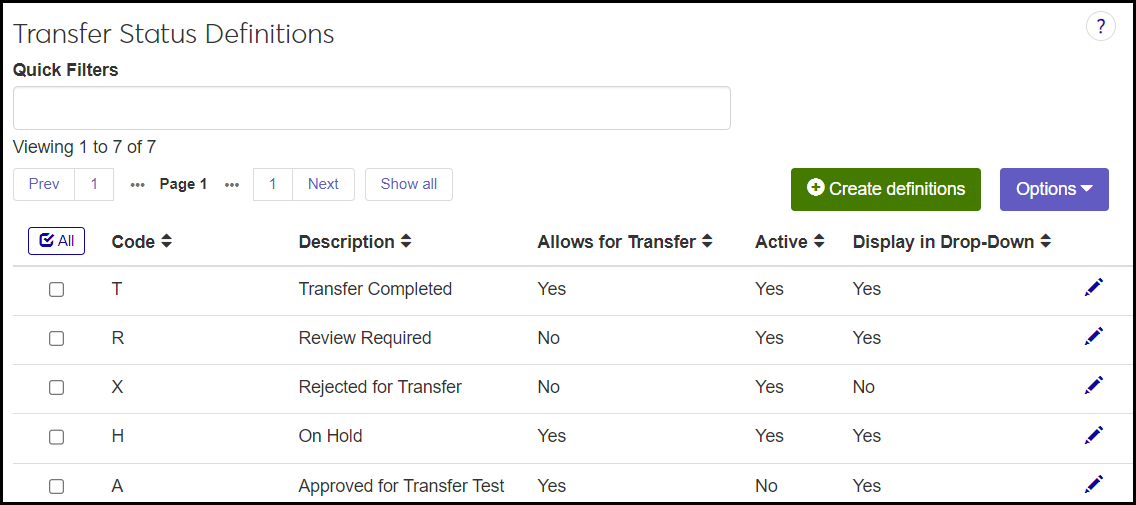
Jenzabar provides the following statuses.
Code | Transfer Status | How the Value Is Set on the Prospective Student Transfer Entry Page | Comment |
|---|---|---|---|
R | Review Required | When a row is inserted manually or via the import process, this value is the default. | |
A | Approved for Transfer | Set manually |
|
T | Transfer Completed | Set by the Transfer Entry process | On the Transfer Entry page, this status is set when a course that's approved for transfer is transferred to student course history. |
X | Rejected for Transfer | Set manually | Use this to indicate that the course was reviewed and was not approved for transfer. |
H | On Hold | Set manually | Use this to indicate that the record is being considered and has been neither approved nor rejected. |
Desktop Location
In Desktop, you can manage transfer statuses on the Transfer Status Definition window, which is found in both Settings - Advising and Settings - Registration.
Database Location
The information is stored on the Transfer Status Definitions table (transfer_status_def).
Code: transfer_status_def.transfer_status_cde
Description: transfer_status_def.descr
Allows for Transfer: transfer_status_def.AllowsForTransfer
Active: transfer_status_def.active
Display in Drop-Down: transfer_status_def.DisplayInDropdown
Sort Order: transfer_status_def.display_order
The definitions are used on the Transfer Entry page.
Code: Up to 3 characters. Required.
Description: Up to 100 characters. Required.
Allows for Transfer: Options are Yes and No. The default is No, meaning that while a prospective transfer course has this status, it can't be moved to student course history. Typically, Approved for Transfer and Transfer Completed would be set to Yes.
Active: Options are Yes and No. The default is Yes. A status set to No can still display in drop-downs and be selected, but it's labeled Inactive.
Display in Drop-Down: Options are Yes and No. The default is Yes. A status set to No isn't available on the Transfer Entry page.
The permission required to access the page is "Can manage transfer status definitions", which is available in the Registrars and Registration Module Manager roles and roles copied from them.
From the Registration Administration hub, click Hub options.
Click Manage Definitions, and select Transfer status definitions. The Transfer Status Definitions page opens.
To temporarily sort the definitions, click the heading of the column you want to sort on. Click once for ascending order and again for descending order. The definitions are sorted for this viewing of the page, but the next time you view or refresh the page, it will return to its default sorting.
To filter the definitions, enter a phrase in the Quick Filters field. To remove a filter, click its Remove icon
 .
.
Click Edit order. The Edit Order window opens.
You can use the Sort By and Order fields or drag and drop individual definitions.
Sort By and Order:
In Sort By, select a column to sort on.
From the Order drop-down, select Ascending or Descending.
Drag and Drop:
Hover your cursor over the vertical arrow icon
 until the cursor changes to a Hand icon
  .
.Click and hold while dragging the definition to the desired location.
Release the mouse button.
Click Update.
Click the Create definitions button. The Create Transfer Status Definitions pop-up opens.
Enter or select information in the fields. Refer to the Fields information above for guidance.
Click either Save and create another or Create and close.
Click the Edit icon
 on the row of a definition. The Edit Transfer Status Definition pop-up opens. The Code field is read only, but the others are editable.
Edit as needed.
Click the Update button. Your changes are saved, and the pop-up closes.
Delete Transfer Status Definitions
Select the checkboxes next to the rows you want to export.
From the Options drop-down, select Download to Excel. The Download to Excel pop-up opens.
Select options for the Excel format and data columns.
Click Download. Your .xlsx or .zip file is saved in the file location that you have set in your browser settings.