Student Health Group Roster
Important
Information and features vary according to the roles to which you belong and the permissions associated with those roles. For more information, contact your module manager or your campus support team.
Several important functions for working with health groups can be found on the health group roster page. There are a couple of ways to get to the health group roster:
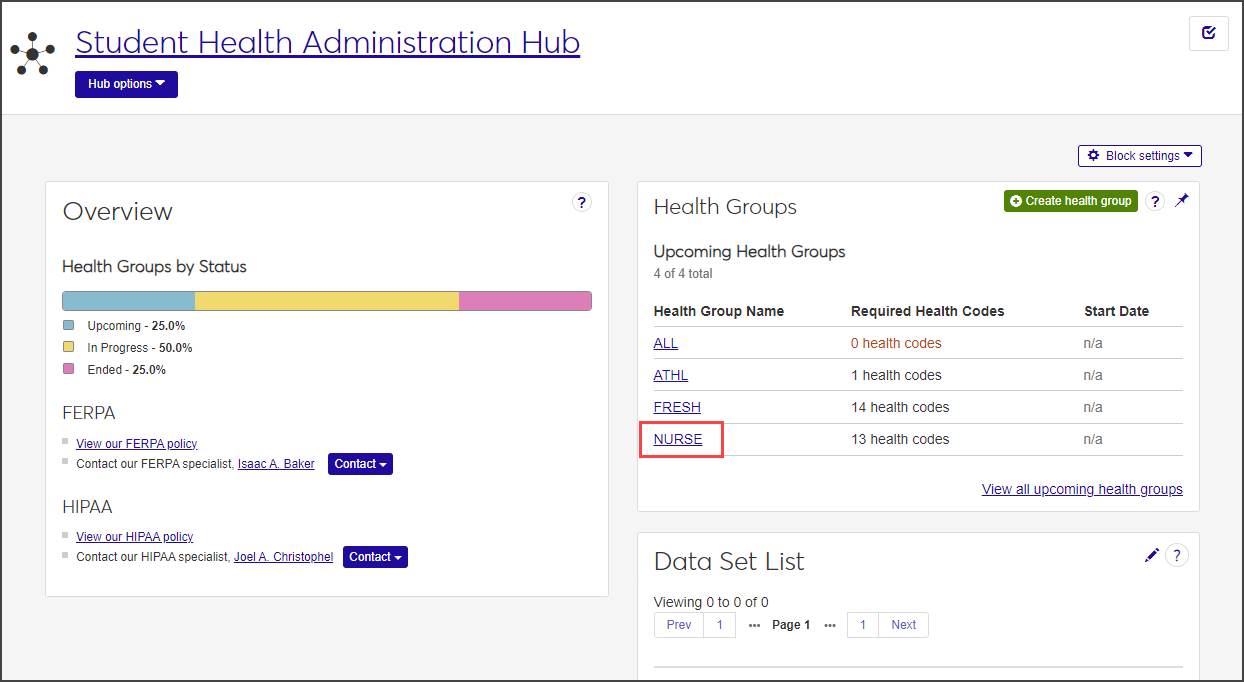
From the Student Health Administration hub, if the health group you want to work with is listed in the Health Groups block, click on its name. When the health group summary page opens, click on the Group Roster link that shows the number of students on the roster. The Health Group Roster page opens.
From the Student Health Administration hub, in the Health Groups block, click View all upcoming health groups. When the View Health Groups page opens, click on the group name or the link in the Roster Count column that shows the number of students on the roster.
The filter allows you to narrow down the group of students shown in the roster. Filter based on these criteria:
Classification - Type-ahead field that searches on student classification (freshman, sophomore, post-graduate, etc...). Can select multiple classifications.
Major - Type-ahead field that searches on student major. Can select multiple majors.
Met Required Health Codes - Type-ahead field that filters based on students who have met the selected health codes. Can select multiple health codes.
Missing Required Health Codes - Type-ahead field that filters based on students who have NOT met the selected health codes. Can select multiple health codes.
Student Name - Use this if you are searching for a particular student (or several students). Filters based on first and last name fields. Can select multiple names, full or partial.
Important
You can only add students to the roster if the health group's status is "Upcoming." You cannot add students if the group has already started.
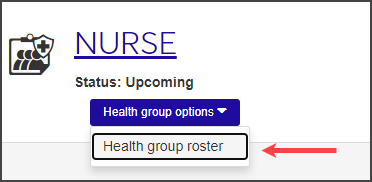
In the Health Groups block on the Student Health Administration Hub page, click the name of the health group you want to add students to.
The group's summary page opens.
From the Health group options drop-down menu, select Health Group Roster.
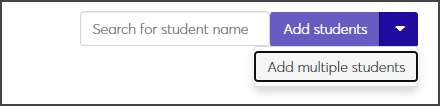
On the Health Group Roster page, click in the Add students field and begin typing the name of the student you want to add. Select the correct student when the name appears on the list and click Add students.

To add more than one student to the roster, use the Add multiple students option:.
Hover your mouse over the arrow on the Add students button and select Add multiple students.
The Add Multiple Students page opens.
Use the radio buttons at the top of the page to choose how to select the students you want to add to the health group roster.
Add by name: Add several students by typing their names in the Name field.
Filter from all students: Choose students based on their major or year classification.
Query: Use an existing query to add multiple students to the health group roster.
Note
Jenzabar provides the default query (q_select_health_roster); you can customize this query as needed. Custom queries must start with the default "q_" filename and must be stored in the Jenzabar Reports directory. This directory is set up as a part of the upgrade\installation process that defaults to C:\Jenzabar\Reports\. Contact your campus support team for more information on customizing default queries or creating queries.
Note
You cannot access InfoMaker directly from J1 Web to edit your queries. See the InfoMaker Resource Center on MyJenzabar.net, or contact your campus support team to learn more about customizing queries.
When you have found the students you want to add to the roster, click Add to roster. The students are added to the health group roster.
Navigate to the Health Group Roster page by clicking the link for the health group found on the Health Groups block of the Student Health Administration hub. From there, select Health group roster from the Health group options drop-down menu.
Find the student you want to remove and click the Actions button for that row.
Click Remove from roster. The Remove from Group Roster pop-up window opens.
Click Yes, remove. The student is removed from the health group roster.
To associate a health code with a student, that student must be in a health group associated with the health code. The easiest way to do this is when you create a new health group; a step-by-step wizard allows you to add multiple students at once based on a variety of criteria. If your health group has already been created and you need to add a student, you can do this by manually adding each student. Follow the procedures for each of these steps to associate health codes with students:
Create a new health group and add students to it.
Manage health information for students.
Important
In order to view or manage student health information, you must belong to a role with the "Can manage health group roster" permissions turned on. Jenzabar provides this permission with the Student Health Administrator default role, but your school may have created a customized version of this role.
The fastest way to manage most health information tasks is from the Student Health Profile page. From this page, you can manage the student's emergency contact and health insurance information, and view and manage required health codes.
Some tasks, however, must be performed on the Student Health Administration hub, such as creating new health codes and adding students to a health group.
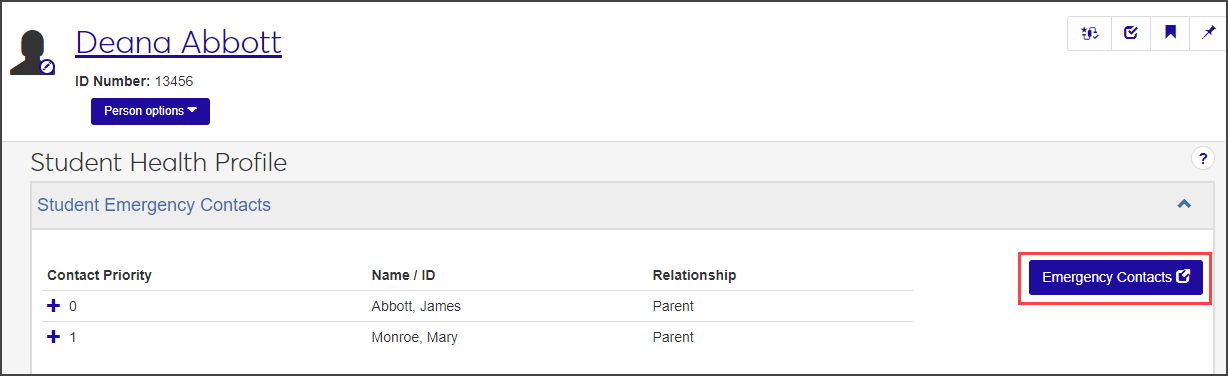
To access a student's Health Profile page, click the student's name anywhere it appears as a link in J1 Web. From the student's summary page, click the Person options drop-down menu and select Student > Student > Student Health Profile.
On the Student Health Profile page, click the Student Emergency Contacts row to expand it.
Important
You must be in a Person Management role with "Can view emergency contacts" permission to access the Emergency / Missing Persons Contacts page. To add, update, or delete contact information, you must also have "Can manage emergency contacts" permission.
To manage emergency contact information, click the Emergency Contacts button. The Emergency / Missing Persons Contacts page opens.
Add or edit contact information as needed.
Manage a student's existing health codes in the Health Codes section of the Student Health Profile page. You can mark existing health codes as met or not met, indicate relevant dates, and enter comments. You cannot add new health codes or assign students to new health groups on this page.
Tip
If you need to add the student to an additional health group, you can do that on the Health Group Roster page for the group you want to add the student to. To add a completely new Health Code, use the Manage Health Codes page in the Student Health Administration hub.
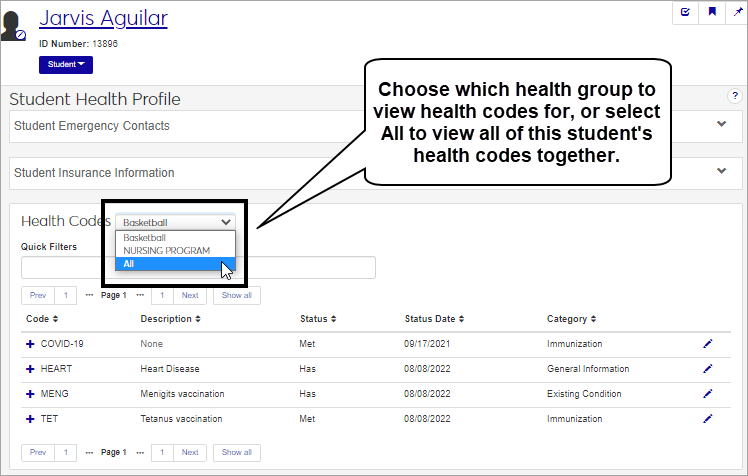
If a student is in more than one health group, use the drop-down menu next to the section title to view codes for each health group separately, or view them all.
Click the plus sign next to a row to expand it and see more details for that health code.
To update the status of a health code, click the pencil icon at the end of the row. The Manage Required Student Health Codes pop-up window opens. The top section displays Immunization and Medical Exam Health Codes; the bottom section displays Informational Health Codes.
Mark Immunization and Medical Exam Health Codes as met by selecting the checkbox next to the appropriate code.
Mark Informational Health Codes as met or unmet by selecting Has or Doesn't have from the relevant drop-down menu.
To see more detailed information about the code or to enter a comment or edit dates, click Show details.
Click Update when you are done editing.
To email students on the health group roster:
Navigate to the Health Group Roster page (Student Health Administration | [Health Group] | Hub options | Health group roster).
Choose the students you wish to email by checking the checkbox beside each name.
Click the Options button in the upper right corner of the roster, and choose Create new communication. The Create New Communication window appears.
Enter a subject, message, include any needed attachments, and click Send. If you are sending the email to more than one student on the roster, each will receive an individual copy of the email.
Select the checkboxes next to the rows you want to export.
From the Options drop-down, select Download to Excel. The Download to Excel pop-up opens.
Select options for the Excel format and data columns.
Click Download. Your .xlsx or .zip file is saved in the file location that you have set in your browser settings.
You may not be in a role with the appropriate permissions to see that block, or your institution may not have that feature enabled. Contact your system administrator or module manager for more information.