Payment Plan Tab
Important
Information and features vary according to the roles to which you belong and the permissions associated with those roles. For more information, contact your module manager or your campus support team.
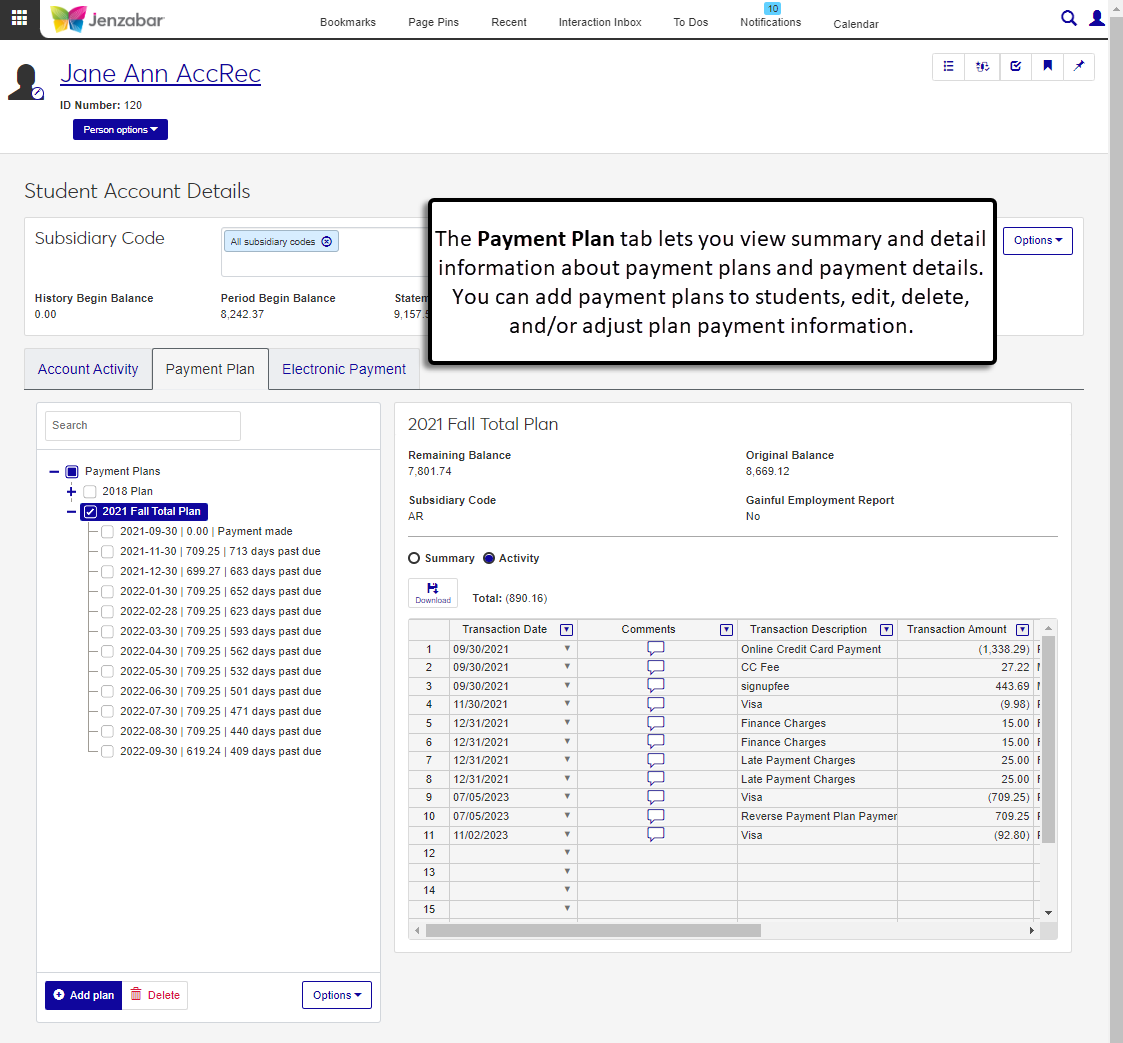
Use the Payment Plan tab of the Student Account Details page to view and manage payment plan information. This tab is available for schools with the Student Finance license.
Payment plan information can also be managed from the Desktop Self-Service Payment Plans window. Although some fields may be named differently in J1 Web, they serve the same purpose. Information entered or updated in either Desktop or J1 Web is updated in the other system.
Desktop Field | J1 Web Field |
|---|---|
Default Subsidiary Code | Subsidiary Code |
Plan Type | This field is not displayed in J1 Web. |
To view and manage the Payment Plan tab, you must be in a Receivables Management role with permissions to work with payment plans. For additional information about payment plan permissions, see Receivables Management Permissions.
When a payment plan is selected from the list, the page displays the following balance information: Remaining Balance, Original Balance, Subsidiary Code, and Gainful Employment Report. This information is always displayed when the payment plan is selected. If the plan's recalculate freeze date is in the future, a "Balance Locked" checkbox is also visible with balance information. Select the checkbox to lock the plan balance when recalculations are run before the freeze date.
You can view payment plan details with the Summary view or Activity view.
Summary View
The summary view has two sections of information: Signup and Fees.
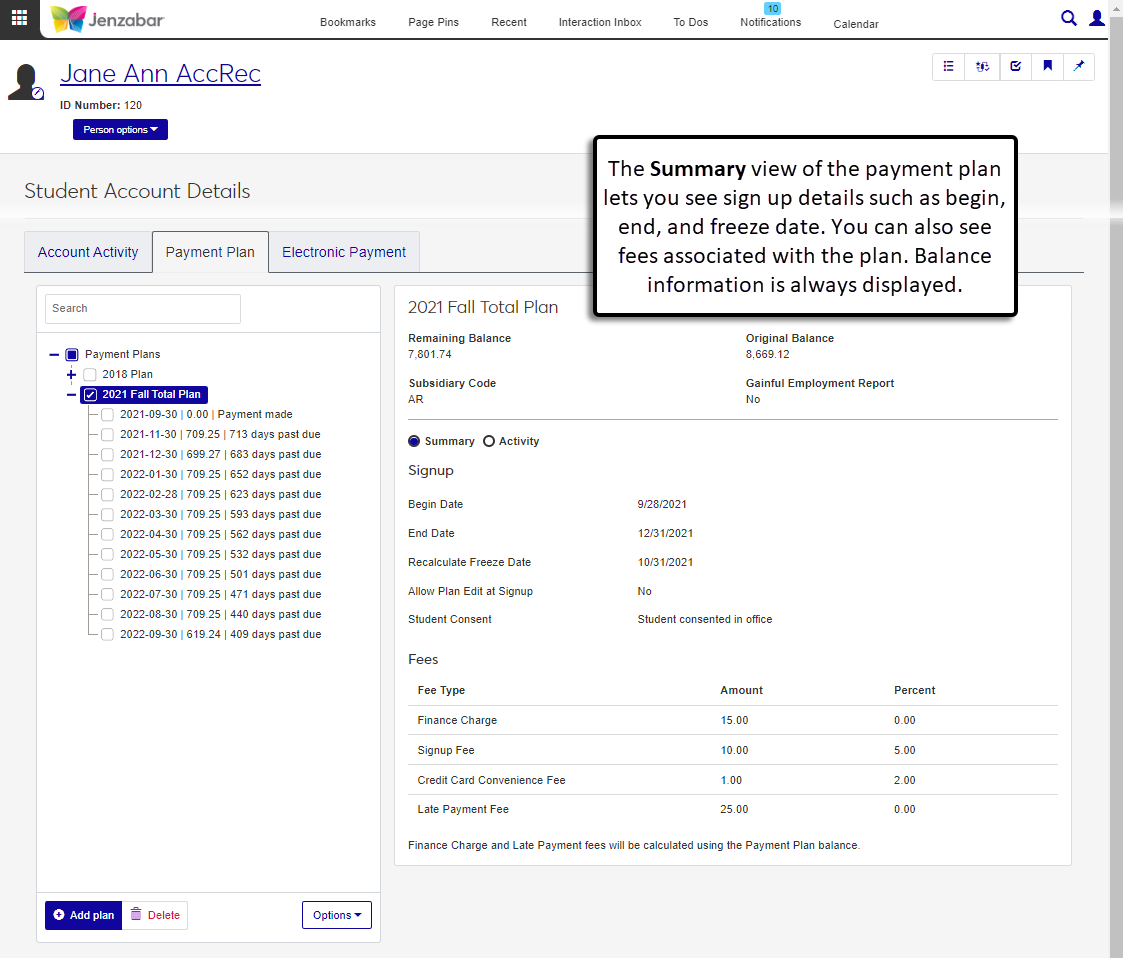
The Signup section includes the following details.
Begin and End Dates - the timeframe for the payment plan to be paid.
Recalculate Freeze Date - the last date the balance to be paid can be recalculated.
Allow Plan Edit at Signup - indicates whether the student can make changes to the plan when they sign up for it.
Student Consent - indicates whether the student consented to the payment plan. The method to obtain student consent caries by school.
The Fees section lists the fee type, amount, and percent for any fees applicable to the payment plan. Fee types include finance charges, signup fee, credit card convenience fee, and late payment fees.
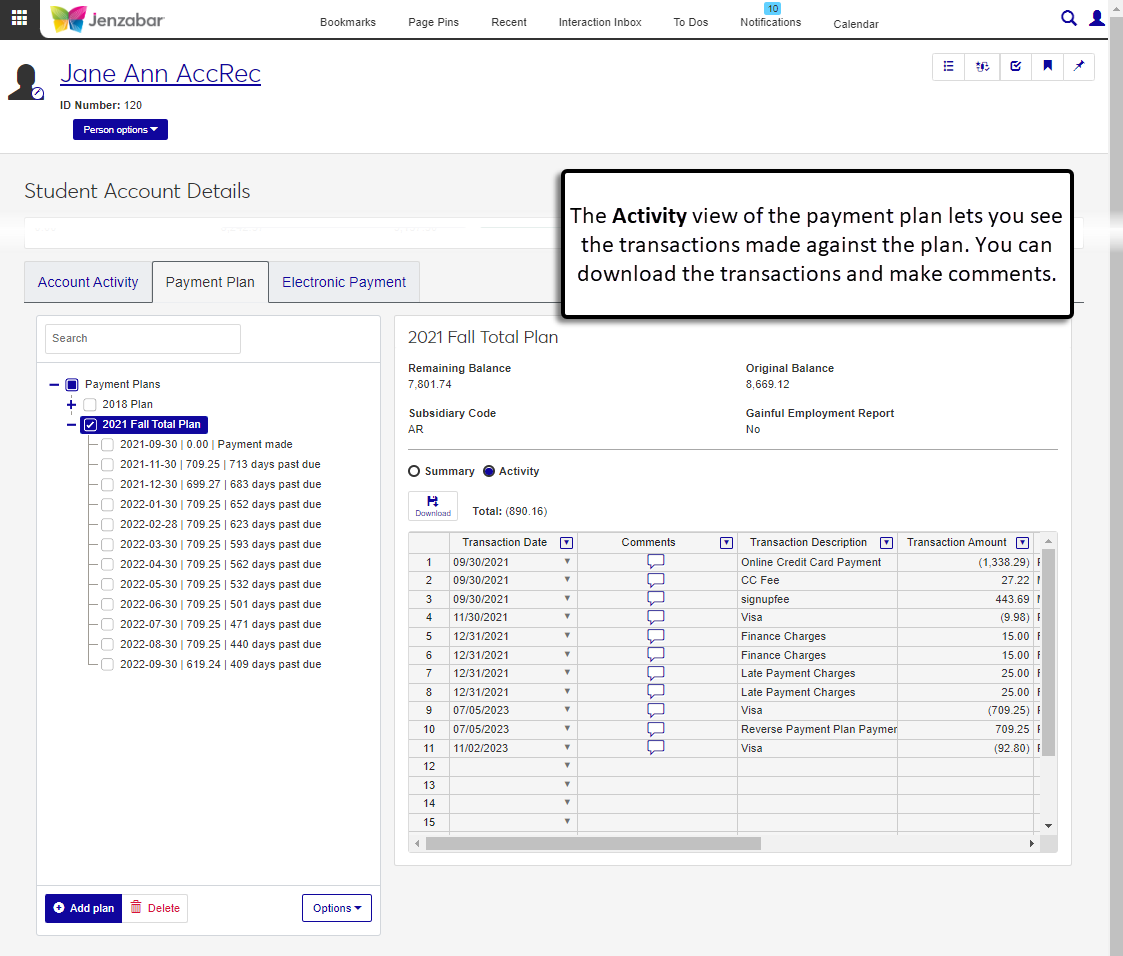
Activity View
The activity view displays transaction details for plan payments. You can download transaction details and make comments on transactions.
On the Student Account Details page, select one or more options in the Subsidiary Code field.
Click the Payment Plan tab. If the student has payment plans associated with the selected subsidiary codes, click the Payment Plans button to see a list of plans.
Click the plan name to view details.
Click the Expand icon
 next to the plan name to see a list of plan payments.
Note
Payment plans can only be added to students with an outstanding balance. If the student has a zero balance, the Add plan button is disabled.
On the Student Account Details page, select one or more options in the Subsidiary Code field.
Click the Payment Plan tab.
Click the Add plan button. The Add New Payment Plan pop-up opens.
Click in the Select Plan field and select the option. The pop-up automatically populates the following fields:
Subsidiary Code - the subsidiary code associated with the selected payment plan. You can change the subsidiary code to another AR subsidiary associated with the student as needed.
Plan Balance - the amount the student owes. This starting balance can be updated as needed.
Number of Monthly Payments - the number of monthly payments that have been set up for the assigned payment plan.
Note
If there are fees associated with the payment plan, a warning message details the fee information.
First Payment Start Day - the date of the month when payments are processed. Default is Last day. The list of payment dates updates when the first payment start day is selected. The amount is divided evenly between the number of months in the payment plan.
If the student has consented to the payment plan, select the Student Consented to Plan checkbox. When this checkbox is selected, the student receives an email with payment plan details after the plan is added.
Click Add.
On the Student Account Details page, select one or more options in the Subsidiary Code field.
Click the Payment Plan tab and click the Payment Plans button to see a list of plans.
Select a payment plan name.
Click the Options button and select Adjust plan payments. The Adjust Plan Payments pop-up opens with a list of payment information.
Make adjustments as needed to the Due Date or Amount on each payment row.
To add a new payment:
Click the Add another plan payment link.
Enter the Due Date and Amount for the new payment.
Note
The total payment amount must equal the remaining balance.
To remove a payment, click the Remove icon
 next to the payment number.
Click Update.
On the Student Account Details page, Payment Plan tab, click Payment Plans to expand the list.
Expand a payment plan to see payment details.
Click the Options button and select Make payment. The Create Receipt page opens in a new browser tab with the Generate Receipt Detail Rows pop-up displayed.
The Type of Payment is autofilled with the "Payment plan" option.
In the Auto Distribute field, select "Yes" or "No". The Payment Plan Detail Rows section appears.
If Yes is selected:
Note
The system automatically distributes the payment amount across unpaid payment detail rows until the payment amount is fully distributed. The payment is distributed to the oldest payment due date first, then up to most recent due date. You can manually adjust the Distribution Amount for each row if needed.
Enter the Payment Amount. The Payment Plan Detail Rows section appears.
In the Select Payment Plan Payment field, the self-service payment plan payment with the next or past due date is automatically selected. Required.
If the Payment Amount is less than the plan payment due, the Distribution Amount autofills with the payment amount. If the Payment Amount is more than the plan payment due, the Distribution Amount autofills with the plan payment amount and generates additional detail rows to distribute the remaining amount across the plan payments. Required.
Notice
Ann makes a $500 payment towards her Fall 2023 payment plan. Her plan has 4 payments of $300. When Yes, Auto Distribute is selected, the system automatically applies the first $300 to Payment 1 and the remaining $200 is applied to Payment 2.
If there are any fees associated with the plan, select or deselect the checkboxes to add the fee to the distribution amount. A note with the distribution amount, including fees, appears beneath the Distribution Amount field. Fee checkbox options can be one or more of the following:
Collect sign-up fee
Collect convenience fee
Enter the Receipt Code for each row. Required.
Click Add another row to distribute the payment amount to additional payments in the plan, and enter or select the required information.
Click the Remove icon to remove payment detail rows.
If No is selected:
The Payment Plan Detail Rows section appears.
In the Select Payment Plan Payment drop-down, select the appropriate plan payment. Required.
If there are any fees associated with the plan, select or deselect the checkboxes to add the fee to the distribution amount. A note with the distribution amount, including fees, appears beneath the Distribution Amount field. Fee checkbox options can be one or more of the following:
Collect sign-up fee
Collect convenience fee
Select a Receipt Code. Required.
Enter the Distribution Amount. Required.
Click Add another row to distribute the payment amount to additional payments.
Click the Remove icon to remove payment detail rows.
Review and update information as needed, then click Continue to generate rows. The pop-up closes and the receipt details spreadsheet is updated with transaction details for each payment row. On the Student Account Details page, Payment Plan tab, the receipt transaction is added to the payment activity.
On the Student Account Details page, select one or more options in the Subsidiary Code field.
Click the Payment Plan tab and click the Payment Plans button to see a list of plans.
Select a payment plan with payments listed.
From the Optionsdrop-down at the bottom of the payment plans, select Recalculate plans. The system recalculates the balances and refreshes the page with the updated amounts.
On the Student Account Details page, select one or more options in the Subsidiary Code field.
Click the Payment Plan tab and click the Payment Plans button to see a list of plans.
Select a payment plan with automatic payments.
Click the Options button and select Cancel automatic payments. The Cancel Automatic Payments pop-up opens.
Click Cancel automatic payments.
On the Student Account Details page, select one or more options in the Subsidiary Code field.
Click the Payment Plan tab and click the Payment Plans button to see a list of plans.
Expand the plan name to view the list of payments.
Select one of the plan payments. Payment activity appears in the spreadsheet to the right of the plan list.
Select a transaction in the spreadsheet.
From the More drop-down above the account activity, selectReverse Payments.
In the Reverse Payments confirmation pop-up, click Reverse Payments. A reversing payment row is added to the payment spreadsheet and a new RC batch is created for the reversal.
On the Student Account Details page, select one or more options in the Subsidiary Code field.
Click the Payment Plan tab and click the Payment Plans button to see a list of plans.
Expand the plan name to view the list of payments.
Select one of the plan payments. Payment activity appears in the spreadsheet to the right of the plan list.
Select a transaction in the spreadsheet.
From the More drop-down above the account activity, selectDetach existing payment. The Detach Existing Payment? pop-up opens.
Click Yes, detach. The payment row is removed from the activity detail, the Remaining Balance updates, and the receipt details are updated to remove the payment plan from the receipt transaction.
On the Student Account Details page, select one or more options in the Subsidiary Code field.
Click the Payment Plan tab and click the Payment Plans button to see a list of plans.
Expand the plan name to view the list of payments.
Select one of the plan payments. Payment activity appears in the spreadsheet to the right of the plan list.
Select a transaction in the spreadsheet.
From the More drop-down above the account activity, selectAttach existing payment. The Attach Existing Payment pop-up opens.
Select one or more receipt transactions from the details spreadsheet.
Click Attach payment. The page refreshes, the remaining balance is updated, and the receipt transaction is updated to show it is attached to a payment plan balance.
Note
Payment plans with payment (RC) transactions cannot be deleted.
On the Student Account Details page, select one or more options in the Subsidiary Code field.
Click the Payment Plan tab and click the Payment Plans button to see a list of plans.
Select a payment plan with payments listed.
Click the Delete button at the bottom of the payment plans.
Click Yes, delete in the confirmation pop-up.
Payment plans are managed in the Desktop Payment Plan window. For additional information about creating a payment plan, see the online help for the Payment Plan window.
Payment plan fees are defined on the Desktop Payment Plan window. If there are additional miscellaneous fees tied to the payment plan, those are defined on the Miscellaneous Charge Codes Entry window.
Students receive automatic emails from the system in the following scenarios:
When a plan is added to a student and the Student Consented to Plan checkbox is selected.
When a payment plan payment is entered via the Create Receipt process or on the Receipt Details page.
For additional information about the system-generated emails to students, see Customizing System-Generated Emails for Student Accounts.
Plans that are set up for automatic payments will have a "Set Up For Automatic Payments" note next to the plan name.
At this time, any changes to the sign-up or payment plan fee information must be made in Desktop from the Self-Service Payment Plan or Payment Plan windows. For additional information, see the following help topics:
The calculation that determines the first payment due date is based on the settings on the Desktop Payment Plan window and the First Payment Start Day.
For example, Payment Plan A starts on August 15, 2024. Use the table below to see how the first payment due date is calculated for different scenarios.
Payment Plan Window "Set first payment due date to the day after the student signs up" checkbox selected? | Plan Added to Student | First Payment Due Date |
|---|---|---|
No | Before the Payment Plan Start Day (e.g., August 1, 2024) | August 15, 2024 |
No | After the Payment Plan Start Day (e.g., August 26, 2024) | September 15, 2024 |
Yes | Before the Payment Plan Start Day (e.g., August 1, 2024) | August 15, 2024 |
Yes | After the Payment Plan Start Day (e.g., August 26, 2024) | August 27, 2024 |
If the Financial Aid source code (FA) is flagged to be included in payment plan balances on the Desktop Define Journal Source Codes window, Financial Aid awards will be applied to payment plan balances.