Manage Vehicle Registrations
On the Vehicle Registrations page, you can view registered vehicles, create new registrations, and assign vehicle permits to people on campus.
A vehicle registration consists of both a predefined Permit Code and a Permit Number. When you create a new registration, you can add detailed information such as the driver's license number and state, vehicle license plate and state, make/model/year of the vehicle, a description of the vehicle, and the status of the permit.
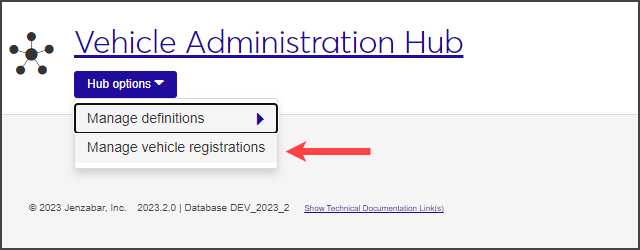
To access the Vehicle Registrations page, select Manage Vehicle Registrations from the Hub options drop-down menu on the Vehicle Administration Hub page.
To add and edit vehicle registrations, users must have the permission Can manage vehicle registrations enabled for the Vehicle Administrator role.
From the Hub options drop-down menu on the Vehicle Administration Hub page, select Manage Vehicle Registrations. The Vehicle Registrations page opens.

For each registration, the list displays the name of the permit holder and the permit code. It may also show the vehicle license plate number; the state in which the vehicle is registered; and the make, model, and year of the vehicle.
By default, vehicle registrations are listed alphabetically by the name of the permit holder. Click a column heading in the list to sort the list by that heading.
Click the plus sign next to the registration to expand the row and see additional information, such as driver's license information; permit fee; the campus and place where the vehicle is permitted; if the permit holder has any violations; and the vehicle owner.
To narrow the list of registrations displayed, check one or more filters in the Vehicle Registration Filter. For each filter you select, enter the criteria by which you want to filter the list and click Apply.
To save a filter that you use often, select the criteria, click Save As, and enter a name for the filter. If you would like this to be the default filter, check Set as default and then click Save.
Click the Create vehicle registration button on the Vehicle Registrations page. The Create Vehicle Registration window opens.
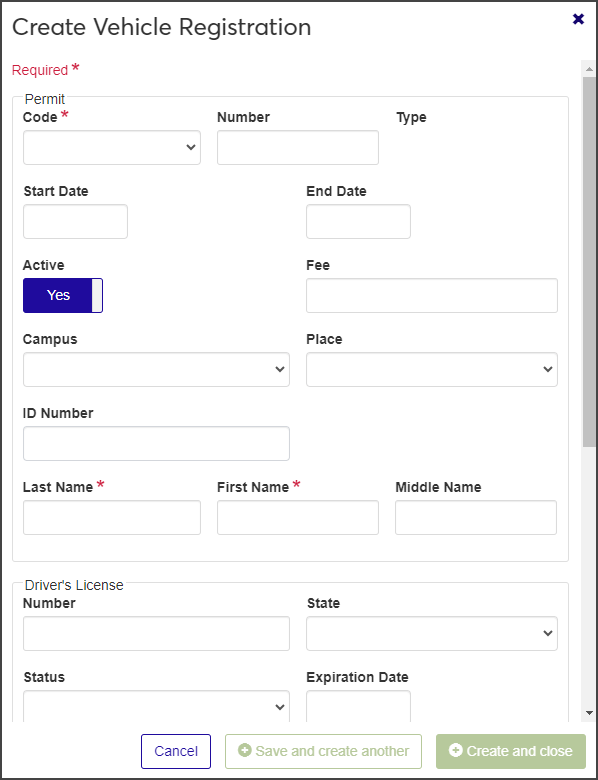
Required fields are indicated by an asterisk.
Select a permit code from the Code drop-down menu. The menu lists all permits defined on the Vehicle Permit Definitions page. When you select a code, the Type field fills in with the permit type specified in the permit definition (e.g., Commuter or Faculty and Staff).
Note
If the maximum number of permits with that code has been reached, a warning message is displayed. To use this permit code, you'll need to increase the value in the Max Allowed field on the Vehicle Permit Definitions page.
Enter the number of the preprinted permit decal or tag in the Number field, if applicable.
If the permit's date range was specified in the permit definitions, those dates fill in automatically in the Start Date and End Date fields. If not, click in each date field and select the date from the pop-up calendar.
If the permit is not active yet, click Active to change the field to No. The value defaults to Yes.
Enter a Fee. If a fee was entered when the permit was created, this field fills in automatically.
Select the Campus and Place where the registration will be valid, if necessary.
Enter the ID number of the person who will be using the vehicle, if necessary.
Enter the Last Name and First Name of the person who will be using the vehicle. These fields are required; the Middle Name field is optional.
Enter optional driver's license information, including the license number, state where valid, status, and expiration date. These fields are optional.
If needed, enter additional information about the vehicle, such as the license plate number; the type of license (e.g., motorcycle or sport utility vehicle); the make, model, and year of the vehicle; and the name of the owner (which might differ from the name of the person using the vehicle). All fields are optional.
When you are done, click Save and create another or Create and close. The new registration is added to the Vehicle Registrations list.
You can edit vehicle registrations one at a time or in bulk.
To edit a single vehicle registration:
Click the Edit icon for the vehicle registration you need to edit. The Edit Vehicle Registration window opens.
Make updates as necessary. You cannot change the permit Code, Number, or Type; all other fields are editable.
When you are done, click Update to save your changes.
To edit multiple registrations:
Check each registration you need to edit and select Edit selected from the Options drop-down menu. The Edit Vehicle Registrations window opens.
Select an option from the Select a Detail to Update drop-down menu.
Select a value from the adjacent drop-down menu.
If you decide one or more of the selected vehicle registrations should not be updated, click the X icon next to it to remove it from the edit list. Only the registrations listed in the edit window will be updated.
When you are done, click Update and edit another to edit another detail for the selected registrations, or click Update to save your changes and close the window.
Under Vehicle Registrations, select the checkbox next to the registrations you need to delete. You need to select at least one to enable the Options drop-down menu.
Select Delete from the Options drop-down menu. The Delete Vehicle Registrations? window opens.
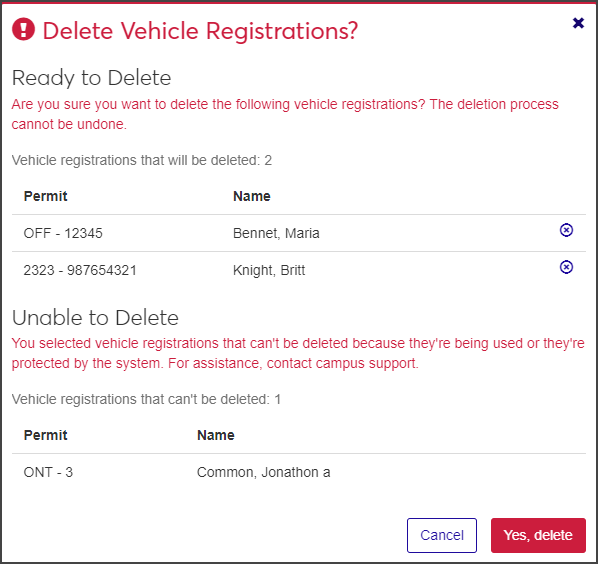
The window might include two sections:
Ready to Delete: Registrations that can be deleted.
Unable to Delete: Registrations that can't be deleted because they're in use or are otherwise protected by the system. If all selected registrations can be deleted, this category does not appear.
If you decide you no longer want to delete a registration listed under Ready to Delete, click the X icon to remove it from the list.
When you are sure you want to delete the registrations listed under Ready to Delete, click Yes, delete.