Invoice Details
Important
Information and features vary according to the roles to which you belong and the permissions associated with those roles. For more information, contact your module manager or your campus support team.
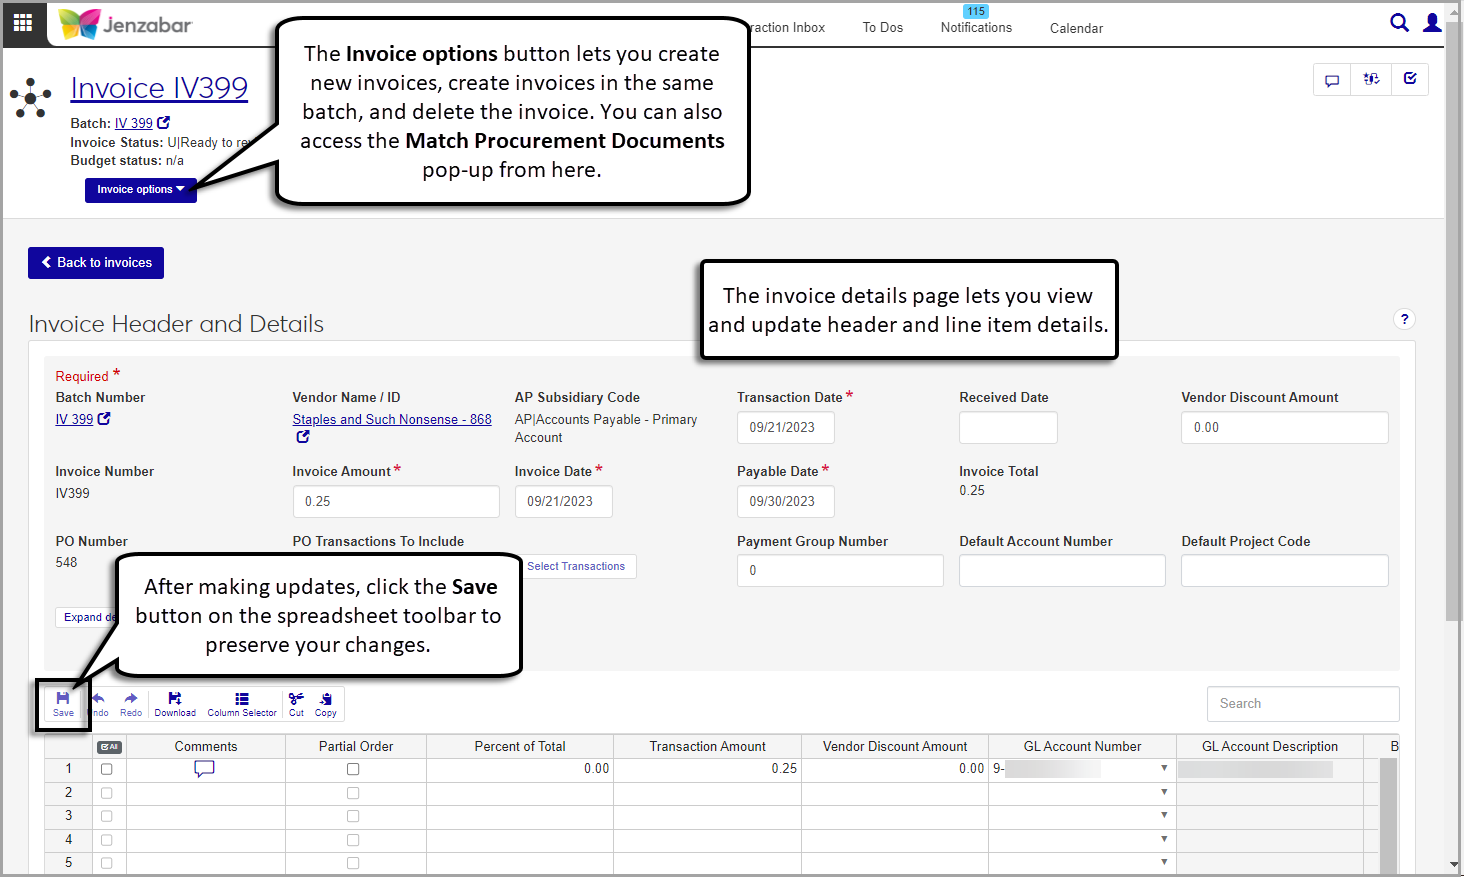
The Invoice Details page lets you review invoice header and transaction detail information. When an invoice is in a suspended (S) or unposted (U) status, certain header fields and detail columns can be edited. You can also use the Invoice options to create new invoices, find procurement documents related to the invoice, or delete the invoice.
Note
Invoices created for PO transactions cannot be updated, even in suspended (S) or unposted (U) status.
You'll see only the transactions that you have access to based on your GL account and project code permissions. If there are transactions associated with an account or project code you don't have access to, an alert displays at the top of the page.
To work with the invoice details, you must be in a Procurement - Accounts Payable role with the "Can view invoices" and "Can edit invoices" permissions. To delete invoices, you must also have the "Can delete invoices" permission. For more information about invoice permissions, see Roles and Permissions to Work with Vendors and Invoices.
You can view invoice details from the Desktop Invoices window (accessed from the Create Vendor Invoices window).
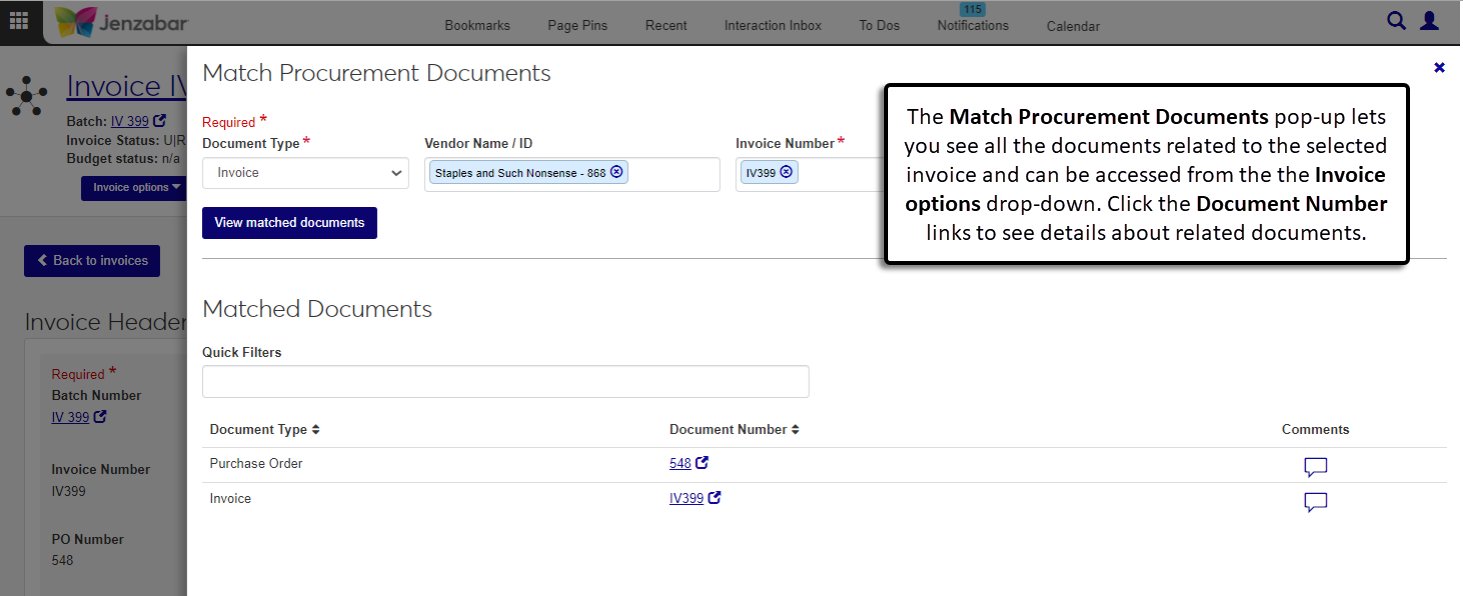
Use the Match procurement documents option to view requisitions, purchase orders, and payments related to the invoice. The Match Procurement Documents pop-up autofills the fields based on the selected invoice, and you can easily see related documents, open their detail pages, and view and add comments.
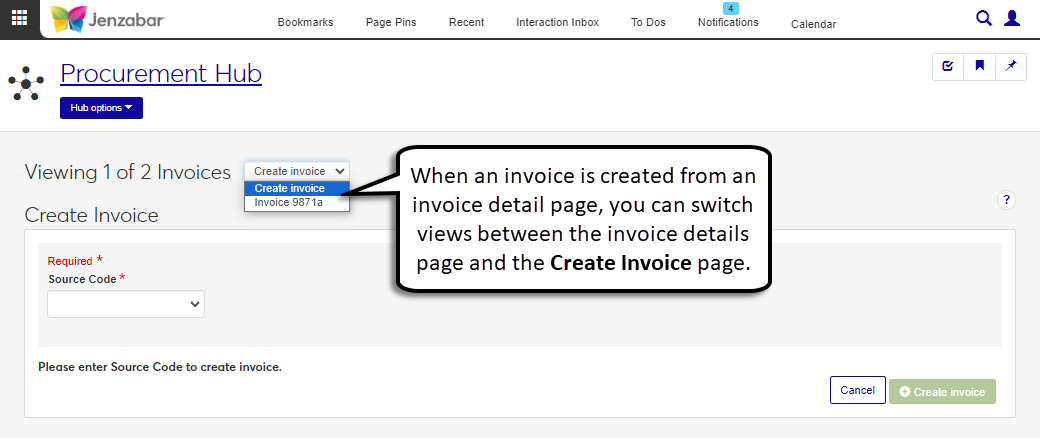
From the Invoice Details page, you can create a new invoice that is in a new batch or you can create an invoice that's in the same batch. When you create an invoice for a new batch, the Create Invoice page opens; you need to select the source code to determine the header details. When you create an invoice in the same batch, the Create Invoice page opens with information from the Invoice Details already filled in: Batch Number (which includes the Source Code assigned to the new invoice), Vendor Name / ID, AP Subsidiary Code, Transaction Date, Payable Date, Payment Name, and address details.
When the Create Invoice page is accessed from the Invoice Details page, it includes a Viewing Invoices drop-down that lets you switch between viewing the invoice details and the Create Invoice page.
Invoices can be deleted unless they are locked, paid, posted, or associated with an asset that is in "Review" status. When an invoice is deleted, all comments and attachments related to the invoice are also deleted. If the invoice transactions are the only transactions in the associated invoice batch (IV, IM, MN, or RF), the batch is also deleted with the invoice.
From the Finance Procurement Hub options, select Invoices. The Invoice List page opens.
Enter or select criteria in the Invoice Filter to find specific invoices.
Click the Invoice Number link to open the invoice details page.
To view details for multiple invoices, select the checkboxes for each invoice and click Open. The invoice details page opens in another tab. A drop-down field at the top of the page lets you switch views between the selected invoices.
Navigate to an invoice's detail page.
Make updates to the editable header fields. The following fields cannot be updated:
Batch Number
Vendor Name / ID
AP Subsidiary Code
Invoice Number
To update the supporting document status for PO transactions associated with the invoice:
From the PO Transactions to Include drop-down, select the "Select" option.
Click the Select transactions button. The Select PO Transactions to Include pop-up opens.
Click in the Supporting Document Status column for each row and select from one of the options below.
No additional support is needed
More support needed
Remind support is needed
Click Continue to close the pop-up.
Make updates to the transaction details spreadsheet.
Use the toolbar to undo, redo, cut, or copy row details.
Tip
Use the Column Selector button to add or remove columns in the invoice details spreadsheet.
Click the Save button in the toolbar to preserve changes to the header and details spreadsheet.
All fields are required.
From either the Create Invoice or Invoice Details page, select an item in the spreadsheet to be submitted as a fixed asset.
In the spreadsheet toolbar, click the Submit New Fixed Asset link. The Submit New Fixed Asset pop-up opens.
Enter a unique fixed asset Number.
Enter a Description.
Select an asset Type from the drop-down options.
Building
Equipment
Other
Vehicle
Select a Department.
Select a Class.
Click Submit asset. The asset is added to the list for review in the Asset Management hub, and the number is added to the Fixed Asset column for the line item.
Navigate to an invoice's detail page.
Click the Invoice options button and select Delete. The Delete Invoice? pop-up opens.
Click Yes, delete.
Navigate to an invoice's detail page.
Click the Invoice options button and select Create. The Create Invoice page opens.
Select a Source Code from the drop-down. The header section updates based on the selected source code.
Enter invoice header information. Required fields are:
Vendor Name / ID
AP Subsidiary Code
Transaction Date
Invoice Number
Invoice Amount
Invoice Date
Payable Date
Payment Prefix (for IM and MN source codes)
Payment Number (for IM and MN source codes)
Enter invoice transaction details in the spreadsheet. Use the toolbar to cut, copy, undo, or redo changes in the spreadsheet. Required columns are:
Transaction Amount
GL Account Number
Transaction Description
Click Create invoice.
In the Invoice Created pop-up, the Create another invoice under the same batch Deselect the checkbox.
Click Continue. The invoice details page opens and an alert appears with a link to open the invoice batch page.
Navigate to an invoice's detail page.
Click the Invoice options button and select Create another invoice in the same batch. The Create Invoice page opens.
The header section is autofilled based on the invoice details. Update and/or enter additional information as needed. Required fields are:
Batch Number (autofilled; includes the Source Code)
Vendor Name / ID (autofilled)
AP Subsidiary Code (autofilled)
Transaction Date (autofilled)
Invoice Number
Invoice Amount
Invoice Date
Payable Date (autofilled)
Payment Prefix (for IM and MN source codes)
Payment Number (for IM and MN source codes)
Enter invoice transaction details in the spreadsheet. Use the toolbar to cut, copy, undo, or redo changes in the spreadsheet. Required columns are:
Transaction Amount
GL Account Number
Transaction Description
Click Create invoice.
In the Invoice Created pop-up, the Create another invoice under the same batch checkbox is selected by default. Deselect the checkbox.
Click Continue. The invoice details page opens and an alert appears with a link to open the invoice batch page.
On the Invoice Details Page, click the Download button in the details spreadsheet toolbar. The Download to Excel pop-up opens.
Select options for the Excel format and data columns.
Click Download. Your .xlsx or .zip file is saved in the file location that you have set in your browser settings.
The payment prefix and payment number cannot be edited after the invoice is created. To correct the invoice payment information:
Void the payment from the Payment List page.
Delete the invoice that was tied to the payment.
Create a new invoice with the correct payment information.
Complete the payment process from the Payment List page.
If you see a message that some transactions can't be displayed, you may be in a role with restricted access to project codes or GL accounts. When a transaction is associated with a project code or GL account that you don't have access to, you cannot unlock or delete the transaction. Contact your campus support team if you need additional information.
If your system is configured for budget checking, you can view the budget status at the top of the page under the invoice status. You can also use the Budget Status column in the transaction details. This column displays one of the following values. Click the status button to view detailed budget information.
n/a: Displays when the transaction isn't associated with a budget.
Over budget: Displays when the transaction is above the associated budget.
Under budget: Displays when the transaction is below the associated budget.
On budget: Displays when the transaction is within the associated budget.
At this time, you won't receive any notifications about the status of fixed assets that are submitted from Accounts Payable. That functionality is planned for a future release.