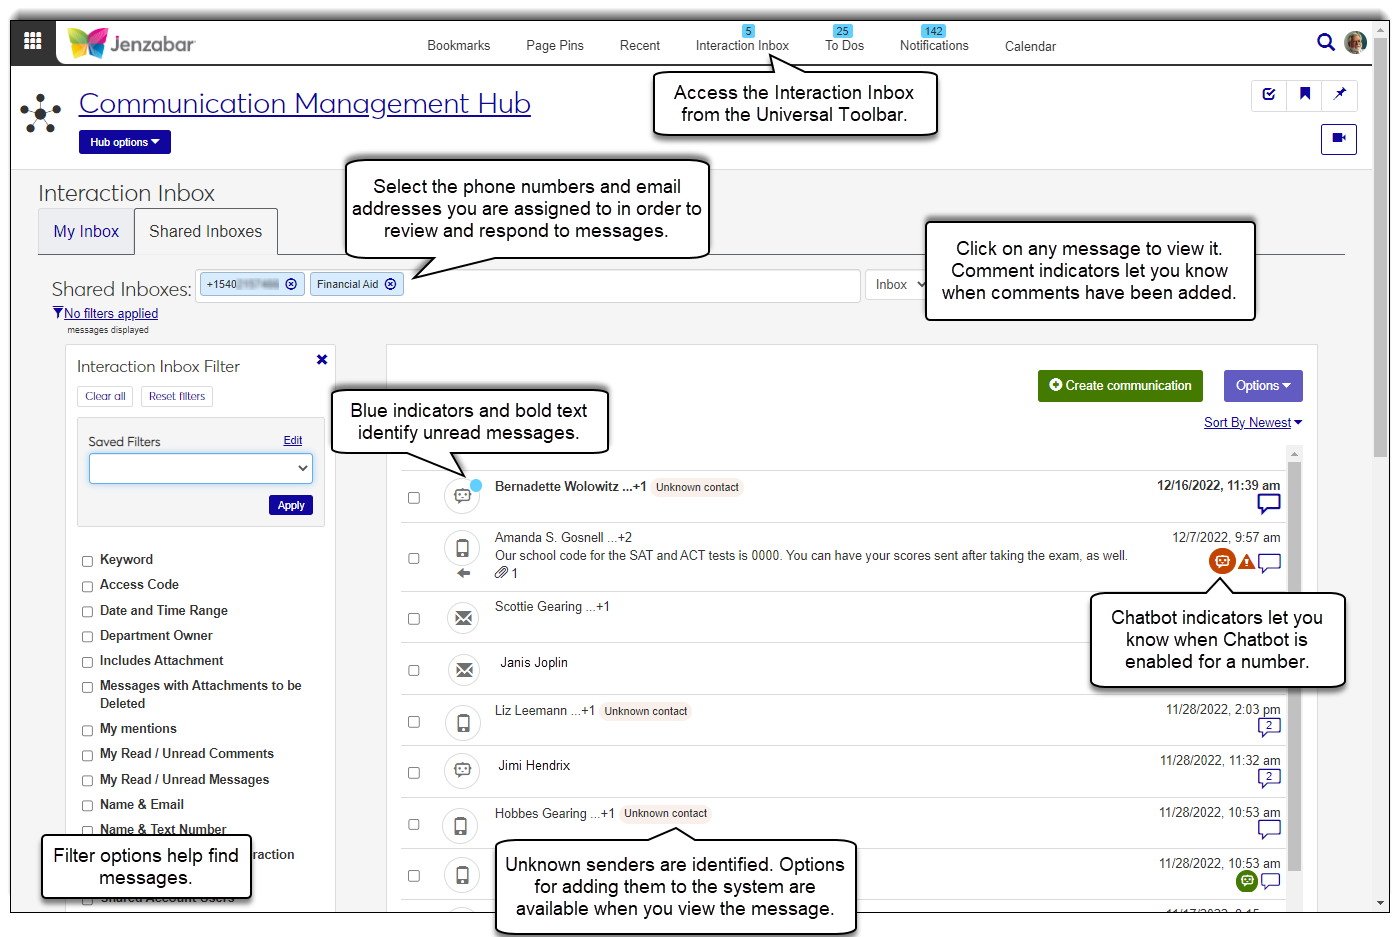
Interaction Inbox: Shared Inboxes
Important
Information and features vary according to the roles to which you belong and the permissions associated with those roles. For more information, contact your module manager or your campus support team.
Note
Interaction Inbox: Shared Inboxes is available with Communications Plus.
Access your shared inbox anywhere in the system from the Universal toolbar. You can open the inbox, see your most recent unread messages, and create a new communication.
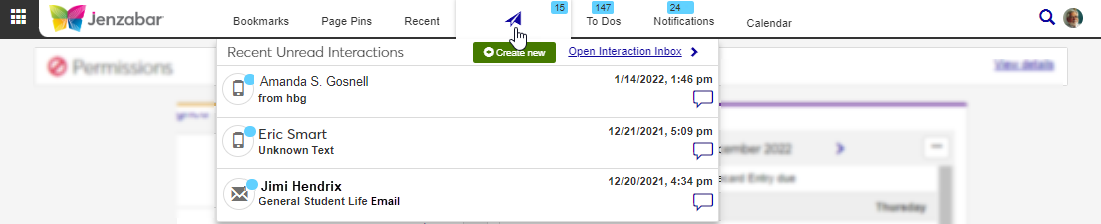
My Inbox shows exchanges only you are involved with and Shared Inboxes shows exchanges sent to phone numbers and email addresses you share with others. For example, your school may have a general admission email address managed by multiple people and the registration department may have a shared department phone number for sending texts about registration deadlines. Using shared inboxes can decrease response time and make it easier to connect others with resources.
Note
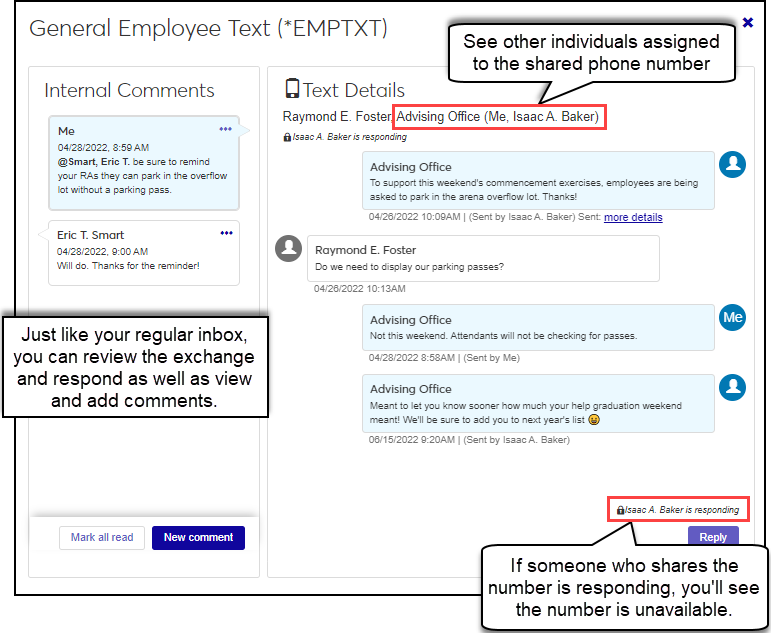
Everyone assigned to the email addresses and phone numbers can see the incoming and outgoing messages they have access to in the shared inbox. This includes individuals temporarily assigned to an email address or phone number.
Use your shared inbox to:
View and respond to texts and emails sent to shared email addresses and phone numbers.
Note
The interactions you see are controlled by the roles you belong to and the interaction access permissions associated with them. For more information, contact your campus support team and review the Interaction Access Codes help topic.
Note
The shared inbox only shows email and text threads with replies. To see everything sent, even if there has been no reply, select the Sent view.
Create new interactions. Send email and text messages from a shared email address or phone number. You can also create notes and To Dos; however, these will come from you and not a shared account.
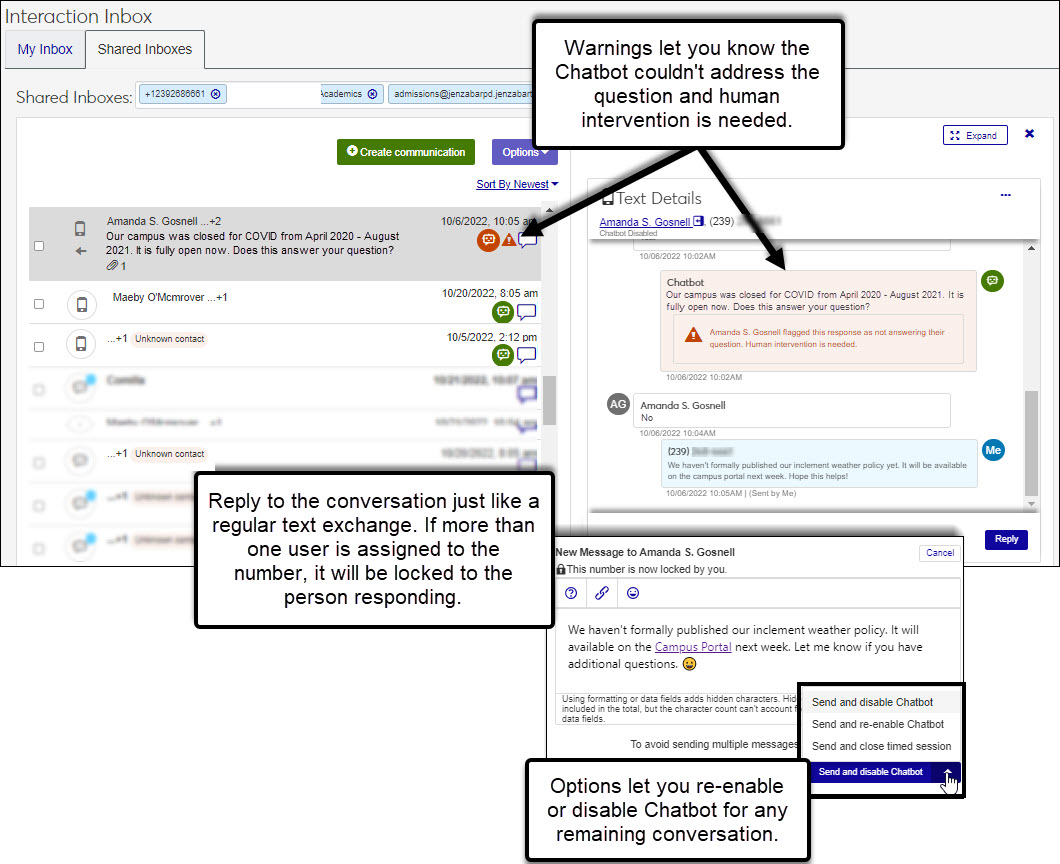
Respond to Chatbot text messages requiring human intervention and manage imported Chatbot exchanges to address unknown contacts or exchanges needing multiple threads.
Read and add comments to interactions.
Use informational messages from SendGrid and Twilio to troubleshoot texts and emails that couldn't be sent.
When Jenzabar Chatbot is integrated with J1 Web, schools can import Chatbot conversations into Communications for a read-only view from the inbox and leverage Chatbot to reply to incoming text messages. Features vary according to how your school is setup.
Tip
Reviewing Chatbot exchanges can provide opportunities for additional engagement as well as allow you and your Chatbot administrator to identify areas where information may be needed in order to build a more robust Chatbot knowledge base.
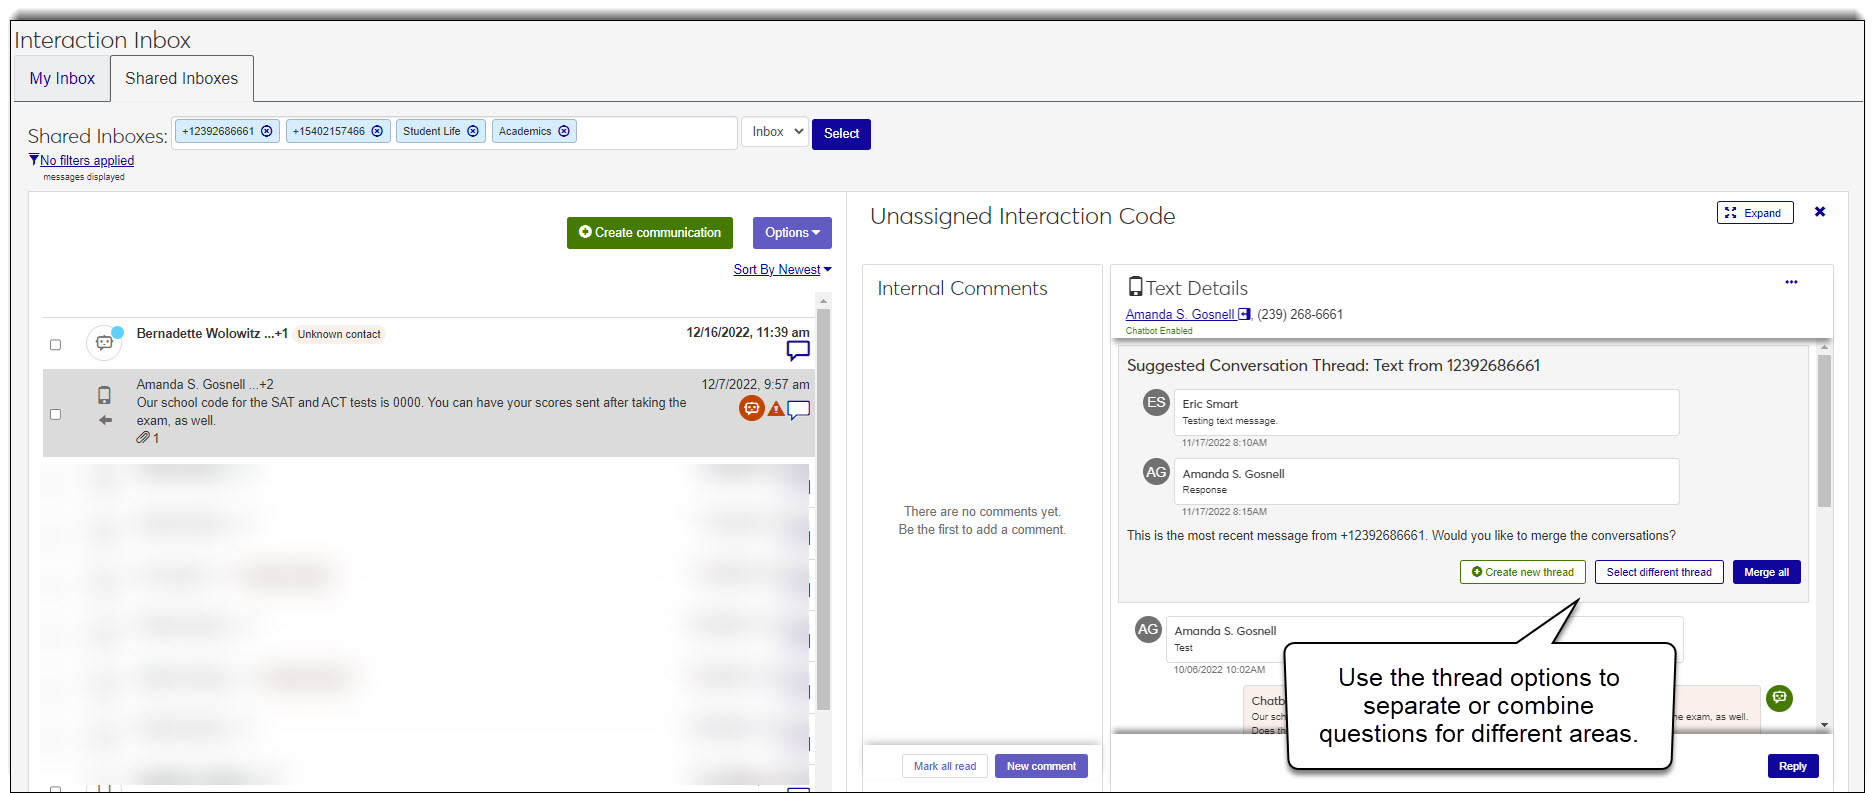
Imported conversations let you view and evaluate Chatbot exchanges. You can handle contacts the system doesn't recognize and split conversations into separate threads if there are questions related to different areas.
Chatbot conversations are imported an hour after there has been no activity on the thread and are identified with the Chatbot icon  . You cannot reply to imported conversations and requests for human intervention in imported conversations are handled outside of J1 Web.
Tip
While you cannot reply to an imported conversation, you can use comments to tag others and confirm the individual received a response or identify an opportunity to reach out with additional information.
Your school may opt to allow Chatbot to reply to incoming text messages. This can be helpful for common numbers receive high volumes of general questions. For example, a number shared by your registration department that receives frequent questions about registration time frames.
These text exchanges are shown in the inbox with a Chatbot icon  . You can review the text exchange, and view and add internal comments. If Chatbot cannot answer the incoming question, you will receive a 'Chatbot Assistance Required' notification and see a warning icon
  .
.
Note
Your Communications Administrator configured Chatbot Confidence and Response Attempts to determine when human intervention will be requested.
Anyone assigned to the number with access to the associated interaction can reply and because these are handled just like texts, when more than one user is assigned to the number, the conversation is locked to the person responding to prevent overlap.
Other options let you handle contacts the system doesn't recognize and split conversations into separate threads if there questions related to different areas. For example, an exchange with a question related to registration and another question related to financial aid may be imported. You can split the conversation into separate threads so it is associated with the correct interaction code and available to others to review.
Note
Blue dot indicates an interaction or comment has not been read.
 | View feed | |
 | ||
 | Text | |
 | To Do | |
 | Document | |
 | Note | |
 | Notification | |
 | Phone Call | |
 | Comment | |
 | Number of comments in an interaction | |
| Sender's information isn't already in the system NoteUnknown senders are added to the external person table. | |
 | Message has an attachment | |
 | Imported Chatbot thread | |
| Chatbot text exchange with no intervention needed | |
| Chatbot text exchange requiring human intervention | |
 | Unread message or comment | |
 | Issue with communication |

There are several ways to find a message:
Note
Messages shown vary according to the email addresses and phone numbers you chose in the Shared Inboxes field. If you don't see an expected message, it may be associated with an email address or phone number that wasn't selected.
Use the filter options. If you don't see the filter options, click the No filters applied link.
Select as many filter options as you want to narrow down your search results and click Apply.
To remove the filters and view the full list of recipients, click Clear all and then click Apply.
Use the column heading buttons to sort by ascending/descending order.
Hover over the Interaction Inbox on the universal toolbar and click Create new, or access the Interaction inventory and click Create new communication.
Follow the steps to create the communication detailed in the sections below.
*Available with Communications Plus.
Note
To make a call from J1 Web, you must be assigned to a Twilio number with call forwarding enabled and you must belong to a role with access to phone call interactions.
Click Create communication or Create new communication.
From the Communication Type drop-down, select Phone call.
From the Recording drop-down, select None or Record.
Select an Interaction Code, Name / Description from the drop-down.
Note
Only those active codes you have access to are available. For more information about permissions, contact your module manager or campus support team.
If you are assigned to more than one number, select the phone number you want to call from.
Note
When you select a shared phone number, anyone else assigned to that number with access to the interaction code can view information about the call you are making.
From the To field, start typing and select the name of the person you want to call.
Tip
The person you are calling must have an active, valid phone number in the system.
Click Save and call now. The Phone Call Details window appears showing information about the individual you are calling. If you opted to record the call, recording options will also appear.

Note
Recipients must have a valid, verified email address in the system. Email addresses are managed on the J1 Web, Person Information Details page, Contact Info tab and in the Desktop on the Name Entity window, Addresses tab.
Click Create communication or Create new communication.
From the Communication Type drop-down, select Email.
Select an Interaction Code, Name / Description from the drop-down.
Note
Only those active codes you have access to are available. For more information about permissions, contact your campus support team.
Start typing and select the individual or shared email you want to use to send the email in the From field.
If your school uses SendGrid, you can view a list of valid email addresses in the system that can be used to send the email from the Communication Settings page, Email Addresses tab. You can also see the individuals assigned to them. This can be helpful when your school has a general email address with several individuals assigned to it (e.g., admissions@yourschool.edu).
Note
When you select a shared email address, anyone else assigned to that email address with access to the interaction code can view, and depending on their permissions, respond to the message you are sending.
If your school uses the Client Application Services as your email provider, your email address is selected for you.
From the To field:
Select the People/Organizations option to choose recipients by name.
Select the Data Set option to select recipients by a SQL or InfoMaker query.
Select the contact type you want to use to send the email.
For example, a student can have *LHP (legal/home/permanent) and *CUR (current) email addresses in the system. This option lets you to specify which contact type should be used to ensure the communication is delivered to the appropriate email.
Enter a descriptive Subject.
Add your message to the Body field. Apply formatting and add hyperlinks using the options available.
To add an attachment, click Attach file, navigate to and select a file.
Click Send.
Click Create communication or Create new communication.
From the Communication Type drop-down, select Note.
Select an Interaction Code, Name / Description from the drop-down.
Note
Only those active codes you have access to are available. For more information about permissions, contact your module manager or campus support team.
Enter a descriptive phrase in the About field.
Add your message to the Note field.
Tip
Click Help to access shortcuts for the note content, including keyboard navigation details, plugin info, and version info.
To add a hyperlink:
Click the link icon
 .
.Enter the URL.
Add an optional Text to display and Title.
From the Open link in... drop-down, select Current window or New window.
Click Save.
To add an attachment, click Attach file, navigate to and select a file.
Click Send.
*Available with Communications Plus.
Note
Recipients must have a valid, verified SMS number in the system. Recipient phone numbers are managed on the J1 Web, Person Information Details page, Contact Info tab and in the Desktop on the Name Entity window, Addresses tab. At this time, you can only select one recipient.
Click Create communication or Create new communication.
From the Communication Type drop-down, select Text.
Select an Interaction Code, Name / Description from the drop-down.
Note
Only those active codes you have access to are available. For more information about permissions, contact your module manager or campus support team.
Select the phone number to send the text from.
Note
When you select a shared phone number, anyone else assigned to that number with access to the interaction code can view, and depending on their permissions, respond to the message you are sending.
From the To field:
Select the People/Organizations option to choose a recipient by name.
Select the Data Set option to select recipients by a SQL or InfoMaker query.
Select the contact type you want to use to send the text.
For example, a student can have *LHP (legal/home/permanent) and *CUR (current) phone numbers in the system. This option lets you to specify which contact type should be used to ensure the text is delivered to the appropriate number.
Enter your message in the Body.
Tip
Messages can be up to 1,600 characters, but long texts will be broken up into multiple 160-character texts.
Click Send or Send and close timed session.
Click Create communication or Create new communication.
From the Communication Type drop-down, select To Do.
Select an Interaction Code, Name / Description from the drop-down.
Note
Only those active codes you have access to are available. For more information about permissions, contact your module manager or campus support team.
Enter a name in the Assigned To field.
Enter a descriptive phrase in the About field.
Select a To Do Type.
Enter a task description in the To Do Item field.
Enter the number of Days to Complete the task.
Add task information in the To Do Details.
To add an attachment, click Choose file, navigate to and select a file.
Click Send.
* Available with Communications Plus.
Click on the message you want to reply to.
Click Reply.
Enter your response in the field and add attachments as needed.
Tip
You can add emojis and hyperlinks when you reply to texts. Click the help icon to see helpful shortcuts, keyboard navigation details, and plugin and version info.
You can enter up to 1,600 characters, but long texts will be broken up into multiple 160-character texts.
Select a send option.
For emails, click Send.
For texts, click Send or Send and close timed session.
Tip
When you select Send and close timed session, the number is unlocked and other users who have been assigned to that number can respond to messages.
*Available with Communications Plus.
Click on the message you want to add comments to.
Click New comment.
Add your message in the New comment field.
To mention someone in the comment:
Enter the @ symbol, followed by the individual’s name. A list of users matching that name appears.
Select the appropriate name. Their name will appear in bold.
Repeat as needed.
To add an attachment, click Attach, navigate to and select a file.
Click Add. If you included @mentions, those users will receive a notification letting them know they've been mentioned.
*Available with Communications Plus.
Note
You can only edit and delete comments you have added.
Click on the appropriate message.
To edit:
Click the Edit icon.
Update the comment as needed.
To tag an individual, enter the @ symbol, start typing their name, and select it. If you included @mentions, those individuals receive a notification letting them know they've been mentioned.
Click Save.
To delete, hover over the . . . and click Delete.
*Available with Communications Plus.
Click on the appropriate message.
Hover over the . . . and select Mark as read or Mark as unread.
Documents are stored in Desktop Document Storage. To receive email attachments, you need the appropriate permissions to document storage categories and types. See the Desktop Document Storage help linked below for more information.
Yes, email and text attachments are scanned for viruses before they can be viewed or downloaded. If a virus is detected, you are notified that the attachment was removed.
No, comments are only visible internally and to users with permission to view the communication.
Note
Comments are only available with Communications Plus.
The lock icon means a shared phone number is being used by one of the individuals assigned to it.
When multiple users are assigned to the same phone number and one of them is creating a text message or replying to a text thread from the shared number, the number is only available to them. The lock icon lets the other individuals assigned to the number know it is unavailable.
Locking the phone number to one individual at a time prevents overlapping messages and replies from being sent. Once the individual using the number clicks Send and close timed session or they are inactive for a certain amount of time, the number is "unlocked" and available for others to use.
The Send button is unavailable until you enter a reply.
The Attach button is unavailable until you enter a reply. Enter text first and then add the attachment.
Those messages will still be available to other users assigned to the phone number or email address.
Yes, emails you send and responses you receive are shown in the Interaction Inbox.
The Chatbot exchange may not be associated with an interaction or you may not be assigned to it. Work with your module manage to ensure the Chatbot category has been assigned to an interaction and you.
If your school enabled Chatbot for a number you are assigned to, you can reply to the Chatbot exchange.
Because Chatbot exchanges occur over text, they are handled just like other text exchanges. A green Chatbot icon
indicates Chatbot is enabled and a red Chatbot icon indicates human intervention is needed. If Chatbot is enabled for a shared number and someone else is replying, the number may be temporarily locked to prevent message overlap.If your school only imports Chatbot exchanges, you cannot reply to the Chatbot exchange.
Imported exchanges are read only and appear in your inbox to handle unknown contacts or split an exchange with questions in multiple areas to different threads. Imported Chatbot exchanges are their own type of interaction. You can filter by them and identify them in your inbox by the Chatbot icon
.