Course Overrides
Important
Information and features vary according to the roles to which you belong and the permissions associated with those roles. For more information, contact your module manager or your campus support team.
Course overrides allow faculty and staff who have permission to allow students into courses they otherwise couldn't register for. In J1 Desktop, overrides are called Course Authorizations, and they're handled in your Campus Portal until your school decides to switch to the overrides features in J1 Web.
Course overrides are handled in J1 Web. (That is, unless your school hasn't yet switched to J1 Web for grade entry and overrides. In that case, see the Switching to J1 Web Features: Grade Entry and Course Overrides topic.)
Settings for Overrides
There are no settings needed for using overrides in J1 Web. (The "Use course authorizations" setting on the Campus Portal (JICS) Settings page in J1 Web is for faculty using Campus Portal features to grant authorizations.)
There are many permissions related to course overrides, and several roles include some subset of them. Permissions are assigned on the Registration Administration hub, Registration Roles page. Permission to grant a particular type of override also allows you to revoke that type of override. And, of course, permission to grant an override includes permission to view it.
Tip
Always assign users to copies rather than to the default template permissions. Keep the default permissions unchanged as a template, and make as many customized copies as you need.
Registration Override and Access Control Role
The Registration Override and Access Control default role template has the most powerful override permissions—about two dozen of them. Assign a copy of this role to the registrar or their designee. For details, see the Registration Override and Access Control topic.
Other Roles with Some Override Permissions
The most-used override permissions are available in all the following roles:
Course Information - Access to All Courses
Department Head Course Access
Faculty - Access to Courses and Students by Course
Registrars
Primary Advisor
Secondary Advisor
These are the overrides permissions included in them:
Grant course authorization
Grant course corequisite
Grant course full
Grant course prerequisite
Grant course prohibited
Grant course repeat
Grant schedule conflict
Special Permissions in the Registrars Role
In addition to the override permissions above, the Registrars default role template also has these important permissions not found in any other template:
Can set up overrides
Can add override after the census date
Depending on your permissions, you can view, create, revoke, and reinstate overrides. You can also search the list using filters.
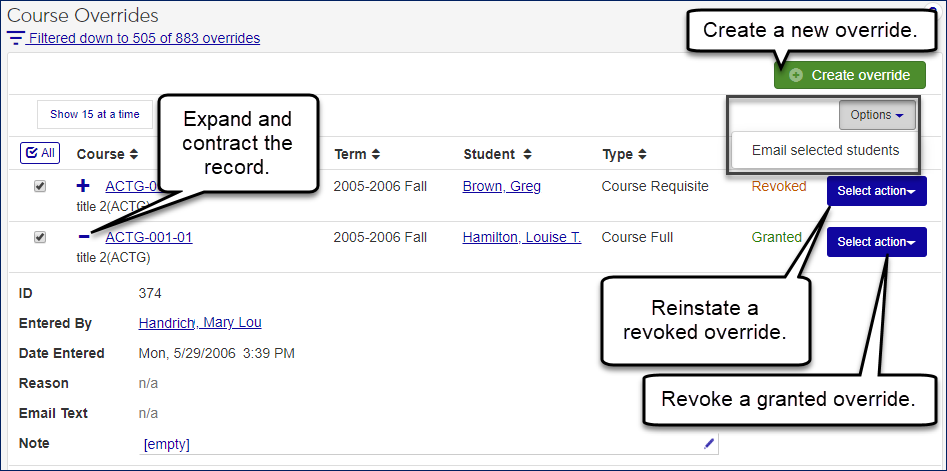
Access the Course Overrides page from the Hub options drop-down list on either the Academic Department hub or the Faculty hub. You can view overrides that were granted in courses you have access to. By default, you'll see the most recent overrides per combination of student, course, and override type.
When you grant an override, you're giving the student permission to override the registration error. When the student registers on the registers on the Campus Portal, they'll be able to override the error that pops up. Or the faculty or staff registering the student can override the error—if they're in a role that has permission to override that error.
Tip
That's a little bit tricky, so let's look at it again. When an override is granted:
Students registering themselves can override the registration error that needed the override.
Faculty and staff registering the student also need to be in a role with permission for that kind of override. (But the good news is that faculty, department heads, advisors, and registration office staff have these permissions available in their roles.)
You can also email the student about the granted override. Select Create new communication from the Options drop-down.
To grant an override, use the Create override button to open the Create Override window. There you select the term, course, student, type, and reason. You can add a note, too.
These are the types available when you create an override:
Course Full (C)
Course Corequisite (CR)
Course Prerequisite (PR)
Course Prohibited (PH)
Registration Permission Required (P)
Schedule Conflict (S)
Course Repeat (R)
Tip
The values for the Reason field are defined on the Maintain Table Values page. Column Name: authorization_reason (Authorization Reason).
You can reinstate a revoked override if you have permission to grant it. In the Action column, click Grant. The Grant window opens. Select a reason, and, if you wish, add a note. You can also reinstate a revoked override.
When you grant, deny, or revoke an override, the system notifies the student by email. However, the email is optional if you have this permission: 'Can skip sending email for student override'. In that case, a prompt asks whether you want to send or skip the email. The email text appears in the Course Overrides list.
The Note field is editable if you have permission to grant this type of override.
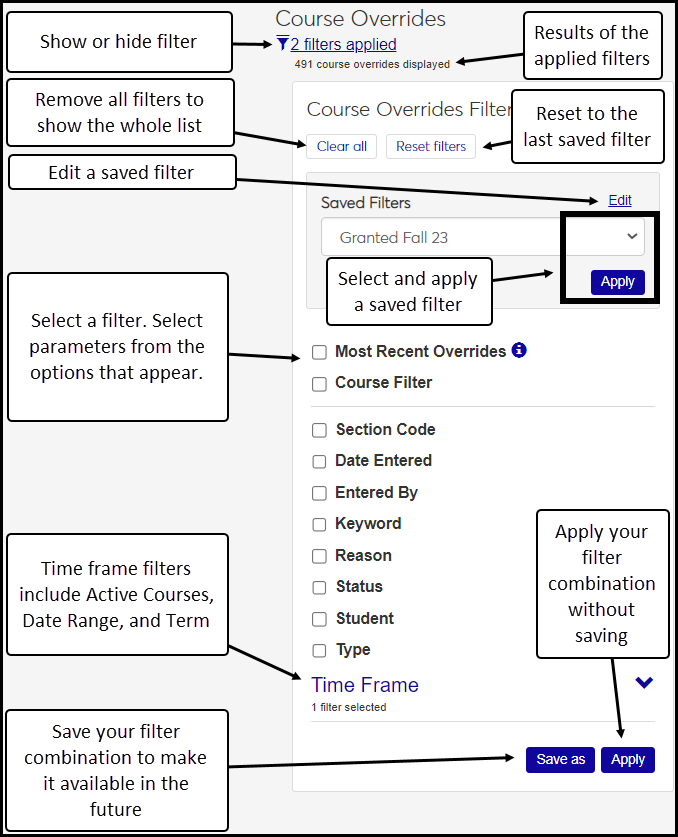
Filters help you search the list of overrides. You can select a saved filter or apply new search criteria. You can filter by a single attribute or combinations, and you can save filters to use again later. You can also edit the name of a saved filter, designate a default filter, reset filters to the last saved one, or clear all filters.
On the Academic Department or Faculty hub, click the Hub options, and select Manage course overrides.
Click the Create override button. The Create Override window opens.
Select the Term, Course, Student, Type, and Reason. Enter a Note if you wish.
Click Grant.
On the Academic Department or Faculty hub, click the Hub options, and select Manage course overrides.
In a row where the Status is 'Requested', click the Action drop-down, and select Grant. The Grant Override window opens.
Enter information in the required fields.
Click Grant.
On the Academic Department or Faculty hub, click the Hub options, and select Manage course overrides.
In any row, click the Expand icon
 to expand the row.
In the Note field, click the Edit icon
 .
.Make your edits.
Click Save. The override is granted, which means that the student registering themselves can override the affected error, and faculty or staff registering the student can override the error if they're in a role that has permission for that type of override.
On the Academic Department or Faculty hub, click the Hub options, and select Manage course overrides.
In a row where the Status is 'Granted', click the Action drop-down, and select Revoke. The Revoke window opens.
Enter information in the required fields.
Click Revoke.
On the Academic Department or Faculty hub, click the Hub options, and select Manage course overrides.
In a row where the Status is 'Revoked', click the Action drop-down, and select Grant. The Grant window opens.
Enter information in the required fields, including Reason.
Click Grant.
Click the filter icon
 to open the filter.
Select a saved filter, or select criteria and enter search phrases.
Click Apply to run your filter, or click Save as to save your criteria.
Click Reset filters to remove criteria you've selected or search phrases you've entered, and then click Apply.
Click Clear all to remove all filters, and then click Apply.
When saving or editing a filter, click Default next to the filter name.
In the Saved Filters drop-down list, select a filter.
Click Edit.
Edit the filter name, and select it as default as you wish.
Click Save.
Click Done editing.
Choose the students you want to email by selecting the checkbox next to each name.
Click the Options button and choose Create new communication. The Create New Communication window appears.
Enter a subject, message, include any needed attachments, and click Send. If you are sending the email to more than one student, each will receive an individual copy of the email.