Case Summary: Case Interactions Tab
Important
Information and features vary according to the roles to which you belong and the permissions associated with those roles. For more information, contact your module manager or your campus support team.
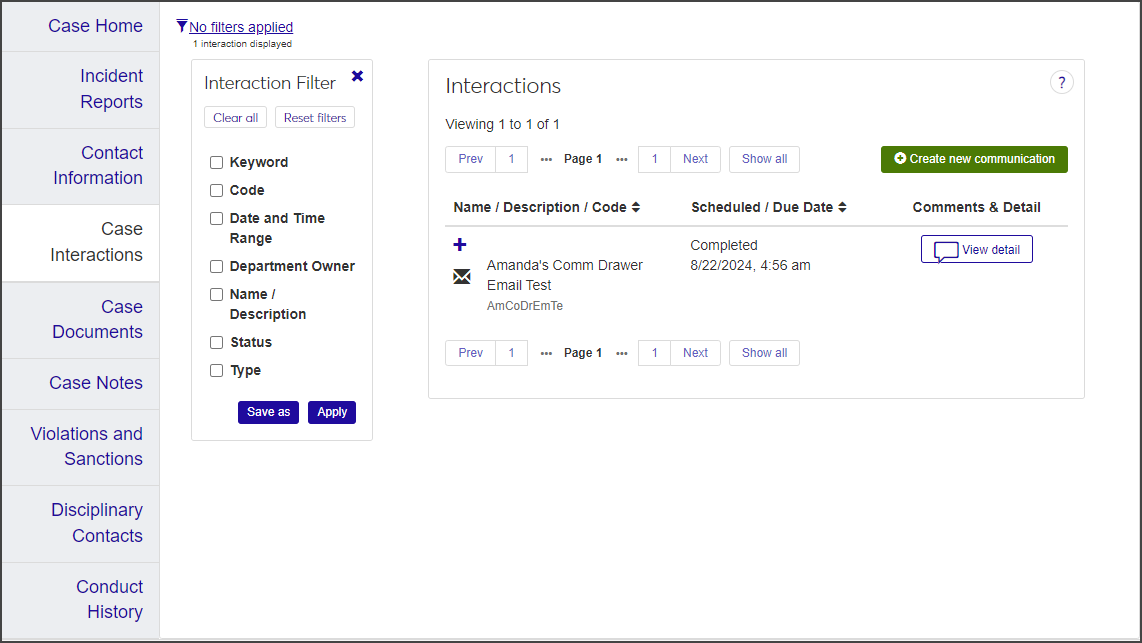
On the Case Interactions tab, you can view all the communications that have taken place in relation to the case. You can also create new communications.
The Case Interactions tab is identical to the Interaction Inventory in the Communication Management Hub.
Case Interactions cannot be edited, but you can add internal comments.
To view case interactions, you must be in one of the following roles with the specified permissions enabled:
Student Conduct - Assistant Director Access by Department role with "Can view assigned cases" and "Can edit assigned cases" permissions.
Student Conduct - Director Access by Department role with "Can view all cases" and "Can edit all cases" permissions.
The Case Interactions tab lists all interactions—emails, text messages, calls, notes, and to-do items—that have occurred in relation to the case.
For each interaction listed, the following information is displayed:
Name / Description / Code: The name or description of the interaction and the interaction code, which classifies the content of the communication (for instance, REGEMAIL refers to a general registration email).
Scheduled / Due Date: If the interaction has been scheduled, this column displays the due date. If it has been completed, that is indicated as well.
Comments & Detail: Click the View detail button to view internal comments and other details. You can also add comments, view audit information, reply to the interaction, and view the interaction in its original format.
Department Owner: The department that is currently responsible for the interaction. The department is automatically assigned based on the interaction code you selected. For example, if the interaction code is ADJMTNOTE (Adjustment Note), the department owner defaults to Budgeting.
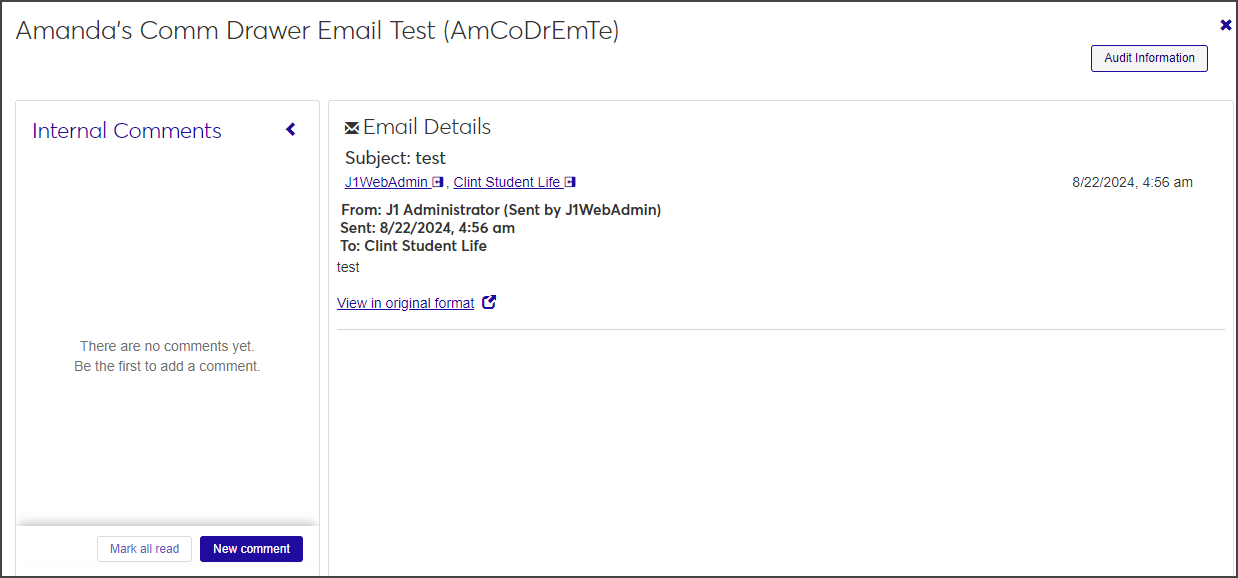
To view case interactions in full, click the View detail button in the Case Interactions tab. The communication window opens, displaying the details of the interaction.
Note
The number in the View detail button label indicates how many internal comments are included in the interaction details.
If any internal comments have been added, review them in the Internal Comments panel.
To view audit information, click the Audit Information button. The Audit Information pop-up opens, displaying the date and time of the interaction and the J1 Web user who initiated it.
Although you cannot edit case interactions, you can add and edit internal comments.
To add an internal comment, click the New comment button in the Internal Comments panel of the details window. A New comment text field opens.
Enter your comment in the text field.
To mention someone in the note, enter the @ symbol followed by the person's name, then select the person's name from the list that appears. You can mention multiple names.
To add an attachment, click the Attach button, locate the file you want, and select it.
Click Add to add the note to the Internal Comments panel.
To edit an internal comment, click the pencil icon for the note, edit as needed, and click Save.
Note
You can only edit and delete comments you have added.
To delete an internal comment, hover your mouse over the ellipsis ... in the note and select Delete.
From the Case Interactions tab, you can create a new communication in the form of an email, note, phone call, text, or to-do item.
Note
Text messaging requires Communications Plus.
On the Case Interactions tab, click the Create new communication button. The Create New Communication window opens.
Required fields are indicated by a red asterisk.
Select Email from the Communication Type drop-down.
Select an Interaction Code, Name / Description from the drop-down. The interaction code classifies the content of the communication. You can only select one code.
Note
Only the active codes you have access to are available to select. For more information about permissions, contact your campus support team.
Click in the From field and begin typing the name or email address you want the email to come from, then select the correct name when it appears in the list.
Under the To field:
Select People / Organizations to choose a recipient by name.
Select Data Set to select recipients by an SQL or InfoMaker query.
Click in the Contact Type field and select a contact type from the list.
To preview the list of recipients, click Preview Recipients.
Enter the Subject of the email.
Type your message in the Body text field. Use the formatting toolbar to format the text.
To attach a file, click the Attach file button, locate the file you want to add, and select it. The file format must be DOTX, HTML, PDF, or WAV.
When you're ready to send the communication, click Send.
On the Case Interactions tab, click the Create new communication button. The Create New Communication window opens.
Required fields are indicated by a red asterisk.
Select Note from the Communication Type drop-down.
The From field defaults to the logged-in user and cannot be changed.
Select an Interaction Code, Name / Description from the drop-down. The interaction code classifies the content of the communication. You can only select one code.
Note
Only the active codes you have access to are available to select. For more information about permissions, contact your campus support team.
Click in the About field, begin typing the name or ID number of the person the note is concerned with, and select the correct name when it appears in the list.
Type your message in the Note field. Use the formatting toolbar to format the text.
To add a hyperlink:
Click the Link icon in the formatting toolbar. The Insert/Edit Link pop-up opens.
Enter the URL.
Enter an optional Text to display and Title.
From the Open link in ... drop-down, select Current window or New window.
Click Save.
To add an attachment, click Attach file, locate the file you want to add, and select it.
Click Send.
In the Case Interactions tab, click the Create new communication button. The Create New Communication window opens.
Required fields are indicated by a red asterisk.
From the Communication Type drop-down, select Phone call.
From the Recording drop-down, select None or Record.
Select an Interaction Code, Name / Description from the drop-down. The interaction code classifies the content of the communication. You can only select one code.
Note
Only the active codes you have access to are available to select. For more information about permissions, contact your campus support team.
The From field defaults to your assigned phone number. If you are assigned to more than one phone number, select the number you want to call from.
In the To field, start typing the name or ID number of the person you want to call and select the correct name when it appears in the list.
If you want to change the Contact Type, click the Remove icon next to the existing contact type and select another option from the drop-down, if more than one is available.
Click Save and call now. The Phone Call Details window opens, show information about the person you are calling. If you opted to record the call, recording options also appear.
Note
Recipients must have a valid, verified SMS number in the system to receive text messages.
In the Case Interactions tab, click the Create new communication button. The Create New Communication window opens.
Required fields are indicated by an asterisk.
From the Communication Type drop-down, select Text.
Select an Interaction Code, Name / Description from the drop-down. The interaction code classifies the content of the communication. You can only select one code.
Note
Only the active codes you have access to are available to select. For more information about permissions, contact your campus support team.
Under the To field:
Select People / Organizations to choose a recipient by name.
Select Data Set to select recipients by an SQL or InfoMaker query.
Select the Contact Type you want to use to send the text.
To preview the list of recipients you're sending the text to, click the Preview Recipients button.
Type your message in the Body field. Click the emoji icon to add an emoji to the text.
Tip
Messages can be up to 1,600 characters, but be aware that long texts will be broken up into multiple 160-character messages.
Click Send or Send and close timed session.
In the Case Interactions tab, click the Create new communication button. The Create New Communication window opens.
The Assigned By field defaults to the logged-in user and cannot be changed.
From the Communication Type drop-down, select To Do.
In the Assigned To field, begin typing the name or ID number of the person you want to assign the task to and select the correct name when it appears in the list.
Under About, select People / Organizations or Current Page.
If you select People / Organizations, begin typing the name or ID number of the student that the to-do task is about and select the correct name when it appears in the list.
If you select Current Page, the case number autofills so the recipient of the to-do notice knows which case the task is about.
From the To Do Type drop-down, select the type of task you're assigning (Email, Phone call, or Other).
In the To Do Item field, enter a brief description of the task.
In the Days to Complete field, enter the number of days the assignee has to complete the task. The due date will be calculated based on the current date.
Enter details about the to-do item in the To Do Details text field. To insert a table, click the table icon.
Note
The table feature is similar to the table feature in Microsoft Word. You can insert and delete rows, merge and split cells, and configure cell properties by selecting options from the table menu.
To include an attachment, click Choose file, locate the file you want to attach, and select it.
Attachments must be .DOTX, .HTML, .PDF,. or .WAV files.
When you are done, click Send.