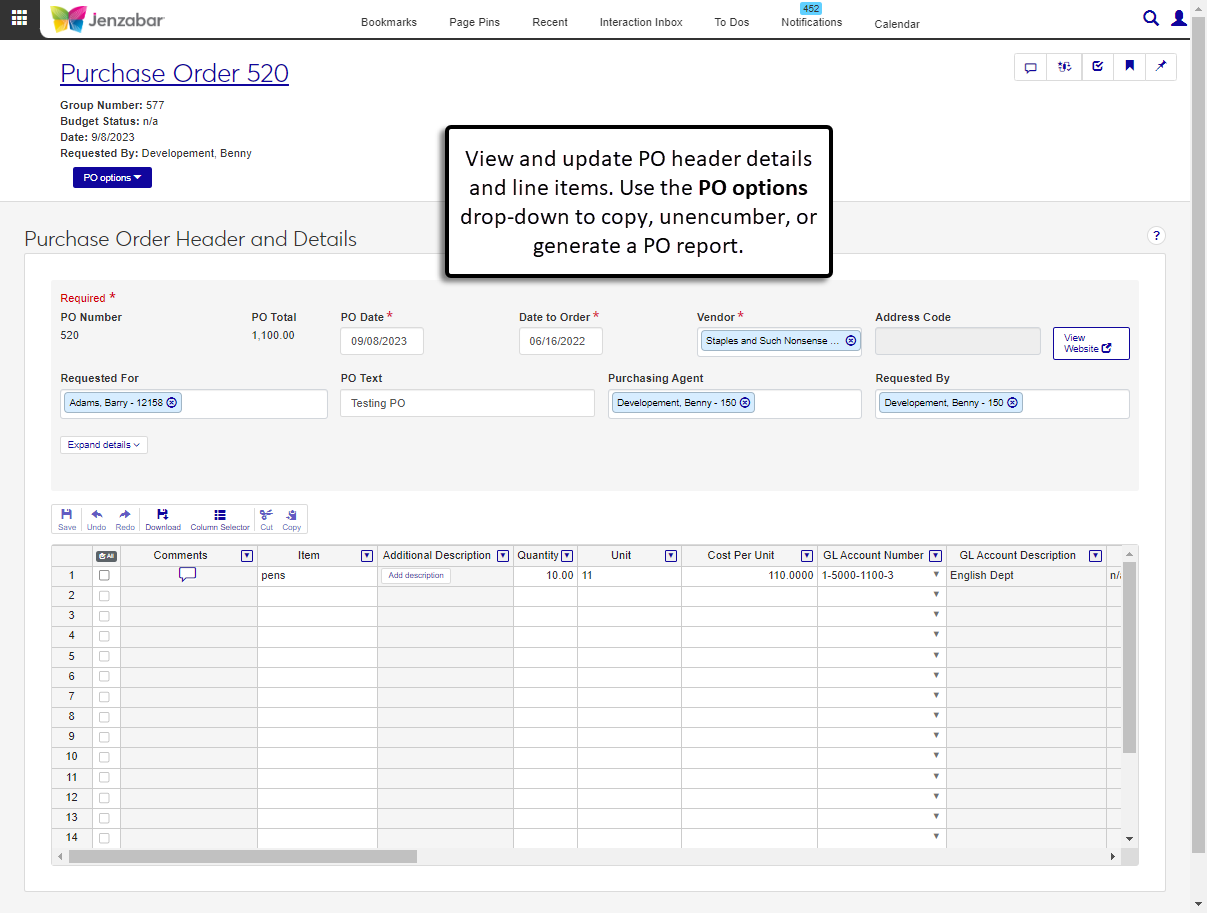
Purchase Order Details
Important
Information and features vary according to the roles to which you belong and the permissions associated with those roles. For more information, contact your module manager or your campus support team.
The Purchase Order Header and Details page lets you review and update PO information. It's accessed from the Purchase Order List by either clicking a PO number or selecting multiple POs and clicking Open. From this page, you can also:
Create new purchase orders
Copy the purchase order
Send communications about the PO and comment on PO line items
Generate PO files in several formats
Unencumber the PO's remaining balance
View related procurement documents
Purchase order details can also be viewed and updated from the Desktop Create/Edit Purchase Orders window.
To view and edit purchase order details, you must be in a Procurement - Purchasing role with at least the following permissions:
All purchase orders
Can view purchase orders and generate reports
Can edit purchase orders
Additional permissions are needed to access other options on the page. For more information about permissions, see Roles and Permissions to Work with Purchase Orders.
Schools configured to manage inventory can use the Inventory Item column to select or add an inventory code. When an existing inventory code is selected, several fields autofill with pre-defined details. If you enter a new inventory code, you can decide whether to save the code and its details to the system so it is available for future use. After adding inventory items to the details spreadsheet, you can also check for lower cost vendors and switch vendors for inventory items.
Note
The inventory features are available only when your system is configured to manage inventory. Available functionality depends on your configuration selections on the Desktop Purchasing Module Setup window. See the following Desktop topics for more details about the inventory configuration options.
The split line item functionality lets you allocate line item totals for requisitions and POs across multiple GL accounts. When a single line item is selected from the details spreadsheet, the Split Line Item button opens a pop-up to select a GL Allocation Code. Each GL Allocation Code has been defined with two or more GL accounts. Different percentages of the line item quantity and total amount are allocated to each account. After an allocation code is selected and applied to the line item, the system adds rows to the details spreadsheet. Each row is associated with a GL account number and a percentage of the original line item quantity and total.
Notice
The OFFSUP allocation code has two GL accounts. Forty percent is allocated to Account 1; sixty percent is allocated to Account 2. When a line item for 100 packages of cleaner totaling $500 is associated with the OFFSUP code, the details spreadsheet is updated to include 2 lines, one associated with Account 1 for 40% of the quantity ($200) and the other associated with Account 2 for the other 60% ($300).
Note
The split line item feature is available when your system has defined allocation codes from the Desktop Purchasing Module Setup window. See the following Desktop topics for more information about setting up allocation codes for requisitions and POs.
Note
POs copied from requisitions cannot be updated. Schools configured for inventory management may see additional options when making updates to PO line items. For more details about inventory options, header fields, and detail columns, see Create a Purchase Order.
From the Finance, Procurement Hub options, select Purchase orders. The Purchase Order List page opens.
Click the PO Number link, or select multiple POs and click Open. The Purchase Order Header and Details page opens.
Make updates to editable header and detail rows as needed.
Use the detail spreadsheet toolbar to undo, redo, cut, and copy changes.
To change which columns are visible, click the Column Selector button in the toolbar and select or deselect columns.
Click Save in the detail spreadsheet toolbar to preserve changes.
From the PO options drop-down, select Create to open the Create Purchase Order page.
On the Create Purchase Order page, enter or select information in the PO header.
The PO Date is today's date by default, and you can update it as needed. Required.
Enter the Date to Order. Required.
Enter a Vendor name and select it from the drop-down. You can also enter the full ID number and press Tab to move to the next field. The system fills in vendor information. Required.
Select an Address Code from the drop-down options.
If you're submitting the PO on someone's behalf, enter an optional Requested For name and select an option from the drop-down.
Enter optional PO Text. This text doesn't appear on any printed reports, but can be helpful for people viewing the PO details.
Enter an optional Purchasing Agent name and select it from the drop-down options.
Enter an optional Requested By name and select it from the drop-down options.
Click the Expand details button to enter the following optional information:
Expiration Date
Desired Ship Date
PO Terms
Carrier to use
Shipping Options
Shipping Goods Here
Send Invoice Here
Enter or select information in the PO details spreadsheet. The following columns are required:
Item
Quantity
Cost Per Unit
GL Account Number
Note
Schools configured for inventory management can select an inventory code or add a new one from the Inventory Item column. The following columns are autofilled when an existing inventory code is selected.
Item
Unit
Cost Per Unit
Catalog #
Part
Use the spreadsheet toolbar to undo, redo, cut, or copy rows. Right-click in the spreadsheet to insert or remove rows.
Click Create purchase order. The Purchase Order Created. Generate PDF & Create Another? pop-up opens.
Select from the following checkbox options:
Create Another Purchase Order. Selected by default. Deselect the checkbox if you don't want to create another PO.
Generate PDF of Purchase Order. Selected by default. Deselect the checkbox if you don't want to generate the PDF.
Purchase Order Layout. Enabled and required when the "Generate PDF . . . " checkbox is selected.
Group Split PO Line Items. Select the checkbox if you want to show line items that were split across multiple GL accounts as a single line item on the PO.
Mark as Sent To Vendor. Selected by default and disabled if the "Generate PDF . . ." checkbox isn't selected.
Click Yes, continue. The PO details page opens, and if you generated the PDF, it opens in a new browser tab.
From the PO options drop-down, select Copy. An alert appears with a link to the copied purchase order.
Click the View new purchase order link to open the details page in a new tab.
On the new PO's detail page, fields are prepopulated with information from the original PO by default. Make updates and save changes as needed.
Note
This option is available for schools configured to check for lower cost inventory items when POs are entered or when savings meet specified minimums.
On the Purchase Order Details page, add one or more inventory codes from the Inventory Item column in the details spreadsheet. If there are vendors with lower prices for the selected inventory codes, a Save Money alert displays above the spreadsheet.
Click the Check for lower cost vendors button. The Lower Cost Vendors pop-up opens with a list of vendors that offer all the PO's line items and at least one item has a lower cost than the current vendor.
Review the vendors and click the Use this vendor button for the vendor with the best price. The pop-up closes and the vendor in the header updates to the new selection.
Note
Available for schools configured to use inventory management.
In the details spreadsheet on the Purchase Order Details page, select an inventory code from the Inventory Item drop-down.
Make changes to any of the autofilled fields related to the inventory code.
Item
Unit
Cost Per Unit
Catalog Number
Part
Click Create purchase order. A Save Changes to Inventory Code? pop-up opens.
To save the inventory item changes in the PO and in the inventory master, click Yes, save changes. Your changes are visible on the Purchase Order Details page and wherever you select this inventory code in the system.
To save the inventory item changes only to the PO and not in the inventory master, click No, don't save. Your changes are visible on the Purchase Order Details page, but the original details from before your updates will be used when you select this code again.
Note
Available for schools configured to use inventory management.
In the details spreadsheet on the Purchase Order Details page, enter a new inventory code in the Inventory Item column.
Complete the remaining fields for the item, including the following.
Item
Unit
Cost Per Unit
Catalog Number
Part
Add additional line items to the PO as needed.
Click Create purchase order. A Create New Inventory Code? pop-up opens.
To create a new inventory code and add it to the inventory master, click Yes, create. The new code is available on the Purchase Order Details page and can be selected from the Inventory Item column for future POs.
To use the inventory code only in the current PO, click No, don't create. The code is visible on the Purchase Order Details page, but it won't be available from the Inventory Item column on future POs.
Select a single row in the details spreadsheet.
Click the Split Line Item button in the toolbar above the spreadsheet. The Split Line Item pop-up opens.
Select an option from the GL Allocation Code drop-down. A list of the accounts and allocation percentages is displayed below the field.
In the Line Item to be Allocated section, review and make updates as needed to the listed fields. Fields with existing values have been autofilled from the selected line item.
Quantity (required)
Inventory Item (visible only if your system is configured for inventory management)
Unit
Cost Per Unit
Project Code
Catalog Number
Part (visible only if your system is configured for inventory management)
Item
Deselect the Copy Comments & Attachments checkbox if you don't want the comments/attachments from the original line item to be copied to the line items generated during the allocation process.
Click Allocate. The pop-up closes and the details spreadsheet updates with additional line items created in accordance with the selected allocation code.
Note
You can select different types of communications to send from the Create New Communication pop-up. The steps below are for sending an email communication. For more information about sending other communication types, see Interaction Inventory: Interactions.
From the PO options drop-down, select Create communication. The Create New Communication pop-up opens. Several fields are prepopulated and you can update them if needed.
In the Communication Type field, Email is selected by default.
The Interaction Code, Name / Description field is set to Purchase Order Email by default.
The From field is prepopulated with the PO requester's email.
The To field is prepopulated with the vendor name and email.
The Contact Type is set to Institutional Priority by default.
The Subject is prepopulated with the PO number and text, and you can change it as needed.
The Body is prepopulated with a generic message about the PO, and you can change it as needed.
Click Send. The PO file is automatically attached to the email, and the PO details page is updated with a note that the PO was sent to the vendor.
From the PO options drop-down, select Generate report. The Generate Report pop-up opens.
Select a Purchase Order Layout. Required. The default selection is Original, and any customized PO layouts are available for selection.
The Group Split PO Line Items checkbox is deselected by default. Select the checkbox if you want line items that are split between multiple GL accounts to appear as a single line on the PO.
The Mark as Sent to Vendor checkbox is selected by default. When selected, a note on the PO details page displays the date and time the report was marked as sent.
Select the File Format for the report. The default format is PDF, but you can select additional file formats, including HTML, XSLX, and others.
Click Yes, generate. The file either appears in a new browser tab or downloads to your machine.
From the PO options drop-down, select Unencumber. The Unencumber Purchase Orders? pop-up opens.
Review the Purchase Order to Unencumber.
In the Use this date for Unencumbrances section, select one of the following options:
New Date. Selected by default with today's date. You can change the date as needed.
Original PO transaction date.
Click Yes, unencumber. The remaining balance is cleared and a success alert appears at the bottom of the page.
On the Purchase Order Header and Details Page, click the Download button in the details spreadsheet toolbar. The Download to Excel pop-up opens.
Select options for the Excel format and data columns.
Click Download. Your .xlsx or .zip file is saved in the file location that you have set in your browser settings.
From the PO options drop-down, select Delete. The Delete Purchase Order? pop-up opens.
Review the warning message and click Yes, delete to remove the purchase order, its comments, and its attachments from the system.
If the purchase order was copied from a requisition, details are populated from the requisition and cannot be updated on the PO.
POs can't be deleted if any of the following conditions are met:
The PO is being edited and has unsaved changes.
The PO has been invoiced.
The PO is in the process of being invoiced.
You may not have access to the GL accounts associated with those allocation codes. Contact your campus support team to ensure you have to correct access to GL accounts.
The system uses the Communication Management hub to send templated emails to the requester and purchasing agent when a PO is created, updated, deleted, or when comments are added or removed. These default communication templates are managed on the Interactions page, and the processes that initiate the emails are managed on the Automation Plans page.
For more information about how procurement communications are set up and customized in J1 Web, see Customizing System-Generated Emails for Procurement.
The notifications set up in the Desktop application are not honored in J1 Web because J1 Web uses the Communication Management hub to send emails and notifications. Default email templates are sent when system events occur (e.g., PO created or updated). If you are in a Communication Management Base role with permission to edit interactions and automation plans, you can customize the default templates according to your preferences.
For more information about how procurement communications are set up and customized in J1 Web, see Customizing System-Generated Emails for Procurement.
If your system is configured for budget checking, you can view the budget status at the top of the page under the PO status. You can also use the Budget Status column in the transaction details. This column displays one of the following values. Click the status button to view detailed budget information.
n/a: Displays when the transaction isn't associated with a budget.
Over budget: Displays when the transaction is above the associated budget.
Under budget: Displays when the transaction is below the associated budget.
On budget: Displays when the transaction is within the associated budget.