Manage Section Details
Important
Information and features vary according to the roles to which you belong and the permissions associated with those roles. For more information, contact your module manager or your campus support team.
Overview of Managing Section Details
You can reach the Manage Section Details page from the Manage Sections page by choosing Manage section details in the Action column.
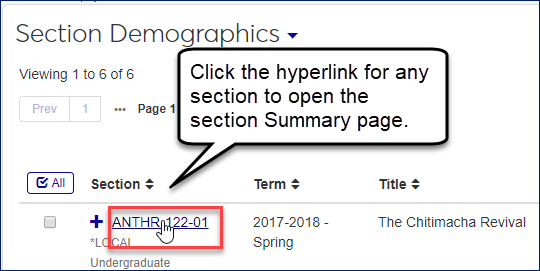
You can also find the Manage Section Details page by first going to the Section Summary page for the section you want to edit. Each course section has its own summary page, which you can find by clicking on the underlined blue hyperlink section on any page you see it. Manage section details is in the Section options drop-down on that page.
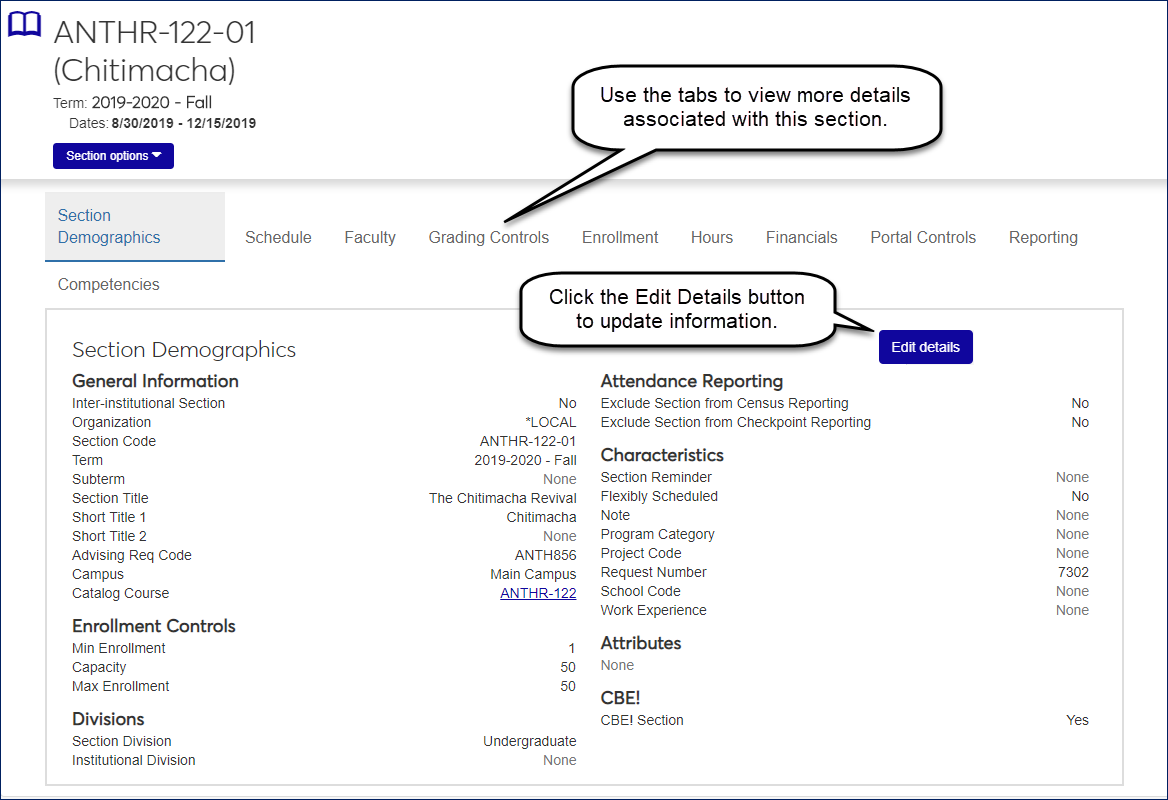
Use this page to view and edit all aspects of course sections. Use the Edit details button to edit information on each tab.
Manage Section Details Tabs
The Manage Section Details page has nine tabs, each containing detailed information related to that specific section, including term, scheduled times, current enrollment, financials, and more. To see all the information available on this page, click on the different tabs available.
Tip
For more information on each of these details, see the Online Help for J1 Desktop.
The Section Demographics tab is similar to the Courses window in J1 Desktop, and allows you to view and edit* these section details:
Important
*Ability to edit details depends on the permissions assigned to you. Contact your module manager or support team for more information.
The most basic details about the course section.
Interinstitutional Section: Yes or No as to whether the section is taught together among several schools
Organization: the code form of the school such as *LOCAL
Section code: the code form of the section such as BIOL-002-01
Term: the scheduled term
Subterm: the scheduled subterm, if any
Section Title: the course section title such as Intermediate Biology
Short Title 1: optional abbreviation such as Biology 2
Short Title 2: optional abbreviation such as Bio 2
Meeting Type: such as lecture or lab
Advising Requirement Code (ARC): the requirement that the course fulfills
Campus: If the section meets on a campus, it's listed here.
Catalog Course: a link to the summary page for the catalog course that the section comes from
Counts for the section.
Min Enrollment: The fewest allowable students registered so the section isn't canceled.
Capacity: the most students that ought to be allowed in the course section
Max Enrollment: the maximum number of students the system will allow to be registered at one time
Section Division: the division (such as Undergraduate, Graduate, Continuing Education, etc., that the section belongs to
Institutional Division: the institutional division (such as an academic department) that the section belongs to
Options to turn on or off Census Date and Check Point reporting.
Miscellaneous information about the section.
Section Reminder: These are also known as prerequisite codes. They're defined on the Maintain Table Values page with the Column Name "prereq_cde". They can be useful reminders at registration.
Flexibly Scheduled: Yes or No
Note: Free text up to 41 characters. Does not appear on Campus Portal for students to see.
Program Category: a category such as Peace Studies or English as a Second Language to which a course, major, or certification might belong. Defined on the Maintain Table Values page with the Column Name "prog_categoy".
Project Code: number used by the General Ledger module to track information kept in the Transaction History table
Request Number: This number is generated by the system for registrations
School Code: such as ED - School of Education
Work Experience: indicates whether the course contributes toward work experience. Values are defined on the Maintain Tables Values page with the Column Name "work_exp".
This displays the section's attributes, or you can select one or more attributes from the drop-down.
Note
Attributes are available only if your school has the Non-Traditional Registration license. The attributes are defined in Desktop on the Attribute Definition window.
This displays whether the course is designated for Competency Based Education. The heading will be whatever your school calls Competency Based Education, but our documentation calls it CBE. You can click the button to Yes or No.
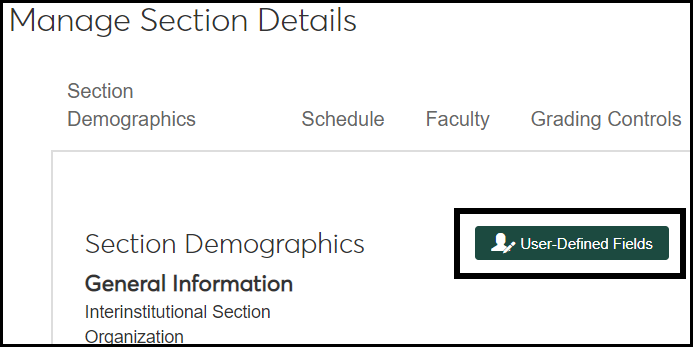
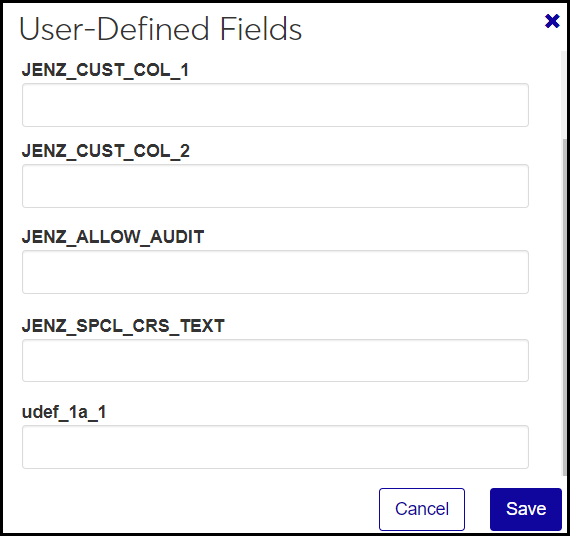
You can view and manage user-defined fields for course sections. The fields may be useful for tracking records, building forms, and customizing reports. User-defined fields are managed by your System Administrator and let your school track unique information not captured in standard, Jenzabar-provided fields.
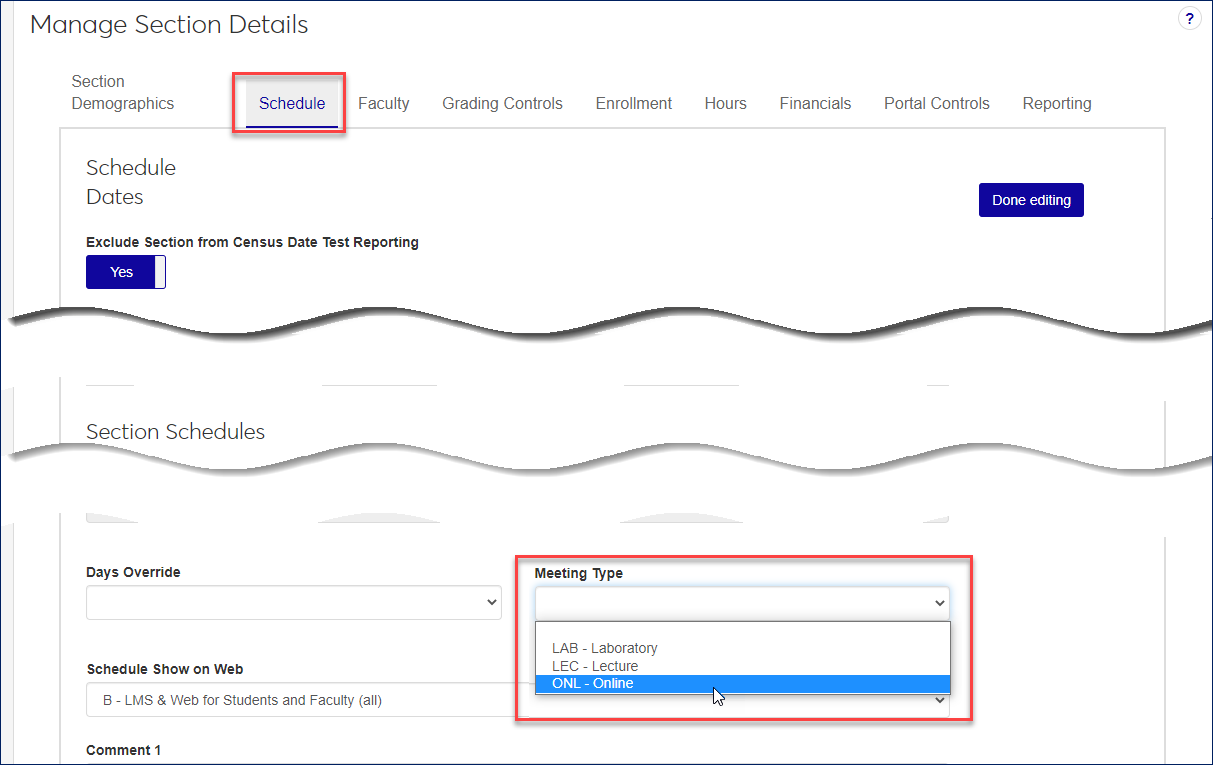
The Schedule tab is similar to the Schedule tab in the Courses window of J1 Desktop and allows you to view and edit* these section details:
Important
*Ability to edit details depends on the permissions assigned to you. Contact your module manager or support team for more information.
Settings that affect the course section's enrollment, attendance reporting, and grading
Exclude Section from Census Date Reporting: Yes or No
Census Date and Time: You can set this different from the term census date as defined on the Year / Term / Subterm Definitions page so that this section has its own Census Date and Time.
Tip
Set the Census Time to 11:59:59 p.m. That keeps Add/Drop open all day on the Census Date. (If you set it for midnight, there will be confusion about whether midnight is the end of the previous day or the beginning of the upcoming day.)
Last Student Withdrawal Date and Time: You can set this different from the term date (Last Campus Portal Withdrawal) on the Year / Term / Subterm Definitions page.
First Begin Date: You can set this different from the Start Date for the term on the Year / Term / Subterm Definitions page.
Last End Date: You can set this different from the End Date for the term on the Year / Term / Subterm Definitions page.
Exclude Section from Check Point Reporting: Yes or No (Your school might call this something else. The display name is set on the General Settings page on the Registration Administration hub.)
Last Withdraw Passing Date and Time: You can set this different from the term date (Last Withdraw Passing) on the Year / Term / Subterm Definitions page.
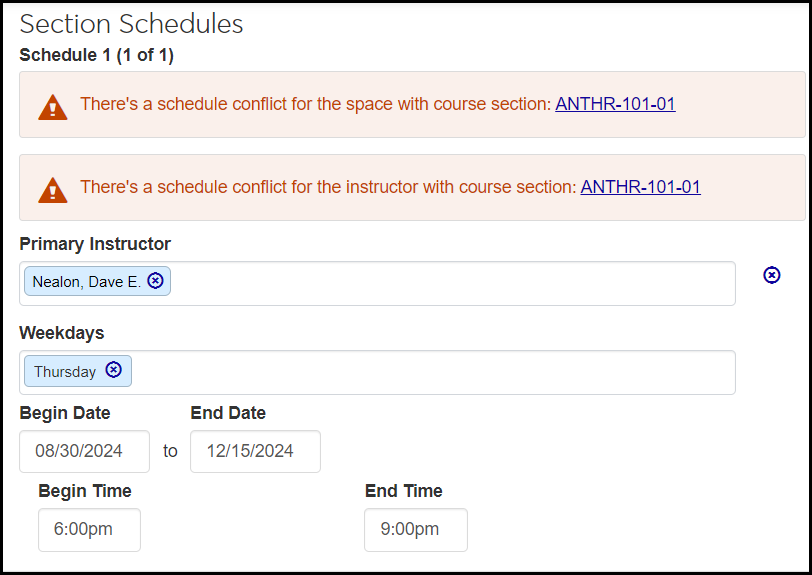
You can have multiple schedules for a section, such as a Monday and Wednesday schedule plus a Friday schedule, or one schedule for the first four weeks, and a different schedule for the last ten weeks. Each schedule has the following fields:
Primary Instructor: Begin typing a name, and select from the results. You can have only 1 primary instructor.
Weekdays: Begin typing a day of the week that the section meets, and select from the results. You can have up to seven days.
Begin Date: Enter a start date for this schedule.
End Date: Enter an end date for this schedule.
Campus: Select from the drop-down.
Place: Begin typing, and select from the results.
Space: Begin typing, and select from the results.
Days Override: Use this to override the schedule. Select a value from the drop-down. The values are defined on the Maintain Table Values page with the Column Name days_tim_ovrid (Day or Time override for Section schedules). The selected Days Override value appears in the Student Schedule Report, the Professor Schedule Report, and the Room Schedule Report.
Caution
When there's a value in this field, the course section is considered noncalendared, just as if it had no schedule. That is, the facilty's calendar it would otherwise be booked for will consider the facility available.
Meeting Type:
Use Meeting Type to designate sections according to types such as Online, Lecture, and Lab. Meeting Type is stored in the database as section_master.crs_meeting_type.
Tip
Meeting Type may be especially useful for helping students search for sections taught online.
Students can search for sections by Meeting Type if these elements are set up:
Meeting Types are defined on the Maintain Table Values page with the Column Name crs_meeting_type (Course Meeting Type).
Meeting Type is made available for course searches on the J1 Web Campus Portal (JICS) Settings page, Campus Portal Course Search section.
The section has a Meeting Type designated (J1 Web Manage Section Details page, Schedule tab).
Show in Campus Portal: Select where you want the schedule to appear: Campus Portal, e-Racer and eLearning, Both, or Neither.
Seq Num: The Schedule Sequence Number is assigned automatically and isn't editable.
Comment 1 and Comment 2: Select from the drop-down. Values are defined on the Maintain Table Values page with the Column Name: comment (Section Schedule Comments).
Comment: 30 free-type characters

In Edit mode, the system checks the primary instructor, the space, meeting days and times, and the date range. An alert warns you if there's a schedule conflict with a link to the conflicting course section.
You can change one or more values in this or the other section to resolve the conflict, or you can save without resolving the conflict.
Tip
You can also look for room conflicts on the Room Schedule Report page. The report notes sections with schedule conflicts.
The Faculty tab is similar to the Faculty Information window | Faculty Load Tab in J1 Desktop and allows you to view and edit* these section details for each of the faculty assigned to the section:
Important
*Ability to edit details depends on the permissions assigned to you. Contact your module manager or support team for more information.
Faculty Name - link to faculty member's summary page
Faculty ID
Section lecture and lab percentages -F or each instructor, indicate the percentage of the instructor's load that is lecture and the percentage that is lab for this section. The total percentage for all instructors, lecture and lab combined, must equal 100%.
Instructor? - Indicates the level of rights this instructor has.
Instructor has rights to the courses the instructor teaches
Course Authorization Only has access to the course in the Course Authorization feature in the Campus Portal
Course Control Only has access to the course in the Faculty Course Control feature in the Campus Portal
Both Authorization and Control has access to the course in both the Course Authorization and the Faculty Course Control features in the Campus Portal
Other has no access to the course in the Campus Portal
Lead Instructor - only one instructor can be designated as Lead Instructor for each section
Show in Campus Portal - allows you to designate if this section should be displayed on Campus Portal features, LMS database and features, or both.
Grading Rights - determines how faculty member can use the Web Grading functionality
The Grading Controls tab is similar to the Grading subtab on Courses window | Course tab of J1 Desktop, and allows you to view or edit* these section details:
Important
*Ability to edit details depends on the permissions assigned to you. Contact your module manager or support team for more information.
Grade Scale: Select a Grade Scale. The options are defined on the Grade Scale Definitions page. By default, the a section's grade scale is the same as that of the section or catalog course it was created from.
Credit Type: Select a Credit Type. The options are defined on the Credit Type Definitions page. By default, the a section's credit type is the same as that of the section or catalog course it was created from.
Add to Special GPA: Yes or No. When set to Yes, this section's grade is calculated in the Special GPA, also called Scholarship GPA and Alternative GPA.
Important
Your school must have the Scholarship GPA license to use this feature.
Variable Grading Type: Yes or No. See the Manage Catalog Courses topic for a more thorough discussion of Variable Grading Types.
Grading Periods: The following fields are available for each grading period assigned to the course section. And you can add more grading periods.
Grade Entry Begin and End Date / Time (defaults to section start date)
Grade Blackout Begin and End Date / Time
Blackout Dates are when students can't view grades.
If you don't enter dates, there are no blackout days.
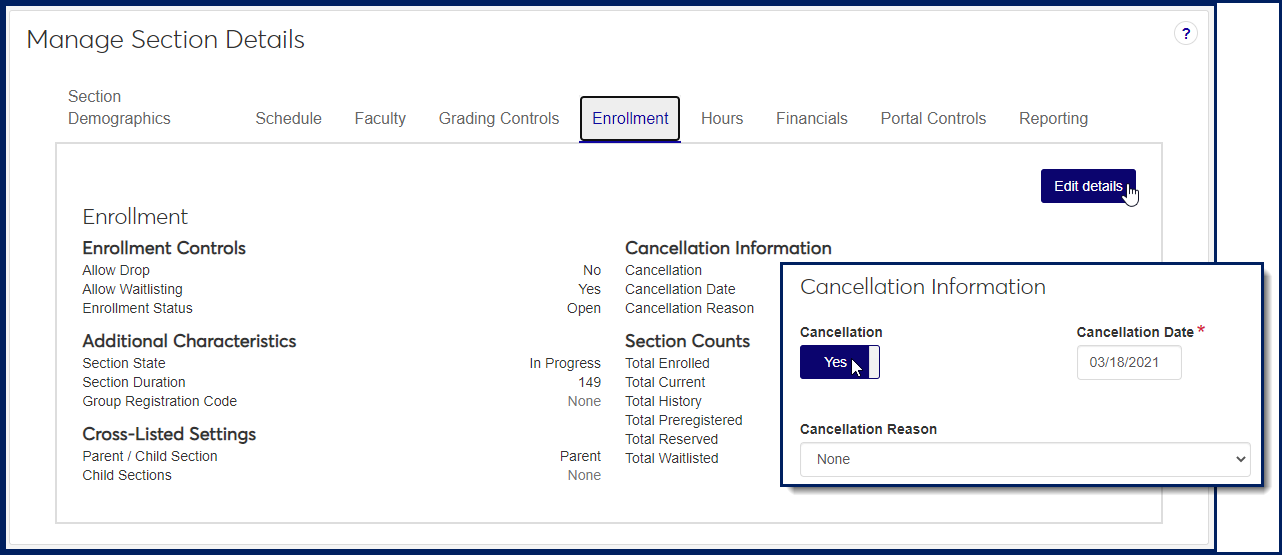
The Enrollment tab is similar to the Enrollment Controls section of the Courses window in J1 Desktop, and allows you to view or edit* these section details:
Important
*Ability to edit details depends on the permissions assigned to you. Contact your module manager or support team for more information.
Enrollment Controls
Allow Drop: Yes or No. Allow students to drop the course section.
Allow Waitlisting: Yes or No. Yes means that if a section is full, you allow students to register and be placed on the waiting list.
Tip
To allow Waitlisting for a section, the Use waitlist process setting on the Enrollment Settings page must be selected.
Allow Waitlist Usher: Yes or No. Yes means you opt in to the prompts that allow students to move themselves from Waitlisted to Current when a seat opens for them. A course section's waitlist usher setting is store on the Section Master table (section_master.allow_waitlist_usher).
Tip
To allow Waitlist Usher for a section, the Use Waitlist Usher setting on the Enrollment Settings page must be switched to On.
Tip
This is the J1 Web Waitlist Usher feature. It's included with J1 Web for no extra fee. See the Waitlist Options Settings topic for details on using the J1 Web feature vs. the Desktop feature.
Enrollment Status: Not editable. Full, Open, Waitlisted
Cancellation Information
Cancellation: Yes or No. Indicates whether the course section is canceled.
Cancellation Date
Cancellation Reason: Select from the drop-down. Options are defined on the Maintain Table Values page with the Column Name crs_cancel_reason (Course Cancellation reason).
Additional Characteristics
Section State: The section's availability for a term. States include
Draft: The section has been created but not made available for registration.
Published: Available for registration
In progress: The section's term has begun but not ended.
Pending completion: The section's term is in the process of ending.
Completed: The section's term has ended. The students' course records are in History status.
Canceled
Section Duration: The number of days from the section start date to the section end date.
Group Registration Code: Select from the drop-down as needed. The codes are defined and assigned to year/terms on the Group Registration Code Definitions page.
Cross-Listed Settings
Parent / Child Section: Select Parent or Child from the drop-down. (Parent is the default, and is appropriate also for courses that aren't cross-listed.)
Child Sections: If the section has child sections, they're listed automatically.
Parent Section Code: If you select Child in the Parent / Child Section, then select a parent section here.
Section Counts: Automatic enrollment counts
Total Enrolled
Total Current
Total History
Total Preregistered
Total Reserved
Total Waitlisted
The Hours tab is similar to the Credits section of the Courses window of J1 Desktop and allows you to view and edit* these section details:
Important
*Ability to edit details depends on the permissions assigned to you. Contact your module manager or support team for more information.
Credits
Credits Variable / Fixed: Select an option from the drop-down. (Variable credits allow students to select at registration the number of credit hours the course earns for them.)
Credits: The standard number of credits a student receives for completing the section (but it can vary if this is a variable credit section).
Min Credits: The fewest credits a student can earn for this section.
Max Credits: The most credits a student can earn for this section.
Lecture Credits: The number of the credits that are for lecture.
Lab Credits: The number of the credits that are for lab.
Lecture / Lab Credits: The number of the credits that are for a combination of lecture and lab.
Clock Hours: The number of hours the course meets over the term. It's usually calculated at weekly meeting hours multiplied by number of weeks.
Clock Hours Variable / Fixed:
Clock Hours: The expected clock hours the section will take.
Min Clock Hours: The fewest clock hours the section can take.
Max Clock Hours: The most clock hours the section can take.
Lecture Clock Hours: The number of the clock hours that are for lecture.
Lab Clock Hours: The number of the clock hours that are for lab.
Load Contact Hours: The number of hours the section contributes to the instructor's term contact hours load.
General Information
Day / Evening: Select an option.
Number of Weeks the Session Meets: Enter the number of weeks. Clock hours are usually the number of weeks multiplied by the weekly hours.
Open Enrollment (Defaults automatically populate in sections created from a course. The values are editable in the sections.)
Allow Open Entry: Select Yes or No.
Allow Open/Early Exit: Select Yes or No.
Registration Cutoff: The number of days before the section's end date that a student can still register.
Max Days Duration: The most days a student can take to complete the course.
Note
If Open Entry = Yes, then the system saves only valid entries. For example, Registration Cutoff must be less than Max Days Duration. If Open Entry = No, then the system ignores information in the other fields.
In Edit mode, these fields are available:
Method to Set Census Date and Last Student Withdrawal Date
Tip
When a student registers for the section, we use this method to calculate the individual student's Census Date and Last Student Withdrawal Date. The dates appear in the student course records such as on the section's Manage Student Section Details page.
By date
By number of days after the start date
By percentage (from start date to end date)
Census Date: calculated according to the method selected above
Last Student Withdrawal Date: calculated according to the method selected above.
The Financials tab is similar to the Course tab | Financial subtab on the Courses window of J1 Desktop and allows you to view and edit* these section details:
Important
*Ability to edit details depends on the permissions assigned to you. Contact your module manager or campus support team for more information.
Exclude from Tuition
Tuition Hours
Tuition Code
Billing Override Date
Billing Period
Contract Code
Contract Course
Funding Source
Refund Code
Third Party ID
The Portal Controls tab is similar to the Course tab | Web subtab on the Courses window of J1 Desktop and allows you to view and edit* these section details:
Important
*Ability to edit details depends on the permissions assigned to you. Contact your module manager or support team for more information.
CRM Display of Cross-listed Sections
Must Pay
Public Registration
Restrict Registration by Course and Restrict Registration by Web Group
Note
You can use these to limit registration in this course section in two ways:
Restrict Registration by Section: You can select one or more groups. Registration in this section will be limited to those groups.
Restrict Registration by Web Group: You can select one or more groups. Students in the selected groups can register only for this course section (and any other section in which their group is selected in this setting).
See details and instructions below in How To: Restrict a Which Groups Can Register for the Section and Which Sections a Group Can Register For.
Section Text
Web Registration Override Dates
External Registration (if your school has the Campus Marketplace license)
The Reporting tab is similar to the Course tab | Master 2 subtab on the Courses window of J1 Desktop and allows you to view and edit* these section details:
Important
*Ability to edit details depends on the permissions assigned to you. Contact your module manager or support team for more information.
IPEDS CIP Code - the CIP Code List is available on the IPEDS home page at https://nces.ed.gov/ipeds/cipcode/
IPEDS CIP Extension
IPEDS Type
Distance Education Course
Distance Education Provider
Dual Enrollment
Exclude from Withdrawal
Exclude from Repeat
In District
Instruction Mode
Interinstitutional Course
Org Providing Instructor
Performance Based Ed Success (Developmental Course)
PESC Course Level
Remote Location
Self-Paced
State Cost Center
State Funded
State Location
State Type
Type of Instruction
Use the Competencies tab to view, edit, or remove competencies from a section. This tab appears only if the section is designated as a CBE (Competency Based Education) section.
Select an element under the section name. In the information grid, you can edit fields as needed. You can use the Remove button to remove the element or the Add button to assign a new element.
Use the Textbooks tab to view, add, and remove textbooks for a section.
Important
You need the "Can view textbooks" permission to see the textbook list, and the "Can manage textbooks" permission to add and remove textbooks.
Textbook information includes the following fields:
Title
Edition
ISBN 10
ISBN 13
Cost / Price Type
Author
Type
Publisher
Copyright
Bookstore Location
Description
For more details see the Textbook Definitions topic.
Use the different tabs on the Manage Section Details page to make changes to section details.
Navigate to the Manage Faculty page to make changes to section faculty information.
There are several ways to edit section details.
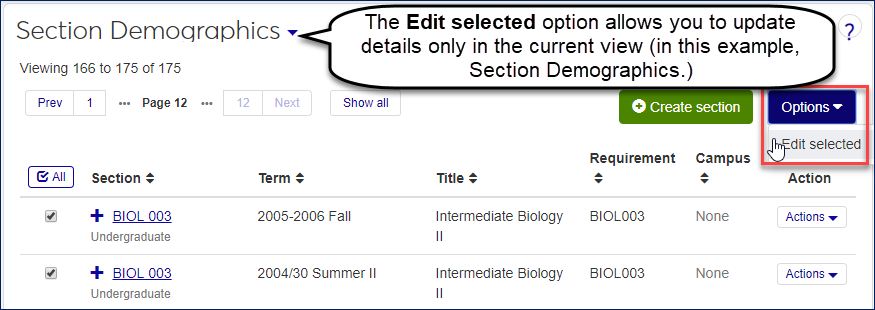
Most details for a section can be edited on the Manage Sections page using the blue options button. This can be used to edit the same details about multiple courses at one time.
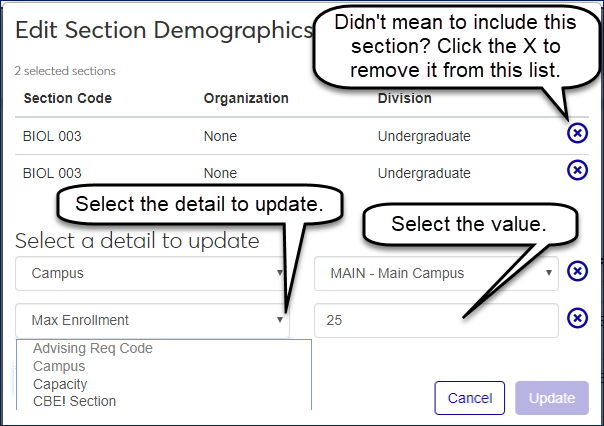
The Options drop-down menu allows you to apply a specific action to all rows that are selected. For the Manage Sections page, the option available is Edit selected. Choosing this option with one or more rows selected allows you to choose a detail to update for all selected sections.
Caution
The details that may be edited using the Options | Edit selected are limited to the details shown on that view. For example, on the Grading Controls view, you will only have the option to update Grade Scale, Credit Type, Variable Grading Type, or Division.
Tip
As long as you are not editing more than 200 rows at a time, the Edit Details pop-up shows the sections that will be affected by this update. You can use the X icon beside each course to remove any section that you don't want to include in this update if you accidentally grabbed the wrong one.
On the Manage Sections page, use the Actions drop-down for the course you want to edit.
The Actions drop-down performs the selected action on that row only. On the Manage Sections pages, the actions available in the drop-down- will change based on the view that you have chosen from the drop-down menu in the table title. Some of the actions that you may see are:
On the Manage Section Details page, click the Edit details button. You can reach the Manage Section Details page from the Section summary page.
In the Section Demographics tab, click the User-Defined Fields button. The User Defined Fields pop-up opens.
Edit the fields.
Click Save. The pop-up closes.
In the Schedule tab, click the Edit details button. The Schedule tab now appears in edit mode, with all fields visible.
Scroll down to Section Schedules. If there's a conflict with either the instructor or the space, an alert warns you and provides a link to the conflicting course section.
To fix the conflict, edit the Primary Instructor, Space, or meeting dates and times as needed. To help with space conflicts, select the checkbox for Restrict to available spaces. This removes spaces from the drop-down list if they're unavailable for the dates and times selected.
If you fixed the conflict, click the Done editing button. The page reverts to view mode.
To save without fixing the conflict, click the Save with conflict button. The page reverts to view mode.
On the Manage Section Details page for a section, click the Enrollment tab.
Click Edit details.
Under Cancellation Information, click to toggle the Cancellation switch to Yes.
Click Done editing. If there are no students enrolled, or if all enrolled students have completed the course, the section is canceled. Students who have completed the course aren't affected by the cancellation.
If students are enrolled who haven't completed the course, a pop-up asks whether you want to keep the students enrolled or drop them.
To keep them enrolled, click Cancel section; keep students. The section is canceled.
To drop them, you can edit the Date. Then click Cancel section; drop students. The section is canceled.
If you don't want to cancel the section after all, click Don't cancel section. The pop-up closes. Click the Cancellation switch to toggle it to No, and click Done editing.

From the Registration Administration hub, click the Hub options drop-down.
Select Admin options and then Manage sections. The Manage Sections page opens to the Section Demographics view.
Use the Section Filter to find the section you want.
On the section's row, click the Actions drop-down, and select Manage section details. The course section's Manage Section Details page opens to the Section Demographics tab.
On the Portal Controls tab, click the Edit details button.
Under Restrict Registration, select one or more groups in either or both of the drop-downs, or leave either or both blank. You can use these to limit registration in this course section in two ways:
Restrict Registration by Section: You can select one or more groups. Registration in this section will be limited to those groups.
Only students in the selected groups can register for this course section.
If no groups are selected here, then students in any group can register for this course section.
This setting is useful if you want to restrict some course sections to only particular groups (honor students, for example).
Restrict Registration by Web Group: You can select one or more groups. Students in the selected groups can register only for this course section (and any other section in which their group is selected in this setting).
Students in the selected groups can register only for this course section. They can't register for anything else—no section of any catalog course, unless that section also has their group selected in this setting.
This doesn't prevent others from registering for this course section (but the Restrict Registration by Section setting could).
If no course sections have groups selected here, then there are no groups who are restricted to only particular sections.
This setting is useful if you want certain groups (dual-enrolled students, for example) to be limited to a particular subset of courses.
Click the Done editing button. Your changes are saved.
From the Registration Administration hub, in the Hub options drop-down, select Manage sections.
Navigate or use the filters to find the section you want to change.
Tip
In the CBE view, select the CBE Section filter, and select Yes to limit the listings to CBE-designated sections.
On the course's row, click the Actions button, and select Manage section details. The Manage Section Details page appears with the Competencies tab open.
Tip
You can also access the Manage Section Details page from a section's summary page in the Section options drop-down.
Click the Add button. The Add Competency pop-up opens.
In the Add to drop-down, select the course. (Or, if there are already units assigned, you can select a unit to add a competency to.)
In the Search Competencies by drop-down, you can search by catalog, section, or competency type.
Click the Add button.
From the Registration Administration hub, in the Hub options drop-down, select Manage sections.
Navigate or use the filters to find the course you want to change.
Tip
In the CBE view, select the CBE Section filter, and select Yes to limit the listings to CBE-designated sections.
On the course's row, click the Actions button, and select View section details. The Manage Section Details page appears.
Tip
You can also access the Manage Section Details page from a section's summary page in the Section options drop-down.
On the Competencies tab, select the checkbox for one or more elements under the section title.
Click the Remove button.
A pop-up asks you to confirm. Click this Confirm button, too.
From the Registration Administration hub, in the Hub options drop-down, select Manage sections.
Navigate or use the filters to find the course you want to change.
Tip
In the CBE view, select the CBE Section filter, and select Yes to limit the listings to CBE-designated sections.
On the course's row, click the Actions button, and select View section details. The Manage Section Details page appears.
Tip
You can also access the Manage Section Details page from a section's summary page in the Section options drop-down.
On the Competencies tab, select the checkbox for one or more elements under the section title.
In the grid, enter or select information in the columns. If the column isn't editable, it won't accept your edit.
Click the Save button.
On the Textbooks tab, click the Expand icon
 to see all the fields.
To remove a textbook, click the Remove icon
 .
.To add a textbook:
Click the Add textbook button. The Textbooks pop-up opens.
Click the Show textbook search button.
You can use the Textbook Filter to narrow the list.
On the row of the textbook you want to add, click the Select button.
Click the Update button. The textbook is added to the section.
* Requires the Campus Marketplace license
Note
If your school allows external registrations, this setting should be used only for noncredit courses. For additional information, see Configuring the J1 Integration with Campus Marketplace.
Go to the Portal Controls tab and click Edit details.
In the External Registration section, click the Allow option to Yes.
Enter a dollar amount for the Fee. This fee is sent to Campus Marketplace and is charged to students when they are successfully registered for a course section. This fee is not charged to students that register for the course directly from the Campus Portal.
Note
You'll need to work with your school's business office to determine how payments received from an external system are noted in the general ledger.
Schools with the Campus Marketplace license can make course sections available to students that aren't enrolled at their institution. Students enroll in a course via Campus Marketplace, and the registration process is completed in J1 Web. For additional details about the external registration process, see the Manage External Registrations topic.
No. That is, the system warns you of schedule conflicts, but it doesn't prevent them because you might have a reason to allow a conflict. The system lets you save with the conflict unresolved, or you can resolve the conflict and then save.
Not necessarily. By default, course sections have the same dates (start, end, census, withdrawal, grading periods, and so on) as the term or subterm they're in. Those dates are configured on the Year / Term / Subterm page.
But an individual course section's dates can be edited on the Manage Section Details page. So a course section can have a census date that's different from the term's.
Likewise, each student in a section can have different dates. They can be edited on the Manage Student Section Details page.
Note
If you create a section using the Create Sections option, the new section gets the dates from the term you assign it to.
But if you use the "Copy Sections to New Year / Term" feature, you can choose between these options:
Use the term or subterm dates
Use whatever dates are in the sections you're copying
The system looks for available drop dates in the following sequence:
Advisor Add / Drop Date Override dates: If there's a drop-date for the advisor in the term, that takes precedence—only for the selected advisor dropping courses for their advisees.
Course section add / drop dates: If there's no drop date for Advisor Add / Drop Date Overrides (or if the person person doing the dropping isn't an advisor with add/drop override dates for the term), then the course section drop date takes precedence.
Registration Control Group dates: If none of the above apply, then the Registration Control Group drop date takes precedence.
Term (or Subterm) dates: If none of the above apply, then the drop date for the term or subterm is used.