Year / Term / Subterm Definitions
Important
Information and features vary according to the roles to which you belong and the permissions associated with those roles. For more information, contact your module manager or your campus support team.
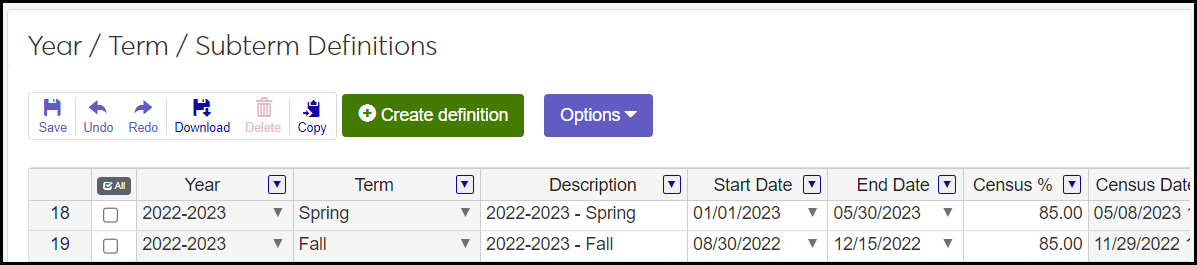
Use this table to associate years with terms and subterms. The resulting year/terms and year/term/subterms are the units of time into which you place course sections.
Years, terms, and subterms each have their own definition pages. This page is where you make combinations of them.
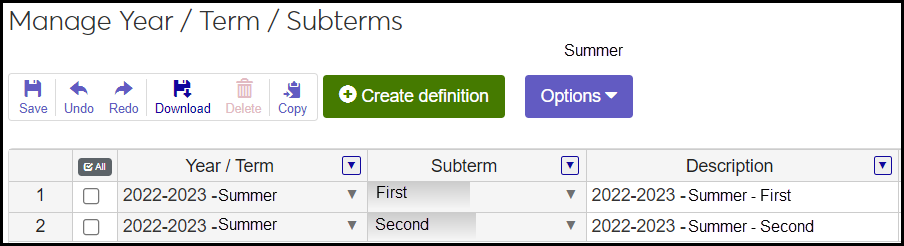
For example, on the Year Definitions page, the academic years 2020, 2021, and 2022 are defined. On the Term Definitions page, the Fall, Spring, and Summer terms are defined. On the Subterm Definitions page, the Summer First and Summer Second subterms are defined. But here on the Year / Term / Subterm Definitions page, you define a 2022 Spring term and a 2021 Summer Second subterm.
The Page Is a Spreadsheet
The page is a spreadsheet. You can select any or all rows, sort by any column, and click the Create definition button to add new rows.
When you select one or more rows, the Options drop-down button is available. Use it to open related spreadsheets.
When you select one or more rows, the toolbar lets you operate on the selected rows. You can save changes, undo and redo edits, download the selected rows to an Excel file, delete the rows, or copy them.

Tip
You can copy more than one row at a time if they have the same Year value.
You can create year/term and year/term/subterm combinations in Desktop, too, on the Year/Term/Subterm window.
The definitions are stored on the Year Term table (year_term_table) and the Year Term Subterm table (yr_trm_sbtrm_table).
Everywhere in the Campus Portal, Jenzabar One Web, and Desktop that students and staff see or select a year/term or a year/term/subterm, it comes from the Year / Term / Subterm Definitions page. The definitions are used throughout the Advising and Registration modules.
Year: Academic years as defined on the Year Definitions page.
Term: Terms as defined on the Term Definitions page.
Description: Up to 65 characters for each combination year/term or year/term/subterm.
Start Date: The year/term's start date must be earlier than its end date. Individual course sections can have different start dates.
End Date: The year/term's end date must be later than its start date. Individual course sections can have different end dates.
Note
Subterms must start or end in the term they're assigned to.
Census Date and Time: The final date to drop courses. After that, students can withdraw but not drop.
Tip
Set the Census Time to 11:59:59 p.m. That keeps Add/Drop open all day on the Census Date. (If you set it for midnight, there will be confusion about whether midnight is the end of the previous day or the beginning of the upcoming day.)
Census %: Calculates the section's census date (drop date) by counting the days from the section's start date to the section's end date and multiplying that number by the census percentage. This allows you to have courses with various last-drop dates.
Tip
Unless you have a fixed census date for all courses in a given year/term or subterm, we recommend using Census % instead of setting Census Date.
Census Day of Week: This merely lists the day of the week of the census date for the year/term or subterm as a reminder.
Last Withdraw Passing Date: Last date a student can withdraw from a course with a withdraw passing grade.
Billing Period: Select a billing period for the year/term.
Payment Due Date: Select a date. This appears for students in the My Financial Account feature in the Campus Portal.
PESC Session Type: Select a session type. See the PESC Session Type topic in Desktop help for more information.
Show in Campus Portal: Select one of these options:
None
Campus Portal
e-Racer and eLearning
Both
Note
If a year/term already has course sections showing in the Campus Portal, you can't suppress them here. Use the Manage Section Details page to stop showing them in the Campus Portal. Then you can come back here and stop showing the year/term in the Campus Portal.
Preregistered: When this checkbox is selected, then when a student registers for a course in the Campus Portal, their registration status is Preregistered. When unselected, the registration status is Current (or Registered).
First Campus Portal Add / Drop: First date students can add and drop courses in the Campus Portal.
Last Campus Portal Add / Drop: Last date students can add and drop courses in the Campus Portal.
Last Campus Portal Withdrawal: Last date student can withdraw from a course in the Campus Portal.
From the Registration Administration hub, click Hub options.
Click Manage definitions, and select Year / Term / Subterm definitions.
Tip
You can also use the Search
 . Select System page in the drop-down. Type "Year" in the field. Select Year / Term Subterm Definitions in the results.
Select one or more rows on the definition list.
Click the Options, and select Year / Term / Subterm. The Manage Year / Term / Subterms spreadsheet for the selected years slides open.
Some cells are editable. Make your edits, and click Save on the toolbar.
To manage grading periods for subterms:
Select one or more rows.
Click Options, and select Grading Periods for Subterms.
Enter Grade Entry start and end dates.
Enter Grade Blackout start and end dates if your school uses them.
Click Save on the toolbar.
Click Close.
On the Registration Administration hub, click the Hub options drop-down.
Select Manage definitions and then Year / term / subterm definitions. The definitions page opens.
Select one or more rows on the definition list.
Click the Options drop-down, and select Year / Term Control for Registration Control Groups. The Manage Year / Term Control for Registration Control Groups spreadsheet slides open.
In the Manage spreadsheet, edit existing rows or click the Create definition button to add a new row.
In each row:
Select a Year/Term and a Registration Control Group (also called Web Registration group and Tel/Web group).
Select dates for students using the Campus Portal to add, drop, and withdraw from courses.
Select a Campus Portal Withdrawal Option.
Select Grade Blackout dates, if applicable.
Select the checkboxes for Registration Clearance and/or Advisor Approval if they're required for this group.
Select the checkbox for Ready for Advising Cycle if applicable. (This allows the Advising Manager in J1 Web to assign the advising cycles to the group. If assigned, it appears here in the Advising Cycle column.)
Select a Plan Sensitivity option. This controls how closely the students in this group must follow their academic plan when they register.
Click the Save icon on the spreadsheet's toolbar.
Click the Close button.
For subterms, follow the same steps, but in Step 4, select the Subterm Control for Registration Control Groups option.
Use this spreadsheet to maintain grading periods that are used on the J1 Web Grade Entry window. Jenzabar provides the Midterm and Final grading period by default. You can add more on the Grading Period Definitions page.
Create grading periods on the General Settings page on the Registration Administration hub.
Select one or more rows on the definition list.
Click the Options, and select Grading Periods for Year / Term. The Grading Periods spreadsheet slides open.
Make your edits.
Tip
If any course sections have their own Grade Entry and Blackout Dates, those will override these dates that apply generally to courses in the year/term.
Click Save on the toolbar.
Click Close.
Use this spreadsheet to set periods when advisors can add and/or drop courses after the add/drop period has ended. This is a period when advisors can override the deadline.
Select one or more rows on the definition list.
Click the Options, and select Advisor Add/Drop-Date Overrides. The Advisor Add/Drop-Date Overrides spreadsheet slides open.
Make your edits.
Click Save on the toolbar.
Click Close.
Click the Create definition button. A new blank row appears at the top of the spreadsheet.
To remove the new row, click Undo on the toolbar. Otherwise, add your information, and click Save.
Make changes in any editable cell.
To remove a change, click Undo on the toolbar. Otherwise, add your information, and click Save.
Warning
Delete with caution. You could lose student records.
Select the checkbox for one or more records.
Click the Delete button on the toolbar.
You can download rows from the main spreadsheet and any of the spreadsheets reached from the Options drop-down.
Select one or more records.
Click Download on the toolbar. The Download to Excel pop-up opens.
The default options are selected, but you can change them.
Click Download. The file goes where your browser is configured to send it, such as your Downloads folder.
You can copy rows on the main spreadsheet and most of the spreadsheets reached from the Options drop-down.
The following are steps for copying on the main spreadsheet. The other spreadsheets are similar, but may not have all the options.
Select one or more rows. If you select multiple rows, they must be in the same year.
Click Copyon the toolbar. The Copy Year / Term pop-up opens.
Select a Target Year by typing a year and selecting from the results.
Select the checkbox for any of the Options you wish:
Include grading periods
Include term controls for registration control groups
Include advisor add/ drop-date overrides
Under Billing Periods, select one of the radio buttons:
Copy the existing billing period
Use this billing period
Select a billing period from the drop-down.
If you want to include subterms in the copy, select Include subterms, and select any of the following you wish:
Include subterm grading periods
Include subterm control for registration control groups
Include billing periods
Click the Copy button. The selected terms are copied to the target year.
Not necessarily. By default, course sections have the same dates (start, end, census, withdrawal, grading periods, and so on) as the term or subterm they're in. Those dates are configured on the Year / Term / Subterm page.
But an individual course section's dates can be edited on the Manage Section Details page. So a course section can have a census date that's different from the term's.
Likewise, each student in a section can have different dates. They can be edited on the Manage Student Section Details page.
Note
If you create a section using the Create Sections option, the new section gets the dates from the term you assign it to.
But if you use the "Copy Sections to New Year / Term" feature, you can choose between these options:
Use the term or subterm dates
Use whatever dates are in the sections you're copying