Define a Notification Interaction

Notifications are pop-up alerts that appear in J1 Web and Campus Portal to let users know about important point-in-time information. You can define notifications you want sent individually, ones you send repeatedly and according to a schedule, or ones that get sent when something happens in the system.
Note
Some notifications are system-generated and not defined or managed by your school. For example, notifications about role permission changes are system-generated.
Note
To see the notifications, recipients must configure their web browser to allow alerts/pop-ups for your J1 Web/Campus Portal site. Depending on their browser settings, they may be prompted to accept the alert the first time one is sent, or they may need to access their browser settings and add the site to their allowed alerts/pop-ups.
Campus Portal users do not need to be in J1 Web or actively using the Campus Portal to receive notifications. They can be selected individually during the define/apply processes or added via a data set that includes them. Once they dismiss the notification, they will not be able to see it elsewhere in the Campus Portal; however, the notification will be applied to their record in J1 Web and viewable from the Interaction Inventory or their Communication Feed.
J1 Web users can view any notification they received in the Notification Center.
Note
At this time, notifications are only available in J1 Web and Campus Portal (JICS). Mobile App alerts may be available in a future release.
Templated notifications are reusable communications your school sends out repeatedly. They can be sent individually or grouped in an automation plan and sent according to a schedule. Examples of notifications include alerts about registration dates, campus activities, information about campus facilities, etc.
Access the Communication Management, Define Interaction page.
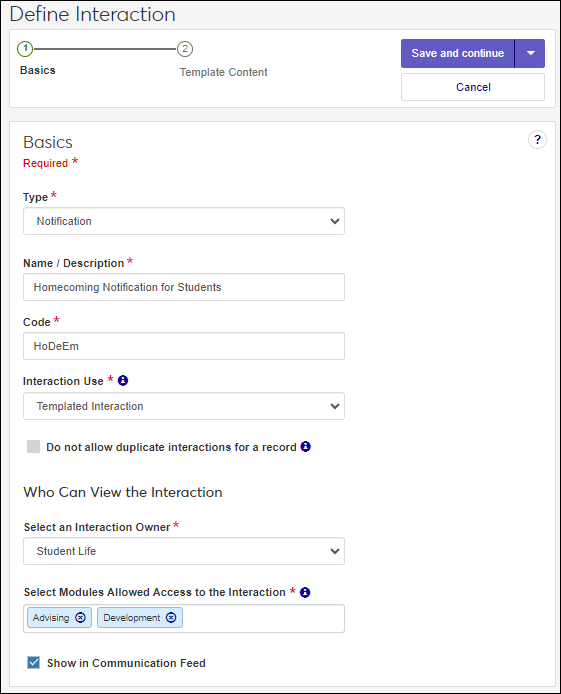
From the Type drop-down, select Notification.
In the Name/Description field, enter a recognizable name or description for the interaction.
In the Code field, a unique code is generated for you or you can choose to enter your own unique identifier for the interaction. Codes cannot be more than 15 characters.
From the Interaction Use field, select Templated Interaction.
From the Select an Interaction Owner drop-down, select the module/department that is primarily responsible for this interaction type.
Note
If you select a default interaction access code from Communication Preferences (My General Settings), it will be shown here; however, you can select another module from the drop-down.
In the Select Modules Allowed Access to the Interaction, start typing and select the modules you want to be able to access the interaction.
Tip
Users in roles with permission to this module code will be able to view and depending on their permissions, work with this interaction. Consider who on campus would benefit from being able to view and potentially comment on this interaction. For example, registrars and advisors may benefit from similar information about a student.
If you want the interaction to be available in an individual’s or organization’s feed, select the Show in Communication Feed checkbox.*
* Available with Communications Plus.
Tip
If sensitive FERPA or HIPPA information might be included in the interaction, it might be better to not include it in the communication feed.
Click Save and Continue. The Template Content step appears.
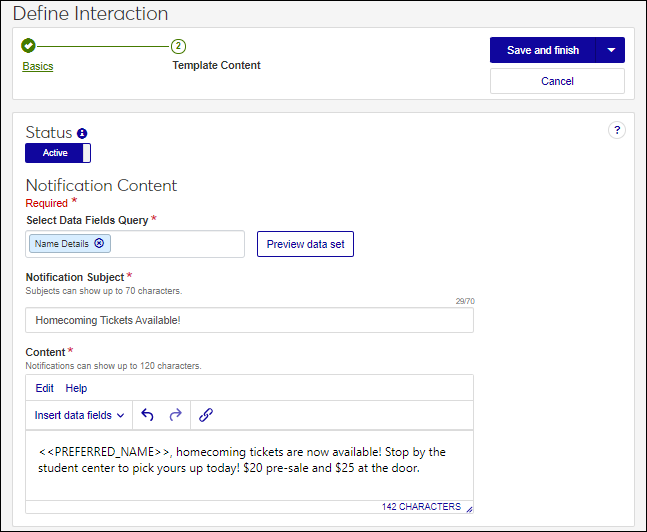
Use the Status option to make the interaction Active or Inactive. Active interactions can be used right away.
In the Select Data Fields Query field, start typing the name of the data set you want to use and select it from the ones available. Data sets let you use placeholder database fields in the content field to customize your communication. Placeholders are replaced with the actual information when the interaction is sent/applied.
Note
Jenzabar provides several general data sets with commonly used information like name and major. Your school can also upload their own data sets.
In the Notification Subject field, enter a brief description of the notification. This appears at the top of the notification.
In the Content field, enter the notification message. Use the Insert data fields drop-down to add data fields.
Tip
Data fields are shown as placeholders, but will be replaced with content when the interaction is sent/applied. For example, PREFERRED_NAME is replaced with the recipient’s preferred name.
Select a save option.
To save and send the interaction at another time or as part of a set, click Save and finish. The interaction will be available from the Interactions page.
To save and apply the interaction immediately, click Save and apply now. For more details, see Save and Apply Interaction Immediately.
System event notifications are sent when a selected event occurs in J1 Web as opposed to being sent according to a schedule. For example, a notification alert can be sent to an admissions officer when a prospective student emails a general admissions inbox.
Access the Communication Management, Define Interaction page.
From the Type drop-down, select Notification.
In the Name/Description field, enter a recognizable name or description for the interaction.
In the Code field, a unique code is generated for you or you can choose to enter your own unique identifier for the interaction. Codes cannot be more than 15 characters.
From the Interaction Use field, select System Event.
From the Select an Interaction Owner drop-down, select the module/department that is primarily responsible for this interaction type.
Note
If you selected a default interaction access code from Communication Preferences (My General Settings), it will be shown here; however, you can select another module from the drop-down.
In the Select Modules Allowed Access to the Interaction, start typing and select the modules you want to be able to access the interaction.
Tip
Users in roles with permission to this module code will be able to view and depending on their permissions, work with this interaction. Consider who on campus would benefit from being able to view and potentially comment on this interaction. For example, registrars and advisors may benefit from similar information about a student.
If you want the interaction to be available in an individual’s or organization’s feed, select the Show in Communication Feed checkbox.*
* Available with Communications Plus.
Tip
If sensitive FERPA or HIPPA information might be included in the interaction, it might be better to not include it in the communication feed.
Click Save and continue. The Data Merge Options step appears.
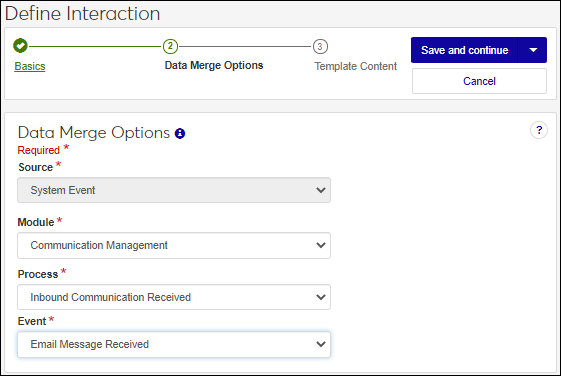
From the Module , Process, and Event drop-downs, select the the module/ department, process, and event you want to trigger sending the notification.
Notice
When an email comes in to the system from a prospective student, you can send a notification to a specific Admissions Counselor altering them the email was received and ask them to reply ASAP.
Click Save and Continue. The Template Content Step appears.
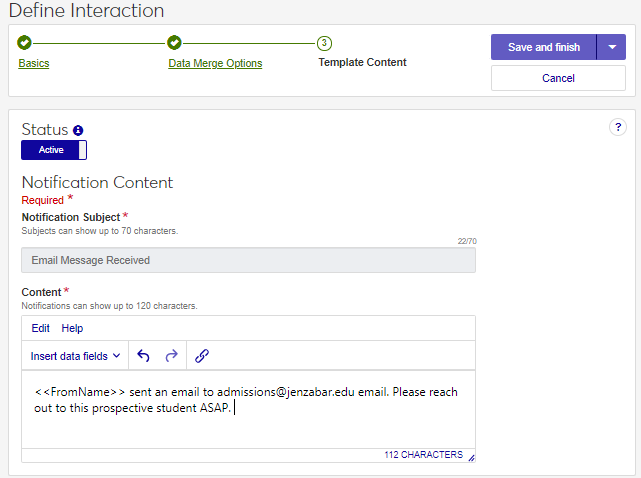
Use the Status option to make the interaction Active or Inactive. Active interactions can be used right away.
In the Content field, enter your notification information. Available options include:
Cut, copy, and paste
Undo, redo
Insert hyperlink
Use the Insert data fields drop-down to add data fields. Data field options will vary according to the process and information related to it.
Tip
Data fields are shown as placeholders. Once the email is sent, the placeholders are replaced with content. For example, FromName is replaced with the name of the email sender.
Click Save and finish. The interaction is available from the Interactions page.