Create Requisition
Important
Information and features vary according to the roles to which you belong and the permissions associated with those roles. For more information, contact your module manager or your campus support team.
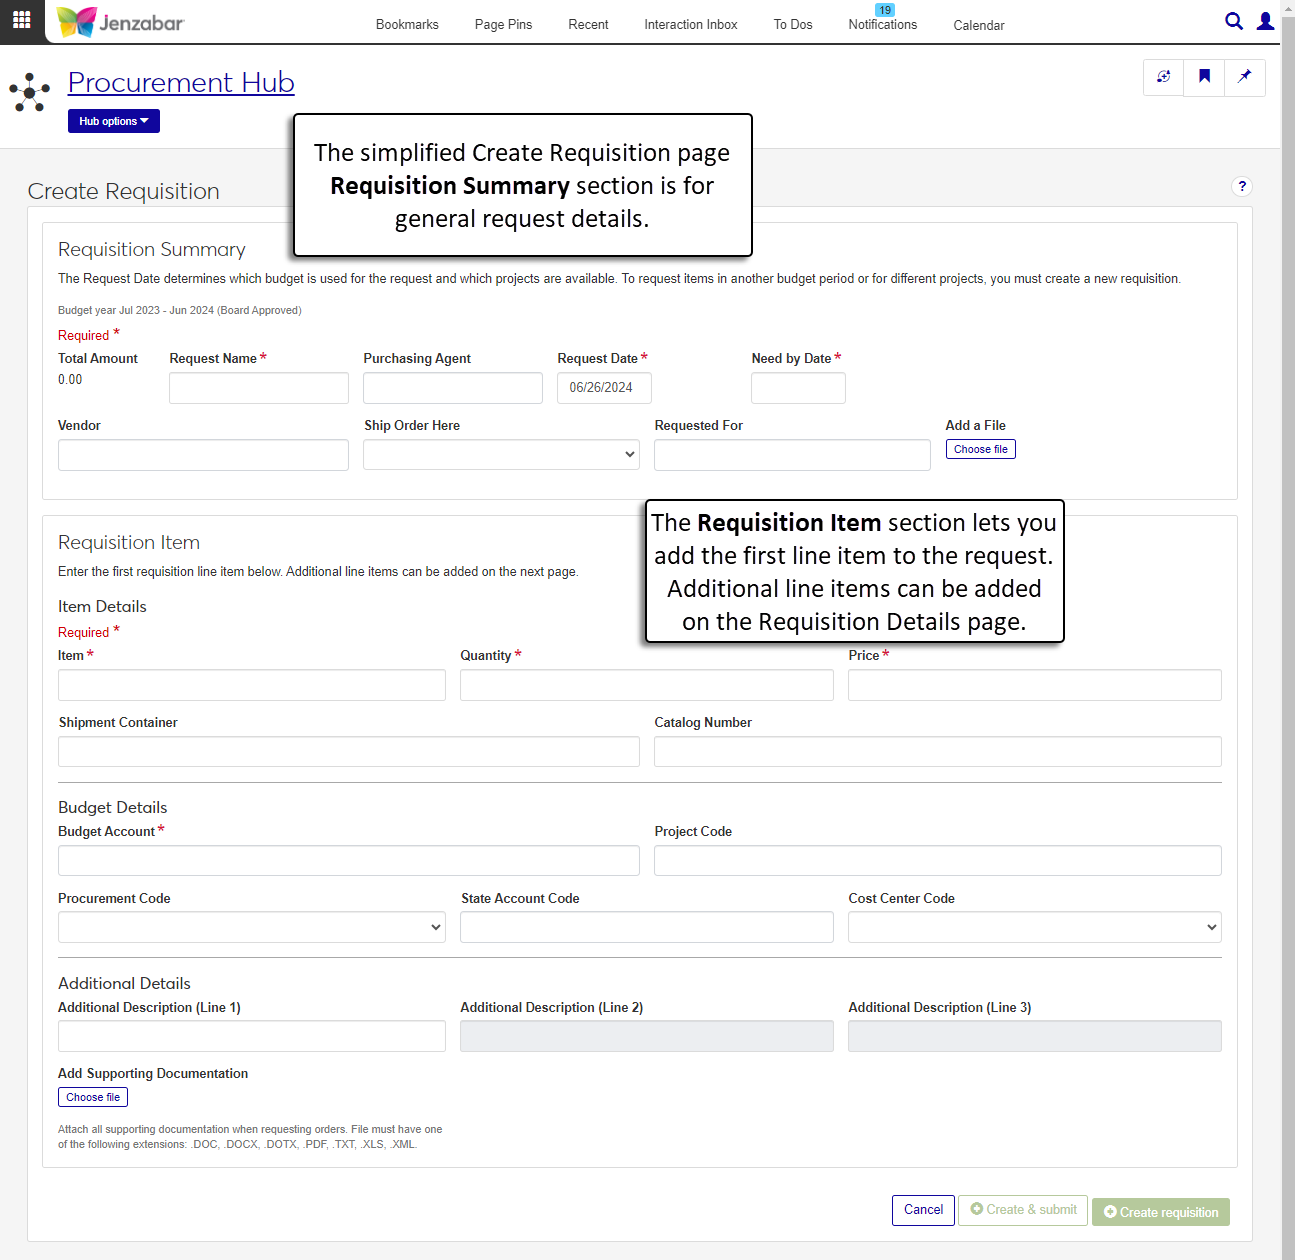
The Create Requisition page lets you create requests for supplies or other items. The page is separated into two sections. General request information (like the description, dates, and approval information) is added to the Requisition Summary section. Details about the first item are added to the Requisition Item section, and additional line items can be added on the Requisition Details page.
To access the Orders and Requests page and create requisitions, you must be in a Purchasing - Procurement role with the "Can create and submit basic requisitions" permission.
You'll also need access to GL accounts to create new requests, so you must also have the "Can view only GL accounts enabled by associations (restricted)" permission and be in one of the following GL account access roles:
General Ledger Accounting GL Account Component Access
General Ledger Accounting GL Account Alternate Code Access
If your school is licensed for Budget Management, you must be in a Budget Management Worksheet & Adjustment Access role with "Can create and delete transfers" and either "Can submit transfers" or "Can approve and deny transfers" permissions to submit budget adjustments.
Note
These are the minimum permissions required to create requisitions. Depending on your responsibilities, you may need additional roles and permissions. For more information about permissions to work with orders and requests, see Roles and Permissions to Work with Orders and Requests.
If your request is over budget, you can make an adjustment to cover the cost of the request. You can save your request after the budget adjustment is submitted. After the transfer is approved, you can submit the request on the Requisition Details page.
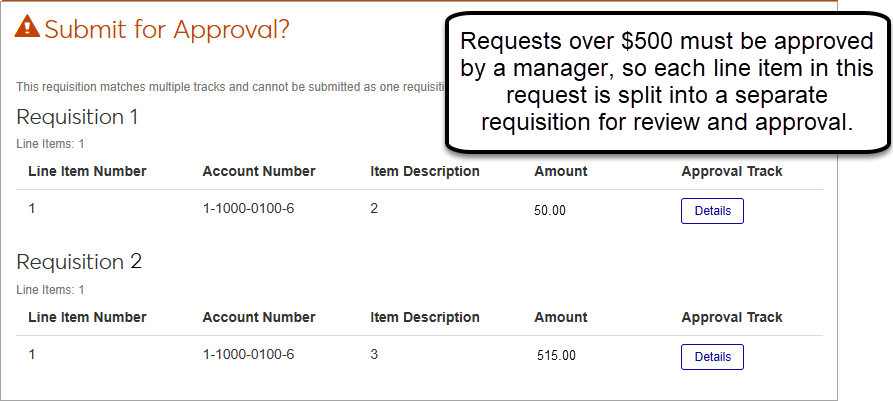
If your school is configured to automatically assign approval tracks based on specific criteria, you may see an option to submit multiple requisitions for approval. When different line items in your request meet different approval track criteria, line items that meet different criteria must be separated into multiple requests.
Susan submits a request for two items. Item 1 is $50 and Item 2 is $515. Her school automatically assigns approval tracks and requests over $500 must be reviewed by a manager. Since her request includes items that need to be reviewed by different people, the pop-up appears when she submits her request to inform her that two separate requisitions will be submitted for approval.
Schools configured to manage inventory can use the Inventory Item field to select an inventory code. When an existing inventory code is selected, several fields autofill with pre-defined details. Fields that can be autofilled based on the inventory code are below:
Item
Price
Shipment Container
Catalog Number
Note
Inventory options are available if your school is configured for inventory management. If your school doesn't inventory options, these fields aren't displayed.
From the Finance Procurement options, select Orders and requests. The Orders and Requests page opens.
Click Create new request. The Create Requisition page opens.
Enter or select options in the Requisition Summary section.
The Total Amount is a read-only field that updates as line items are added to the request.
Enter a Request Name that describes the purpose of the request. Required.
If known, type a Purchasing Agent name and select it from the drop-down options. This is the person responsible for the request.
The Request Date defaults to today's date, and you can update it if needed. Required.
Enter the Need by Date. Required.
If the request needs to be reviewed and approved by a specific person or group of people, select an Approval Track from the drop-down options. Click the Details button to view the list of approvers.
Note
If an approval track isn't selected, your request is automatically approved when it is submitted.
Type and select a Vendor to fulfill the request.
From the Ship Order Here drop-down, select the campus where the order should be sent.
If you are making the request for someone else, enter and select their name in the Requested For field.
Click the Choose file button to attach supplemental documentation to the request. These files can be accessed on the requisition details page by clicking the line item Comment icon
 .
.
Enter or select options for the first line item in the Requisition Item section. Additional line items can be added from the Requisition Details page after the request is created.
Note
The Inventory Item field is visible for schools configured for inventory management.
In the Item Details section, enter an Inventory Item code and select it from the list.
Note
When an inventory code is selected, the following fields are autofilled with default values for that code.
Item
Price
Shipment Container
Catalog Number
Enter the Item name. Required.
Enter a numerical Quantity of items to order. Required.
Enter the Price for each individual item. Required.
In Shipment Container, enter how the item is packaged, priced, or sold (e.g., by the dozen, in a box of 50, etc.).
If known, enter the vendor's Catalog Number for the item.
In the Budget Details section, enter and select a Budget Account from the drop-down list. Required.
Note
If you see an alert that the selected account will be over budget after completing the purchase, see Adjust the Budget for a Request.
If known, enter the Project Code associated with your request.
The following fields are visible only for schools with state reporting licenses: Procurement Code, State Account Code, and Cost Center Code.
In the Additional Details section, enter optional Additional Descriptions for the request.
In the Add Supporting Documentation section, click the Choose file button to upload attachments.
Click the Create & submit button to immediately submit the request for approval. To review the request and add line items before submitting, click the Create requisition button. The Requisition Details page opens when either button is clicked.
When the requested amount makes the selected Budget Account over budget, an over budget alert displays. Click the Adjust budget button. The Create Transfer pop-up window opens.
The Transfer Name is read-only.
Enter the Reason why the transfer is needed. Required.
Enter the Total Amount that needs to be transferred. Required. This should match the total amount of the request.
From the Date drop-down, select the month, quarter, or year when the transfer should take place. Only options with a positive available amount can be selected.
If the increased funds for the request should be applied to future budgets, select the This need is permanent. Include this increase in next year's budget. checkbox.
In the Transfer Details spreadsheet, select a line item code with a positive amount in the Available Now column.
Enter the Transfer from Amount. Required. If you are transferring funds from a single line item code, the Transfer from Amount must equal the Total Amount. If you are transferring funds from multiple line item codes, the sum of the Transfer from Amounts for the selected line item codes must equal the Total Amount.
Enter the Transfer from Date. Required.
If you have transfer approver permissions and want to approve the transfer when it is submitted, select the Do you want to approve this transfer? If checked you will submit and approve this transfer. checkbox.
Click Create transfer. The pop-up closes and the Create Requisition page is displayed.
Your school defines each approval track, so contact your purchasing administrator for guidance about selecting the appropriate approval track. In some cases, your school automatically assigns the approval track when the request is entered.
In J1 Web, you can start typing the name of the person or vendor in the Purchasing Agent or Vendor field and select them from the drop-down list. There isn't a separate tool to search for purchasing agents or vendors based on specific criteria on the Create Requisition page.
If your school has the Budget license, you can use the Budget Activity page in the Budget Management hub to review account information for current and future years. This page replaces the Campus Portal Budget feature. Access to the Budget Activity page is managed by the Budget Management roles.
If your school doesn't have the Budget license, you can use the GL Account Activity page in the General Ledger Accounting hub to view account balance information. This page replaces the Campus Portal GL Account Lookup feature. Access to GL Account Activity is granted by General Ledger Accounting roles.
For more information, see the following topics: