Account Statements
Important
Information and features vary according to the roles to which you belong and the permissions associated with those roles. For more information, contact your module manager or your campus support team.

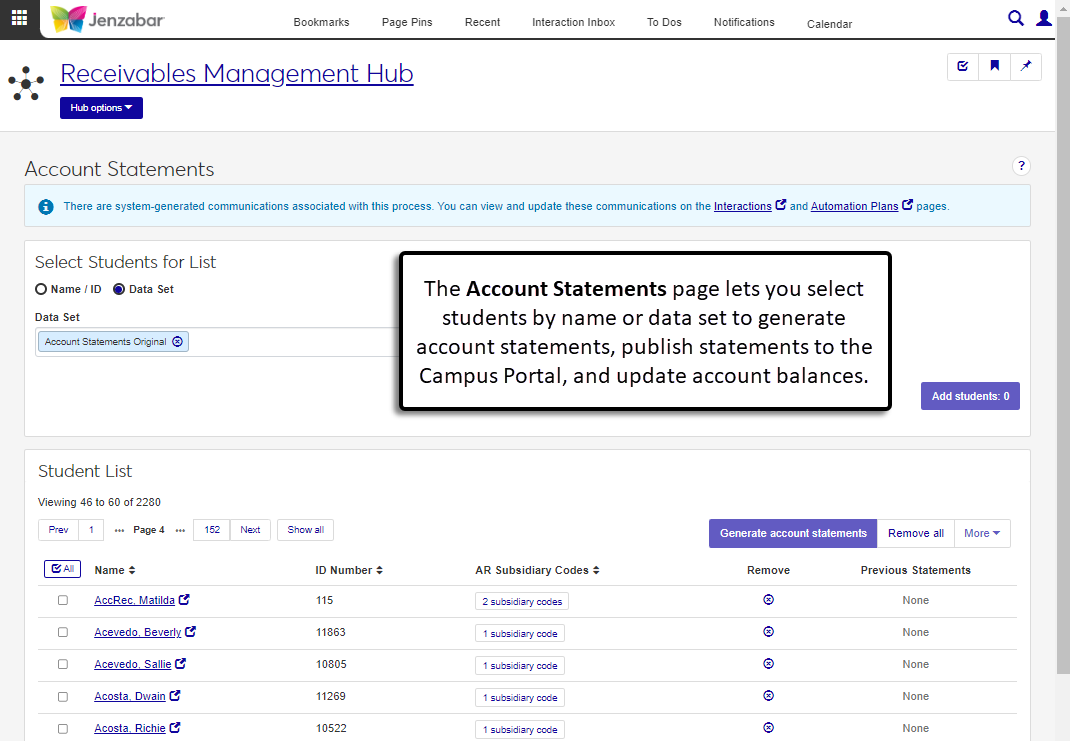
The Account Statements page lets you print statement reports and update account balances. When statements are generated, you can choose whether or not to publish them on the Campus Portal for students.
Generating account statements can take a while, and after the process is initiated you can continue working in J1 Web. A notification pop-up with a link to the statement report and the process status appears when the process is complete.
Note
Before generating account statements, use this checklist to prepare student account data: Before Generating Account Statements.
You can also generate account statements from the Desktop Student Account Statements window.
To access the Account Statements page, you must be in a Receivables Management role with one or more of the following permissions:
Can generate account statements
Can update account balances
Can publish statements to students
Additionally, you must be in a Person Management role with the "Can view additional name information" permission and the "Legal Name" Additional Name Type enabled on the Associations tab.
Data sets are used across the system to generate reports, run processes, select information you want to view and work with, determine communication recipients, tailor content, and more. Jenzabar delivers commonly used data sets with the system, and you can also create custom ones using InfoMaker and SQL queries as well as source code (e.g., imported contact lists).
The default data set for account statements is "Account Statements Original". Custom queries made in the Desktop, as well as customized data sets that are classified as "Account statement queries" on the Data Sets page, are available from the drop-down.
Note
To upload custom data sets, you must be in a Campus-wide Definitions role with the "Can add or edit data sets" permission. For more information about data sets, see Data Sets.
You can update statement or period balances when statements are generated, or you can select one or more students in the list and select the Update account balances option from the More drop-down.
There are two options for updating balances: Update Statement Balances and Update Period Balances. The transaction status is updated based on which checkboxes are selected, and the default checkbox selections are based on the selections on the Subsidiary Control Settings page. If neither checkbox is selected in the Subsidiary Control window, the Update account balances option isn't available from the More drop-down.
Update Statement Balances Selected | Update Period Balances Selected | Result |
|---|---|---|
Yes | Yes | Transactions with a C or Y status are updated to H and will not appear on subsequent statements. |
No | No | No update occurs. Transactions remain as they are and will appear on subsequent statements. |
Yes | No | Transactions with a C status are updated to Y. These transactions will continue to appear on subsequent statements, but they won't be included in the calculations for finance charges. |
No | Yes | Transactions with a Y status are updated to H. |
If you've published statements for students in the list, the View previous statements button in the Student List opens a pop-up with all published statements. Click the link to open the file in a new tab.
The system automatically sends email notifications to students when account statements are published to the Campus Portal. If the Include Statement in Student Notification Communication checkbox is selected, the statement is attached to the email.
The system-generated emails are managed on the Interactions page in the Communication Management hub. For more information about account statement communications, see Customizing System-Generated Emails for Student Accounts.
Tip
The system updates the ID Number / Name field when you enter a full ID number and press Tab to move to the next field.
From the Receivables Management Hub options, select Account statements. The Account Statements page opens.
Select students for the list.
To add students manually, select the Name / ID option. Enter a name, ID number, or SSN and select the student from the drop-down. Add as many students as needed.
To add students based on a query, select the Data Set option. (This option is selected by default.) Select a data set from the drop-down. "Account Statements Original" is the default option, and customized versions of the data set are also available.
Click the Add students button. The Student List updates.
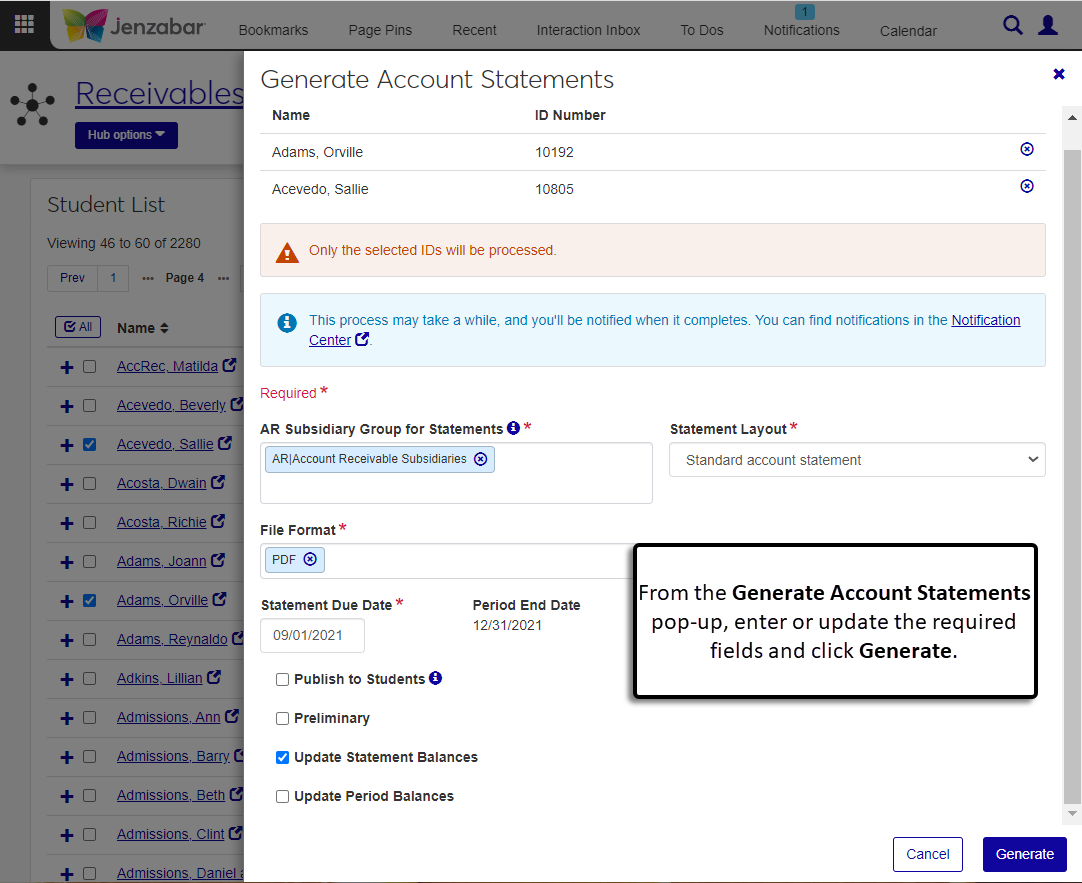
Select one or more students from the list and click Generate account statements. The Generate Account Statements pop-up opens.
Click in the AR Subsidiary Group for Statements field and select an option from the drop-down.
Select a Statement Layout. Customized versions of the Jenzabar-provided reports are also available for selection.
Standard account statement (default). Organizes statements alphabetically by the student's last name, then by subsidiary code.
Account statement with schedule. Organizes statements alphabetically by the student's last name, then by subsidiary. The student's schedule for the selected billing period will display at the top.
Note
Customizations to this layout (r_statements_layout2) that were made in Desktop will not work in J1 Web.
Account statement - year/term. Organizes statements alphabetically by the student's last name, then by year/term in descending order.
Account statement - billing period. Organizes statements alphabetically by the student's last name, then by billing period in descending order.
Select the statement File Format. PDF is the default, and you can select one or more additional formats.
By default, the Statement Due Date is the date defined on the Desktop Subsidiary Control window. It can be changed as needed.
The Period End Date is defined on the Desktop Subsidiary Control window and cannot be updated.
Select from the following checkboxes. Some may be selected by default based on the selections in the Desktop Subsidiary Control window.
Publish to Students. When selected, a PDF version of each selected student's account statement is posted in their Campus Portal Financial Document Center. Each student also receives an automated email that a new statement is available.
Preliminary. Select this checkbox to print account activity and include suspended (S) transactions in the statement balances.
Update Statement Balances. When selected, transactions with a C (current) status are updated to Y (year) status. These transactions will still appear on subsequent statements.
Update Period Balances. When selected, transactions with a Y (year) status are updated to H (history) status.
Click Generate. An alert that the process has started appears. You can continue working in J1 Web while the report is generating, and you'll receive a notification pop-up when the report is finished.
To view the statement report:
Click the Account Statements Process Completed notification link from the Notifications drop-down in the global toolbar. You can also navigate to the Notification Center, select the notification titled "Account Statements Process Completed", and click the View Details icon.
In the Account Statements Process Completed pop-up, click the Statement Report link to open the report in a new browser tab.

On the Account Statements page, add students to the list manually or with a data set.
In the Student List, select one or more students.
Under the More drop-down, select Update account balances. The Update Account Balances pop-up opens.
Select or deselect the balance checkboxes. One or both checkboxes may be selected by default based on the selections on the Desktop Subsidiary Control window.
Update Statement Balances. When selected, transactions with a C (current) status are updated to Y (year) status. These transactions will still appear on subsequent statements.
Update Period Balances. When selected, transactions with a Y (year) status are updated to H (history) status.
Click Update. A notification that the process has started appears. You can continue working in J1 Web while the balances update, and you'll receive a notification pop-up when the process completes.
On the Account Statements page, add students to the list manually or with a data set.
In the Student List, click the [number] subsidiary codes button for a student. The AR Subsidiary Codes pop-up opens.
Click the View link for any of the listed subsidiary codes. The Student Account Details page opens with the Account Activity tab selected. Transactions are filtered based on the selected subsidiary code.
Click the Comment icon to view or add comments and attachments to the subsidiary code.
Note
This option is available only for students who have had one or more statements published to the Campus Portal.
On the Account Statements page, add students to the list manually or with a data set.
In the Student List, click the View previous statements button. The Previous Statements pop-up opens with statements organized by date published.
Click the name link to open the statement in another browser tab.
On the Account Statements page, add students to the list manually or with a data set.
Select one or more students from the Student List.
Click the More button and select one of the following options from the drop-down to open that page in a new tab.
Person information details. This page lets you view and manage name, contact, biograph, ethnicity/race, military service, and tribal information.
Student account details. This page lets you view and manage student account activity by subsidiary, payment plans, and electronic payment information.
Student information details. This page lets you view and manage information about the student's course, enrollment, program, and graduation.
Note
Information available on these pages is based on your role and permissions.
Student account balances can be reviewed on the following pages:
Student Accounts page: The Balance column displays the student's total balance. You can also use the Calculate Balance options to calculate and view balances based on specified criteria.
Student Account Details page: The Account Activity tab for the student displays transaction details and balances based on the subsidiary codes.
At this time, AR subsidiary groups can be managed only in the Desktop from the Subsidiary Group Control window.
During the AR statement process, the system only includes transactions with a C status in calculations. Both C and Y status transactions can appear on statements depending on the settings selected on the Subsidiary Control Settings page.
Note
Registrars can optionally print statements during registration from the Desktop Student Registration window. These statements include suspended and unposted transactions so the newly created registration charges (e.g., tuition and fees) appear on the statement.
Update Statement Balances Selected | Update Period Balances Selected | Result |
|---|---|---|
Yes | Yes | Transactions with a C or Y status are updated to H and will not appear on subsequent statements. |
No | No | No update occurs. Transactions remain as they are and will appear on subsequent statements. |
Yes | No | Transactions with a C status are updated to Y. These transactions will continue to appear on subsequent statements, but they won't be included in the calculations for finance charges. |
No | Yes | Transactions with a Y status are updated to H. |
Students are notified when statements are published to the Campus Portal. If the Publish to Students checkbox is not selected in the Generate Account Statements pop-up, students aren't notified about new statements.
In most cases, yes. Customized versions of the report created in Desktop before your school started using J1 Web should be available as options in the Report Layout drop-down. If your school created new customized layouts in Desktop and copied them to the appropriate location on the J1 Web server, those reports are also available in the drop-down.
However, certain reports were modified to be used in J1 Web (i.e., the base report for J1 Web is different from the base report in Desktop). In those cases, the customized versions from Desktop will not work even when they are moved to the correct location on the J1 Web server. You'll need to re-customize those reports from the original version of the J1 Web report by following the instructions to Customize Reports for J1 Web.
See the help for each report page for guidance about customizing a specific report.
Customizations to account statement formatting must be done in InfoMaker. For more details about updating the format, see Working with Reports in J1 Web.
Reference the table below for the report names in the ARWebReport PBL.
Statement Layout | Report Name |
|---|---|
Standard account statement | r_statements_layout1 |
Account statement with schedule | r_statements_layout2 NoteVersions of this report that were customized in the Desktop application cannot be used in J1 Web. |
Account statement - year/term | r_statements_layout3 |
Account statement - billing period | r_statements_layout4 |
Infomaker must be installed on your machine to work with and customize reports. Contact your campus support team for additional information.
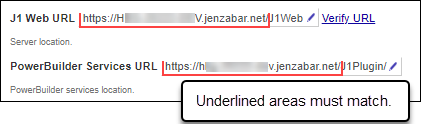
Verify the PowerBuilder Services URL is entered correctly in System Administration, System Settings, Product Installs and Sign page.
The URL must use HTTPS and not HTTP
The URL subdomain and domain must match the J1 Web URL
If the location where you store J1 Web reports is not the default installation location (C: > Jenzabar > Reports), verify the J1 Web server has permission to access the location. Detailed steps are available in the help topic Working with Reports in J1 Web.