Review Leave Requests
Important
Information and features vary according to the roles to which you belong and the permissions associated with those roles. For more information, contact your module manager or your campus support team.
As an employee supervisor, use the Review Leave Requests page to view and approve or deny your employee leave requests. You can also record leave for any requests not past the timecard approval cutoff date.
Note
If employees or your administrator make any changes to the leave requests displayed on this page, the timecards are updated here in real time. For this reason, you might see changes to the leave requests while you are working with them.
Access the Employee Supervisor Hub.
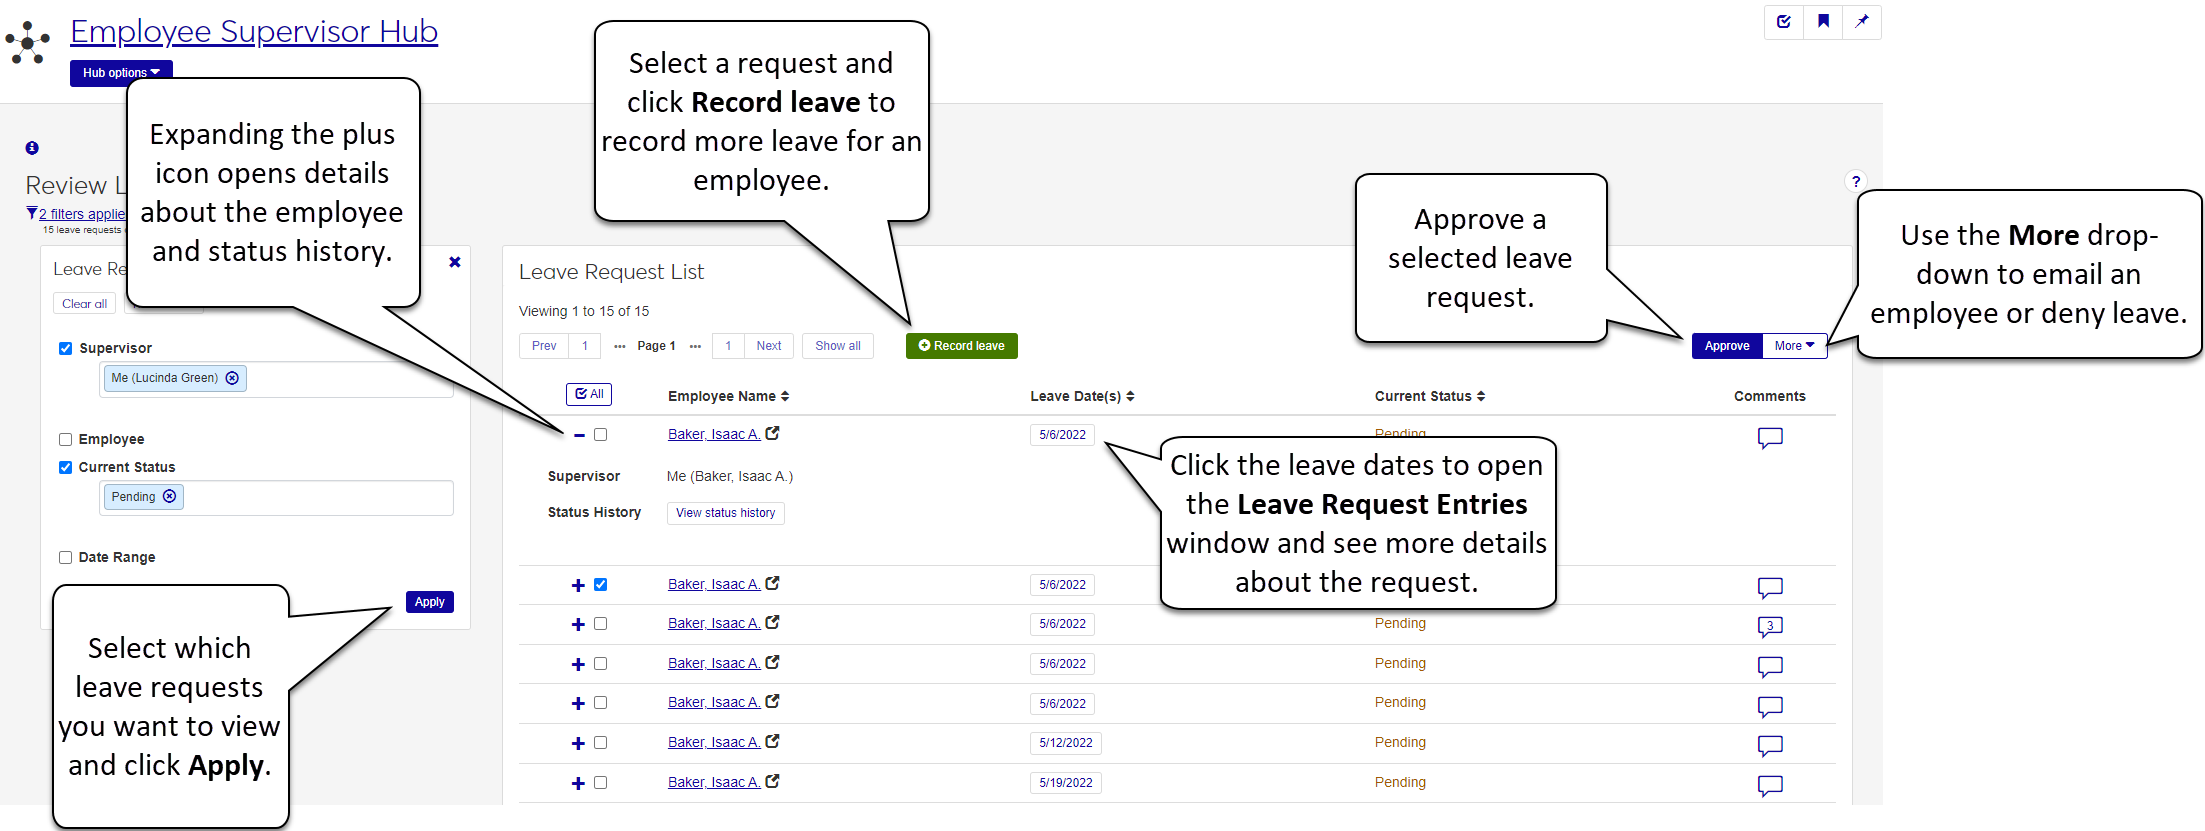
From the Hub options, select Review leave requests. The Review Leave Requests page appears listing any pending leave requests.
Review the Leave Request List and select the requests you want to approve. Click the Approve button on the row of the leave request.
Tip
Once approved, the Review Leave Requests page refreshes and updates the request Status to Approved. Once Approved, you cannot edit the request.
Access the Employee Supervisor Hub.
From Hub options, select Review leave requests. The Review Leave Requests page appears listing any pending leave requests.
Select the requests you want to deny from the Leave Request List.
Click the More drop-down and select Deny.
On the Deny Leave Request? confirmation pop-up window, click Yes, deny for leave requests appearing in the Ready to Deny section. Click Cancel to go back to the Leave Request List without denying the leave.
Note
After denying the request, the Review Leave Requests page updates the request status to Denied. Once you deny a request you cannot edit it.
Tip
If you do not want to receive warning messages confirming you want to deny similar leave requests, select the checkbox next to Don't show me these warnings again.
Access the Employee Supervisor Hub.
From the Hub options, select Review leave requests. The Review Leave Requests page appears listing any pending leave requests.
Select the checkboxes next to the employee names of the requests you want to approve, or select all the entries for requests you want to deny.
From the More drop-down, select either Approve selected leave requests, or Deny selected leave requests. The entries update with the appropriate status.
If you are denying the requests, a confirmation pop-up windows displays. click Yes, deny. To return to the Leave Request List without denying the leave, click Cancel.
Tip
If you do not want to receive warning messages confirming you want to deny similar leave requests, select the checkbox next to Don't show me these warnings again.
While on the Review Leave Request page, click a link in the Leave Date(s) column to see more details about the request.
You can also see the status history of the leave request by clicking the plus icon to open details about the employee, then clicking the View status history button.
From the Hub options, select Review leave requests. The Review leave requests page appears.
Click the Record leave button.
On the Record Leave window, type the employee name you want to enter leave for in the Employee field.
Enter the following information:
Description: enter a short title or date range for the leave, something to help remind you what/when the request is for (this field has a limit of 60 characters).
Date: enter a day for the request. You can enter only one day on a row. If the leave spans multiple days, you can enter more than one day using the Add another link.
Type: from the drop-down, choose the type of leave (such as vacation, holiday, sick, personal, etc.) you are requesting.
Start Time: from the drop-down, select a start time for the leave to begin (such as 8:00am or 12:00pm).
Hours: from the drop-down, select the number of hours you are requesting off (for example, if you are taking a whole day, select 8).
Comments: if applicable, enter comments to help your leave approver better understand the request.
If the leave spans more than one day, use the Add another link to add a row and repeat step 4 for each additional day.
After completing the form, click the Record leave button. Once recorded, the employee's timecard, calendar, and leave request page are updated.
FAQ
In order to see content, there need to be requests sent to you by employees you supervise.
When an employee requests leave, the request appears on your Review Leave Requests page. When the page opens, your list is filtered for Pending requests. If you want to see all requests, including those you have already approved or denied, use the Leave Request filter to change the list shown.
If the request falls within a past pay period that can no longer be edited, you cannot approve or deny the request.
Tip
You should always check your Review Leave Requests page before the end of a pay period to make sure there are no pending requests that need to be approved or denied.
The Approve button is disabled if you have already approved or denied a leave request. Once approved or denied you cannot change the status. The Approve button is also disabled if the request relates to a timecard with a past due approval deadline or if the request was cancelled.
If a leave request is denied, the calendar entry made when an employee first requested the leave is removed from your calendar. However, you can still view the leave request on the Review Leave Request page. Use the filter on the Review Leave Request page to show denied requests.
If an employee cancels a leave request, the entry is removed from your calendar.
If your employee cancels a leave request, the system does the following:
Removes the leave request from your calendar.
Removes the leave request form your employee's calendar.
Removes any associated timecard entry, if applicable.
When an employee you supervise submits a leave request, the request appears on your Review Leave Requests page with a status of Pending. You also receive an system task that appears on your home page and Task Center. The assigned task includes a link to the Review Leave Requests page.
Note
Once you approve or deny a request, the task is automatically marked complete.
With leave requests turned ON, you and your employees will see any pending or approved leave as a bulleted list above any additional timecard entries.
Once you deny a request, you cannot edit it or change the status. If you deny a request you wanted to approve, your employee can re-submit the request or you can record leave for the employee.
When you record leave for an employee:
The leave entry appears on your calendar and leave request page.
The leave entry appears on your employee's calendar, timecard, and leave request page.
Employee leave eligibility is attached to their active position. To view or change leave eligibility in Desktop, use the HR Employee Master via Personnel window to search the employee's ID number. When you've retrieved the employee you want to work with, click the Positions tab. The Leave/Holiday Eligible Position checkbox controls whether or not an employee can request leave.