Communication Contacts
Important
Information and features vary according to the roles to which you belong and the permissions associated with those roles. For more information, contact your module manager or your campus support team.
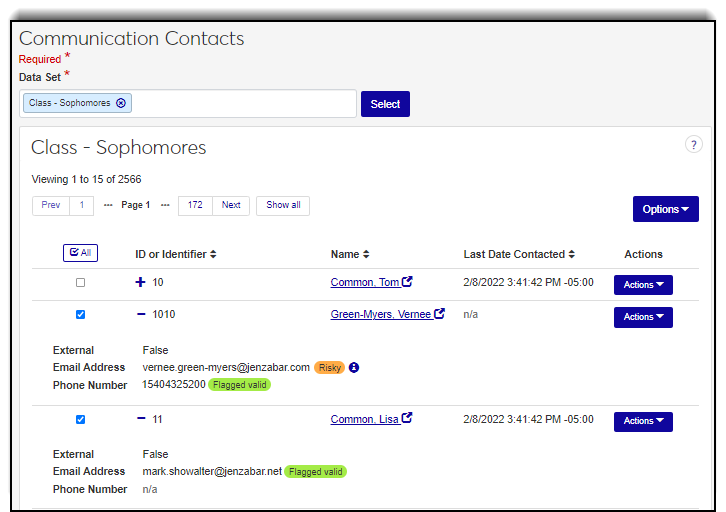
The Communication Contacts page lets you view and work with contact lists based on data sets you select. Contact lists are dynamic and reflect the most current individuals/organizations that meet the data set's criteria. Information displayed about a contact varies according to the fields in the data set.
For example, you might have an Activities data set that includes general and extracurricular information and another data set for interns that includes general and work study/employee status information. Both contact lists show general information, but the extracurricular activities fields also appear when the Activities data set is selected.
Validate recipients' phone numbers/email addresses to ensure interactions are being received:*
Note
Use the FormFlow Contact Information Update form to confirm and collect updated contact information from students, faculty, and staff using your campus portal. See the Set Up the Contact Information Update Form help topic for more information.
The validation process can be run for different contact types (for example, *LHP, *CUR, or Institutional Priority).
Indicators identify valid, risky, and invalid contact information.
When validations are run, required contact information is updated in J1 Web and Desktop.
Previously validated email addresses and phone numbers are identified to save you from potentially incurring unnecessary expenses.
View recipient communication analytics to determine communication effectiveness and identify issues.*
Send one or more recipients a communication.
Note
For example, registrars can send a text to incoming freshman that haven't signed up for orientation yet, advisors can send their advisees an email about academic plan approval deadlines, employee supervisors can send their staff reminders about when vacation days must be submitted, etc.
Link to a recipient's page or access their interaction inventory/feed for a comprehensive look at all the communications they've received.
Use search and filter options to find specific recipients. Filter options vary according to the fields in the selected query.
*Available with Communications Plus.
To access this page and work with the general features, you must belong to a Communication Management Base role with the Can view Communication Contacts permission enabled.
To be able to add a new contact to the system, you must belong to a Communication Management Base role with the Can create contacts permission enabled.
Data set options are limited to those you can access. Modules are granted access to a data set on the Data Sets page and you must belong to a role with that module access enabled (Edit Role page). If you don't see a particular data set, contact your campus support team.
Validation status information comes from Twilio and SendGrid. Their validation processes not only confirm the email address and phone number validity, but also determine detailed message delivery success rate information such as if messages were opened or forwarded, sent to spam folders, bounced back, etc.
Not Validated means contact information has not been confirmed.
Validated means messages will be sent and there is no known history of issues.
Risky* means messages will still be sent but may be going to an address with a history of known issues. For example, it could be a throw away address.
Flagged Invalid means messages will not be sent to this email address/number because it is invalid.
*This validation status is only used with email addresses.
Tip
Filter a recipient list by Risky/Invalid and then send them a communication that includes a link to the FormFlow Contact Information Update form on your campus portal.
There are several ways to find a contact and contact information:
Use the filter options. If you don't see the filter options, click the No filters applied link.
Select as many filter options as you want to narrow down your search results and click Apply.
Filter options vary according to the fields in the data set, but keyword, email and phone number status, external, and last date contacted options are always available.
If the selected data set includes additional fields, those are available as custom filters including user-defined fields.
To remove the filters and view the full list of recipients, click Clear all and then click Apply.
Use the column heading buttons to sort by ascending/descending order.
Data sets are queries that can be used group communication recipients. For example, you or your campus support team can create and upload a query that includes student names, email addresses, graduation dates, and majors. That data set can then be used to send math majors a communication about an upcoming mathlete competition and English majors an email about the Shakespeare Festival.
Note
Only those data sets you have permission to view are available. If you don't see a particular data set, contact your campus support team.
Click in the Data Set field to see a list of data sets you can select.
Select the appropriate data set.
Click Select. The contacts included in the data set appear.
Note
The contact list may vary if a recipient no longer meets the query conditions. For example, if you have a data set that queries enrolled students and a student drops out, they'll no longer appear in the recipient list.
Click the + icon to view more detailed information about the contact.
Note
Filter contacts by status to see who has validated contact information and identify contacts with invalid or risky contact information.
Email addresses are sent to SendGrid for validation. SendGrid confirms the email address is in a valid format and verifies the domain has a valid Internet presence, is a reputable address, and if they successfully delivered email to that address in the past.
SendGrid is an industry leader, and the validation process leverages their expansive data on email validity and delivery success rates.
Note
As of J1 Web Version 2022.1, SendGrid includes 2,500 free email address validations per month with the Jenzabar-recommended Pro 100 subscription. Additional validations cost $.01 per validation. For detailed pricing information, see SendGrid's Email Address Validation API article: https://sendgrid.com/solutions/email-api/email-address-validation-api/
Email addresses that have already been validated are shown and can be removed to save you from potentially incurring unnecessary expenses.
Note
Filter contacts by status to see who still hasn't been validated.
Click in the Data Set field and select the query that generates the contact list you want to work with.
Click Select. The contacts included in the data set appear.
To validate all the email addresses in the list, select the All checkbox. To validate email addresses for specific individuals, find them using sort and filter options and select the checkbox next to their ID.
From the Options drop-down, select Validate email. The Validate Email? window appears showing the list of email addresses to be validated, email addresses that have previously been validated, and recipients missing an email address for the default contact type.
Click in the Email Address Contact Type field and select an available contact type.
Click the Select button. Contacts in your system that meet the data set criteria are shown.
To remove previously validated email addresses, click the x icon next to their name in the Already Validated section of the window.
Click Yes, validate. Once the email address validation process completes:
The Validate Email? window closes and Communication Contacts validation results page appears. Email status indicators appear next to the email addresses for the individuals in the list that completed the validation process.
The following information is updated for each verified individual's email address in J1 (J1 Web, Person Information Details page and Desktop, Name Entity window): Verification Status and Date Confirmed.
Phone numbers are sent to Twilio for validation. Twilio confirms the phone number is in a valid format and SMS capable.
Note
As of J1 Web Version 2022.1, Twilio charges $.005 per validation to your account. For detailed pricing information, see Twilio's Lookup API article: ttps://www.twilio.com/lookup. Phone numbers that have already been validated are shown and can be removed to save you from potentially incurring unnecessary expenses.
Note
Filter contacts by status to see who still hasn't been validated.
Click in the Data Set field and select the query that generates the contact list you want to work with.
Click Select. The contacts included in the data set appear.
To validate all the phone numbers in the list, select the All checkbox. To validate phone numbers for specific individuals, find them using sort and filter options and select the checkbox next to their ID.
From the Options drop-down, select Validate phone number. The Validate Phone Number? window appears showing the list of phone numbers to be validated, numbers that have previously been validated, and recipients missing a phone number for the default contact type.
Click in the Phone Contact Type field and select an available contact type.
Click the Select button. Contacts in your system that meet the data set criteria are shown.
To remove previously validated phone numbers, click the x icon next to their name in the Already Validated section of the window.
Click Yes, validate. Once the phone number validation process completes:
The Validate Phone Number? window closes and the Communication Contacts page reappears. Phone number status indicators appear next to the phone numbers for the individuals in the list that completed the validation process.
The following information is updated for each validated individual's phone number in J1 (J1 Web, Person Information Details page and Desktop, Name Entity window): Verification Status, Date Confirmed, SMS Capable, Country Code, Phone Carrier, and Mask.
Click the Create Contact button. The Create Contact window appears.
Enter the new contact's first and last names, and click the Next button.
Enter the new contact's email address and phone number, and select the phone type.
Click in the Data Set field and select the query that generates the contact list you want to work with.
Click Select. The contacts included in the data set appear.
To send the communication to everyone in the list, select the All checkbox. To send the communication to specific individuals, find them using sort and filter options and select the checkbox next to their ID.
From the Options drop-down, select Send communication. The Create New Communication window appears.
From the Communication Type, select Email or Text.*
*Text option is available with Communications Plus.
Select an Interaction Code, Name / Description from the drop-down.
Select the email address or phone number you want to send the communication from.
If you are sending an email, enter your Subject.
Enter your message in the Body field.
To add a hyperlink:
Click the link icon
 .
.Enter the URL.
Add an optional Text to display and Title.
From the Open link in... drop-down, select Current window or New window.
Click Save.
To add an attachment, click Attach file, navigate to and select a file.
Click Send.
Click in the Data Set field and select the query that generated the contact list you want to work with.
Click Select. The contacts included in the data set appear.
Use the filter and sort options to find the individual.
Click their name link. The recipient information pop-up appears.
To create an email, note, text, or To Do communication for them, click the Create communication button.*
*Text option is available with Communications Plus.
To view additional information about the contact available with another data set, select it from the Change view drop-down.
Note
You can only select data sets classified as General Details. If there is additional information you'd like to view, work with your system administrator to create and upload queries with that information and classified as 'General Details View' data sets (Data Sets page).
To view more detailed information, click their name to link to their Person page. If their name doesn't have a link, they might be an external person or inactive in the system.
Communication analytics include information about how many text and email messages were delivered, opened, re-subscribed, processed, failed, bounced back, marked as spam, and rejected which can show communication effectiveness and identify delivery issues.
Click in the Data Set field and select the query that generated the contact list you want to work with.
Click Select. The contacts included in the data set appear.
Use the filter and sort options to find the individual.
From the Actions drop-down, select Communication Analytics. Analytic information for the selected individual is shown. Click on a link to see additional information and a preview of the interaction.
Note
Totals reflect the total number of times the initial message was sent. Open tallies the number of times the messages were opened, which could be multiple times.
Analytical information for text messages is limited because SMS has tracking limitations.
*Available with Communications Plus.
A recipient's communication feed shows all their email, notification, note, and text communications in chronological order.
Click in the Data Set field and select the query that generated the contact list you want to work with.
Click Select. The contacts included in the data set appear.
Use the filter and sort options to find the individual.
From the Actions drop-down, select Communication Feed. The communication feed appears where you can see all the interactions available for the selected individual. Click on an interaction to see detailed information and related comments.
*Available with Communications Plus.
A recipient's interaction inventory lets you see all the all interactions associated with them. You can also view their Notepad archive, which shows the current and past notepad actions associated with them.
Click in the Data Set field and select the query that generated the contact list you want to work with.
Click Select. The contacts included in the data set appear.
Use the filter and sort options to find the individual.
From the Actions drop-down, select Interaction Inventory. The Interaction Inventory page appears in a new tab where you can see the interactions associated with the selected individual.
Information and options on the recipient page vary depending on if they are a student, staff, faculty member, etc. Generally, you can see contact information and access more detailed information.
Click in the Data Set field and select the query that generated the contact list you want to work with.
Click Select. The contacts included in the data set appear.
Use the filter and sort options to find the individual.
Click their name link. If their name doesn't have a link, they might be an external person or inactive in the system.
*Available with Communications Plus.
The information you see for contacts is determined by the data set you select. Because data sets contain different fields, the information varies.
The field label used in the data set query. Labels can make fields more easily recognizable.
The data sets available vary according to the ones your school has in the system and to who has access to them. Data sets are managed in the Campus-wide Definitions hub, Data Sets page. If you don't see a particular data set, contact your module manager or campus support team.
Once an email address or phone number is validated by SendGrid or Twilio, the status is updated to Valid. Recipients will still receive communications if they have verified contact information, but valid is an even higher-level verification status.