Student Aims
Use this page to maintain a student's aims. Aims are root-level advising requirements (ARCs) such as major, minor, and a general education requirement. A student aim is an aim assigned to a student. They're assigned automatically when a student is assigned a major, minor, concentration, or certification program in Registration.
The student aims appear in trees. In fact, they're copies of advising trees. The top level is the root, and the lower levels are groups and courses.
You can reach the Student Aims page from several locations.
The Advising Administration hub options
A student's Summary page Student drop-down
The Manage Advisees page Actions drop-down
If a student isn't already selected, use the Student / ID field to select a student.
Use the Student Aims Filter to find the aims you want to administer.
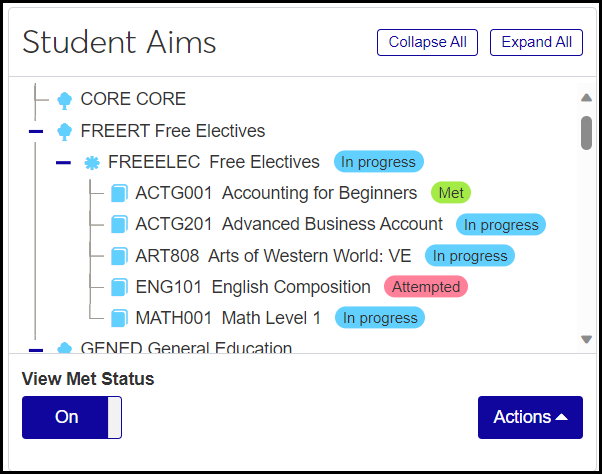
The aims appear in a tree. Use the Expand  and Collapse
  icons or the Collapse All and Expand All buttons to navigate in the tree. You can also double-click an aim to view its advising requirements (ARCs).
Tip
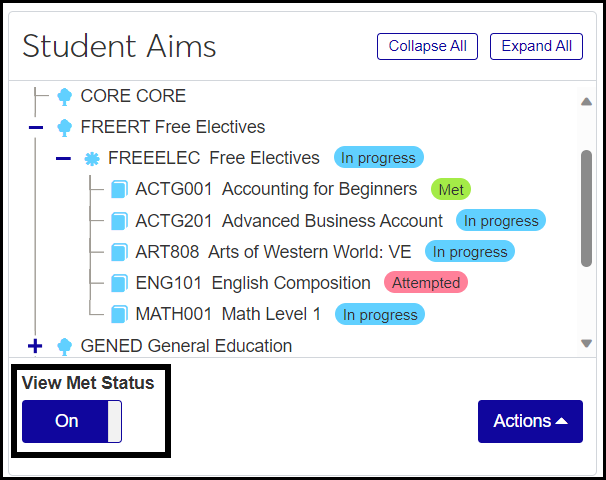
Click the View Met Status button to turn it on. Badges appear showing whether aims are met, in progress, or attempted. (Attempted means the course was taken but not completed with a grade that satisfies the requirement.)
The page has several areas.
Student / ID: Select the student whose aims you want to administer.
Student Aims Filter: You can narrow the list of a student's aims by Advising Requirement (ARC), Advising Requirement Type, Alterations (yes or no), and/or Status.
The Student Aims tree
The Detail panel: This shows details for the selected aim or ARC.
When you click a node in the tree, the Detail panel appears.
Aim Details
Type: The Aim Label Type (such as Root or Course Total Requirement)
Relation: AND or OR
Required: Yes or No
Aim Label: The sort of aim (such as Admin, Major, or Free Elective). These are the labels in the main nodes of the tree. Aim Labels are defined on the Aim Label Definitions page.
Status: Active, Inactive, Prospective, and Other
Year: The academic year the aim applies to. When an aim is assigned automatically this defaults to the Advising Requirement Year from the Student Information Details page, Program tab (degree_history.adv_tree_yr_cde).
Note: Up to 30 characters
Primary: You can select one aim as the primary. If an aim is already selected as primary, it becomes deselected if you select another one.
Date and Options
Print Order: Positive integers 1–999. The smallest number has the highest priority. This sets the sequence for aims in the Advising Worksheet.
Start Date: Select from the date picker. Start and End Dates are when the aim applies to the student.
End Date: Select from the date picker.
Print: When this checkbox is selected, the aim is available to print.
Display: When this checkbox is selected, the student aim is available to display on other pages.
Requirement Status
Met: There are 3 options:
Met: The requirement has been completed.
Not Met: The requirement has not been completed.
In Progress: The requirement is in progress.
Reason Not Met: If the requirement isn't met, the reason stored on the Student Progress table (student_progress.req_err_cde) is displayed here.
Alteration: If there's an alteration on this aim, the Requirement Met By Type Definition description is displayed.
Transaction: Transfer, Local, or empty. The value indicates whether the requirement is being fulfilled by a transfer course or a locally taken course. If neither, this is empty. The values are pulled from the Student Progress table (student_progress.adv_trans_sts).
Summary: This lists earned and needed hours, counts, GPA, etc., for the selected item. Some of the fields display only under certain conditions.
Hours Earned: Up to 2 decimal places. 0.00–99.99.
Hours Needed: Displays if Hours Earned < Hours Needed. Up to 2 decimal places. 0.00–99.99.
Count Earned: Integers 0–99.
Count Needed: Integers 0–99.
Quality Points Earned: Up to 2 decimal places. 0.00–999.99.
Quality Points Needed: Displays if Quality Points Needed > 0. Up to 2 decimal places. 0.00–999.99.
GPA Earned: 4 decimal places. 0.0000–9.9999.
GPA Needed: Displays if GPA Needed > 0. 4 decimal places. 0.0000–9.9999.
Hours Attempted: Up to 2 decimal places. 0.00–99.99.
Hours in Progress: Up to 2 decimal places. 0.00–99.99.
Maximum Hours: Displays if Hours Max > 0 and Hours Earned < Hours Needed
GPA Hours: Up to 2 decimal places. 0.00–99.99.
Grade Scale Needed: Values come from the Grade Scale Definitions page. Available only for courses and cumulative courses.
Credit Type Needed: Values come from the Credit Type Definitions page. Available only for courses and cumulative courses.
Grade Needed: Values come from the Grade Definitions page.
Requirements Needed: Displays if Count Earned < Count Needed.
Maximum Requirements: Displays if Count Max > 0 and Count Earned < Count Needed.
For ARCs, the Detail panel shows only the Requirement Status and Summary information.
In the Student Aims section of the page, the Actions drop-down gives you access to several features. The table below shows which features are available depending on whether a root, group, or course is selected.
Root | Group | Course | |
|---|---|---|---|
Add aim: Opens the Add Aim pop-up |  | | |
Create alteration: Opens the Create alteration panel | | | |
Print: Opens a Student Progress Report pop-up to generate a report on the selected item in the Student Aims tree. | | | |
Reuse and Priority: Opens the Reuse and Priority pop-up showing every aim containing the selected ARC. You can edit their priorities for this student. Editing the priorities is a kind of alteration. | | ||
Delete Aim: Opens the Delete Aim pop-up to let you delete the aim from this student's aims. | |
The Reporting and Processes drop-down gives you access to the Compute Student Progress process and the Advising Worksheet report.
The Options drop-down gives you access to other pages (which open in a separate tab):
Advising Alterations: This option is available only if you have permission to manage alterations.
Advising Trees: The option is available only if you have permission to the Advising Trees page.
Student Section List: The option is available only if you have permission to the Student Section List page.
The corresponding Desktop location is the Maintain Student Aims window. Access it from the Maintain Advisees window right-click menu.
Data is stored on the Student Progress (student_progress) table. The Student Progress table is a copy of the Student Aims (stud_aims) table applied to the invididual student.
The description (stud_aims.aim_desc), such as "Biology Minor" or "Free Electives" is populated with the Advising Requirement Description from the selected requirement on the Advising Requirement (advising_requirement) table.
From the Advising Administration hub:
In the Hub options drop-down, select Advisees and then Student Aims. The Student Aims page opens.
From the Manage Advisees page:
In the Actions drop-down on an advisee's row, select Student aims. The Student Aims page opens with the student already selected.
From a student's Summary page:
In the Person options drop-down, select Student and then Student and then Student aims. The Student Aims page opens with the student already selected.
If a student isn't already selected, then in the Student / ID field, begin typing a name or ID number, and select a student from the list.
Click Apply. The Student Aims panel populates.
To narrow the list of aims, use the Student Aims Filter.
To see the status of aims and ARCs, click the View Met Status button to turn it on.
To navigate the aims tree, click the Expand
and Collapse icons. (You can also double-click to expand and collapse.)To see details for any item in the tree, click on the item. Details appear in the Detail panel.
In the Actions drop-down, select Add aim. The Add Aim pop-up opens.
Enter information in the fields.
Year: Select the academic year that the aim should apply to. Required.
Select an Aim Label. Required. All active aim labels are available.
Requirement: Select an ARC. Required. (ARCs with a Cluster of Root, Course Total, or Other are available.)
Select a Status: Active, Inactive, Prospective, or Other. Required.
Start and End Date: Use the date picker to select dates.
Print Order: Enter a number 0–999.
Primary: Select the checkbox to make this the primary aim. (Enabled only if no other aim is marked as primary for this student.)
Select Print to make the aim available to print.
Select Display to make the aim available for to assign to students.
Note: Enter a note of up to 30 characters.
Click Save.
Click an item in the tree to select it.
In the Actions drop-down, click Create alteration. The Create Alteration panel opens.
Fill in the fields.
In Met By, select a Requirement Met By Type.
If your Met By selection is a substitution, then in the Substitution Requirement, select a requirement.
For substitutions, the Show all course requirements checkbox is enabled. Select it to display all possible course and cumulative courses in the drop-down.
If you leave Approved By blank, an administrator can approve your alteration on the Advising Alterations page. To approve it now, start typing a name or ID, and select from the list.
Tip
Fields related to approvals are available only if Use Approval Track for Alterations on the Advising Settings page is turned on.
In the optional Applied Date, Expiration Date, and Approved Date fields, click to open the date picker, and select a date.
In the optional Note field, enter up to 30 characters.
In the Overrides section, select values for each of the fields as needed.
Click Save.
If an item in the tree has an alteration, the Alteration button appears next to the item. If the alteration is approved, the button is plain with blue lettering. If the alteration is not approved, the button has a caution triangle, and the lettering is amber.
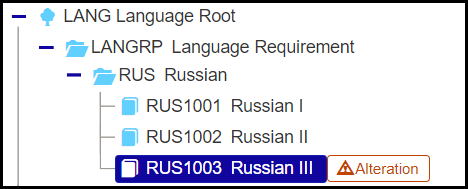
Click the Alteration button. The Alteration panel opens showing the information on the alteration.
To approve the alteration (if it's not already approved):
In the Alteration panel's Options drop-down, select Approve alteration. The Approve Alteration pop-up opens.
In Approver Name / ID, begin typing a name or ID, and select from the list.
Optional: Enter an Approval Date and Expiration Date.
Click Yes, approve.
To edit an alteration:
In the Alteration panel's Options drop-down, select Edit alteration. The fields become editable.
Make your changes, and click Save.
To delete an alteration:
In the Alteration panel's Options drop-down, select Delete alteration. The Delete Alteration pop-up opens with a warning that deletion can't be undone.
Click Yes, delete.
In the Student Aims tree for a student, select any item (a root, a group, or a course).
In the Actions drop-down, select Print. The Student Progress Report pop-up opens.
In the Report field, select a report layout. The Original report layout is provided by Jenzabar, and your school may have other reports available.
Click Generate PDF. The report for the selected root, group, or course opens in a new tab.
To print or save the report, use your browser's functions.
Tip
For more information, see the Student Progress Report topic.
Select a course (or cumulative course) in the tree.
In the Actions drop-down, select Reuse and Priority. The Reuse and Priority pop-up opens showing each aim that the selected course appears in.
To edit the information, click the Edit Priority button. You can edit Priority 1, Priority 2, and the Bypass field.
A message warns you that editing any of these fields amounts to an alteration. Click Yes, alter requirements. The alteration is added to the aim.
Select an aim label in the tree.
In the Actions drop-down, select Delete aim. The Delete Aim pop-up opens with a warning that the deletion process can't be undone.
Click Yes, delete.
In the Reporting and Processes drop-down, select Compute Student Progress. The Compute Student Progress pop-up opens.
See the Compute Student Progress topic for complete instructions and information on when to run the process.
In the Reporting and Processes drop-down, select Advising Worksheet. The Advising Worksheet Report pop-up opens.
Select a report, and click Generate. The report opens in a new tab. See the Advising Worksheet topic for more information about the report.
In the Options drop-down, click Advising alterations. The Advising Alterations page opens.
See the Advising Alterations topic for complete instructions.
In the Options drop-down, click Advising trees. The Advising Trees page opens.
See the Advising Trees topic for complete instructions.
In the Options drop-down, click Student section list. The Student Section List page opens.
See the Student Section List topic for complete instructions.