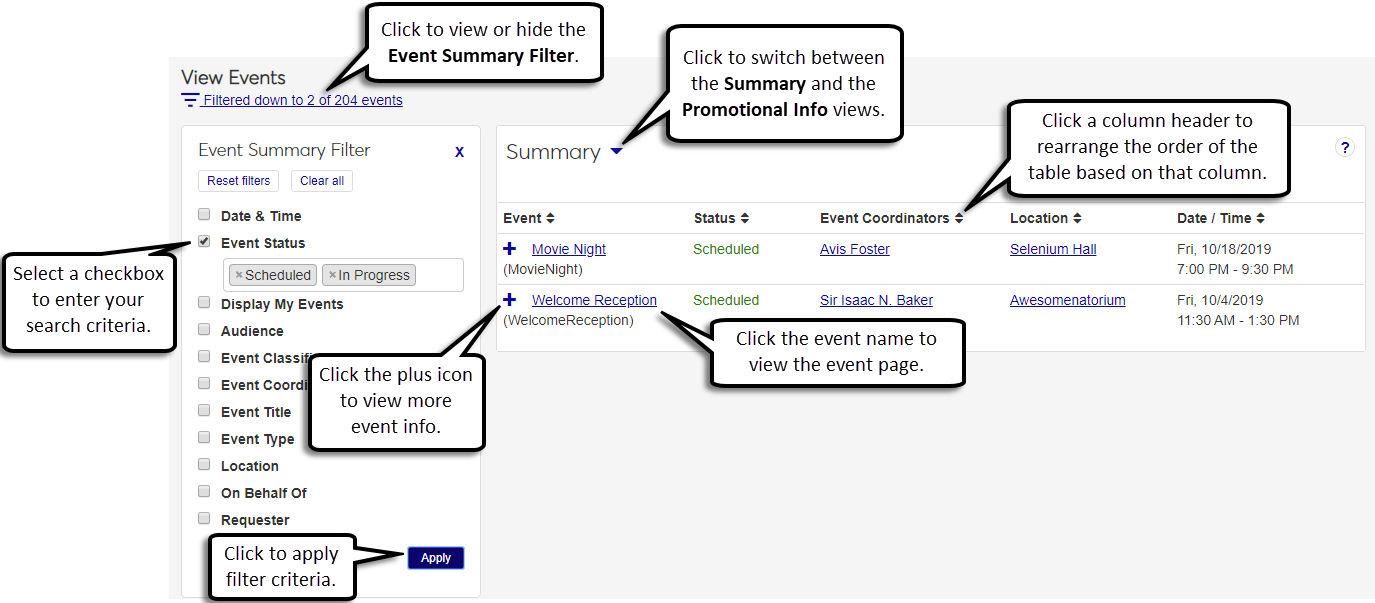
View Events
Use this page to review full and filtered lists of events. You can see the general event information, filter events to view only those you need, and access additional information about the event.
Tip
When you select the View My Events option from the Hub options, the View Events page opens with a filter to only show events that you are associated with.
Event Views
The View Events page has two views. You can change the views by selecting the view you want from the view drop-down in the top-left corner of the View Events table.
Summary - This view allows you to view basic event information such as the event status, event type, audience, event coordinators, who the event is hosted by, location and date/time.
Promotional Information - This view allows you to view the event promotional information that is displayed on your school's Campus Portal calendars (JICS). Using the Options in the Promotional Info view, you can also quickly add or remove events from Campus Portal calendars and determine the date the event will begin displaying on those calendars.
Important
You must be assigned to a role with Can promote events permission to add events to Campus Portal calendars.
Note
When you update Promotional information for a recurring event, the change is applied to every occurrence in the recurring series.
Event Summary Filter
The Event Summary Filter allows you to filter through the list of events with a variety of search criteria so you can find specific events.
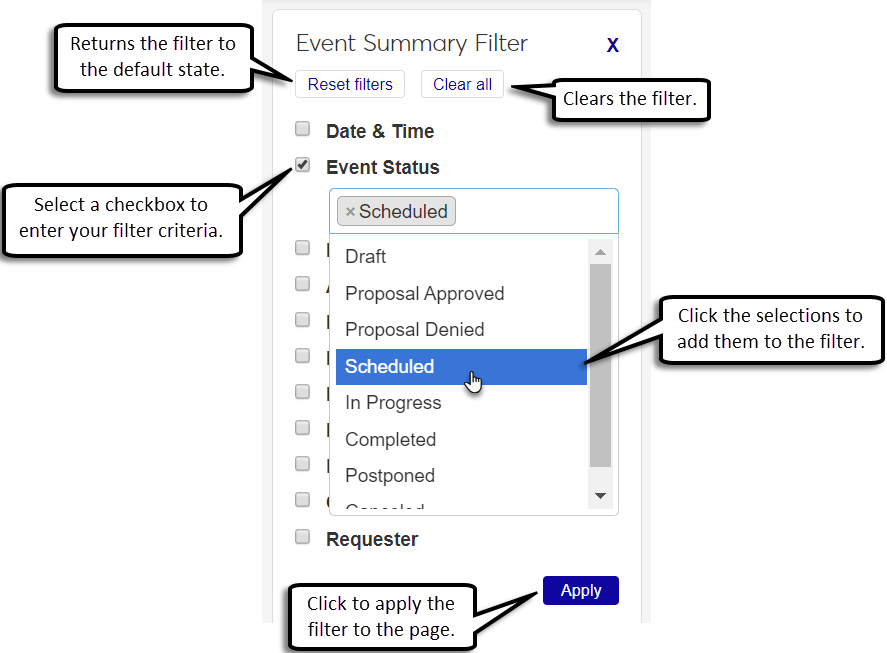
Click the Filter icon if the filter is not displayed.
Select the checkbox for the search criteria you want to filter by. A field appears below.
Click the field below the checkbox.
If a drop-down list appears, add a selection to the filter by clicking the selection. The selection appears in the criteria field. To remove a selection from the filter, click the x next to the selection.
If the field is a keyword search, type the information you wish to search by into the field.
If the field is a typeahead name search, begin typing the name into the field and select a name from the drop-down.
Click Apply to apply the filter to the page.
Tip
Click Reset filters to return the filter to the default state, or select Clear all to clear filters.
Locate the appropriate event.
Click on the name of the event to open the Event page.
Locate the appropriate event.
Click on the event coordinator's name to open the event coordinator's page and see contact information.
Click the view drop-down and select the Promotional Info view.
Note
If you are in the Summary view, the view drop-down will read, Summary. If you are in the Promotional Info view, the view drop-down will read, Promotional Info.
Click the view drop-down and select the Promotional Info view.
Select the checkboxes of the events you want to add to your school's Campus Portal calendars.
Click the Options drop-down and select Add events to calendars.
Enter the Campus Portal calendar name in the Promotional Calendars (Campus Portal) field and select the calendar name from the drop-down.
Click the Event Display Start Date field and select the date from the drop-down calendar.
Switch the Event Display to On.
Click Update.
Click the view drop-down and select the Promotional Info view.
Select the checkboxes of the events you want to remove from your school's Campus Portal calendars.
Click the Options drop-down and select Remove events from calendar to open the Calendars Displaying Selected Events pop-up.
In the Promotional Calendars (Campus Portal) field, click the x next to the calendar name to remove it.
Click Update.
Click the view drop-down and select the Promotional Info view.
Find and select the checkboxes of the events you wish to turn the display on/off.
Click the Options drop-down, then select Turn event display on/off.
Click the Event Display Start Date field in the Turn event display on/off pop-up.
Select the date the event will begin displaying on the Campus Portal promotional calendars.
Click the Event Display option to On or Off.
Click Update.
You can filter events by the criteria below.
Date & Time - Filters events by their Start Date / Time and End Date / Time.
Event Status - Filters events by their scheduling status (e.g., Postponed, Scheduled, or In Progress).
Display My Events - Displays events where you are the Event Coordinator or Requester.
Audience - Filters by the audience that the event is for. For example, if the event is a Private event, Campus-wide event, or Invitation-only event.
Event Classification - Filters by whether the event is a single event, multi-part event, or sub-event. Selecting multi-part event will only display main events and not their sub-events.
Event Title - Filters by a keyword search for the event title.
Event Type - Filters by the type of event, such as an Alumni or Fundraising event.
Hosted By - Filters by the event requester or who the event has been scheduled on behalf of.
Location - Filters by the campus, place, and space the event has been scheduled at. Once a campus is selected, the places within that campus will appear in the Place drop-down list. Once a place is selected, the spaces within that place appear in the Space drop-down list.
On Behalf Of - From the drop-down, select the type of entity the event was scheduled on behalf of (Individual/Organization, Department, etc.). Another field may appear below based on your selection:
Name - The name of the person or organization who requested the event.
Department Name - The name of the department that requested the event.
Student Group Name - The name of the student group that requested the event.
Requester - Filters by the event requester.
If you are in the Promotional Info view, the following will also display:
Promotional Name - Filters by the promotional name for the event.
Promotional Calendars - Filters by the promotional Campus Portal calendars the event has been added to.
Promotional Calendar Tags - Filters by the promotional calendar tags that have been added to the event.
Promotional Point of Contact - Filters by the promotional point of contact for the event.
An event's status is its scheduling status. For example, an event status shows if the event is Postponed, Scheduled, or In Progress.
Calendar integration allows your school to share events created in J1 Web with Campus Portal calendars. Campus portal calendars are called promotional calendars in J1 Web. When you publish J1 Web events to promotional calendars, general event details, promotional information, and registration links are also displayed in the Campus Portal.
The event display allows you to determine whether or not the event will display on the event's designated Campus Portal calendars.
If an event does not have a location, a location has not yet been selected for the event. Add a location with the Edit location, date, and time link on the Review Event Details page.
N/A indicates the event is the main event of a multi-part event. Main events do not have locations, but their sub-events do.