Create Invoices
Important
Information and features vary according to the roles to which you belong and the permissions associated with those roles. For more information, contact your module manager or your campus support team.
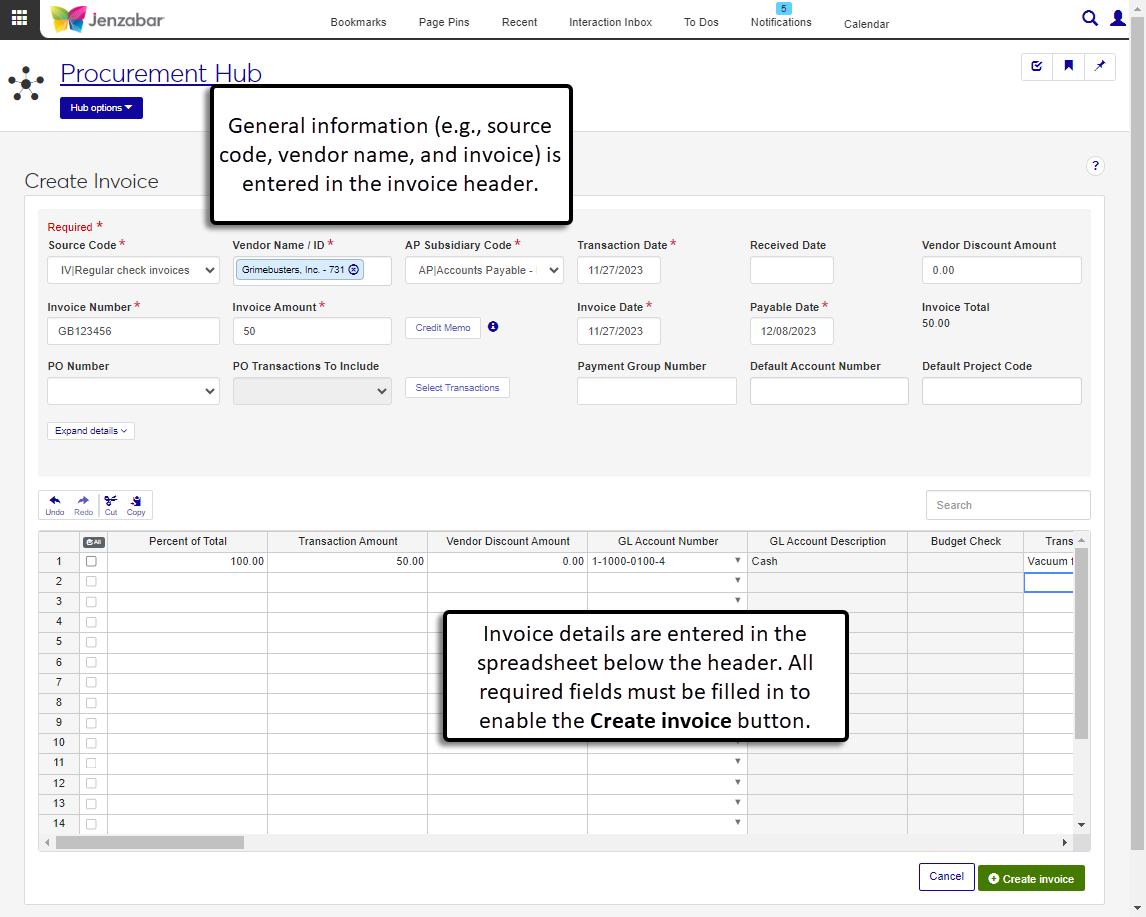
The Create Invoice page lets you add vendor invoices to the system for payment. You can create regular (IV), manual (MN), immediate check (IM), and refund (RF) invoices from this page. The visible and required header fields are dependent on the selected invoice source code. Invoice transaction details are added in the spreadsheet below the header.
To create invoices, you must be in a Procurement - Accounts Payable role with the "Can create invoices" permission. Additionally, you'll need to be in one of the General Ledger Accounting GL Account Access roles to add GL accounts to invoice line items. For more details about permissions and access to create invoices, see Roles and Permissions to Work with Vendors and Invoices.
You can also create invoices from the Desktop Create Vendor Invoices window (click New to open the Invoices window and enter invoice details).
The invoice header information is saved to the INVOICE_HEADER table, and the invoice details, including credit memos, are saved to the TRANS_HIST table.
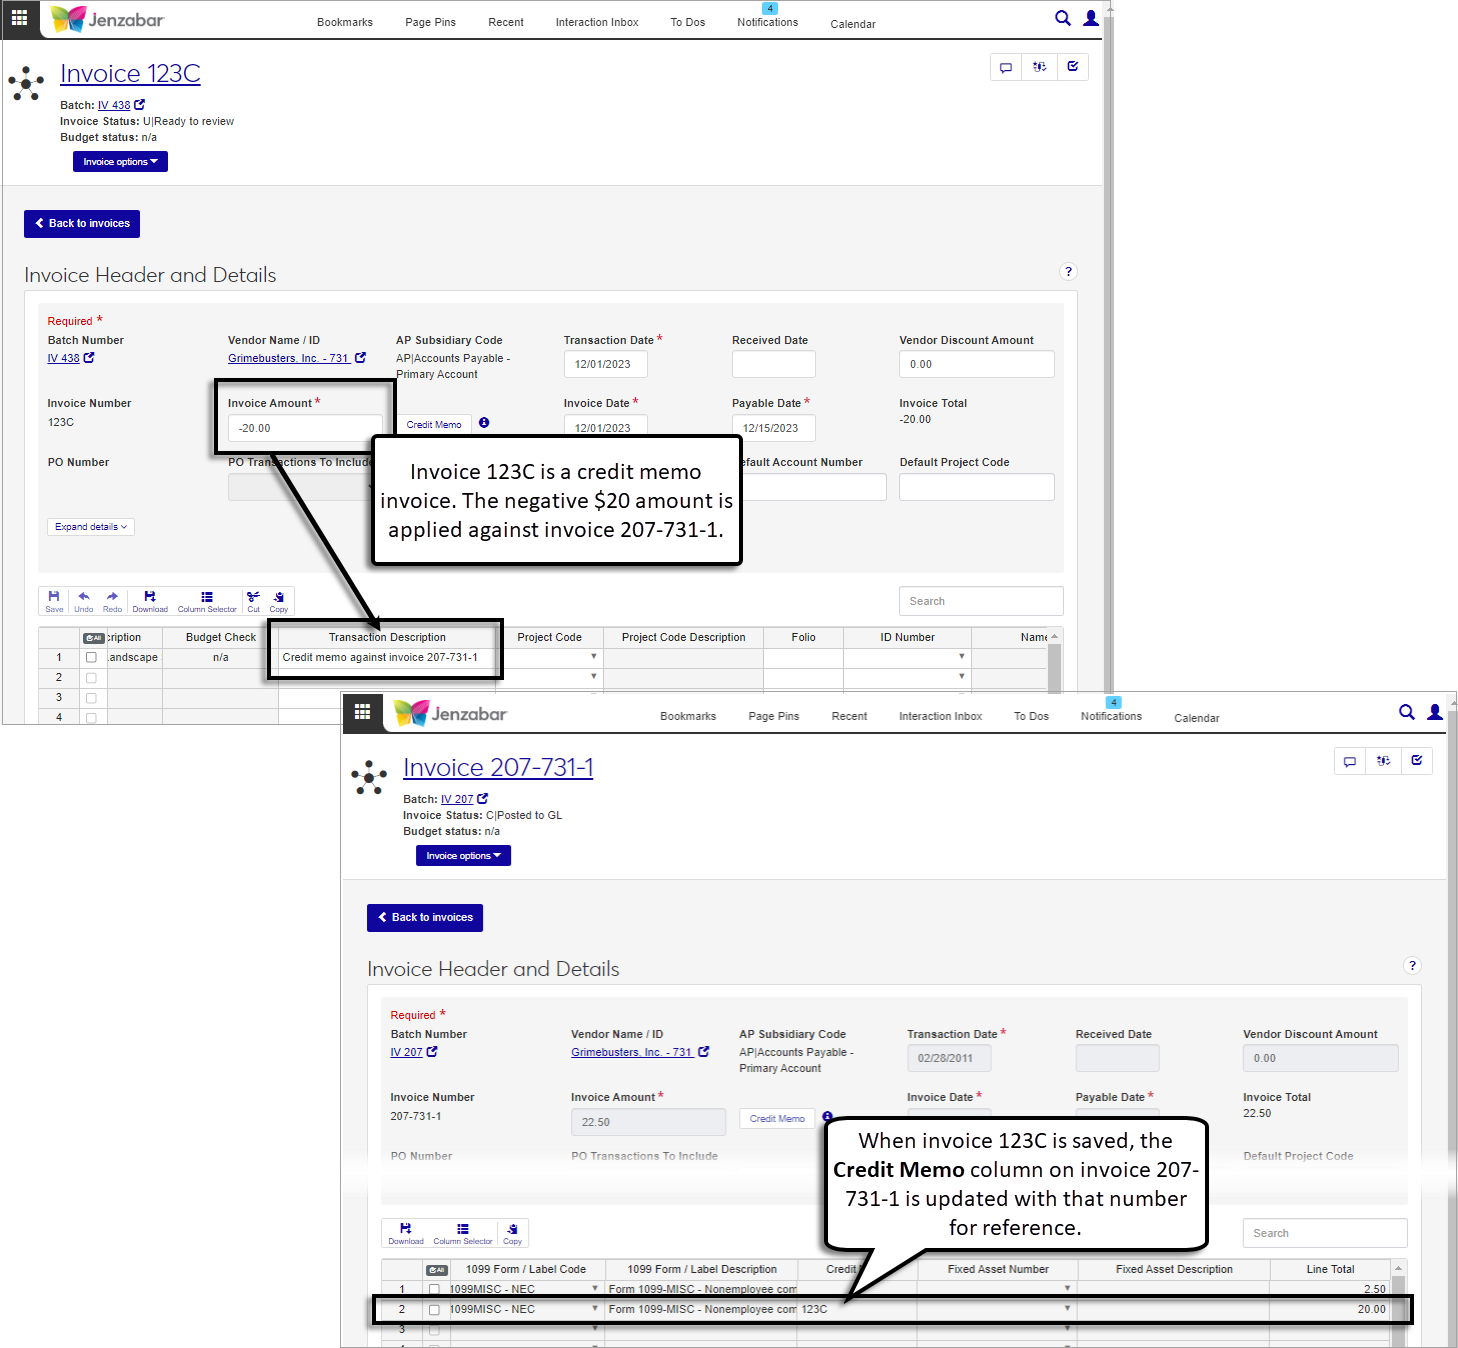
You may receive a credit memo invoice from a vendor that has provided goods that were unsatisfactory. To enter a credit memo, enter a negative Invoice Amount to enable the Credit Memo button. When you click the button, a pop-up lets you select the invoices the credit memo will be applied to. After the pop-up closes, the invoice details spreadsheet is updated with the transaction details for the selected invoices. When the credit memo invoice is saved, the Credit Memo column of the invoice it was applied to is updated with the credit memo invoice number.
Note
Additional transactions cannot be added to the details spreadsheet after credit memo invoices are added.
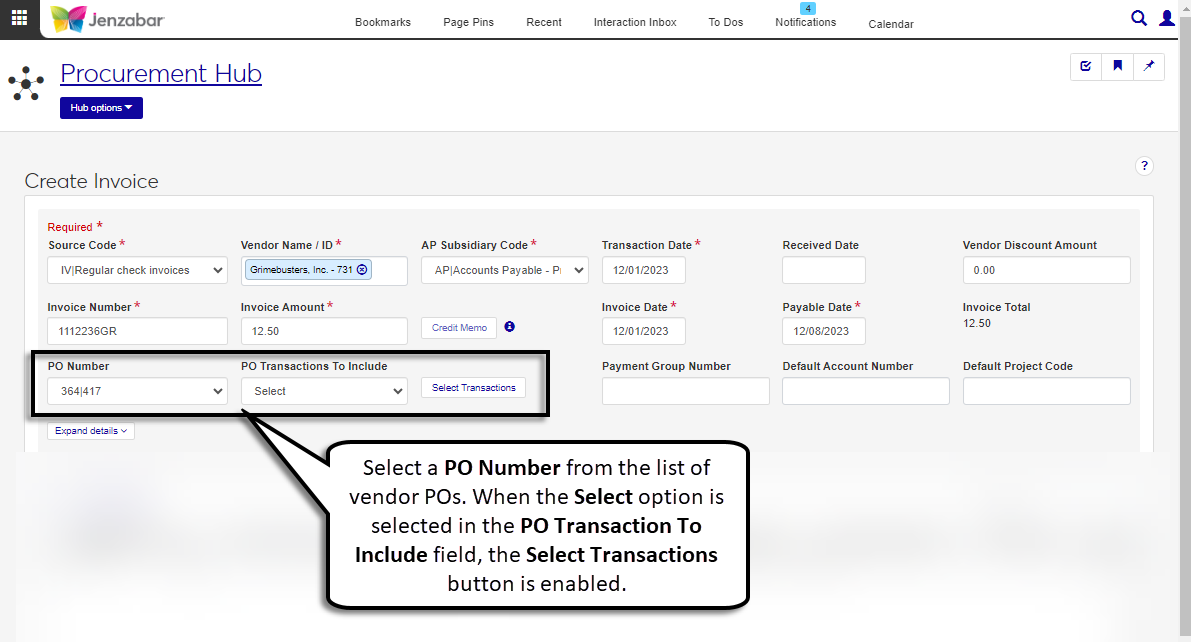
You can also create invoices for POs in your system. When you enter the vendor name, the PO Number drop-down is enabled and you can select from POs with a remaining balance for that vendor. Choose whether to include all the PO transactions or specific transactions. When the "Select" option is set for the PO Transactions To Include field, the Select Transactions button is enabled.
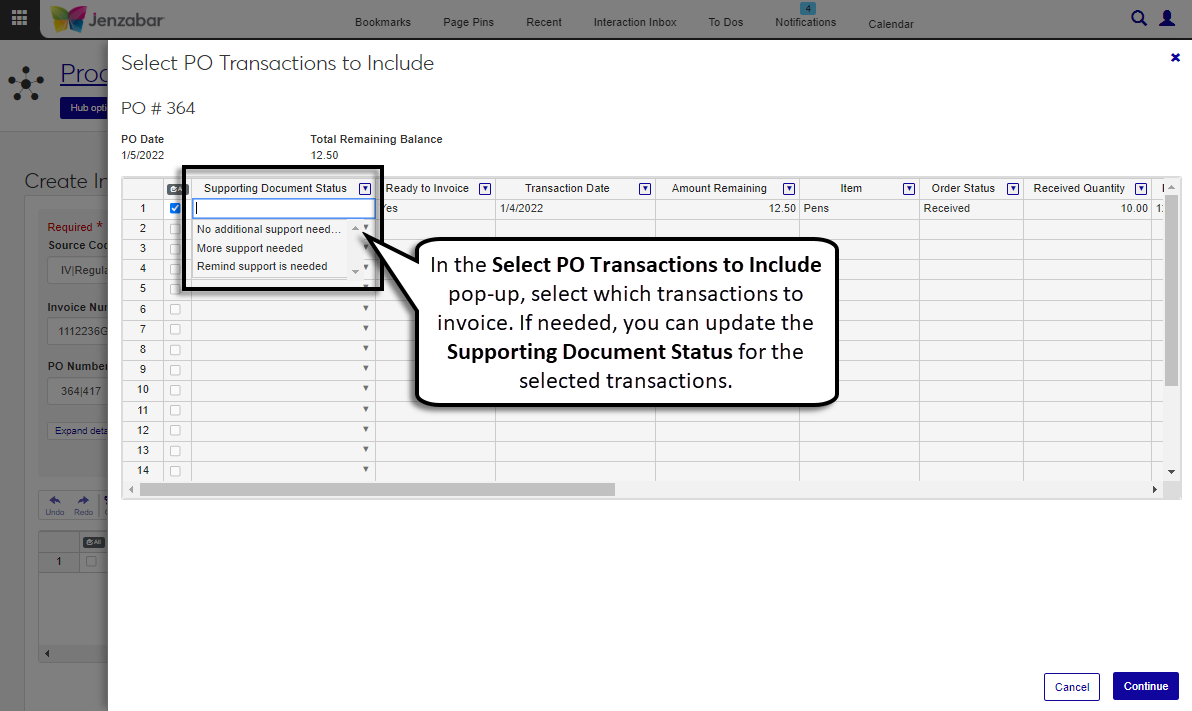
The Select Transactions button opens a pop-up that lets you select which transactions to include on the invoice and update their supporting document status.
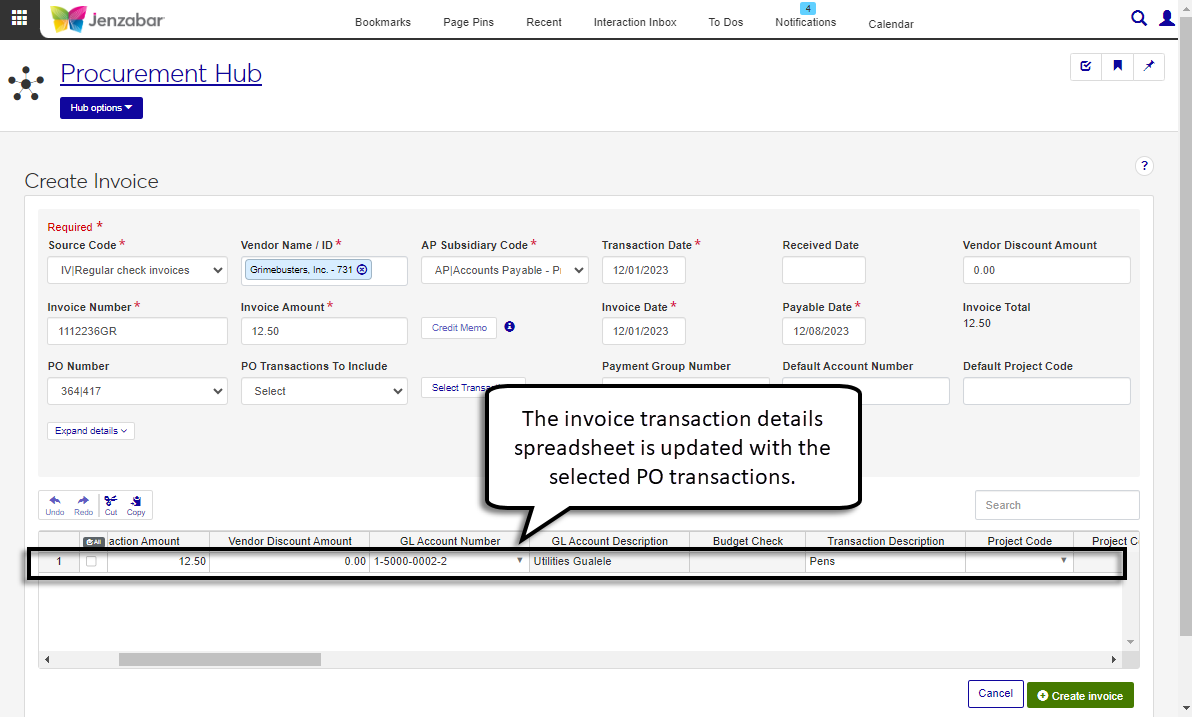
After PO transactions are selected, the invoice transaction details spreadsheet is updated with selected PO line items.
If you are configured for invoice budget checking ("Invoice Funds Check Warning" is set to Warning or Error on the A/P Configuration window), the Budget Check column is visible in the details spreadsheet. This column indicates whether the transaction is over, under, or on budget. When you click the Over budget/Under budget/On budget button, you can view budget information for the line item's GL account, such as unposted, posted, unencumbered, and available balances.
Note
This functionality is available for schools with the Fixed Assets license. You must also be in an Asset Management Fixed Asset Access role with the "Can submit assets" permission.
Schools that manage fixed assets can submit invoice line items for review to create capital assets. When a line item is selected, the Submit New Fixed Asset link on the spreadsheet toolbar opens a pop-up. After asset information is entered and submitted, the asset is added to the list for review in the Asset Management hub.
A few things to note about submitting assets from accounts payable:
At this time, you are not notified when assets are approved or denied.
The asset number associated with the line item is not removed when an asset is denied.
If you delete a line item or invoice associated with a fixed asset, the asset is not deleted from the system.
Invoices cannot be posted to the general ledger if they are associated with fixed assets that were denied.
The following fields are available in the header. Some are only visible or required for certain source codes. The "Source Code Availability" column in the table below indicates which source codes the field is visible for.
Note
Some fields visible in the Desktop Invoices window, Header tab are in a different place, labeled differently, or not yet available in J1 Web.
Group Number. In J1 Web, the Group Number is the Batch Number. The Batch Number is assigned when the invoice is saved and is visible on the Invoice Details page.
Source Code. In Desktop, "IV" is the default source code and can be changed by clicking Actions and selecting Regular, Immediate Check, Manual, or Refund from the drop-down. In J1 Web, the Source Code must be selected to start the process and can be changed at any time before saving. When the Source Code is changed, the header fields are cleared.
State Reporting Fields. J1 Web does not currently support State Reporting functionality or fields, so fields like Claim Type are not available in J1 Web. That functionality is planned for a future release.
PO Transactions to Include. In Desktop, this option is at the top of the window. In J1 Web, this field is located next to the PO Number. Similar to Desktop, clicking the Select Transactions button in J1 Web opens a pop-up where you can select which PO transactions to invoice.
Invoice Total, Invoice Amount, and Invoice Number. For clarity, J1 Web adds "Invoice" to the labels for the total, amount, and number fields.
Field | Description | Source Code Availability |
|---|---|---|
Source Code | Indicates the type of invoice being entered. Required. Available options:
| All |
Vendor Name / ID | The vendor associated with the invoice. Required. | All |
AP Subsidiary Code | The AP subsidiary code associated with the selected vendor for the invoice. Available options are all the AP subsidiary codes associated with the vendor. Required. | All |
Transaction Date | The date assigned to the invoice transactions in the spreadsheet. Must be within the current or future fiscal period. Default is today's date. Required. | All |
Received Date | The date the invoice was received from the vendor. This date may be different from the invoice date (e.g., invoice was dated 5/6 and was received for processing on 5/10). This date can be used for reporting, but is not used in any AP processes. | All |
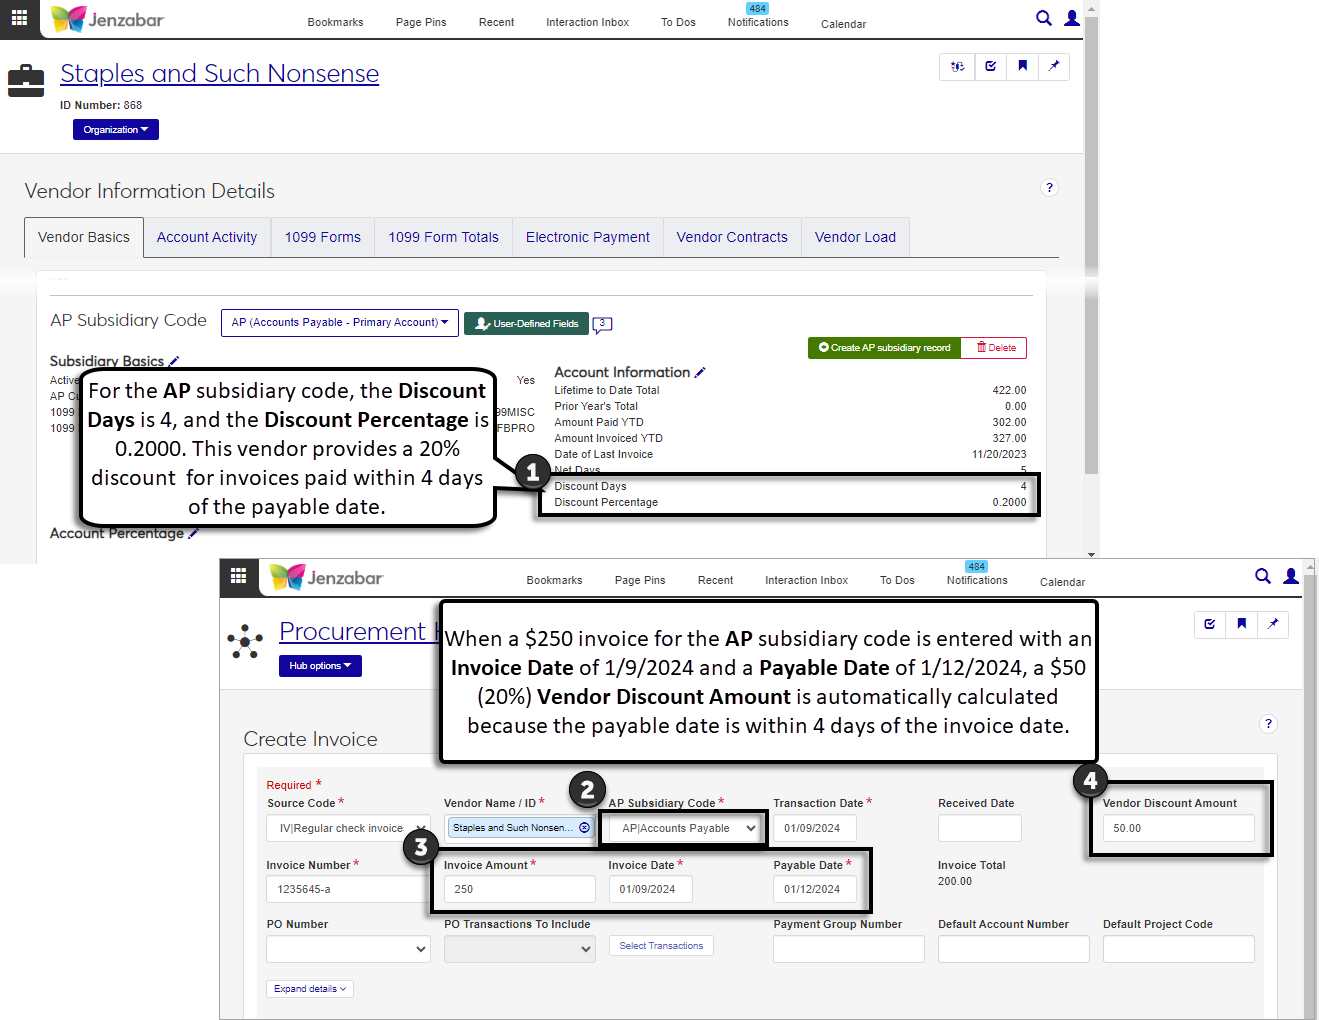
Vendor Discount Amount | The amount the vendor invoice is discounted. This can be entered manually, or it is updated automatically based on the Invoice Date and Payable Date when there are values entered in the Discount Days and Discount Percentage fields for the selected subsidiary code on the Vendor Information Details page. | IV, IM, MN |
Invoice Number | The unique invoice identifier assigned by the vendor. Required. | All |
Invoice Amount | The amount invoiced by the vendor. This must match the transaction total in the details spreadsheet. Required. | All |
Credit Memo | Visible when the "Allow Credit Memo Item Selection?" is selected on the Desktop A/P Configuration window and enabled when a negative Invoice Amount is entered. When clicked, a pop-up lets you select the invoices to apply the credit memo to. The invoices selected for the credit memo are added to the transaction details spreadsheet. | All |
Invoice Date | The date on the vendor invoice. Must be within the current or future fiscal period. Default is today's date. Required. | All |
Payable Date | The date the invoice should be paid by. If the "Calc Invoice Payable Date Based on Vendor Terms?" checkbox is selected on the A/P Configuration window, this is automatically calculated by adding the Net Days (defined on the Vendor Information Details page for the selected subsidiary code) to the Invoice Date. You can also enter or change the date. Required. NoticeIf the Net Days is 30 and the Invoice Date is 1/12/2023, the Payable Date is 2/11/2023. | All |
Invoice Total | Displays the result of the Invoice Amount minus the Vendor Discount Amount as read-only text. | All |
PO Number | Select from the POs with a remaining balance that are associated with the selected vendor. POs are shown with the PO number followed by the PO Batch number. | IV, IM, MN |
PO Transactions to Include | The transactions from the selected PO that are included on the invoice. Options are All and Select (which lets you pick specific transactions). | IV, IM, MN |
Select Transactions | Enabled when PO Transactions to Include is set to "Select"; opens a pop-up where you can select transactions to invoice. When the pop-up closes, those transactions are added to the invoice details spreadsheet. | IV, IM,MN |
Payment Group Number | Unique 4-number identifier. When the same Payment Group Number is entered for multiple invoices, those invoices are combined into a single payment. If the Payment Group Number is left blank, each invoice is paid separately. | IV |
Payment Prefix | Identifies the bank account from which the payment will be made. Available options are defined on the Desktop Payment Prefixes - Setup Bank Accounts window. Required. | IM, MN |
Payment Number | Autofilled with the next check number for the selected payment prefix and can be manually updated if needed. Required. | IM, MN |
Default Account Number | An active GL account that is automatically assigned to each transaction added to the detail spreadsheet. Available GL accounts are dependent on your account access permissions. | All |
Default Project Code | An active project code that is automatically assigned to each transaction added to the detail spreadsheet. Available project codes are dependent on your project access permissions. | All |
Reference Number | A 9-character identifier that can be used to reference the invoice. This number is not used by any Jenzabar-provided processes or associated with the invoice's related POs or requisitions. | All |
Summarize on Payment Stub | A summary description of the invoice transactions (up to 40 characters). When a summary is entered, that text and the invoice total are printed on the check instead of the transaction details. When this field is blank, each transaction detail line is printed on the check. | All |
Payment Name | The name on the check. Defaults to the Vendor Name / ID. | All |
Address Code | The code assigned to the vendor's address. Default is the current address code for the selected subsidiary. The Payment Address Lines, Payment City, Payment State, and Payment ZIP Code are autofilled based on the selected address code. | All |
Payment Att Line | Identifies a specific person to route payment to. Default is the Attention Line identified for the address code. | All |
Payment Address Line 1, 2, 3 | The vendor's street address. Autofilled based on the Address Code. | All |
Payment City | Autofilled based on the Address Code. | All |
Payment State | Autofilled based on the Address Code. | All |
Payment ZIP Code | Autofilled based on the Address Code. | All |
Country | Autofilled based on the Address Code. | All |
Tax Refund Code | Visible when the "Grant Refunds?" checkbox is selected on the Desktop A/P Configuration window. Identifies the tax refund percentages and other items used to calculate tax refunds and indicates the kind of refund or rebate your organization will claim for taxes paid. Options are the Tax Refund Codes defined on the Tax Refund window. | All |
Note
Some columns visible in the Desktop Invoices window, Details tab are in a different place, labeled differently, or not yet available in J1 Web.
Create New Asset. J1 Web currently does not allow assets to be created from the Create Invoice page; this functionality is planned for a future release. If your school is licensed for Fixed Assets, you can associate invoice line items with an existing asset in the Fixed Asset Number column.
State Reporting Fields. J1 Web does not currently support State Reporting functionality or fields, so fields like Claim Type are not available in J1 Web. That functionality is planned for a future release.
Paste from Excel. In Desktop, you can use the Paste from Excel button to add detail rows. In J1 Web, you can paste rows from Excel by clicking in the detail spreadsheet and using the keyboard shortcuts (e.g., CTRL + V).
Column Name | Description |
|---|---|
Partial Order | Visible when a PO Number is selected. Select the checkbox if the remaining amount for the selected PO will only be unencumbered by the line item's transaction amount. When unselected, the remaining PO amount will be fully unencumbered regardless of the line item transaction amount. NoticePO 123 has a $50 remaining amount to be invoiced. The transaction amount for the line item is $40. If the Partial Order checkbox is selected, the PO will be unencumbered for $40 when the invoice is paid and the remaining $10 can be invoiced later. If the Partial Order checkbox is not selected, the PO will be marked as fully unencumbered and the remaining $10 cannot be invoiced later. |
Percent of Total | The percent of the total invoice amount covered by the line item. When entered, the system automatically calculates the Transaction Amount based on the Invoice Amount. |
Transaction Amount | The amount to be paid for the specific line item transaction. If the Percent of Total is entered, this is automatically calculated based on the Invoice Amount. If the Percent of Total is empty, this is entered manually. The total of all transaction amounts in the details spreadsheets must equal the header Invoice Amount. Required. |
Vendor Discount Amount | The amount subtracted from the transaction amount when there is a discount. If the Percent of Total is entered and a Vendor Discount Amount was entered in the header, this is calculated automatically. The total of all the discount amounts in the details spreadsheet must equal the header Vendor Discount Amount. |
GL Account Number | The expense account the transaction will be paid from. Autofilled when the Default Account Number is entered in the header, and can be manually updated. Available options are the GL accounts you have permission to access. Required. |
GL Account Description | Autofilled based on the description for the selected GL account. |
Budget Check | Visible when the "Invoice Funds Check Warning" is set to Warning or Error on the A/P Configuration window and the selected PO is within the current or future year. Indicates whether the transaction is over, under, or on budget. Click the button to view additional budget information for line item's GL account. |
Transaction Description | Describes the transaction details (up to 40 characters). Required. |
Project Code | The project the transaction is associated with. Autofilled when the Default Project Code is entered in the header. Available options are the project codes you have permission to access. |
Project Code Description | Autofilled with the description for the selected project code. |
Folio | Additional transaction information that can be used for later reference (e.g., a PO number). Up to 8 characters. This field is useful for reporting and is saved to the TRANS_HIST table. |
ID Number | The ID number associated with the transaction. Used when you manually enter student refund invoices. |
Name | Autofilled based on the ID Number. |
AR Subsidiary Code | The Accounts Receivable subsidiary associated with the transaction. Used when manually entering student refund invoices. |
AR Subsidiary Code Description | Autofilled with the description for the selected AR subsidiary code. |
Billing Period Identifier | The billing period associated with the invoice. Used when manually entering student refund invoices. |
Billing Period Description | Autofilled with the description for the selected Billing Period Identifier. |
Financial Aid Period Code | The financial aid period code associated with the transaction. Used when manually entering student refund invoices. |
Financial Aid Period Description | Autofilled with the description for the selected Financial Aid Period Code. |
1098-T Eligibility Flag | Indicates whether the transaction should be included in the 1098-T balance calculations. Used when manually entering student refund invoices. The following options are available: |
1098-T Eligibility Flag Description | Autofilled with the description for the selected 1098-T eligibility flag. |
1098-T Academic Year / Term | The year and term associated with the transaction. Used when manually entering student refund invoices. If a Billing Period Identifier is entered, the 1098-T Academic Year / Term should match the selected billing period. Required when an ID Number is entered. |
Year / Term Description | Autofilled with the description for the selected 1098-T academic year / term. |
AP Subsidiary Code | Autofilled with the AP Subsidiary Code selected in the header and can be changed. |
AP Subsidiary Code Description | Autofilled with the description for the selected AP subsidiary code. |
Billing Fee Code | The charge fee associated with the transaction. Used when manually entering student refund invoices. Available options are defined on the Charge Fee Definition window. |
Billing Fee Description | Autofilled with the description for the selected Billing fee code. |
Tax Refund Code | Visible when the "Grant Refunds?" checkbox is selected on the A/P Configuration window. Identifies the tax refund percentages and other items used to calculate tax refunds and indicates the kind of refund or rebate your organization will claim for taxes paid. Options are the Tax Refund Codes defined on the Tax Refund window. |
Tax Refund Description | Visible when the "Grant Refunds?" checkbox is selected on the A/P Configuration window. Autofilled with the description for the selected tax refund code. |
Tax Refund Amount | Visible when the "Grant Refunds?" checkbox is selected on the A/P Configuration window. Autocalculated when the tax refund code is selected. |
1099 Form / Label Code NoteThis column combines the Desktop Government Form Code and Government Label Code columns. | Indicates the 1099 form the transaction will be associated with. Default is the 1099 Form Code Default identified on the Vendor Information Details page, Vendor Basics tab. |
1099 Form / Label Description | Autofilled with the description for the selected 1099 form / label code. |
Credit Memo | Indicates whether a credit memo is attached to the invoice. |
Fixed Asset Number | Indicates that the invoice is associated with a capital asset. Assets in the Review or CIP status can be selected. |
Fixed Asset Description | Autofilled with the description for the selected fixed asset number. |
Line Total | Autocalculated by subtracting the Vendor Discount Amount from the Transaction Amount. |
Select Create Invoice from the Procurement Hub options or click the Create invoice button on the Invoice List page. The Create Invoice page opens.
Select a Source Code from the following options. The invoice header appears with the appropriate fields for the selected code.
IM (immediate check invoice)
IV (regular check invoice)
MN (manual check invoice)
RF (refunds from vendors)
Enter header information and click Expand details to view or update additional details. Visible header fields vary based on the selected source code, and the required fields are below. See the Header Fields section above for more information about each field.
Vendor Name / ID
Tip
The system updates the ID Number / Name field when you enter a full ID number and press Tab to move to the next field.
AP Subsidiary Code
Transaction Date
Invoice Number
Invoice Amount
Invoice Date
Payable Date
Payment Prefix (for IM and MN source codes)
Payment Number (for IM and MN source codes)
To add comments to the invoice header, click the Comment icon next to the Create Invoice title. The Comments pop-up opens.
Click New comment.
Enter your comment text.
Click the Attach button if you want to add an attachment.
Click Add.
To add invoice transactions from an existing PO:
Note
When invoice transactions are added from a PO, you cannot add other transaction lines to the invoice detail spreadsheet.
Select a PO from the PO Number field. POs with a remaining balance for the selected vendor are included in the list.
In the PO Transactions to Include drop-down, select All or Select.
When All is selected, the transaction details spreadsheet is autofilled with all the line items from the selected PO.
When Select is selected, the Select Transactions button is enabled. Click to open the "Select PO Transactions to Include" pop-up and select one or more transactions to add to the invoice.
Update the Supporting Document Status for selected transactions, if needed.
Click Continue. The transaction details spreadsheet is autofilled with the line items from the selected PO.
To enter invoice transactions manually, enter and select information in the details spreadsheet. The following columns are required. See the Line Item Detail Columns section above for more information about each column.
Transaction Amount
GL Account Number
Transaction Description
To add comments to line items, click the Comment icon for the row. The Comments pop-up opens.
Click New comment.
Enter your comment text.
Click the Attach button if you want to add an attachment.
Click Add.
Use the spreadsheet toolbar buttons to undo, redo, cut, and copy row information. You can also insert or remove rows with the right-click options.
Click Create invoice. The Invoice Created pop-up opens.
The Create another invoice under the same batch checkbox is selected by default. Deselect it if you don't want to create another invoice in the same batch.
Click Continue to open the invoice details page or the Create Invoice page, depending on the checkbox selection. An alert on the bottom of the page links to the invoice batch that was created.
Note
This option is only available when "Allow Credit Memo Item Selection?" is selected on the A/P Configuration window.
On the Create Invoice page, select a Source Code. The header fields become visible.
Enter information for the following header fields.
Vendor Name / ID
AP Subsidiary Code
Transaction Date
Invoice Number
Invoice Date
Payable Date
Payment Prefix (for IM and MN source codes)
Payment Number (for IM and MN source codes)
Enter a negative Invoice Amount to enable the Credit Memo button.
Click the Credit Memo button.
In the Credit Memo pop-up, select one or more invoices to apply the credit memo to.
Click OK when the total amount for the selected invoices equals the Credit Memo Invoice Amount and the Balance Total is $0. The transaction details spreadsheet updates with a row for each selected invoice.
Click Create invoice. The Invoice Create pop-up opens.
The Create another invoice under the same batch checkbox is selected by default. Deselect it if you don't want to create another invoice in the same batch.
Click Continue to open the invoice details page or the Create Invoice page, depending on the checkbox selection. An alert on the bottom of the page links to the invoice batch that was created.
Note
When the credit memo invoice is saved, the Credit Memo column for the invoices it was applied to are updated with the credit memo invoice number.
All fields are required.
From either the Create Invoice or Invoice Details page, select an item in the spreadsheet to be submitted as a fixed asset.
In the spreadsheet toolbar, click the Submit New Fixed Asset link. The Submit New Fixed Asset pop-up opens.
Enter a unique fixed asset Number.
Enter a Description.
Select an asset Type from the drop-down options.
Building
Equipment
Other
Vehicle
Select a Department.
Select a Class.
Click Submit asset. The asset is added to the list for review in the Asset Management hub, and the number is added to the Fixed Asset column for the line item.
The Credit Memo button is only enabled when a negative Invoice Amount is entered.
The Credit Memo is visible when the "Allow Credit Memo Item Selection?" is selected on the Desktop A/P Configuration window. Additionally, you must be in a Procurement - Accounts Payable role with the "Can issue credit memo" permission. If you need additional assistance,
When detail rows are added via the Credit Memo process or the Select PO Transactions process, the spreadsheet is updated based on the selections in the pop-up and additional detail rows cannot be added to the invoice spreadsheet.
Your school determines how assets should be categorized. Contact someone in your business office for more information.