Purchase Order Details
Important
Information and features vary according to the roles to which you belong and the permissions associated with those roles. For more information, contact your module manager or your campus support team.
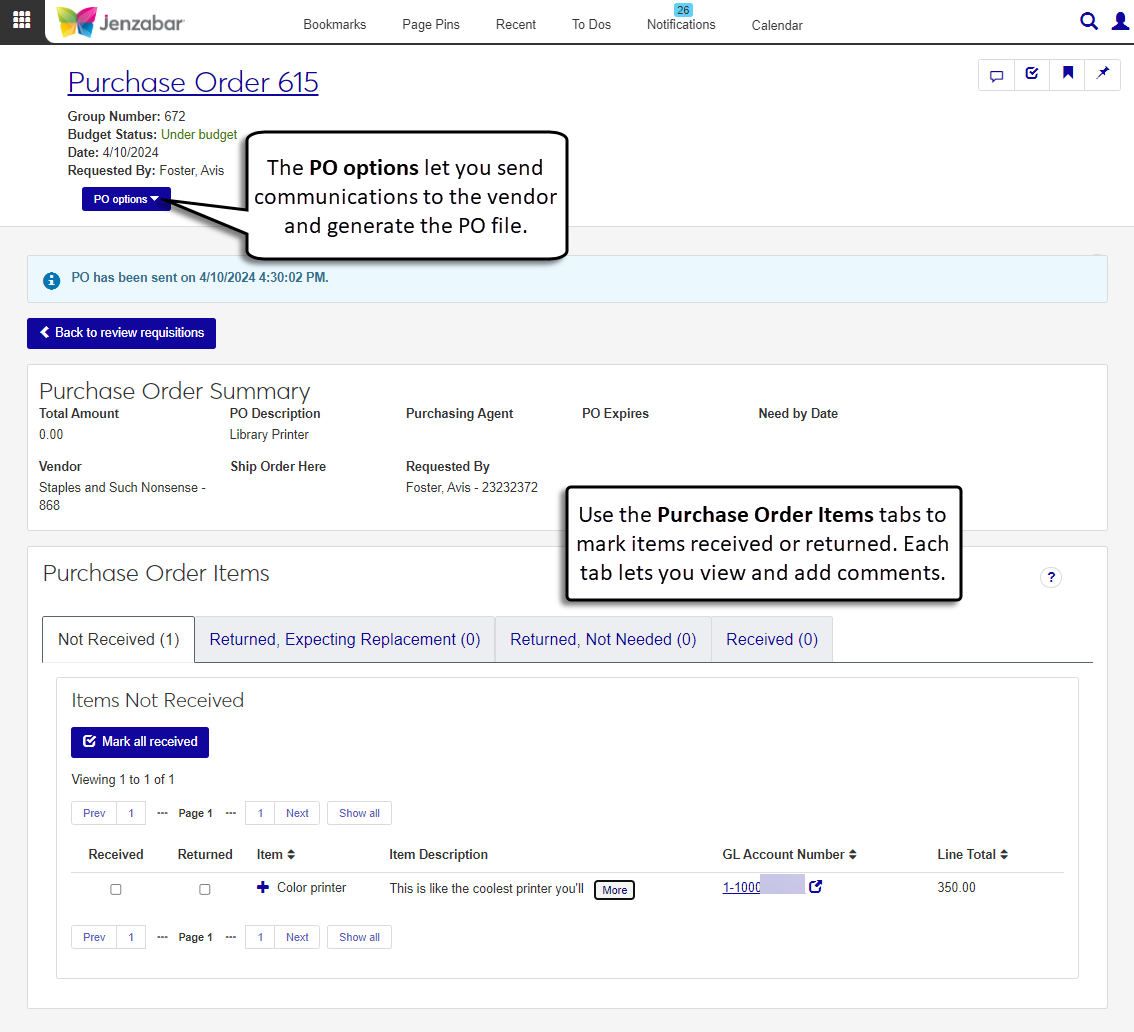
The Purchase Order Details page lets you view general purchase order (PO) information such as vendor, amount, and dates in the Purchase Order Summary. In the Purchase Order Items section, use the different tabs to mark items as received or returned.
From the PO options menu, you can generate the PO file and send communications to the vendor.
Note
To send emails in J1 Web, you must have a valid email address associated with your profile.
Permissions Required
To access the Purchase Order Details page, you must be in a Procurement - Purchasing role with the following permissions:
Can view purchase orders and generate reports
Can update purchase order line item receiving status
You'll also need access to GL accounts to view line items, so you must also have the "Can view only GL accounts enabled by associations (restricted)" permission and be in one of the following GL account access roles:
General Ledger Accounting GL Account Component Access
General Ledger Accounting GL Account Alternate Code Access
Note
These are the minimum permissions required to access and work with the Purchase Order Details page. Depending on your responsibilities, you may need additional roles and permissions. For more information about permissions to work with orders and requests, see Roles and Permissions to Work with Orders and Requests.
Tabs on the Page
The four tabs in the Purchase Order Items section categorize line items based on status. You can view and update item comments on each tab.
Not Received: Lists items that haven't been marked received. From this tab, you can receive or return the items.
Returned, Expecting Replacement: Lists items that were returned and will be replaced. From this tab, you can mark items received or not needed.
Returned, Not Needed: Lists items that weren't needed and were returned. From this tab, you can mark items as needing replacement.
Received: Lists items that have been received. From this tab, you can indicate if items were marked as received in error.
Access the Purchase Order Details page from the Review Requisitions page or from the Purchase Orders, Action Needed tab on the Orders and Requests page.
To mark all items as received:
On either the Not Received or Returned, Expecting Replacement tab, click Mark all received. The Mark All Items Received pop-up opens.
Review the items in the list and verify you've received all the items.
Click Mark all received. The Received tab updates with the list of received items.
To mark individual items as received:
On either the Not Received or Returned, Expecting Replacement tab, select the Received checkbox for an item. The Mark Item Received pop-up opens.
Enter the Number of Received Items. Required. This can be less than or equal to the item Quantity.
Click Mark received. The Received tab updates with the list of received items.
Access the Purchase Order Details page from the Review Requisitions page or from the Purchase Orders, Action Needed tab on the Orders and Requests page.
On the Not Received tab, select the Returned checkbox for an item. The Mark Item Returned pop-up opens.
Enter the Number of Returned Items. Required. This can be less than or equal to the Quantity.
Enter a Reason for Return. Required.
If you are expecting a replacement for the returned item, select the Expecting Replacement checkbox.
Click Mark returned. If the Expecting Replacement checkbox was selected, the Returned, Expecting Replacement tab updates to list the item. If the Expecting Replacement checkbox wasn't selected, the Returned, Not Needed tab updates to list the item.
Access the Purchase Order Details page from the Review Requisitions page or from the Purchase Orders, Action Needed tab on the Orders and Requests page.
On the Returned, Not Needed tab, select the Needs Replacement checkbox for an item. The Mark Item Needs Replacement pop-up opens.
Enter the Number of Replacement Items Needed. Required. This can be less than or equal to the item Quantity.
Enter the Reason for Replacement. Required.
Click Mark needs replacement. The Returned, Expecting Replacement tab updates to list the item.
Access the Purchase Order Details page from the Review Requisitions page or from the Purchase Orders, Action Needed tab on the Orders and Requests page.
On the Received tab, select the Did Not Receive checkbox for an item. The Mark Item Did Not Receive pop-up opens.
Enter the Number of Items Not Received. This can be less than or equal to the Quantity.
Click Mark did not receive. The Not Received tab updates with the list of items not received.
Note
Supporting documentation can be added to an item via the comment attachments.
Access the Purchase Order Details page from the Review Requisitions page or from the Purchase Orders, Action Needed tab on the Orders and Requests page.
For PO comments, click the Comment icon
 in the page toolbar at the top right of the page. For line item comments, click the Comments icon in the item list. (You may need to click the Expand icon
  to see the Comments icon.) The Comment pop-up opens.
Click New comment.
Enter your comment text.
Click the Attach button if you want to add an attachment.
Click Add.
Access the Purchase Order Details page from the Review Requisitions page or from the Purchase Orders, Action Needed tab on the Orders and Requests page.
Click PO options at the top left of the page and select Generate Report. The Generate Report pop-up opens.
The Purchase Order Layout is set to <Original> by default. If your school has customized the report layout, those options are also available for selection.
The Group Split PO Line Items checkbox is deselected by default. Select the checkbox if you want line items that are split between multiple GL accounts to appear as a single line on the PO.
The Mark as Sent to Vendor checkbox is selected by default. When selected, a note on the PO details page displays the date and time the report was marked as sent.
Select the File Format for the report. The default format is PDF, but you can select additional file formats, including HTML, XSLX, and others.
Click Yes, generate. The file either appears in a new browser tab or downloads to your machine.
Note
You can select different types of communications to send from the Create New Communication pop-up. The steps below are for sending an email communication. For more information about sending other communication types, see Interaction Inventory: Interactions.
Access the Purchase Order Details page from the Review Requisitions page or from the Purchase Orders, Action Needed tab on the Orders and Requests page.
From the PO options drop-down, select Create communication. The Create New Communication pop-up opens. Several fields are prepopulated and you can update them if needed.
In the Communication Type field, Email is selected by default.
The Interaction Code, Name / Description field is set to Purchase Order Email by default.
The From field is prepopulated with the PO requester's email.
The To field is prepopulated with the vendor name and email.
The Contact Type is set to Institutional Priority by default.
The Subject is prepopulated with the PO number and text, and you can change it as needed.
The Body is prepopulated with a generic message about the PO, and you can change it as needed.
Click Send. The PO file is automatically attached to the email, and the PO details page is updated with a note that the PO was sent to the vendor.
Contact your purchasing administrator or campus support team.
J1 Web sends system-generated emails to the requester and purchasing agent when POs are updated. To receive these emails, you must have a valid email address associated with your J1 Web profile.
If your school has the Budget license, you can use the Budget Activity page in the Budget Management hub to review account information for current and future years. This page replaces the Campus Portal Budget feature. Access to the Budget Activity page is managed by the Budget Management roles.
If your school doesn't have the Budget license, you can use the GL Account Activity page in the General Ledger Accounting hub to view account balance information. This page replaces the Campus Portal GL Account Lookup feature. Access to GL Account Activity is granted by General Ledger Accounting roles.
For more information, see the following topics: