Manage J1 Web Users
Important
Information and features vary according to the roles to which you belong and the permissions associated with those roles. For more information, contact your module manager or your campus support team.
Use this page to:
View a list J1 Web users and important user information
Activate and deactivate users to let them access J1 Web and be assigned to roles
Manage the roles users belong to
View detailed technical information
Search for one or more users by name and/or the roles they are assigned to
Copy roles and permissions of one user to another to give other users similar access to features
The Technical Detailed Views option accesses technical database information about a user such as their authentication type and conflict, SQL server information, Person and Party Role AppIDs, and authentication information that can be helpful when troubleshooting data and login issues.
The User Detailed Views option accesses information about a user such as when they were added to the system or when updates were made, their directory and exchange service identifier information, position titles, if they are a Campus Portal user, and the last time they logged into J1 Web and the Campus Portal.
To access detailed views, find the user you want to view additional information about and select Technical or User from the Options, Detailed Views menu.
There are several ways to find a user:
Click on the Name, ID, or Changes by Date column headings to sort users and find the user you are looking for.
Click the Filter link to search for a user. System Users Filter options appear.
To search by a specific name, select the System User Names checkbox, enter their name, select the relevant name, and click Apply.
To search by Account Status, select the Account Status checkbox and select Active, Inactive, or Not a User and click Apply.
To search by role name, select the Assigned System Roles checkbox, enter the role name, select the relevant name, and click Apply.
Find the user you want to activate or deactivate.
To activate:
Select Activate from the Options menu. The Activate pop-up window appears.
Click Yes, activate. The user can be assigned to roles and will be able to sign into J1 Web.
To deactivate:
Select Deactivate from the Options menu. The Deactivate pop-up window appears.
Click Yes, deactivate. The user will lose access to J1 Web.
Find the user you want to assign to a particular role or roles.
Click Manage system roles. The Associated Role window appears.
Start typing the name of the role you want to add the user to in the System Roles field.
Select the appropriate role from those that appear.
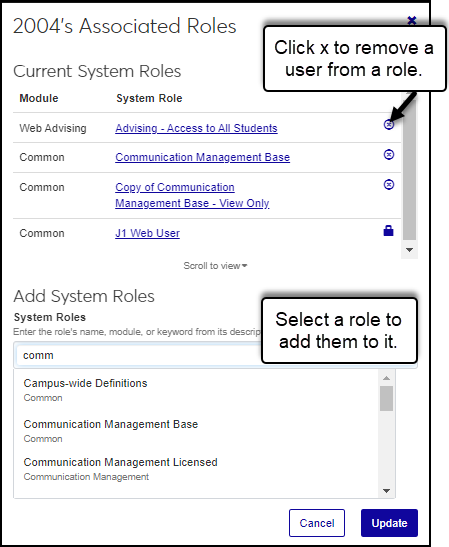
Repeat steps 3 and 4 as many times as needed. To remove a role, click the x icon next to the role name.
Click the Update button. Several things happen:
The Associated Roles window closes.
The user is assigned to the selected roles and has immediate access to the features related to the roles you selected.
The user receives a message to let them know they have been added to the roles.
The Changes by Date is updated to show the current day and time.
Select the checkboxes next to the users you want to assign to a particular role or roles.
From the Options drop-down list, select Assign to roles. The Assign System Roles window appears.
Start typing the name of the role you want to add the users to in the System Roles field.
Select the appropriate role from those that appear.
Repeat steps 3 and 4 as many times as needed. To remove a role, click the x icon.
Click the Update button. Several things happen:
The Assign System Roles window closes.
The users are assigned to the selected roles and have immediate access to the features related to the roles you selected.
The impacted users receive a message to let them know they have been added to the roles.
The Changes by Date for each user is updated to show the current day and time.
Find the user you want to remove from a particular role or roles.
Click Manage System Roles. The Associated Role window appears.
Click the remove icon next to the role or roles you want to remove the user from.
Click the Update button. Several things happen:
The Associated Roles window closes.
The users are removed from the selected roles and lose access to the features related to the roles you selected.
The users receive a message to let them know they have been removed from the roles.
The Changes by Date for each user is updated to show the current day and time.
The copy feature lets you assign other users to the same roles as a selected user. For example, if your school has a customized employee role for interns, you can find a user assigned to that role and use the copy option to assign the interns to the same customized role.
Find the user whose roles and permissions you want to assign to another user.
From the blue Options drop-down button in their row, select Copy roles to another user. The Copy System Roles window appears.
From the Copy To field, start typing the name of the user you are adding to the roles.
Select the appropriate name from those that appear.
Repeat steps 3 & 4 as needed.
Click the Copy roles button. Several things happen:
The Copy System Roles window closes.
The users are assigned to the selected roles and gain access to the related features.
The users receive a message to let them know they have been added to the roles.
The Changes by Date for each user is updated to show the current day and time.
To see the permissions related to a role, click Manage system roles. From the role list shown, click on a role name. The Edit Role page appears.
To see the roles a user currently belongs to, click Manage system roles. The Associated Roles window appears.
Position titles are managed in the Desktop application. If a position title isn't shown:
Your school may not be licensed to use the Human Resources module.
The user may not be assigned to a position on the Desktop HR Employee Master via Personnel window, Positions tab.
Users in light gray who cannot be selected means they haven't been designated as active J1 Web users (Desktop Users window) and assigned to a J1 Web role.
The total system users count includes:
Active J1 Web users who have been designated active J1 Web users on the Desktop Users window and assigned to J1 Web roles
Campus Portal Employee users who aren't in the Desktop application, but were added to J1 Web when they first logged in using their Campus Portal credentials (System Settings, Product Sign In configurations must be in place for this feature to work)
The Changes by Date shows the last time a user was added/removed to a role and/or if a permission was added/removed to one of the roles they belong to.
The white options list button is only available when multiple users are selected. To assign a single user to a role/roles, use the blue options button list.
Yes, you can remove and grant access to the same user as many times as needed. Follow the How-Tos listed above for step-by-step instructions on adding a user to a role and removing a user from a role.
Yes, any user assigned to a role can immediately access all the information and features associated and enabled for the role. You can create several similar roles with varying levels of access to control access for different users.
Ensure you clicked the Edit button before updating the role permissions. If you still cannot update the role permissions, you may not have access to the edit feature.
They may not have been added to the Desktop application. This can be verified by checking the Desktop Users window.
Users can be added in J1 Web if they are informally associated with a process, but they cannot log in to J1 Web and are not considered active J1 Web users. In order to be assigned to a role in J1 Web, they must be in the Desktop application and have an active J1 Web login (designated on the Desktop Users window).
Several things could cause this to happen:
The user may have been added to J1 Web and not the Desktop application.
The user may be in the Desktop application but doesn't have an active J1 Web login.
The user may already be assigned to this role.
To resolve this issue:
Verify the user exists on the Desktop Users window.
Verify the user has an active J1 Web login on the Desktop Users window.
Verify the user isn't already assigned to the role by searching for them in the Filter these users search option.
Position titles are assigned to users on the Desktop HR Employee Master via Personnel window, Positions tab. If the user is not assigned to a position title, nothing appears in this column.
Your school may not be licensed to use the Human Resources module.
The user may not be assigned to a position on the Desktop HR Employee Master via Personnel window, Positions tab.