Student Registration in J1 Web
Important
Information and features vary according to the roles to which you belong and the permissions associated with those roles. For more information, contact your module manager or your campus support team.
Use this page to register students when they can't register themselves. You can also drop or withdraw students from sections, update their course enrollment status, or contact students. You can work with one student or with multiple students at once.
First you build a list of students to register, and then you register them. You can also generate charges for their courses, drop or withdraw them, move them to different sections, and grant overrides.
Tip
The Student Registration page roughly mirrors the J1 Desktop Student Registration window, mostly on the Registration tab | Register subtab and Student Course Details subtab.
The first thing to do on this page is build the list of students you want to work with. You can populate the list by entering students' names or IDs one at a time, or you can filter down from all students. You can even use both methods together, adding some students to the list individually and others by filtering down.
You can add multiple filters, so, for example, you could filter for art majors whose GPA in Spring 2017 was 0 to 1.9. Or you could filter for students whose Group Reg Code is Cohort 16 who are off their academic plan.
For some filters, you can select multiple values. For example, in the Major filter, if you select Art and Art Education, you'll see the Art majors and the Art Education majors.
These are the filters available to narrow your search for students:
Student Filters
Academic plan (On Plan or Off Plan)
Classification (such as Freshman, Doctoral)
Degree (such as BA, AS)
Division (such as Graduate, Undergraduate)
Group Registration Code (such as Registration Group A or Underclassmen)
Holds
Major
Primary Academic Advisor
PT / FT Status
Registration Control Group (also known as Tel/Web Group or Web Registration Group)
Term-Based Filters
For each of the term-based filters, you first select the term, and then you select the value to search for.
Section
Academic Standing (such as honors or probation)
GPA
Reg rules – advisor approval
Reg rules – registration clearance
Reg rules – plan sensitivity
Sport tracking – sport
Sport tracking – level
Term credit

If any of the students have holds, you can click the Exclamation icon  to see how many holds the student has. To view the holds, click the Plus icon
  to expand the row.
Use the Options drop-down and the Action button to take registration action the students in your list.
The options in the Options button operate on all the students you select.
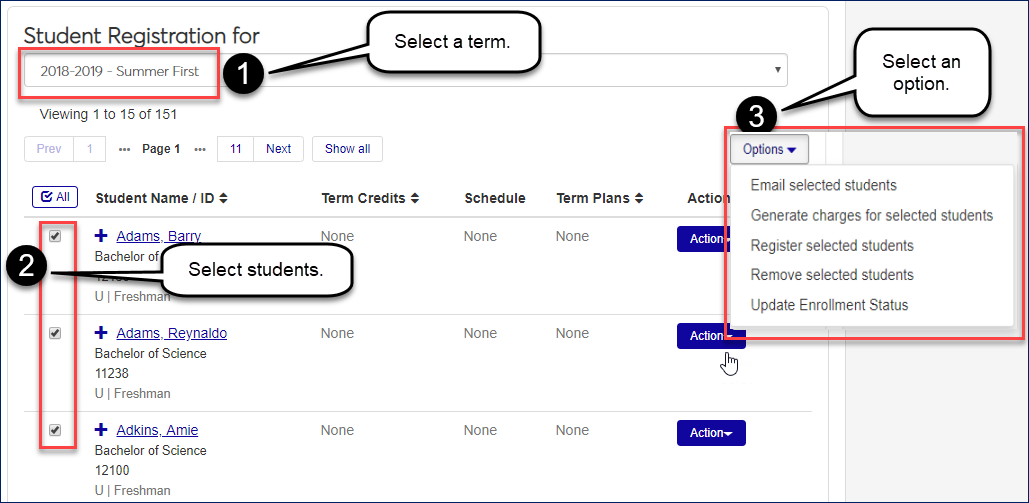
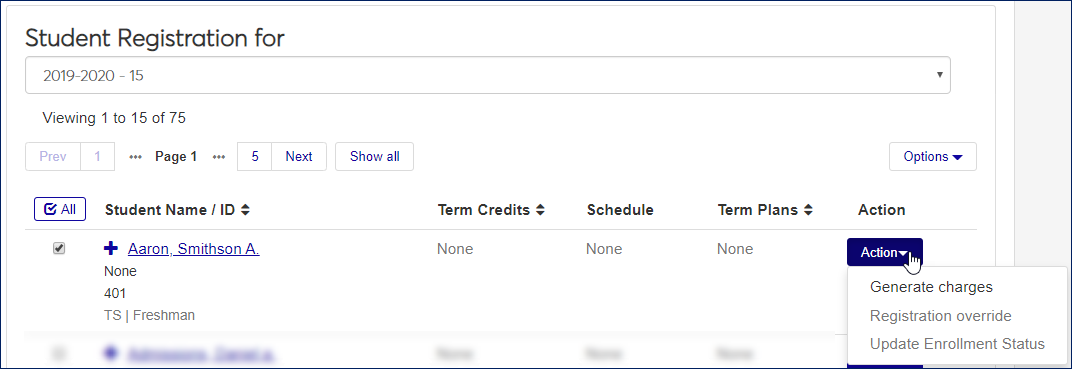
The Action button on a student's row operates on that student only.
When you've made a list of students, you can click the Option drop-down and select Register selected students. The Register Selected Students pop-up opens showing the list of selected students.
The Student List
The student list has the following columns:
Planning Calendar: Click the the Open icon
 on a student's row to see their planning calendar. You can see courses they're registered for as well as courses they're considering.
Note
Students' planning calendars are available only if the Campus Portal feature your school uses for students registering themselves is the newer Student Registration feature rather than the older Add/Drop feature. The setting to turn on the Student Registration feature is in J1 Web on the Campus Portal (JICS) Settings page.
Student (name) and ID
Classification: Such as Freshman or Senior
Remove: If you decide not to register one of the students, click the Remove icon
 in their row.
Section [in the selected term]
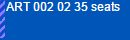
In the Section field, you can enter a few characters of the section code to bring up a list of matching sections. (For example, to find Art 1001-02, you could enter "Ar", "1001", or "1-02".)
Transaction Status
You select a Transaction Status (also called Registration Status):
Current: fully registered
Preregistered: enrolled, but the registrar's office hasn't made registrations final. (Some schools mark students as preregistered while they run preliminary charges. The registrar's office then changes the status to Current.)
Reserved: a seat is held for the student temporarily while they get approvals or make payments.
Course Message
When you select a course section to register students for, the Course Message pop-up opens if the course has prerequisites or special requirements, if the census date has passed, or if the section is full.
The Planning Calendar
A student's planning calendar shows courses they're registered for and courses they're considering. Students work with their calendars in the Student Registration feature in the Campus Portal (if your school is using that feature). If your school doesn't use that feature, planning calendars aren't available in J1 Web, either.
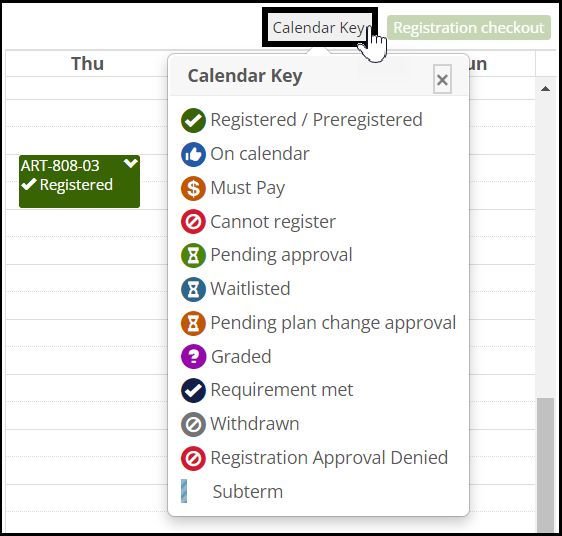
Tiles on the calendar represent course sections. Colors and symbols indicate the status of the section. Click the Calendar Key link to view the key of symbols and colors.
Green tile with check mark: Registered (or preregistered).
Blue tile with thumb up: On the calendar but not registered. (You could say it's in the cart and ready for checkout.)
Amber tile with dollar sign: Requires payment before it can be registered.
Red tile with a circle struck through: The student cannot register for this course.
Green tile with hourglass: Registered pending approval.
Blue tile with hourglass: Waitlisted.
Amber tile with hourglass: Pending approval of change to academic plan.
Purple tile with question mark: Course completed and graded.
Dark blue with check mark: Requirement met.
Gray with circle struck through: Withdrawn.
Red tile with a circle struck through: Registration Approval Denied.
Edge Stripes and Colors
Edge striping indicates a special condition concerning a course. Colors and stripes are used together to help you quickly identify what you need to do for a course. Click the course and select View details.
Striping | Meaning | Example | |||
|---|---|---|---|---|---|
Same Color as the Course | a course in a subterm |
| |||
Amber and White | a course with a warning TipTo see the begin and end dates of a course in a subterm, click the course on your calendar and select View details. |
| |||
Solid Red | a course with an error such as:
|
|


Registration Options
The Register and continue drop-down has the options for the selected course section for these students:
Register and continue: Register the selected students for the selected sections, and keep this pop-up open.
Register and close: Register the selected students for the selected sections, and close this pop-up.
Add to planning calendar: Place the selected sections on the planning calendars for the selected students.
Tip
Adding a course to the planning calendar does not register it. It's merely placed on the student's planning calendar to help in schedule planning. You can see it on the student's planning calendar by clicking the Open icon
in the student's row on this pop-up.Tip
The course also appears as an unregistered course in the student's view of their planning calendar on the Campus Portal.
Registration Overrides
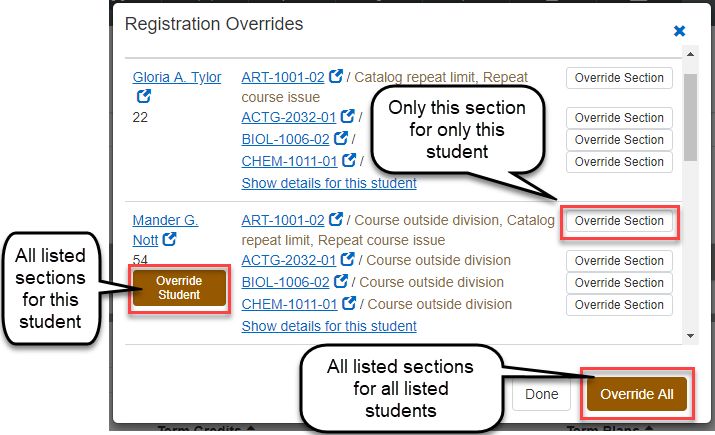
If any students have registration issues such as a schedule conflict, a message informs you. If an override is possible (such as for repeat course issues and holds), the Registration Overrides window pops up automatically with a list of students and errors. You can override issues several ways:
To override issues for only a single section for an individual student, click Override section.
To override issues for all listed sections for an individual student, click Override student.
To override issues for all listed sections for all listed students, click Override all.
If you close the Registration Overrides pop-up leaving some issues unresolved, you can still grant overrides for any of those students by clicking the Action button and selecting Registration override. When you grant an override, a confirmation message lets you know whether the override was successful. If it was, the student is now registered for the course.
The Registration override action is inactive if none of the students requires an override.
Corequisites
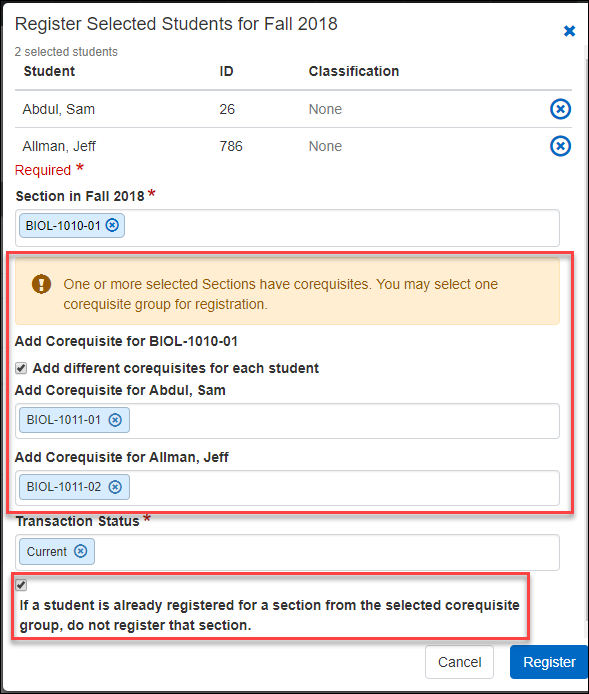
If the course has corequisites, a message notifies you (if the "Use the Add corequisites prompt" setting is selected on the Enrollment Settings page). Click in the Add Corequisite field to see the corequisite group (that is, the list of sections of all courses that satisfy the corequisite). You can select the same corequisite for all students or select a different one for each student.
By default, if a student is already registered for any section of the corequisite group, they won't be registered for the section you select. But you can deselect the checkbox for that default.
Note
The Basis for Corequisites drop-down on the Enrollment Settings page controls which kinds of corequisites the system looks for: Course, Advising Requirement (ARC), or Both.
Generate Charges
You can generate charges for students for the term. See the "Generating Charges . . ." topics for details.
You can change the enrollment status for one or more students in all the sections they have in a term. The option is available for an individual student on the Action drop-down, and for all selected students on the Options drop-down.
This is where you can drop or withdraw students from any or all of their sections. Select the Status (Dropped or Withdrawn), the dates and reason, and a Grade.
Note
Dropped courses don't appear on the transcript, and they aren't counted as repeats.
The State Funded field resets to the value on the section in the Courses window (Section Master).
The Unfunded Reason field resets to null.
Send a Communication to Students
Send a communication to each of the selected students. (Each student receives an individually addressed identical communication, not a group communication.) You can include a salutation (such as "Dear") in the Personalized Greeting field. The message will then read, for example, "Dear Saad". A message alerts you if any selected students are missing an email address.
Remove Students from the List
You can remove one or more students from the working list. (Doing so merely means you won't be working on their records right now; it doesn't drop them from courses or change their records in any way.)
You can also clear every student from the working list by clicking the Clear student registration list below button.
On a section's Roster page, there's a convenient way to move students to a different section. This helps you balance enrollment in various sections or better fit the constraints of your facilities and schedules.
When you move students to a new section, you can select an option for what to do with the old section.
Delete it (so it doesn't show in the student's course history)
Drop it (so it appears as a dropped course)
Keep it (so the student is enrolled in both)
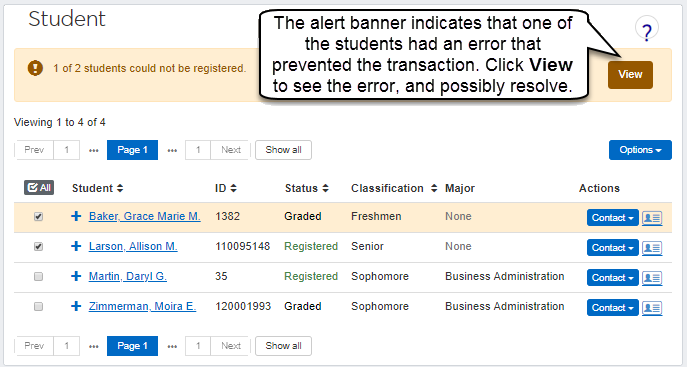
After you click Done, a confirmation message appears. If there were registration errors that require an override, the Registration Overrides pop-up opens. If you have permission, you can override the error and complete the action. Other alerts may appear to let you know if any students couldn't be registered.
 |

To add students by their name or ID
Select the Select by name radio button.
Click in the Student Name / ID field.
Enter a few characters of a name or ID. Matching students will appear.
Select a student.
To add students by filtering from all students
Select the Filter from all students radio button.
In the Filter 1 drop-down, select a filter.
Click in the field next to filter, and select a value. Click again to select another value.
To narrow the list, click the Add another filter link to select another filter and its values.
Click the Add students to the list button.
In the Year / Term to Register field, select a year/term.
To remove all the students from your working list, click the Clear student registration list below button.
To remove only some students
Select the students to remove.
Click the Options drop-down, and select Remove selected students. A pop-up asks you to confirm the removal.
Click the Remove icon on the value.
Click the Remove icon on the right of the row.
Build a working list for registration.
Select the term.
Select some or all students on the list.
In the Options drop-down, select Register selected students. The Register Selected Students pop-up opens.
To remove a student from the list to register, click the Remove icon
on their row.To view a student's planning calendar, click the Open icon in the
Enter a Section. (You can enter any part of a section code to bring up a list of matches.)
If the section has corequisites, a message notifies you.
If you wish, select the checkbox to Add different corequisites for each student.
Click in the Add Corequisite for All Selected Students field. The corequisite sections appear.
Select a section.
If any students have registration errors such as a schedule conflict, a message informs you. If an override is possible (such as for repeat course issues and holds), the Registration Overrides pop-up opens with a list of students and errors.
To override issues for all students at once, click Override all.
To override issues for one student at a time, click Override on the student's row.
To close the pop-up, click Done.
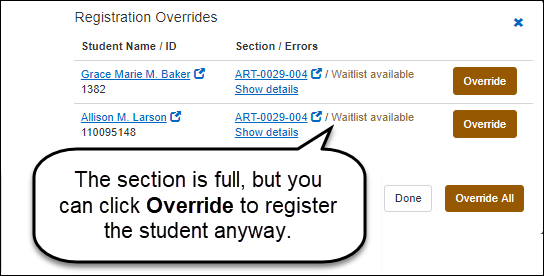
If the course has prerequisites or special requirements, if the census date has passed, or if the section is full, a pop-up notifies you. If the section is full but waitlisting is available, the message tells you the course will have a waitlisted status.
The default Enrollment Status is 'Current'. To change it, click the Remove icon
on the 'Current' chip. Then select one of the other values. The status applies to all sections above.If the section has corequisites, this checkbox is selected by default: If a student is already registered for a section from the selected corequisite group, do not register that section. Deselect the checkbox if you want to register the student for the section anyway.
Click the Register button.
Note
Students' planning calendars are available only if the Campus Portal feature your school uses for students registering themselves is the newer Student Registration feature rather than the older Add/Drop feature. The setting to turn on the Student Registration feature is in J1 Web on the Campus Portal (JICS) Settings page.
In the Register Selected Students pop-up, click the Open icon
in a student's row. The student's planning calendar appears. To register the selected students in the section and keep the pop-up open, click the Register and continue button.
To register the selected students in the section and close the pop-up, click the Register and continue drop-down arrow, and select Register and close.
To place the section on the selected students' planning calendars (but not register it), click the Register and continue drop-down arrow, and select Add to planning calendar. The section is added to the calendar, and you or the student can register it later if it suits their schedule.
To drop, register, or work with a section on the calendar:
Click the section's tile. A drop-down menu appears.
Select an option.
When you're registering selected students, if any of them have issues that require overrides, the Registration Overrides pop-up appears.
To override issues for only a single section for an individual student, click Override section.
To override issues for all listed sections for an individual student, click Override student.
To override issues for all listed sections for all listed students, click Override all.
To grant overrides for an individual student
Click the Action button on a student's row.
Select Registration override. The Registration Overrides pop-up opens with only that student listed.
Click Override. A confirmation message lets you know if the override was successful.
On a section's Roster, use the list view.
Select one or more students.
In the Options drop-down, select Register in another section. The Register Students in Another Section window pops up.
Select the Term, Section Code, and Enrollment Status for the new section.
In the Action drop-down, select what happens to the old section: drop, delete, or keep.
Click the Register button.
Tip
For dropping and withdrawing students, see specific instructions below.
Build a working list for registration.
Select the term.
To update the status for one student:
Click the student's Action drop-down.
Select Update enrollment status. The Update Enrollment Status pop-up opens listing the student's sections in that term.
To update the status for multiple students:
Select some or all students on the list.
In the Options drop-down, select Update enrollment status. The Update Enrollment Status pop-up opens listing the the selected students and the number of sections they have in that term.
Warning
The changes you make apply to all the sections in the selected term for the selected students. If you don't want a student's sections affected, click the Remove icon
on the appropriate row.
In the Update Enrollment Status pop-up, click in the Enrollment Status field.
Select a status. This will apply to all sections the selected students have in the selected term.
Note
You can't change the status to Dropped or Withdrawn from this option. To drop or withdraw a student, use the Actions drop-down on their row.
Fill in all required fields.
Click the OK button. The pop-up closes, and your changes are saved.
Build a working list for registration.
Select the term.
Click the student's Action drop-down, and select Update enrollment status. The Update Enrollment Status pop-up opens listing the student's sections in that term and their status.
In the Update Enrollment Status pop-up, click in the Status field, and select Withdrawn. The withdrawal fields appear.
Fill in the information. All fields are required except the checkboxes.
Add to withdrawal counts (checkbox): Select the checkbox in most circumstances. The withdrawal of each listed course adds to the student's withdrawal count.
Selected: Listed courses add to the withdrawal count.
Tip
Don't worry: If a section is already counted as a withdrawal in the term, it won't be counted double. But if a section is not already counted as a withdrawal in this term, it will be now.
Unselected: Listed courses don't add to the student's withdrawal count. (If a listed courses is already counted in student course history, this changes it to not counted. To avoid this, remove the course from the list.)
Tip
If a listed course is already counted toward the withdrawal limit, this will change it to not counted.
Withdrawal Date: Select from the drop-down:
First day of class
Day before first day of class
Friday before first day of class
Date dropped
Last date of attendance
Manual date entry
Withdrawal Reason: Select from the drop-down. Options are defined on the Withdrawal Reason Definitions page.
Tip
If you're withdrawing the student from all courses, select the Total withdrawal from term option.
Drop Date: Select from the drop-down:
First day of class
Day before first day of class
Friday before first day of class
Last date of attendance
Manual date entry
Drop Flag: Select Drop or None from the drop-down.
Last Date of Attendance: Enter a date.
Final Grade: Select from the drop-down. The options are defined on the Grade Table Definitions page. Only grades designated as withdrawal grades are listed.
Update Midterm Grade Columns: If you select this checkbox, select a Midterm Grade from the drop-down. The options are defined on the Grade Table Definitions page. Only grades designated as withdrawal grades are listed.
Click the OK button. The pop-up closes, and your changes are saved.
Build a working list for registration.
Select the term.
Click the student's Action drop-down., and select Update enrollment status. The Update Enrollment Status pop-up opens listing the student's sections in that term and their status.
In the Update Enrollment Status pop-up, click in the Status field, and select Dropped. The drop fields appear.
Select a Drop Date from the drop-down:
First day of class
Day before first day of class
Friday before first day of class
Last date of attendance
Manual date entry
Click the OK button. The pop-up closes, and your changes are saved.
Build a working list for registration.
Select the term.
Select some or all students on the list.
In the Options drop-down, select Email selected students.
In the pop-up, enter a subject and a message. You can also enter a greeting.
Click the Send email button.
The Registrar's office determines the registration dates on the Year / Term / Subterm Definitions page.
A registration administrator on the Campus Portal (JICS) Settings page selects the fields available for course searches.
The student might be restricted to registering only for courses on their academic plan for this term. The level of restriction is called "plan sensitivity." You can see their level just under the My Academic Plan heading.
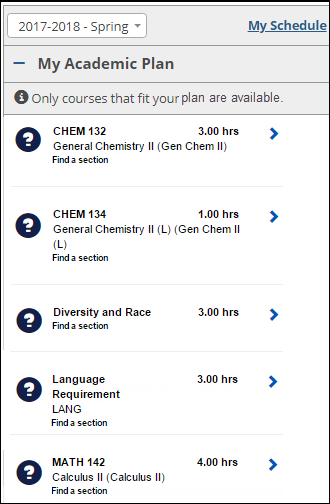
Click the Info  icon for a description of the student's plan sensitivity.
Level | Description | Info Pop-Up | Courses you can see |
|---|---|---|---|
Most restrictive | Only courses on this term's plan are available. | Select courses on the student's academic plan for this term. This will help them successfully complete your degree program. | Courses on their plan for the selected term. |
Moderately restrictive | Only courses on their plan are available. | Select courses on the student's academic plan. If you register them for courses planned for a future term, be sure to update their academic plan. |
|
Least restrictive | Courses on and off the student's plan are available. | You can select any courses, but be aware of the requirements for the student's academic plan. |
|
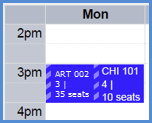
If the subterm dates don't overlap, you can put courses from different subterms in the same time slot. On the calendar, they'll appear with blue edge striping to remind you that they're subterm courses and not necessarily in conflict.
 |
It may be disabled for a number of reasons including these:
The registration period is not open yet. (The button label is "Registration closed".)
There are no unregistered courses on the calendar.
The student needs registration clearance.
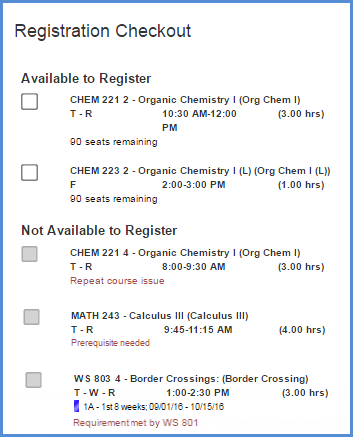
On the registration checkout screen, some courses may be listed under the heading Not Available to Register. The checkboxes for those courses are disabled. The reasons are listed. Examples include schedule conflicts, required prerequisites or corequisites, and repeated courses or courses that fulfill the same requirement as another course on your calendar.
 |
There are several possibilities.
The course search may be view only. You can't add courses to to schedule from it.
The course may not be on the student's academic plan or doesn't meet their degree requirements.
The course might not be allowed in the student's division.
No. Advisors can add and drop students subject to the settings and dates set on the Year / Term / Subterm Definitions page and on the Manage Section Details page. However, advisors can't withdraw students. Only the Registrars and Registration Module Manager roles (and copies of them) include permissions to withdraw students.
Current: The student is fully enrolled in the course. (This is sometimes called "Registered".)
History: The student completed the course.
Preregistered: The student is enrolled in the course, but the registrar's office hasn't made registration final yet. (Some schools mark students as preregistered while they run preliminary charges. The registrar's office will change your status to Registered by the time the course begins.)
Reserved: A seat is being held for for the student pending approvals or payments. If the deadline passes before they get approvals or make payments, they'll be dropped from the course.
Waitlisted: The course is full, but the student is in line. They'll be notified if a seat opens.
Withdrawn: The student left the course after the drop deadline.
In the Actions drop-down, select Update enrollment status.
It may be because you don't have permission to edit student course records. The following permissions are available in the Registrars role and the Registration Module Manager role and roles copied from them:
Can delete student section records that do not have History status
Can delete student section records that have History status
Can drop student section records that do not have History status
Can drop student section records that have History status
Can edit student section records that do not have History status
Can edit student section records that have History status
Can withdraw student section records that do not have History status
Can withdraw student section records that have History status
Many factors control withdrawals. See the "Student Withdrawal Overview" topic. It explains factors that affect staff withdrawing students and factors affecting students withdrawing themselves.
We use "student withdrawal" to refer to students withdrawing themselves from sections, which they do in the Student Registration feature in the Campus Portal.
When the student's advisor registers a course requiring advisor approval, the approval is granted automatically and marked with that day's date.
When someone other than the advisor registers a course requiring advisor approval, the course is set to Reserved status. The course will move to Current status when either the advisor approves or a registrar overrides the advisor approval requirement. (The "Can override advisor approval required" permission is in the Registration Override and Access Control role and roles made from it.)
Yes, you can place a student in a division group that includes more than one division.
Use Division Group to Control Which Divisions a Student Can Register In
Division Group (student_master.div_grp_cde) is a field on the Student Information Details page, General Information tab, under the Demographics heading. The options in the drop-down are defined on the Division Group Definitions page.
A division group is some combination of your existing divisions. You may have reasons to put Undergraduate and Graduate in a division group together, but Continuing Education and Parent Education in another division group. You may want to make an All Divisions group.
You can use division to allow a student to register for courses in more than one division. For example, if you want a student to be able to register for both undergraduate and graduate courses (but not Continuing Education), you create a division group with those parameters, and assign the student to it.
Tip
If you want to allow all students to register for courses in all divisions, use the "Allow alternate division" setting. See instructions below.
On the Division Group Definitions page, create the division groups you need. For example, if you need some students to be able to register for both undergraduate and graduate courses, create a division group associated with both those divisions.
On a student's Student Information Details page, General Information tab, click the Edit details button.
In the Division Group drop-down, select the group that has the divisions you want.
Click the Done Editing button. The student is now permitted to register in the divisions included in the group. This works for students registering themselves on the Campus Portal or staff registering students in J1 Web or J1 Desktop.
Access the the Campus Portal (JICS) Settings page.
In the Campus Portal Registration Configuration category, select the Allow alternate division checkbox. All students can now register in all divisions.