Calendar Setup in Campus Portal
Configure the following settings in your Campus Portal to allow events created in J1 Web Events Management to be published on Campus Portal calendars.
Step 1: Enable Calendar Permissions
This configuration grants the appropriate Campus Portal roles permission to designate Campus Portal calendars as J1 Web calendars.
Step 2: Make Campus Portal Calendars Available to J1 Web
Campus portal calendars can display events created in J1 Web. These calendars must be created in Campus Portal before users can select them for events created in J1 Web.
Notice
The Alumni calendar in Campus Portal has been designated as available to J1 Web. When an Event Coordinator creates an alumni homecoming event in J1 Web, they can choose to show it on the Alumni calendar in Campus Portal.
Step 3: Manage Promotional Calendar Tags
Important
To access the Calendar Tags page, a user must have global calendar permissions to manage tags.
This page can be used to create, edit, delete, and make tags active or inactive.
Log into your Campus Portal as an administrator.
Click the user icon and select Site Manager from the drop-down menu.
Select Global portlet operations from the sidebar menu.
Click Calendar to open the calendar Global Operations page.
Select 'Yes' in the Can Manage J1 Calendars column for any Campus Portal roles that will be allowed to mark Campus Portal calendars as J1 Web available calendars.
Note
Campus portal users must belong to one of the Campus Portal roles with this operation enabled to create a calendar and designate it as a J1 Web calendar.
Click Save to return to the portlets page.
Log in to your Campus Portal.
Click View full calendar or access the appropriate Calendar page.
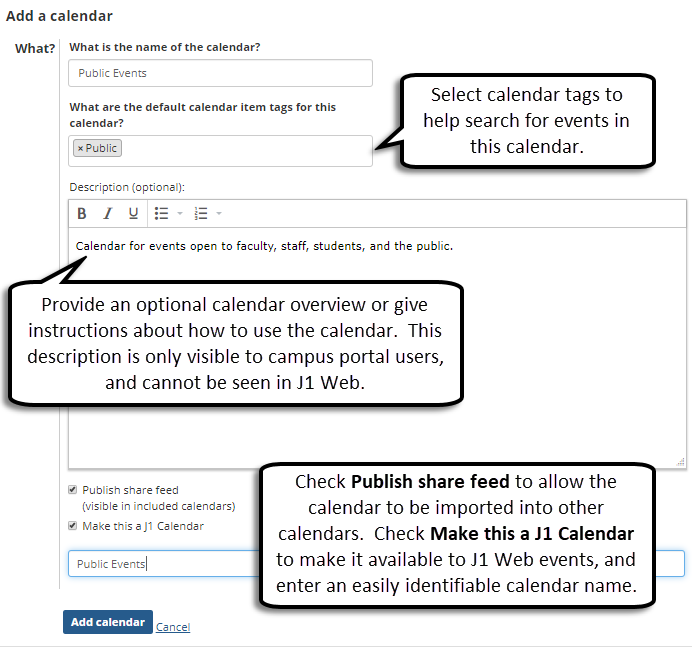
Click Add a calendar and fill in the required information.
Tip
Shared feeds can be used to generate an iCalendar link to your Campus Portal calendar. This link can be imported into your Google, Exchange, and J1 Web calendars. For example, you could view all sporting events from a master calendar by importing separate sports calendars into one location. Events must be managed on their original calendars, but updates are applied to any shared calendars.
Note
After a calendar is created, its designation as a J1 Web Events Calendar cannot be changed.
Click Add calendar to add the calendar to your Campus Portal and make it available to J1 Web Events Management users to publish scheduled events.
New and existing Campus Portal calendars can be added to other calendars within your portal as well as to your external Google, Outlook, and J1 Web calendars.
Notice
Your school may manage a public events calendar on your Campus Portal and your music department may manage its own events calendar. You can sync the music department calendar to your public events calendar to make music related events open to the campus and community.
Log in to your Campus Portal.
Access the calendar you want to sync to another calendar.
Click the Manage calendars link.
Click Share URL to open the Share URL pop-up.
Note
The Publish share feed option must be checked on the calendar you want to sync in order for the Share URL option to appear in the Manage calendars pop-up.
Copy the URL.
Tip
The URL can also be used to sync the Campus Portal calendar to your Outlook, Google, and J1 Web calendars. For more information, see any available import calendar feed documentation for the respective calendars.
Click Close.
Access the Campus Portal calendar you are adding the new calendar feed to.
Click Add a calendar.
Click Import calendar.
Paste the URL in the Paste the URL for the calendar… field.
Click Import.
Caution
When the Campus Portal calendar is deleted, any events associated with the calendar will no longer appear in Campus Portal unless they are associated with another Campus Portal calendar. Before deleting a Campus Portal J1 Web calendar, verify with the J1 Web Events Coordinator or event point of contact that the calendar you are deleting is no longer needed to display any events.
Log in to your Campus Portal.
Access the Campus Portal calendar or a Campus Portal calendar page you have set up.
Click the Manage calendars link to see all the calendars synced to the portal calendar.
Click the Edit calendar link for the calendar you want to delete.
Click the Delete button.
Click Confirm delete.
Log in to the Campus Portal as a user that has permission to manage tags.
Navigate to any calendar.
Click the Manage calendar tags link.
Enter in the tag you would like to create in the Enter new tag name field.
Click Create New Tag.
Log in to the Campus Portal as a user that has permission to manage tags.
Navigate to a calendar.
Click the Manage calendar tags link.
Click the Edit icon next to the tag you want to change.
Update the tag name.
Click Save.
Log in to the Campus Portal as a user that has permission to manage tags.
Navigate to a calendar.
Click the Manage calendar tags link.
Locate the tag you would like to make active or inactive.
To make a tag active:
Move the slider to Yes in the Active column.
Note
Making the tag active allows both Campus Portal and J1 Web users add the tags to calendars, calendar items, and events.
To make a tag inactive:
Move the slider to No in the Active column.
Click Make Inactive in the Deactivate this tag pop-up.
Note
Making a tag inactive will prevent it from being added to new calendars and calendar items. However, it will remain on any calendars or calendars items it is currently assigned to.
Log into the Campus Portal as a user that has permission to manage tags.
Navigate to a calendar.
Click the Manage calendar tags link.
Locate the tag you would like to delete.
Click the Delete icon.
Click Confirm delete in the Delete this tag pop-up.