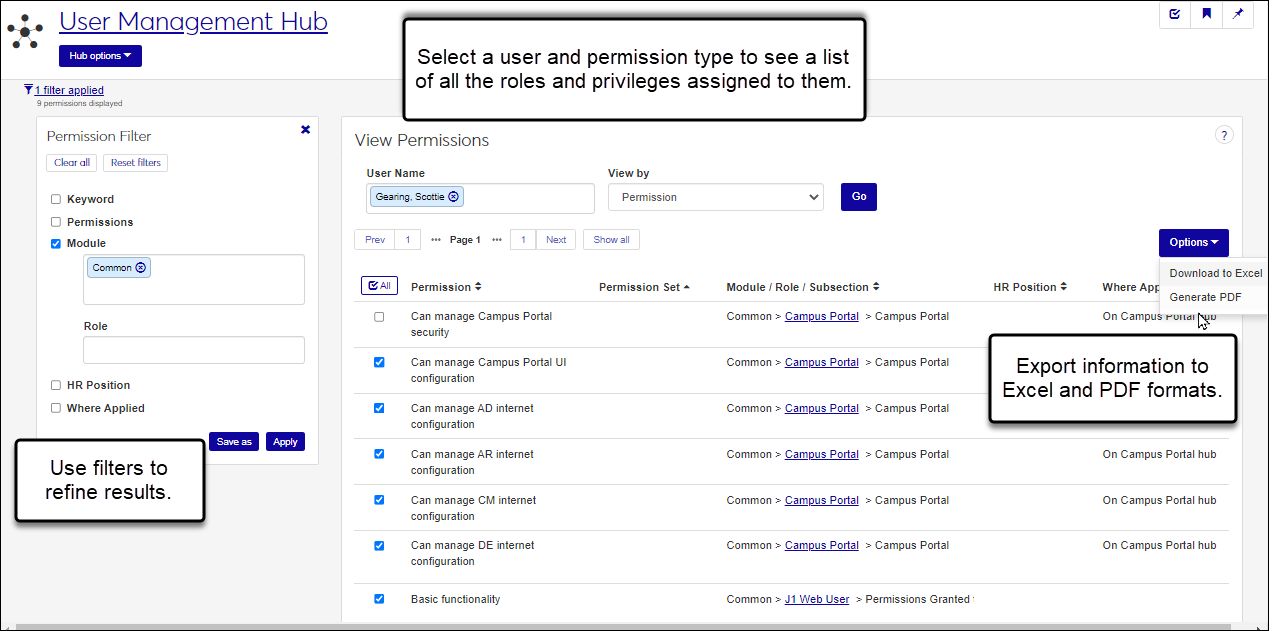
View Permissions
Important
Information and features vary according to the roles to which you belong and the permissions associated with those roles. For more information, contact your module manager or your campus support team.
The View Permissions page lets you see the roles and privileges available for a selected individual in the system.
View permission information for a specific user in the system. You can view:
Person and security role pages they can access
Module interactions they can see
Comprehensive lists of permissions and system roles
Types of sensitive data they can view (e.g., salaries and social security numbers)
User-defined fields they can view/manage
Select the information you need and export it to Excel or a PDF.
Use filters to find the information you need.
To view this page, users must belong to a User Management role with the Can view permissions permission enabled.
From the User Management hub option, select View Permissions.
From the System Users page, select View permissions from the Options drop-down.
From the Search option, select System page and enter View Permissions.
Access the View Permissions page.
In the User Name field, start typing the name or ID number of the individual you want to work with and select from the options that appear.
From the View By drop-down, select Entity Access.
From the Entity Type drop-down, select:
Person to view all individuals the user can access and the level of access they have to them.
The level of access may vary based on secondary permissions such as coaches with access to students on their roster that rotate out each semester. Also, Student Health Managers and Residence Life Administrators may have higher level access to persons who are students than to other persons who are not students.
Security Role to view the roles they belong to with module access enabled.
Click Go.
Use the filter options to find specific results and/or click the column headings to sort information.
To export the results:
Select the All checkbox or just the checkboxes of the information you want to export.
From the Options button, select Download to Excel or Generate PDF.
Access the View Permissions page.
In the User Name field, start typing the name or ID number of the individual you want to work with and select from the options that appear.
From the View By drop-down, select Interactions and click Go. Roles they belong to with module access enabled appear.
Note
Module access controls what interactions a user can see. For example, users that belong to a role with Advising module access enabled, can see the interactions associated with Advising.
Use the filter options to find specific results and/or click the column headings to sort information.
To export the results:
Select the All checkbox or just those checkboxes of the information you want to export.
From the Options button, select Download to Excel or Generate PDF.
Access the View Permissions page.
In the User Name field, start typing the name or ID number of the individual you want to work with and select from the options that appear.
From the View By drop-down, select Permission and click Go. A full list of every permission they have appears.
Use the filter options to find specific results and/or click the column headings to sort information.
To export the results:
Select the All checkbox or just those checkboxes of the information you want to export.
From the Options button, select Download to Excel or Generate PDF.
Access the View Permissions page.
In the User Name field, start typing the name or ID number of the individual you want to work with and select from the options that appear.
From the View By drop-down, select Sensitive Data and click Go. A full list of all the sensitive information they are allowed to view appears. Sensitive information can include bank account and social security numbers, salary information, etc.
Use the filter options to find specific results and/or click the column headings to sort information.
To export the results:
Select the All checkbox or just those checkboxes of the information you want to export.
From the Options button, select Download to Excel or Generate PDF.
Access the View Permissions page.
In the User Name field, start typing the name or ID number of the individual you want to work with and select from the options that appear.
From the View By drop-down, select System Role and click Go. A full list of all the roles they are assigned to appears.
Use the filter options to find specific results and/or click the column headings to sort information.
To see the specific privileges associated with a specific role:
Click the + icon next to the role name.
Click the View button next to the information you want to see. A pop-up window appears.
When finished, click the Close button.
To export the results:
Select the All checkbox or just those checkboxes of the information you want to export.
From the Options button, select Download to Excel or Generate PDF.
Access the View Permissions page.
In the User Name field, start typing the name or ID number of the individual you want to work with and select from the options that appear.
From the View By drop-down, select User-Defined Field and click Go. A full list of all the user-defined permissions they have appears.
Use the filter options to find specific results and/or click the column headings to sort information.
To export the results:
Select the All checkbox or just those checkboxes of the information you want to export.
From the Options button, select Download to Excel or Generate PDF.
Access the View Permissions page.
In the User Name field, start typing the name or ID number of the individual you want to work with and select from the options that appear.
From the View By drop-down, select the permissions information you want to export and click Go.
Use the filter options to find specific results and/or click the column headings to sort information.
Select the All checkbox or just those checkboxes of the information you want to export.
From the Options button, select Download to Excel or Generate PDF.
Use filter options.
If the filters aren't appearing, click theNo filters appliedlink.
Search by a specific word using the Keyword filter.
Select and use one or more filters (e.g., role, module, permissions, etc.). Filter options vary according to the permission type you are viewing.
Use the column headings to sort information.
Access Relationship information appears when you search for permissions related to an individual's security role entity access. Access Relationship information shows you the role and permission that grants access to the entity.
If your school has a J1 Human Resources (HR) license, these are the Desktop positions at your school that have been associated with the user.
Note
Desktop positions are managed on the Organization Positions window and associated with users on the Applicant Master and HR Positions windows.
If your school does not have a J1 Human Resources (HR) license, these are positions that have been created in J1 Web.
Note
Positions are managed on the J1 Web Assign Positions page.
The security role entity information is populated from the Security Role permissions associated with the selected user via the SecurityRoleAssignment table and the Permission and SecurityRoleCatElementPermissionTemplate tables. This table may have multiple rows per Security Role, since permissions to the same security role may be granted by multiple roles with differing access types.
The interaction access information is populated from the ManagedTaskAccessDefinition rows associated with the selected user via the ManagedTaskAccessRoleAssignment table.
The permissions information is populated from the SecurityRoleElement rows associated with the selected user via the EffectiveSecurityRoleAssignment view.
The sensitive data information is populated from the MaskFormat rows associated with the selected user via the MaskSecurity table.
The system role information is populated from the set of SecurityRole rows associated with the selected user via the EffectiveSecurityRoleAssignment view.
The user-defined field information is populated from the FormFlowUserDefinedForms rows associated with the selected user via the Permission table and EffectiveSecurityRoleAssignment view.
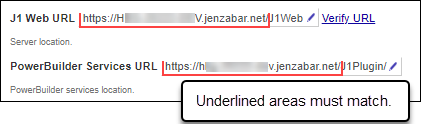
Verify the PowerBuilder Services URL is entered correctly in System Administration, System Settings, Product Installs and Sign page.
The URL must use HTTPS and not HTTP
The URL subdomain and domain must match the J1 Web URL
If the location where you store J1 Web reports is not the default installation location (C: > Jenzabar > Reports), verify the J1 Web server has permission to access the location. Detailed steps are available in the help topic Working with Reports in J1 Web.