Withdrawal Reason Definitions
Important
Information and features vary according to the roles to which you belong and the permissions associated with those roles. For more information, contact your module manager or your campus support team.
If your institution uses withdrawal reasons, you can use this page to create and manage them. When instructors enter a withdrawal grade for a student (in Desktop or Campus Portal), they may need to select a withdrawal reason.
See the settings for using withdrawal reasons in Desktop on the Registration Configuration window | Configuration Table tab.
You can also manage these definitions in the Desktop, on the Withdrawal Reason Definitions window.
Withdrawal Reason definitions are stored in the withdrawal_reason_def table.
Withdrawal Reasons, if used by your school, are entered along with the Withdrawal Grade. This can be done in the Grade Entry feature in Campus Portal, and in Desktop on the Withdraw Student from Term window. The withdrawal reasons are stored on Student Course History and may be viewed in Desktop on the Student Course Details window and the Withdrawn Courses window.
The permission to manage Withdrawal Reason Definitions is in the Registration Module Manager and Registrar default roles, listed under Manage Definitions.
Field | Note |
|---|---|
Code | Up to 10 characters. Required. Not editable for existing definitions. Must be unique. |
Description | Up to 255 characters. Required. |
Show in Campus Portal | Yes or No drop-down menu selection. |
Active | Yes or No drop-down menu selection. |
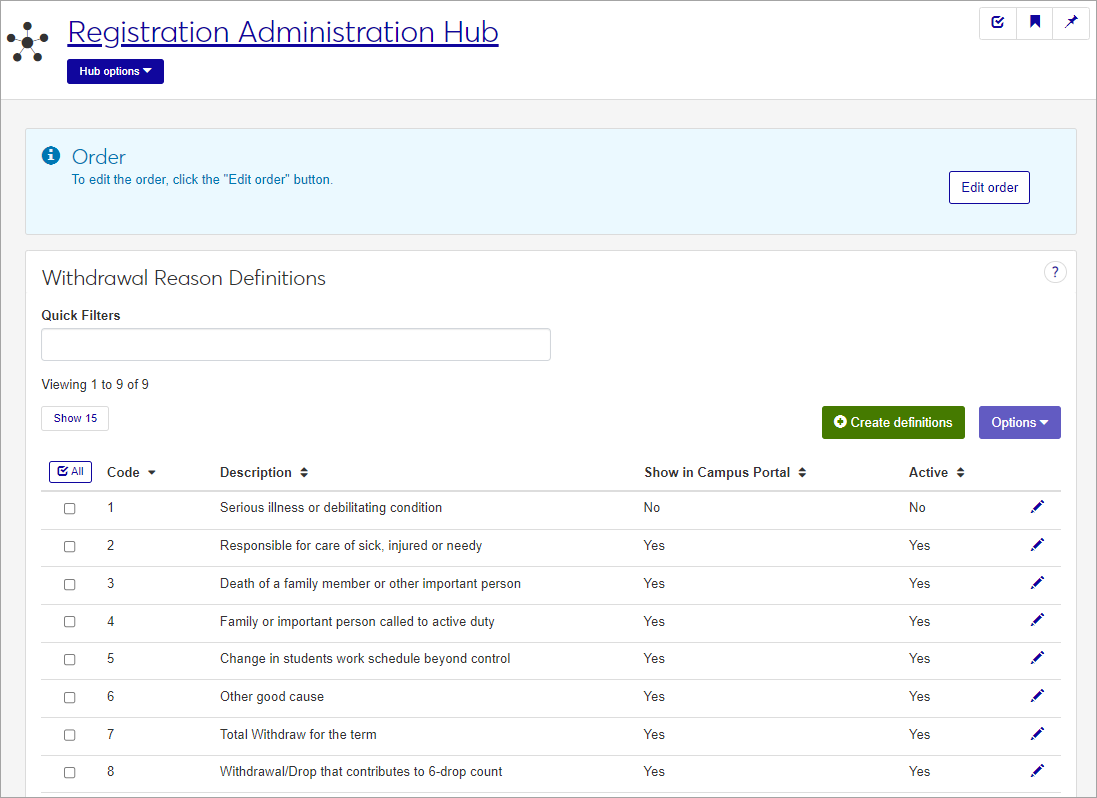
From the Registration Administration hub, click Hub options.
Click Manage Definitions, and select Withdrawal reason definitions.
Enter characters, words, or phrases in the Quick Filters to limit the list of definitions.
Click a heading to sort the list by that column.
If desired, select the order you want the list to be displayed using the Edit Order button.
Tip
You can also use the page search in the upper right corner of J1 Web. Just start typing the name of the definition page you want, and select it in the results.
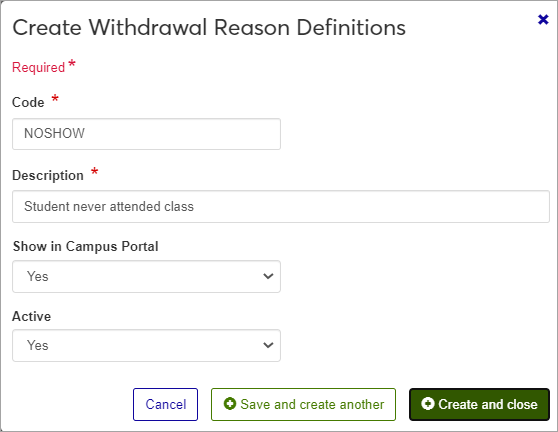
Click the Create definitions button.
Enter a unique Code, required, up to 10 characters.
Enter a Description, required, up to 255 characters.
In the Show in Campus Portal field, select yes or no from the drop-down menu. This will determine if someone entering a withdrawal grade in the Grade Entry feature in the Campus Portal will be able to select this withdrawal reason.
Choose an option in the Active field. If you set the status as not active, this code will still be visible in the drop-down menus where it can be selected, but it will be marked as (Inactive).
Click either Save and create another or Create and close.
Click the Edit icon
 on the row of a definition. The edit pop-up opens.
The Code cannot be edited once it has been created. The Description , Show in Campus Portal, and Active fields may be edited. Edit the available fields as needed. If you set the status as Inactive, this code will still be visible in the drop-down menus where it can be selected, but it will be marked as (Inactive).
Click the Update button.
The Edit Order options let you set the order of definitions in drop-down menus and how they are prioritized when used.
In the Edit Order window, change the order using either the Sort By and Order drop-down menus or the drag and drop option.
Sort By and Order:
From the Sort By drop-down, select the column you want to sort by.
From the Order drop-down menu, select Ascending or Descending.
Drag and drop:
Hold your cursor over the arrow icon
 on the left side of the row until the cursor changes to a hand icon
  .
.Click and hold while you drag the definition to the new location.
Release the mouse button.
Click Update.
After you click Update, your changes are saved in the following ways:
The definitions are listed in the saved order whenever they appear in drop-down menus (where a user selects from the list of definitions).
If the definitions are used in calculations or rules where priority matters, the definitions are now in your saved order of priority.
The definitions page is now sorted according to your changes.
Select the checkboxes next to the rows you want to export.
From the Options drop-down, select Download to Excel. The Download to Excel pop-up opens.
Select options for the Excel format and data columns.
Click Download. Your .xlsx or .zip file is saved in the file location that you have set in your browser settings.