Relationship Definitions
Important
Information and features vary according to the roles to which you belong and the permissions associated with those roles. For more information, contact your module manager or your campus support team.
The Relationships Definition page lets you view, create, update, export, and delete relationship and attitude definitions.
Relationships show how an individual or organization is connected to another individual or organization. For example, relationships can be used in Development to identify second generation students, in Financial Aid to award alumni endowment scholarships, and in Admissions to indicate a candidate with a father/mother alumnus.
Attitudes describe the sentiment between two related individuals/organizations. For example, an alumnus may assist with interviewing applicants and their assessment of the student's eligibility for admission could be added to the record as an attitude.
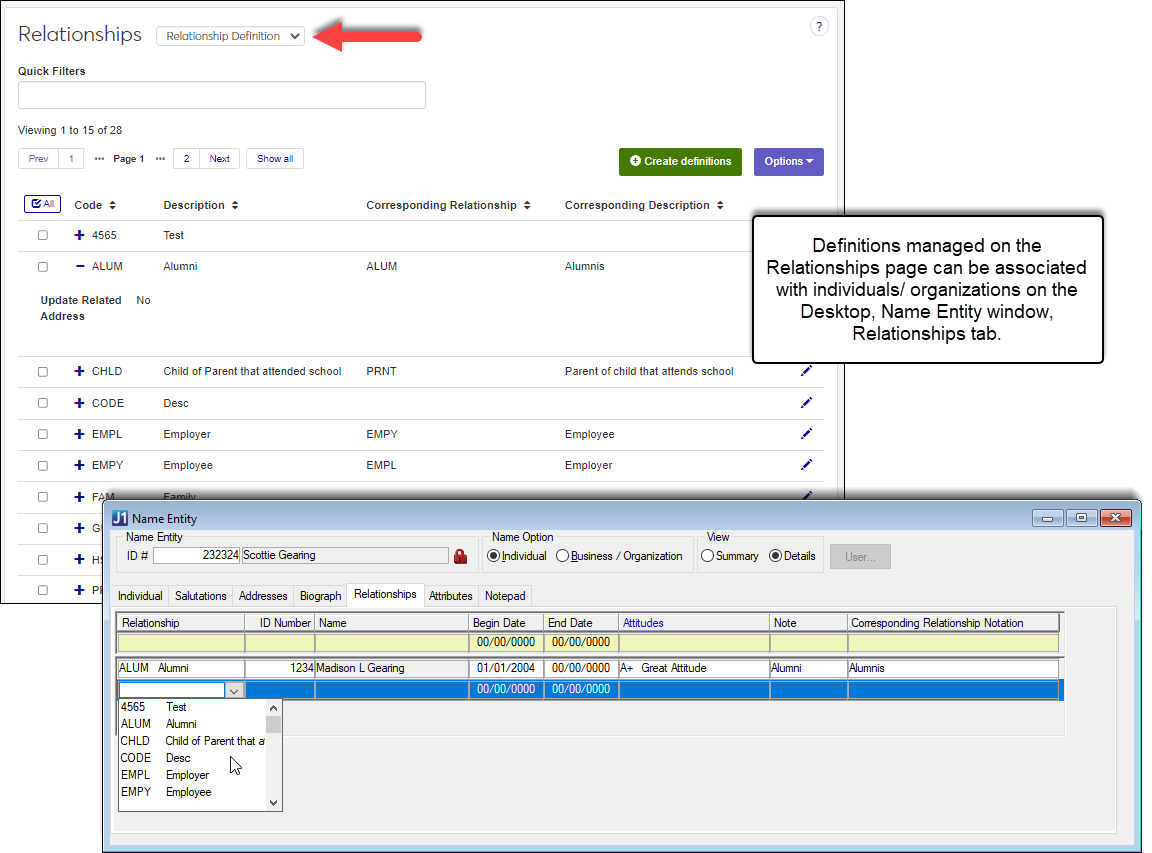
At this time, relationship and attribute information can only be associated with individuals in J1 Desktop (Name Entity window, Relationships tab). Options to associate relationship and attribute information with individuals in J1 Web will be available in a future release.
A relationship connects one person, group, or organization to another person, group, or organization. Multiple relationships can be associated for an individual or organization. As you create your definitions, consider different relationships between employees and students, candidates and alumni, faculty and staff, etc.
If your school utilizes Student and Exchange Visitor Information System (SEVIS), be sure you create the following: an option to (None)01 Spouse02 Child03 CPT Employer04 OPT Employer identify the SEVIS Element (table insert) for the appropriate Relationship codes.
To manage relationship definitions, you must belong to a role with the Can manage relationship definitions permission enabled. Jenzabar provides this permission with the Core, Campus-wide Definitions role.
Relationship definitions can also be managed in J1 Desktop using the Relationship Definition window (Create Students activity center). Updates made to the definitions in the Desktop are applied in J1 Web and vice versa.
Relationship definitions are stored in the RELATIONSHIP_DEF table.
From the Core hub, select Campus-wide Definitions, Relationships.
From the Relationships drop-down, select Relationship Definition.
Click on a column heading to sort in ascending or descending alphabetical order.
To search for a definition, enter a phrase or characters in the Quick Filters field and press the Enter key. To remove a filter, click its remove icon.
From the Core hub, select Campus-wide Definitions, Relationships or use the global search option to access the page.
From the Relationships drop-down, select Relationship Definition.
Click Create definitions. Create Relationship window appears.
In the Code field, enter a recognizable code. This code is permanent and can only be 4 characters.
In the Description field, enter a brief code description to help others determine which code should be used when selecting it in the system. This field is limited to 50 characters.
In the Corresponding Relationship drop-down, select the type of relationship. For example, if you are creating a parent relationship, select child from the drop-down. If a corresponding relationship isn't shown in the drop-down list, you may need to create it and then come back establish the association.
Table 1. Corresponding Relationship ExamplesRelationship Code
Corresponding Relationship
CHILD
PAR (Parent)
PAR (Parent)
CHILD
EMPL (Employer)
EMPY (Employee)
EMPY (Employee)
EMPL (Employer)
In the Corresponding Description field, enter a brief description to help others determine which relationship definition should be used when selecting it in the system.
From the Update Related Address drop-down:
Yes lets users opt to update addresses for the related individuals/ organizations simultaneously. When address information for an address code the individuals/ organizations share, the Update Related Address window appears where they can chose to update the related individuals or organizations address.
For example, Charlie Brown has an update to his legal/home/permanent (LHP) address information. He is related to Sally and Snoopy who also have LHP address information in the system. When Charlie's LHP updates are saved, the system sees Sally and Snoopy are related and have LHP information. It gives the user an option to update their LHP information as well.
No means addresses for related individuals/ organizations are not shown the option to update addesses at the same time.
To create another definition, click the Save and create another button and repeat steps 4 - 8. If you're finished creating definitions, click the Create and close button.
From the Core hub, select Campus-wide Definitions, Relationships or use the global search option to access the page.
From the Relationships drop-down, select Relationship Definition.
Click the Edit icon next to the definition you want to update. The Edit Relationship window appears.
Make the needed changes:
The Description field should be brief and help others determine which code should be used when selecting it in the system. This field is limited to 50 characters.
The Corresponding Relationship drop-down determines the type of relationship. For example, if you are creating a parent relationship, select child from the drop-down. If a corresponding relationship isn't shown in the drop-down list, you may need to create it and then come back establish the association.
The Corresponding Description field, should be brief and help others determine which relationship definition should be used when selecting it in the system.
The Update Related Address drop-down:
Yes lets users opt to update addresses for the related individuals/ organizations simultaneously
No means addresses for related individuals/ organizations are not shown the option to update addesses at the same time
Click the Update button. The Edit Relationship window closes.
Select the checkboxes next to the rows you want to export.
From the Options drop-down, select Download to Excel. The Download to Excel pop-up opens.
Select options for the Excel format and data columns.
Click Download. Your .xlsx or .zip file is saved in the file location that you have set in your browser settings.
Relationship definitions used in other tables cannot be deleted.
From the Core hub, select Campus-wide Definitions, Relationships or use the global search option to access the page.
From the Relationships drop-down, select Relationship Definition.
Select the checkboxes of the relationship definitions you want to delete.
From the Options drop-down, select Delete. The delete confirmation window appears.
Click Yes, delete. The delete confirmation window closes.
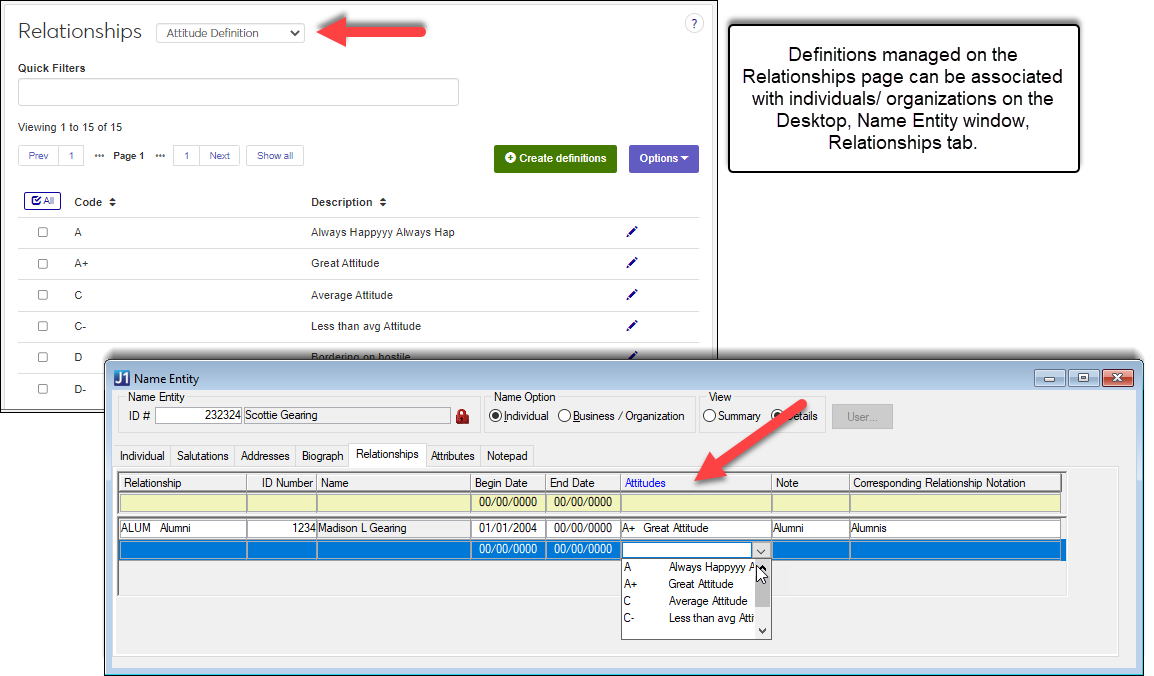
Attitude definitions describe the attitude between two related ID numbers. For example, if a student has a friendly relationship with a related employee. Attitudes are associated with individuals and organizations on the J1 Desktop Name Entity window, Relationships tab.
Note
Use clear descriptions and remember information in the system can by subject to request by consistituent/court order including relationship attitude information.
To manage attitude definitions, you must belong to a role with the Can manage relationship definitions permission enabled. Jenzabar provides this permission with the Core, Campus-wide Definitions role.
Attitude definitions can also be managed in J1 Desktop using the Attitude Definition window (from the Create Students, Settings - Admissions, and Settings - Development activity centers). Updates made to the definitions in the Desktop are applied in J1 Web and vice versa.
Relationship definitions are stored in the ATTITUDE_DEF table.
From the Core hub, select Campus-wide Definitions, Relationships.
From the Relationships drop-down, select Attitude Definition.
Click on a column heading to sort in ascending or descending alphabetical order.
To search for a definition, enter a phrase or characters in the Quick Filters field and press the Enter key. To remove a filter, click its remove icon.
From the Core hub, select Campus-wide Definitions, Relationships or use the global search option to access the page.
From the Relationships drop-down, select Attitude Definition.
Click Create definitions. Create Attitude window appears.
In the Code field, enter a recognizable code. This code is permanent and can only be 4 characters.
In the Description field, enter a brief code description to help others determine which code should be used when selecting it in the system. This field is limited to 50 characters.
To create another definition, click the Save and create another button and repeat steps 4 - 5. If you're finished creating definitions, click the Create and close button.
From the Core hub, select Campus-wide Definitions, Relationships or use the global search option to access the page.
From the Relationships drop-down, select Attitude Definition.
Click the Edit icon next to the definition you want to update. The Edit Attitude window appears.
Make the needed Description changes. This field is limited to 50 characters.
Click the Update button. The Edit Attitude window closes.
Select the checkboxes next to the rows you want to export.
From the Options drop-down, select Download to Excel. The Download to Excel pop-up opens.
Select options for the Excel format and data columns.
Click Download. Your .xlsx or .zip file is saved in the file location that you have set in your browser settings.
Attitude definitions associated with records in the system cannot be deleted.
From the Core hub, select Campus-wide Definitions, Relationships or use the global search option to access the page.
From the Relationships drop-down, select Attitude Definition.
Select the checkboxes of the attitude definitions you want to delete.
From the Options drop-down, select Delete. The delete confirmation window appears.
Click Yes, delete. The delete confirmation window closes.