Holds Definitions
Important
Information and features vary according to the roles to which you belong and the permissions associated with those roles. For more information, contact your module manager or your campus support team.
The Holds Definitions page allows you to manage Hold Types, Hold Categories, and Hold Codes. You can switch between types, categories, and codes using the drop-down menu beside Holds Definitions at the top of the page. Currently, Holds Definitions are the only part of the holds process that can be managed in J1 Web.
To learn more about how Holds work in Desktop and Campus Portal, read the Holds help topic.
In the Processes role, users need "Can manage hold definitions" permission in the Holds section. If users don't have this permission, they won't be able to access the Holds Definitions page.
In Desktop, Hold Types are created on the Hold Setup window, Hold Type tab. Hold Types created in Desktop are available in J1 Web and vice versa.
Hold Types are stored in the hold_type_def table.
Hold Type: Maximum of 10 characters. Required.
Description: Maximum of 100 characters. Required.
Active: Yes/No field. The default is Yes. Select No if you don't want users to have access to this Hold Type.
From the Processes hub, click Hub options.
Choose Holds, and then select Holds Definitions.
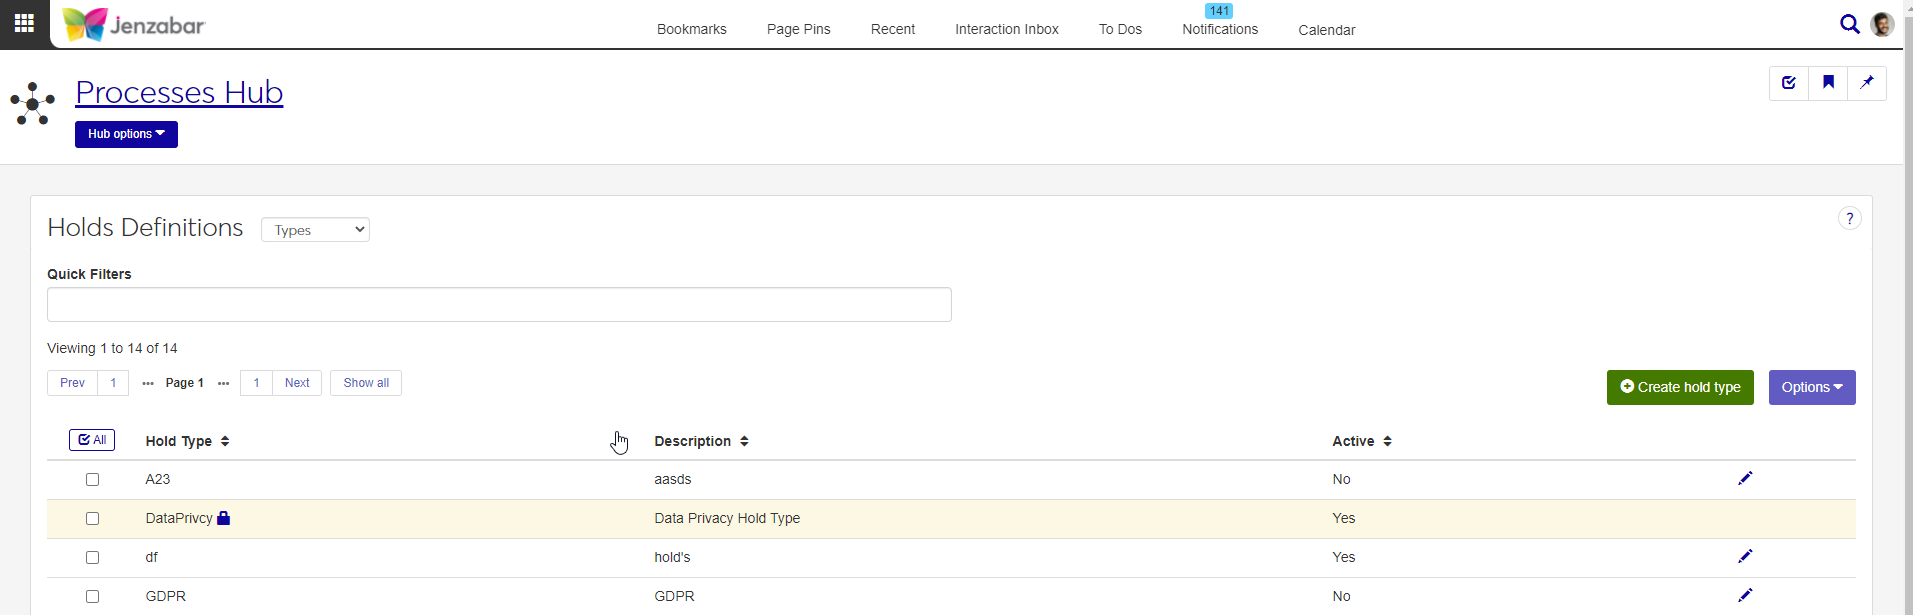
The Hold Definitions page opens, with Types as the default view.
To filter the definitions, enter a phrase in the Quick Filters field. To remove a filter, click its Remove icon.
To sort the definitions, click the arrows at the head of the column you want to sort on.
Click the Create hold type button. The Create Hold Type pop-up opens.
Enter a Hold Type (maximum of 10 characters). Required.
Enter a Description (up to 100 characters). Required.
Active is set to Yes by default, but you can select No if you want to make the definition unavailable.
Click Create and close or Save and create another.
Tip
You can't edit Hold Types that are provided as default data (these display as gold rows with a lock icon in the list of definitions). To make default Hold Types unavailable to users, set Active to No.
Click the Edit icon on the row of a definition. The Edit Hold Type pop-up opens.
Hold Type is not editable.
You can edit Description. Up to 100 characters. Required.
Active is a Yes/No drop-down.
Important
If there are Hold Codes associated with this Hold Type, setting Active to No also sets the associated Hold Codes' Active flags to No.
Click Update.
Tip
You can't delete Hold Types that are provided as default data (these display as gold rows with a lock icon in the list of definitions). To make default Hold Types unavailable to users, set Active to No.
After you create a new hold type, it appears on the Holds Definitions page. Also, you'll see a message letting you know that the hold type was created. If you clicked Create and close the message appears on the Hold Definitions page, and if you clicked Save and create another the message appears on the Create Hold Type pop-up.
In Desktop, Hold Categories are managed on the Hold Setup window, Hold Category tab.
Hold Categories are stored in the HoldCategoryDefinition table.
From the Processes hub, click Hub options.
Choose Holds, and then select Holds Definitions. The Hold Definitions page opens.
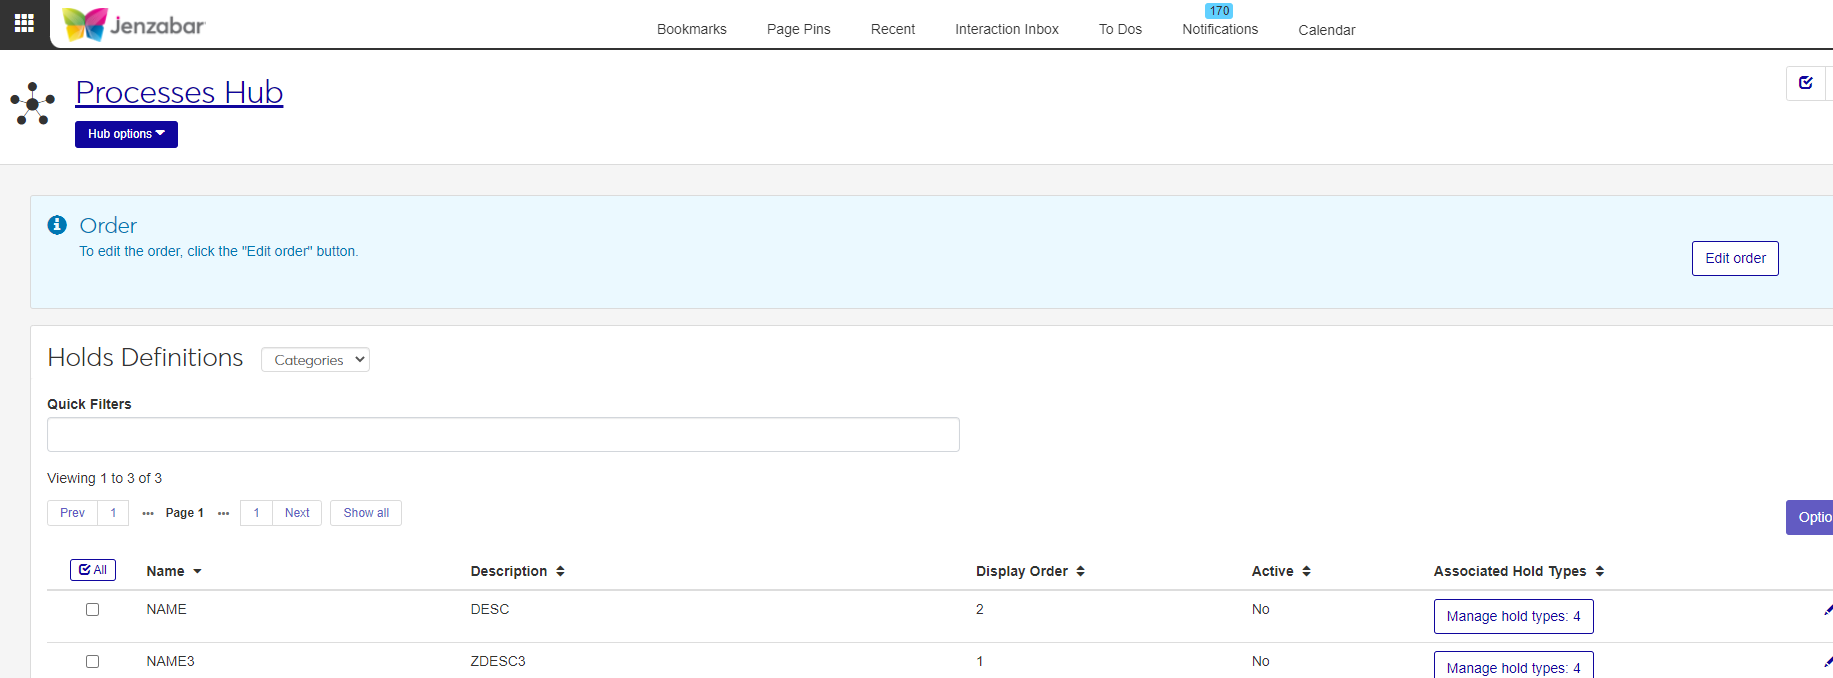
Choose Categories from the drop-down menu.
To filter the definitions, enter a phrase in the Quick Filters field. To remove a filter, click its Remove icon.
To sort the definitions, click the arrows at the head of the column you want to sort on.
To view the Hold Types associated with a Hold Category, click Manage Hold Types in the Associated Hold Types column.
Hold Categories are provided by Jenzabar, and new ones can't be created.
Click the Edit icon on the row of a Hold Category. The Edit Hold Category pop-up opens.
Active is a Yes/No drop-down.
In the Manage Associated Hold Types section, you can delete Hold Types and add new ones.
To delete a Hold Type from the Hold Category, click the Remove icon at the end of its row.
To add a Hold Type
Click Add another hold type.
Choose the Hold Type you want to add from the Hold Type drop-down.
Repeat steps i and ii to add additional Hold Types. There is no limit to the number of Hold Types that can be added to a Hold Category.
Click Update.
Note
Display Order determines the order Hold Categories are shown to users when available as options in a drop-down.
Click the Edit Order button.
The Order Definiton Categories pop-up opens, with the list of categories shown in the current Display Order.
To reorder the entire list, use the Sort By (options are Name, Description, and Active) and Order (options are Ascending and Descending) fields.
To reorder specific items within the list, use the arrows or drag and drop.
Click Update.
Hold Categories are provided by Jenzabar, and can't be deleted. If you want to make a Hold Category unavailable to users, set Active to No.
FAQ
Hold Categories are provided by Jenzabar, and can't be deleted. If you want to make a Hold Category unavailable to users, set Active to No.
In Desktop, Hold Codes are created and managed on the Hold Setup window, Hold Definition tab.
Hold Codes are stored in the holds_def table.
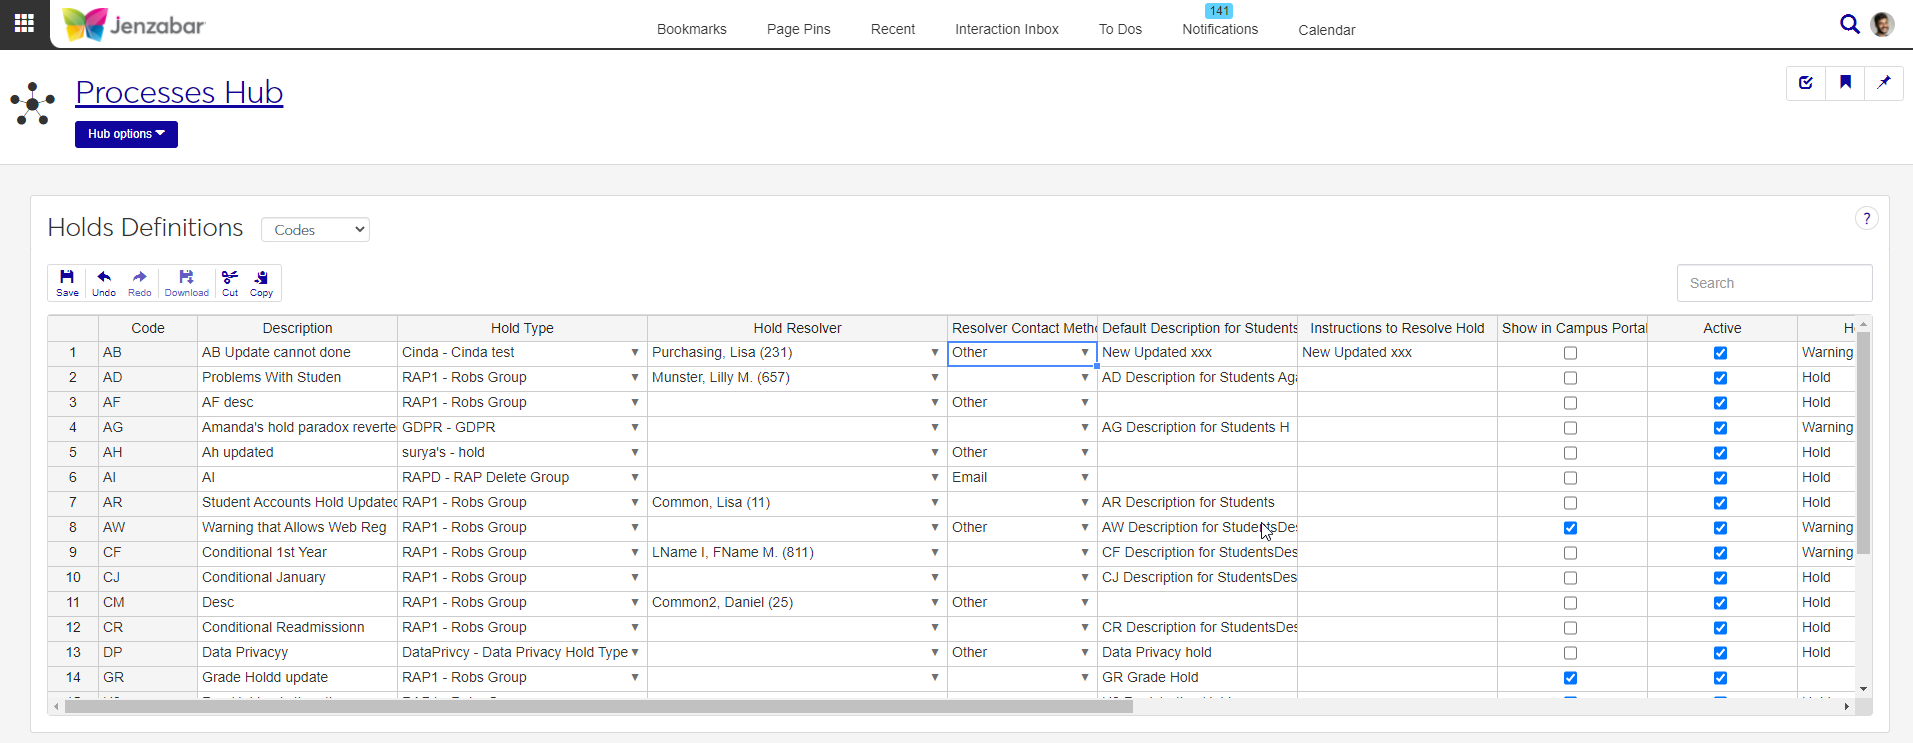
Code: Only editable for new codes. Required. Maximum of 2 characters. Codes must be unique in the system.
Description: Required. Maximum of 30 characters.
Hold Type: Drop-down that includes all active hold types/descriptions.
Hold Resolver: Names and ID numbers of people in your organization. Begin typing a name and then make a selection from the drop-down. If the Resolver Contact Method is Email or Phone, you must select a Hold Resolver.
Resolver Contact Method: Options include no selection (blank), Other, Email, and Phone. Default is Other. If Email or Phone is selected, you must also select a Hold Resolver.
Default Description for Students: Maximum of 255 characters. Required if Show on Campus Portal field is checked.
Instructions to Resolve Hold: Maximum of 255 characters.
Show in Campus Portal: This checkbox (along with values in the Active, Hold Registration, Allow Campus Portal Registration, Hold Transcript, View Unofficial Transcript Online, Hold Grade Report, and View Grades Online columns) controls whether or not Holds are displayed in the Course Schedules, Unofficial Transcript, Grade Report, Course History, Advisee Roster, and/or View My Students features in Campus Portal. Default is unchecked. If selected, you must also enter a Default Description for Students.
Active: Default is checked. If a Hold Code is Inactive, then it is not available in the Hold drop-down list when the user is adding a hold to a student.
Hold Registration: Default is Hold. Options include no selection (blank), Hold, and Warning and determine what appears to users when they attempt to register.
Allow Campus Portal Registration: Default is unchecked. Determines if Campus Portal Registration is permitted in spite of the existing hold. Enabled only if the Hold Registration is Warning.
Prevent Campus Portal Drop: Default is unchecked (students with holds can drop courses). Select this checkbox only if you want to block students with the selected hold from dropping courses in the Campus Portal Student Registration feature.
Prevent Campus Portal Withdraw: Default is unchecked (students with holds can withdraw from courses). Select this checkbox only if you want to block students with the selected hold from withdrawing from courses in the Campus Portal Student Registration feature.
Hold Transcript: Default is Hold. Options include no selection (blank), Hold, and Warning.
View Unofficial Transcript Online: Default is unchecked (students cannot view their transcript in Campus Portal). If the View Unofficial Transcript Online checkbox is selected, the student receives a warning but can view their transcript in Campus Portal despite the existence of the hold.
Hold Grade Report: Default is checked, which means this Hold Code is defined as a Grade Report Hold.
View Grades Online: Default is unchecked. If selected, the student receives a warning but can see their grades in the Campus Portal Grade Report Course History features despite the existence of the hold. This column does not impact the Unofficial Transcript feature.
From the Processes hub, click Hub options.
Choose Holds, and then select Holds Definitions.
The Hold Definitions page opens, with Types as the default view. Select Codes from the drop-down.
On the list of Hold Codes, you can filter the display by clicking on the column names. Use the search field to find specific terms within the list.
Tip
Code and Description are required fields, and display throughout the system. Make sure they are understandable and appropriate for internal and external users.
Right-click in a row within the list. Choose Insert row above or Insert row below.
Enter a Code. Required. Maximum of 2 characters.
Enter a Description. Required. Maximum of 30 characters.
Complete or update the defaults for the following fields as necessary:
Hold Type: Drop-down that includes all active hold types/descriptions.
Hold Resolver: Names and ID numbers of people in your organization. Begin typing a name and then make a selection from the drop-down. If the Resolver Contact Method is Email or Phone, you must select a Hold Resolver.
Resolver Contact Method: Options include no selection (blank), Other, Email, and Phone. Default is Other. If Email or Phone is selected, you must also select a Hold Resolver.
Default Description for Students: Maximum of 255 characters. Required if Show on Campus Portal field is checked.
Instructions to Resolve Hold: Maximum of 255 characters.
Show in Campus Portal: This checkbox (along with values in the Active, Hold Registration, Allow Campus Portal Registration, Hold Transcript, View Unofficial Transcript Online, Hold Grade Report, and View Grades Online columns) controls whether or not Holds are displayed in the Course Schedules, Unofficial Transcript, Grade Report, Course History, Advisee Roster, and/or View My Students features in Campus Portal. Default is unchecked. If selected, you must also enter a Default Description for Students.
Active: Default is checked. If a Hold Code is Inactive, then it is not available in the Hold drop-down list when the user is adding a hold to a student.
Hold Registration: Default is Hold. Options include no selection (blank), Hold, and Warning and determine what appears to users when they attempt to register.
Allow Campus Portal Registration: Default is unchecked. Determines if Campus Portal Registration is permitted in spite of the existing hold. Enabled only if the Hold Registration is Warning.
Prevent Campus Portal Drop: Default is unchecked (students with holds can drop courses). Select this checkbox only if you want to block students with the selected hold from dropping courses in the Campus Portal Student Registration feature.
Prevent Campus Portal Withdraw: Default is unchecked (students with holds can withdraw from courses). Select this checkbox only if you want to block students with the selected hold from withdrawing from courses in the Campus Portal Student Registration feature.
Hold Transcript: Default is Hold. Options include no selection (blank), Hold, and Warning.
View Unofficial Transcript Online: Default is unchecked (students cannot view their transcript in Campus Portal). If the View Unofficial Transcript Online checkbox is selected, the student receives a warning but can view their transcript in Campus Portal despite the existence of the hold.
Hold Grade Report: Default is checked, which means this Hold Code is defined as a Grade Report Hold.
View Grades Online: Default is unchecked. If selected, the student receives a warning but can see their grades in the Campus Portal Grade Report Course History features despite the existence of the hold. This column does not impact the Unofficial Transcript feature.
Right-click in the row that contains the code you want to delete.
Select Remove row. The row is immediately removed from the list, but your changes aren't saved yet. Click Undo to add the row back to the list.
Click Save.
The Delete Definitions? pop-up opens. It lists the codes in two categories:
Ready to Delete (for definitions that can be deleted)
Unable to Delete (for definitions that can't be deleted, either because they're in use or protected by the system)
Under Ready to Delete, if there are any codes you don't want to delete, click the Remove icon at the end of their row.
To delete all the rows listed under Ready to Delete, click Yes, delete.
Hold Codes can't be deleted if they are used in the following database tables: columns.
DataPrivacyConsentTypeDefinition: HOLDS_DEF_APPID
HEALTH_GRP_MASTER: HOLDS_DEF_APPID
HOLD_TRAN: HOLD_CDE