Manage Catalog Course Details
Important
Information and features vary according to the roles to which you belong and the permissions associated with those roles. For more information, contact your module manager or your campus support team.
Overview of Managing Course Details
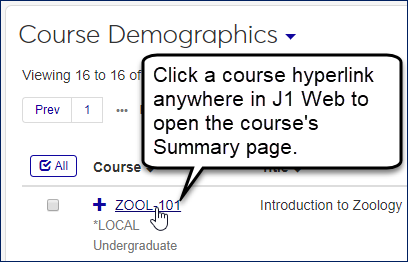
You can find the Manage Course Details page by first going to the Course Summary page for the course you want to edit, and then select Manage course details from the Catalog course options drop-down. Each course section has its own summary page, which you can find by clicking on the underlined blue hyperlink section on any page you see it.
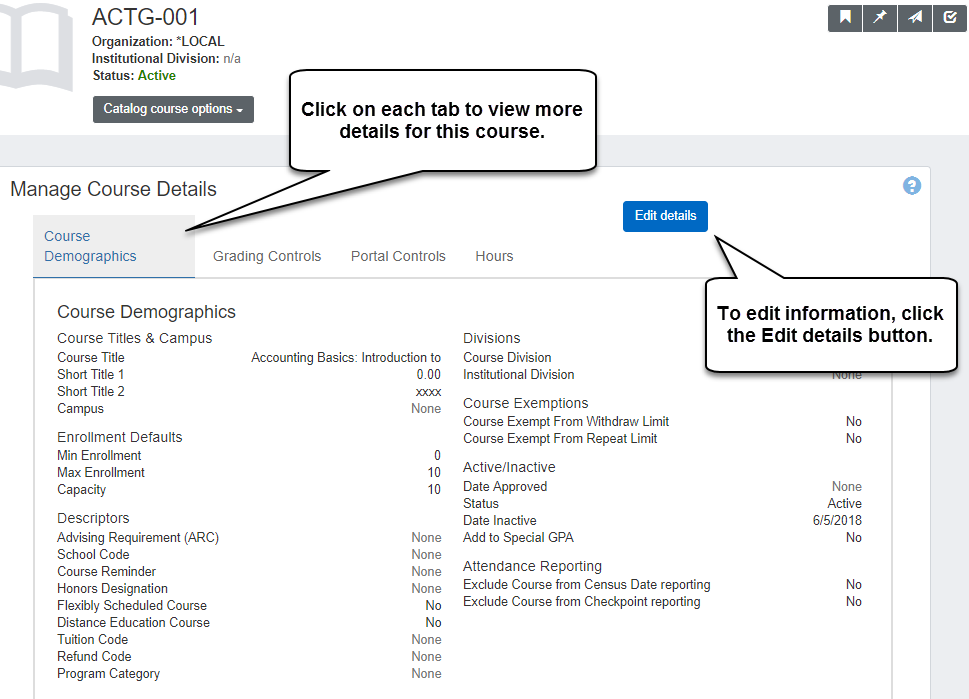
Manage Course Details Tabs
The Manage Course Details page has four tabs, each containing detailed information related to that specific section, including term, scheduled times, current enrollment, financials, and more. To see all the information available on this page, click on the different tabs available.
Tip
For more information on each of these details, see the online Help for J1 Desktop.
The Course Demographics shows details that can be found on the Course Attributes and Course Description tabs of the Catalog window in J1 Desktop. You can view and edit* the following details:
Course title, Organization, and Course Division
Course Title
Advising Requirements
Maximum Enrollment
Capacity
Short title
Institutional Division
Location
School Code
Tuition Code
Refund Code
Program Category
Flexibility Scheduled
Exclude Course from Census Date Reporting
Exclude Course from Checkpoint Reporting
Course Reminder
Status
Date Inactive (if applicable)
Date Approved
*Ability to edit details will depend on the permissions that have been assigned to you. Contact your module manager or support team for more information about your permissions.
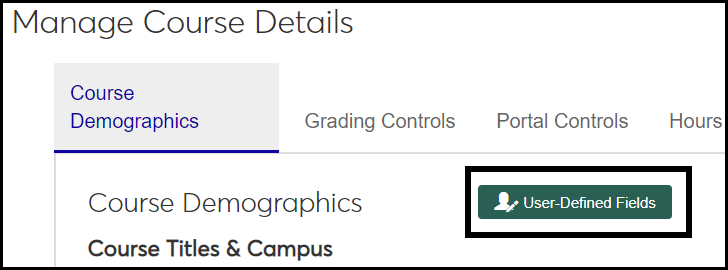
You can view and manage user-defined fields for catalog courses. The fields may be useful for tracking records, building forms, and customizing reports. User-defined fields are managed by your System Administrator and let your school track unique information not captured in standard, Jenzabar-provided fields.
The Grading Controls tab is similar to the Grading subtab on Courses window | Course tab of J1 Desktop, and allows you to view or edit* these section details: Course title, Organization, and Course Division
Grading Periods
Grading Type
Variable Grading
Grading Period
Status
Date Inactive
*Ability to edit details will depend on the permissions that have been assigned to you. Contact your module manager or support team for more information about your permissions.
The Portal Controls tab is similar to the Course tab | Web subtab on the Courses window of J1 Desktop and allows you to view and edit* these section details:
Course title, Organization, and Course Division
Catalog Text
Must Pay
Public Registration
Course Authorization Requirement
Status
Date Inactive
*Ability to edit details will depend on the permissions that have been assigned to you. Contact your module manager or support team for more information about your permissions.
The Hours tab is similar to the Credits section of the Courses window of J1 Desktop and allows you to view and edit these section details:
Header
Course title, Organization, Course Division, Status
Credits
Credits, Min Credits, Max Credits, Fixed or Variable Credits
Repeat Preference
Course Repeatable, Times May Be Taken, Credits Allowed for Degree
Lab Repeatable, Lab Times May Be Taken, Lab Credits Allowed for Degree
Lecture & Lab Hours
Lecture Credits, Lab Credits, Total Lecture & Lab Credits
Clock Hours
Clock Hours, Min Clock Hours, Max Clock Hours
Lecture Clock Hours, Lab Clock Hours
Load Contact Hours
Fixed or Variable Credits
Number of Weeks Course Meets
Open Enrollment (Defaults automatically populate in sections created from the course. These values are editable in the sections.)
Default Allow Open Entry, Default Allow Open/Early Exit
Method to Set Census Date and Last Student Withdrawal Date
By date
By number of days after the start date
By percentage (from start date to end date)
When a student registers for the section, we use this method to calculate the individual student's Census Date and Last Student Withdrawal Date. The dates appear in the student course records such as on the section's Manage Student Section Details page.
Begin Date: the day the student registers
End Date
Census Date: calculated according to the method selected above
Last Student Withdrawal Date: calculated according to the method selected above.
Default Registration Cutoff, Default Max Days Duration
Note
If Open Entry = Yes, then the system saves only valid entries. For example, Registration Cutoff must be less than Max Days Duration. If Open Entry = No, then the system ignores information in the other fields.
Important
Ability to edit details depends on your permissions. Contact your module manager or support team for more information about your permissions.
Use the Reporting tab to manage reporting options for the catalog course. The options may be pertinent to your school's state reports.
These are the fields available:
Course: Includes Course Code, Organization (such as *LOCAL or other institution), and Division
State Type: Select an option from the drop-down. Defined on the Maintain Table Values page, Column Name: crs_state_type (Course State Type).
Type of Instruction: Select an option from the drop-down. Defined on the Maintain Table Values page, Column Name: crs_instrtn_method (Course Instruction Method).
State Funded: Yes or No
Taught in District: Yes or No
Dual Enrollment: Yes or No
Interinstitutional: Yes or No
Self-Paced or Intervention: Yes or No
ESOL: Yes or No
Developmental: Yes or No
Performance-Based Education: Yes or No
Tip
Performance-Based Education courses are a type of Developmental Course, so if you're looking for Performance-Based Education courses on the Manage Catalog Courses page, make sure Developmental Course in the Catalog Filter does not have No selected.
Education Success Type / Level: Associated types and levels are listed. In the Edit mode, click the Manage associations button to open the Manage Education Success Associations pop-up. There you can view, add, or remove associations. (An association is an Education Success Type paired with an Education Success Level.)
State Articulation Elements 1: Select a Department Code and a Course Number from the drop-downs. Defined on the Maintain Table Values page, Column Name crs_articulation_dept_1 (Course Articulation Department Code 1).
State Articulation Elements 2: Select a Department Code and a Course Number from the drop-downs. Defined on the Maintain Table Values page, Column Name crs_articulation_dept_2 (Course Articulation Department Code 2).
Course Level: Select from the drop-down. Defined on the Maintain Table Values page, Column Name crs_level (Course Articulation Course Level).
Eligible for Subsidy: Yes or No
IPEDS CIP Code: From the drop-down, select the Classification of Instruction Program (CIP) code that matches the student's academic program.
IPEDS CIP Code Extension: If the student's program has a CIP extension, select it here.
Use the Competencies tab to view, edit, or remove competencies from a course.
Select an element under the course name. In the information grid, you can edit fields as needed. You can use the Remove button to remove the element or the Add button to assign a new element.
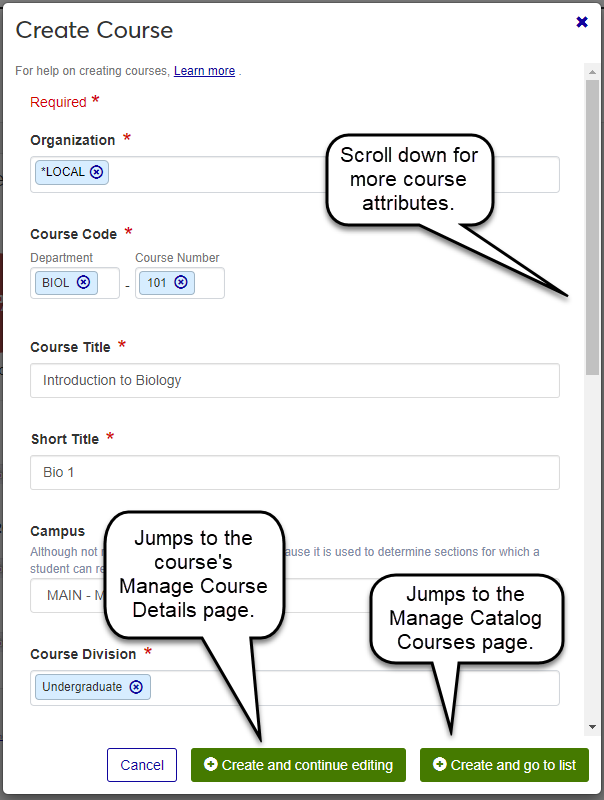
To create a new course, use the Create course option in the Hub options drop-down on the Registration Administration Hub, or use the Create course button the Manage Catalog Courses page.
In the Create Course pop-up, enter all information as required.
After you have completed all required information, choose one of the green buttons to continue:
Create and continue editing - saves the course you just created and takes you to the Manage Course Details page for this course.
Create and go to list - saves the course you just created and returns you to the Manage Catalog Courses page.
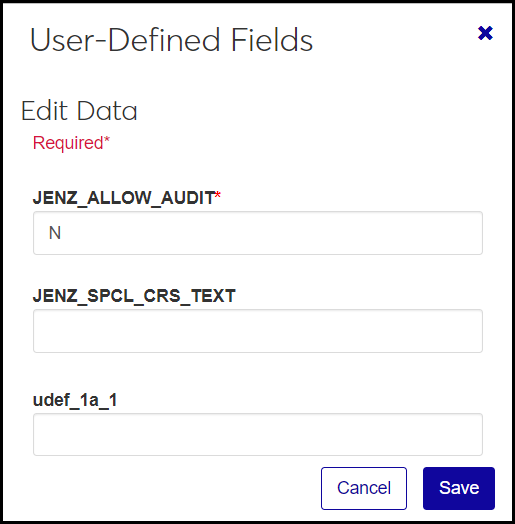
In the Course Demographics tab, click the User-Defined Fields button. The User Defined Fields pop-up opens.
Edit the fields.
Click Save. The pop-up closes.
On the Reporting tab, click the Edit details button.
Make changes as needed.
To add or remove Education Success associations:
Click the Manage associations button. The Manage Education Success Associations pop-up opens.
To remove an associated Education Success Type and Level, click the Remove button
 .
.To add an association, click Add another association. Select a Type and a Level from the drop-downs.
To save your changes, click Update.
Click Done editing.
From the Registration Administration hub, in the Hub options drop-down, select Manage catalog courses.
Navigate or use the filters to find the course you want to change.
Tip
In the CBE view, select the CBE Catalog Course filter, and select Yes to limit the listings to only CBE-designated courses.
On the course's row, click the Select action button, and select View Course Details. The Manage Course Details page appears. The Competencies tab opens.
Tip
You can also access the Manage Course Details page from a course's summary page.
Click the Add button. The Add Competency pop-up opens.
In the Add to drop-down, select the course. (Or, if there are already units assigned, you can select a unit to add a competency to.)
In the Search Competencies by drop-down, you can search by catalog, section, or competency type.
Click the Add button.
From the Registration Administration hub, in the Hub options drop-down, select Manage catalog courses.
Navigate or use the filters to find the course you want to change.
Tip
In the CBE view, select the CBE Catalog Course filter, and select Yes to limit the listings to only CBE-designated courses.
On the course's row, click the Select action button, and select View Course Details. The Manage Course Details page appears.
Tip
You can also access the Manage Course Details page from a course's summary page.
On the Competencies tab, select the checkbox for one or more elements under the course title.
Click the Remove button.
A pop-up asks you to confirm. Click this Confirm button, too.
From the Registration Administration hub, in the Hub options drop-down, select Manage catalog courses.
Navigate or use the filters to find the course you want to change.
Tip
In the CBE view, select the CBE Catalog Course filter, and select Yes to limit the listings to only CBE-designated courses.
On the course's row, click the Select action button, and select View Course Details. The Manage Course Details page appears.
Tip
You can also access the Manage Course Details page from a course's summary page.
On the Competencies tab, select the checkbox for an element under the course title.
In the grid, enter or select information in the columns. If the column isn't editable, it won't accept your edit.
Click the Save button.